
- Published on
HW3. Building an HTCondor Cluster and Running Jobs
- Authors

- Name
- seren-wib
Contents
- 0. Lab Environment
- Why I Didn't Use VirtualBox on an Apple Silicon Mac
- Naming the Key File
- 1. Building the HTCondor Cluster (Chapter 5)
- main Node (central manager + submit)
- work1 and work2 Nodes (execute)
- Checking the Cluster
- Problems During Installation
- Problem 1. exim Permission Error on condor Restart
- Problem 2. VM Clocks About 32 Minutes Behind
- 2. Processing Jobs with HTCondor (Chapter 6)
- Job 1. A Simple Job (01.date)
- Job 2. A Job with Arguments (02.argument)
- Job 3. Running Multiple Jobs at Once (03.multiple)
- Job 4. Running at Once with Separate Directories (04.multiple)
- Problem: Extra data found after queue statement
- Job 5. Running at Once with Separate File Names (05.multiple)
- Job 6. Separating Directories with $(Process) (06.multiple)
- Job 7. A Job with Requirements (07.requirment)
- Problem: The Slide's Fixed Version Doesn't Match Either
- 3. Exercises
- Ch2-4. Pros and Cons of the Multitenancy Model
- Ch2-6. A Cloud Development Environment Case in a Large Project
- Ch2-15. Data Disputes in Multinational Cloud Services
- Ch3-3. How Fast Is the Fastest Supercomputer?
- Ch3-5. When Small Problems Are Not Fully Independent
- Ch3-7. InfiniBand Topology and Operation
- Ch4-2. How an SSH Server and Client Connect
- Ch4-3. How Public Key Cryptography Works
- Ch4-9. Can You Log In to the Master Node as root?
- Ch5-2. Relationship Between CPU Count and Slot Count
- Ch5-5. Making the Master Process Jobs Too
- Ch5-6. How GPG Works
- Ch6-2. Checkpointing and Remote System Calls
- Ch6-9. DAGMan
I installed HTCondor on the three virtual machines built in HW2 to make a cluster (textbook Chapter 5) and submitted jobs to it (textbook Chapter 6). The later part collects my answers to the Chapter 2–6 exercises.
0. Lab Environment
Same environment as HW2. Ubuntu runs in UTM on an M3 Mac, and inside it three Rocky Linux VMs run on KVM/libvirt.
macOS (Apple M3)
└─ UTM (Apple Virtualization, nested virtualization)
   └─ Ubuntu 24.04 ARM64 (host yoosung-vm, the "Ubuntu host" in the lecture)
      └─ KVM + libvirt   (replaces VirtualBox)
         ├─ main   Rocky Linux 10.2 aarch64 192.168.56.101 main.cloud.org
         ├─ work1  Rocky Linux 10.2 aarch64 192.168.56.102 work1.cloud.org
         └─ work2  Rocky Linux 10.2 aarch64 192.168.56.103 work2.cloud.org
| Textbook (slides) | This environment |
|---|---|
| VirtualBox, x86_64 | KVM/libvirt, aarch64 (ARM64) |
| Account cloud, host cloudman@abelia | Account yoosung, host yoosung@yoosung-vm |
| Cluster interface enp0s8 | enp2s0 (192.168.56.0/24 private network). enp1s0 is NAT for the Internet |
| No HTCondor version specified | condor-25.14.1-1.el10.aarch64 (install script's default channel) |
Why I Didn't Use VirtualBox on an Apple Silicon Mac
Creating three VMs with VirtualBox for Apple Silicon does work in itself. The problem is that the host running VirtualBox then becomes macOS, so there is no way to have the "Ubuntu host" the lecture assumes. Here is what I confirmed from the official VirtualBox 7.2 documentation.
- Installing VirtualBox on Ubuntu: in the list of supported hosts, Linux is supported only on x86_64, not ARM64. To use Ubuntu on Apple Silicon you have to run ARM64 Ubuntu as a VM, and VirtualBox can't be installed there.
- Running VMs again inside Ubuntu inside VirtualBox: this needs nested virtualization, and VirtualBox does not provide nested virtualization (Nested VT-x/AMD-V) for ARM guests.
- Using x86 images: VirtualBox on an ARM host only runs ARM guests. Either way, the lecture's x86_64 VMs can't be used as-is.
So, to follow the lecture's flow of "create VMs on an Ubuntu host, connect to them over SSH from the host terminal, and distribute keys made on the host to the VMs" as closely as possible, I ran Ubuntu in UTM, which supports nested virtualization, and used KVM/libvirt, the standard Linux hypervisor, inside it.
Reference: Oracle VirtualBox 7.2 User Guide, Supported Host Operating Systems
Naming the Key File
In HW2 I left the file name prompt of ssh-keygen at the default (id_ed25519). In the cloud you need to manage multiple keys separately, so this time I created a new one named cloud.key, as in the Ch04-Extra slides. -o IdentitiesOnly=yes is an option that uses only the specified key instead of trying the default keys.
ssh-keygen
Enter file in which to save the key (/home/yoosung/.ssh/id_ed25519): /home/yoosung/.ssh/cloud.key
Your identification has been saved in /home/yoosung/.ssh/cloud.key
Your public key has been saved in /home/yoosung/.ssh/cloud.key.pub

ssh-copy-id -i ~/.ssh/cloud.key.pub 192.168.56.101      (same for 102, 103)
Number of key(s) added: 1

ssh -i ~/.ssh/cloud.key -o IdentitiesOnly=yes 192.168.56.101 hostname
main.cloud.org
ssh -i ~/.ssh/cloud.key -o IdentitiesOnly=yes 192.168.56.102 hostname
work1.cloud.org
ssh -i ~/.ssh/cloud.key -o IdentitiesOnly=yes 192.168.56.103 hostname
work2.cloud.org
1. Building the HTCondor Cluster (Chapter 5)
An HTCondor cluster is made of nodes with different roles. As in the slides, I set up main as central manager + submit, and work1 and work2 as execute.
| Node | Role | Daemons running |
|---|---|---|
| main | central manager: collects node status and matches jobs to nodes / submit: accepts jobs and queues them | condor_collector, condor_negotiator, condor_schedd |
| work1, work2 | execute: actually runs the jobs | condor_startd |
On all three nodes, condor_master (daemon management), condor_procd and condor_shared_port run as well.
Every command was run by connecting to each VM over SSH from the Ubuntu host terminal. I didn't put the VM names in the host's /etc/hosts, so I connected by IP, and handled the two workers at the same time in two terminals.
ssh 192.168.56.101     # main
ssh 192.168.56.102     # work1
ssh 192.168.56.103     # work2
main Node (central manager + submit)
① Install curl
Rocky 10.2 already had curl; this command upgraded curl, libcurl and openssl-libs to newer builds.
sudo dnf install -y curl
② Install HTCondor
The get.htcondor.org install script detects the OS, adds the HTCondor repository, enables the EPEL and CRB repositories Rocky needs, and then installs condor. GET_HTCONDOR_PASSWORD is the pool password nodes use to authenticate with each other, and --central-manager is this node's role. The script supports Rocky 10 and aarch64, so I could use the slide's command as-is.
curl -fsSL https://get.htcondor.org | sudo GET_HTCONDOR_PASSWORD="htcondor" /bin/bash -s -- --no-dry-run --central-manager main.cloud.org
Unlike in the slides, the current version of the script opens the HTCondor port (9618/tcp) in the firewall and even runs systemctl enable/start condor at the end of the install. The installed version is condor-25.14.1.
③ Turn off the firewall
So that traffic between nodes isn't blocked, I stopped firewalld and disabled it from starting at boot. --no-pager is there so the output doesn't stop in less.
systemctl status firewalld --no-pager
sudo systemctl stop firewalld
sudo systemctl disable firewalld
systemctl status firewalld --no-pager
④ Add the submit role
The 01-central-manager.config created by the install script only has the central manager role. I added one line for the submit role so jobs can also be submitted from main.
cd /etc/condor/config.d
echo "use role:get_htcondor_submit" | sudo tee -a 01-central-manager.config
sudo cat 01-central-manager.config
CONDOR_HOST = main.cloud.org
# For details, run condor_config_val use role:get_htcondor_central_manager
use role:get_htcondor_central_manager
use role:get_htcondor_submit
⑤ Write condor_config.local
NETWORK_INTERFACE is the interface HTCondor uses for cluster communication. The slide's enp0s8 is a VirtualBox name; in this environment the 192.168.56.0/24 private network is enp2s0, so I changed it. Using it as-is would point to an interface that doesn't exist.
printf "%s\n" "UID_DOMAIN = main.cloud.org" "ALLOW_WRITE = *.cloud.org" \
  "CONDOR_HOST = main.cloud.org" "NETWORK_INTERFACE = enp2s0" | sudo tee condor_config.local
| Setting | Meaning |
|---|---|
| UID_DOMAIN | Domain the user accounts on this node belong to |
| ALLOW_WRITE | Hosts allowed to perform writes (job submission, etc.), *.cloud.org |
| CONDOR_HOST | Central manager node, main.cloud.org |
| NETWORK_INTERFACE | Interface used for cluster communication, enp2s0 |
⑥ Start HTCondor
sudo systemctl restart condor
sudo systemctl enable condor
systemctl status condor --no-pager
collector, negotiator and schedd come up under condor_master, so both the central manager and submit roles are working.
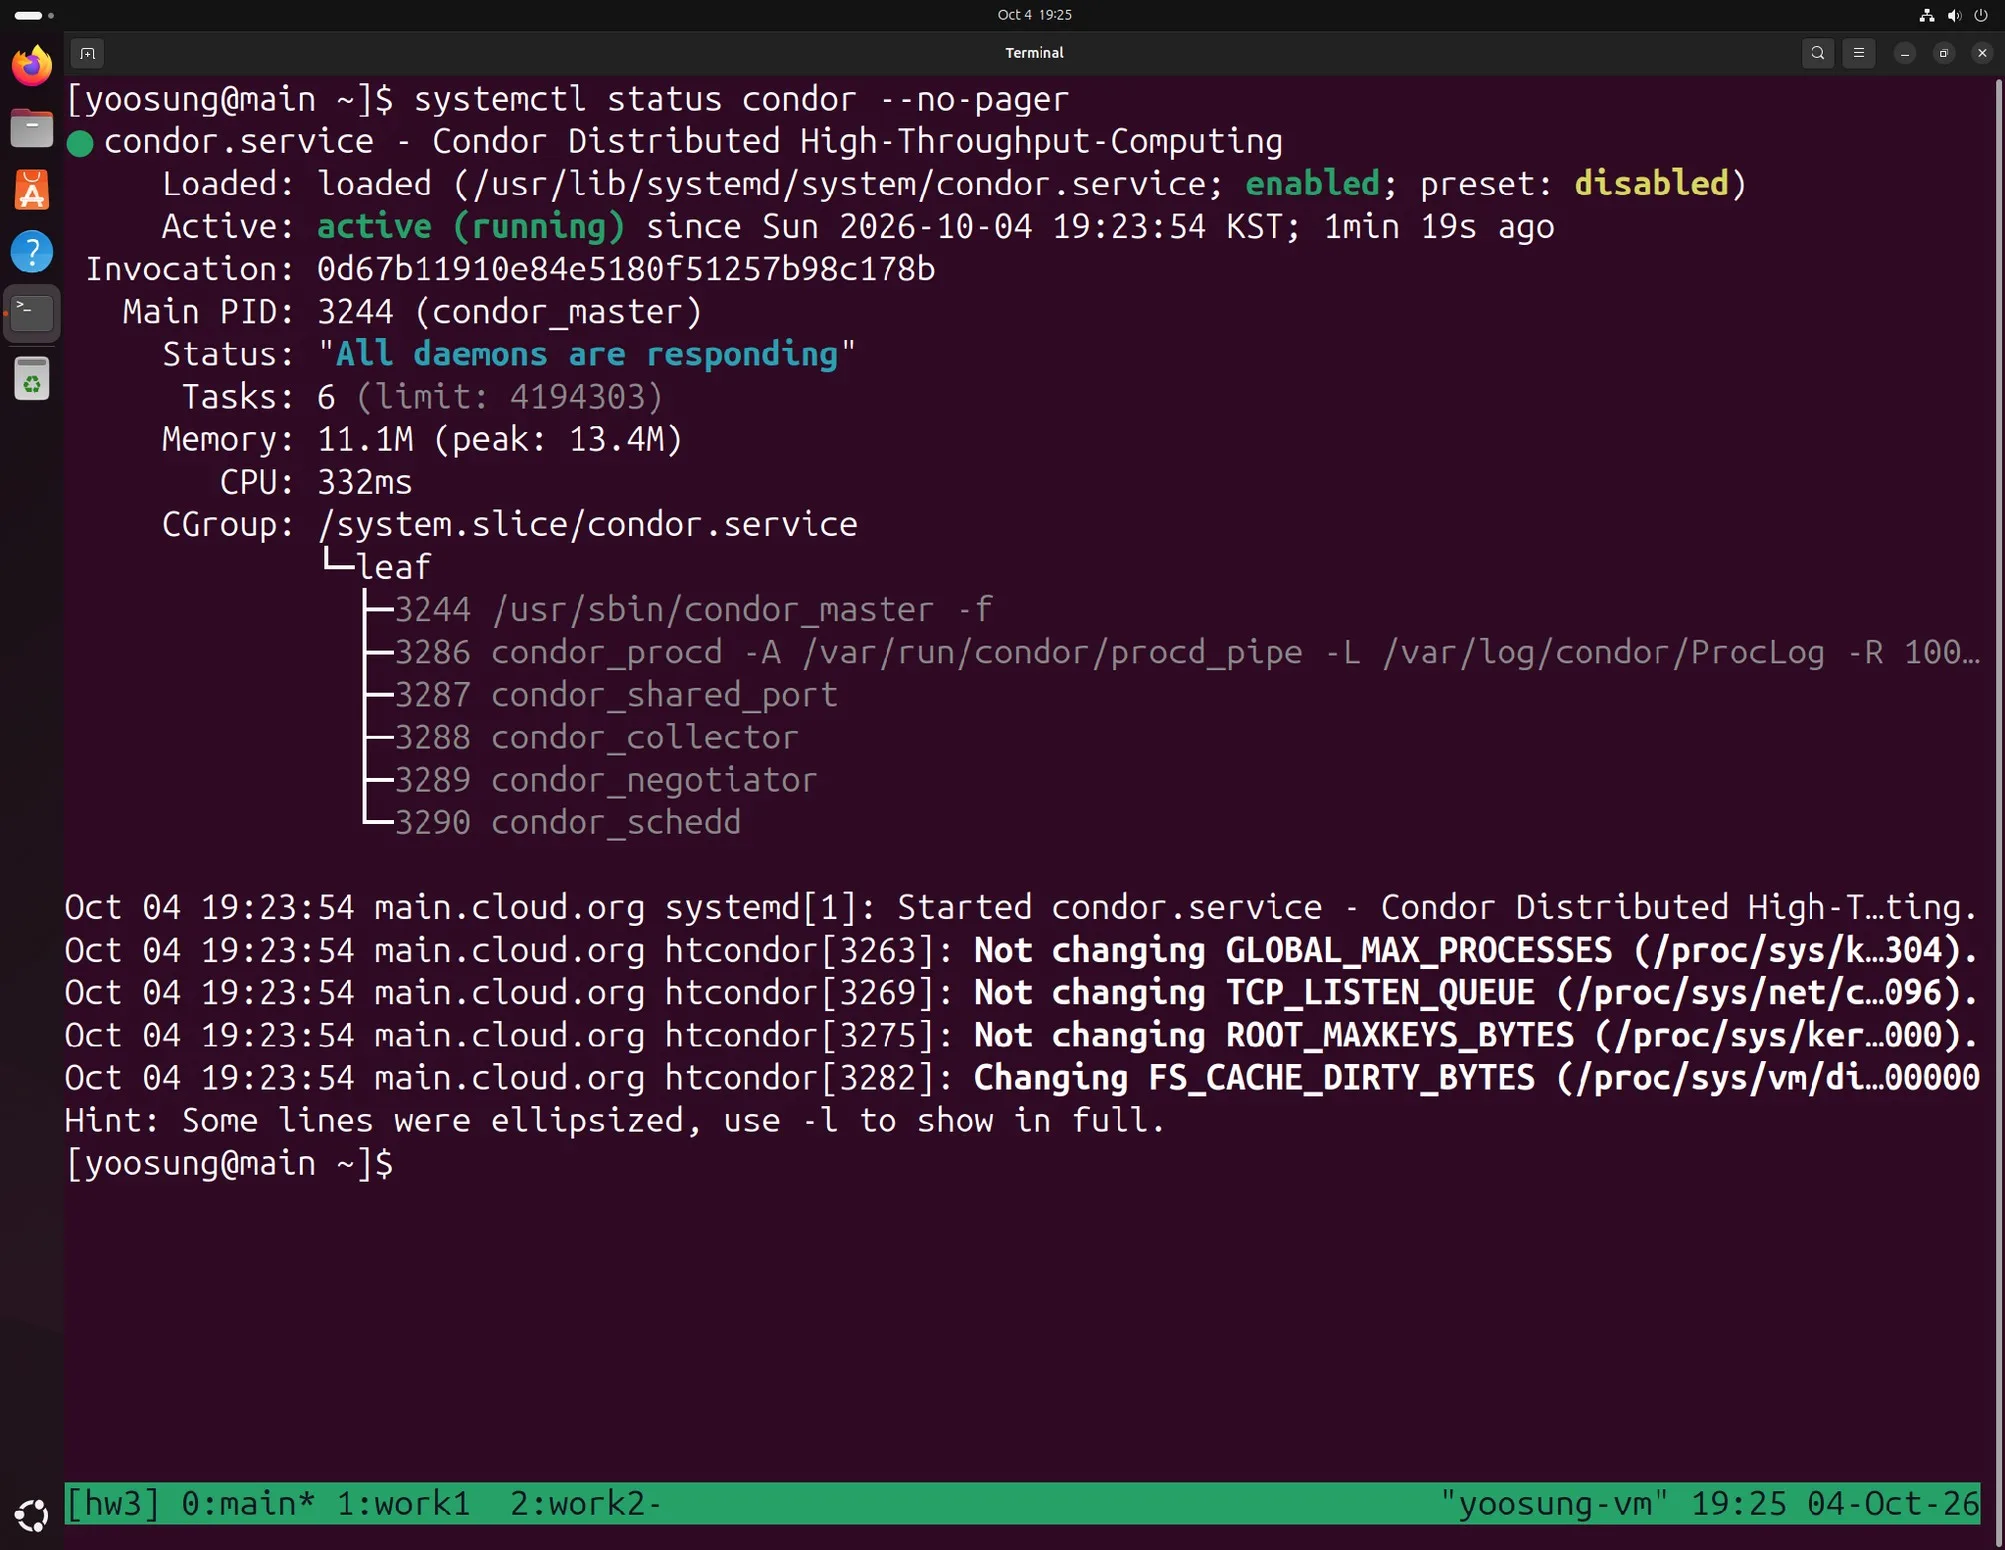
main: condor service active, collector, negotiator and schedd running (central manager + submit)
work1 and work2 Nodes (execute)
I repeated the same process with the execute role. I passed --execute main.cloud.org to the install script, set UID_DOMAIN to each node's own hostname, and NETWORK_INTERFACE again to enp2s0.
sudo dnf install -y curl
curl -fsSL https://get.htcondor.org | sudo GET_HTCONDOR_PASSWORD="htcondor" /bin/bash -s -- --no-dry-run --execute main.cloud.org
sudo systemctl stop firewalld
sudo systemctl disable firewalld
cd /etc/condor/config.d
printf "%s\n" "UID_DOMAIN = work1.cloud.org" "ALLOW_WRITE = *.cloud.org" \
  "CONDOR_HOST = main.cloud.org" "NETWORK_INTERFACE = enp2s0" | sudo tee condor_config.local
sudo systemctl enable condor
sudo systemctl restart condor
systemctl status condor --no-pager
For work2 I ran it with UID_DOMAIN = work2.cloud.org. condor_startd came up on both nodes, and log files such as MasterLog and StartLog appeared in /var/log/condor/.
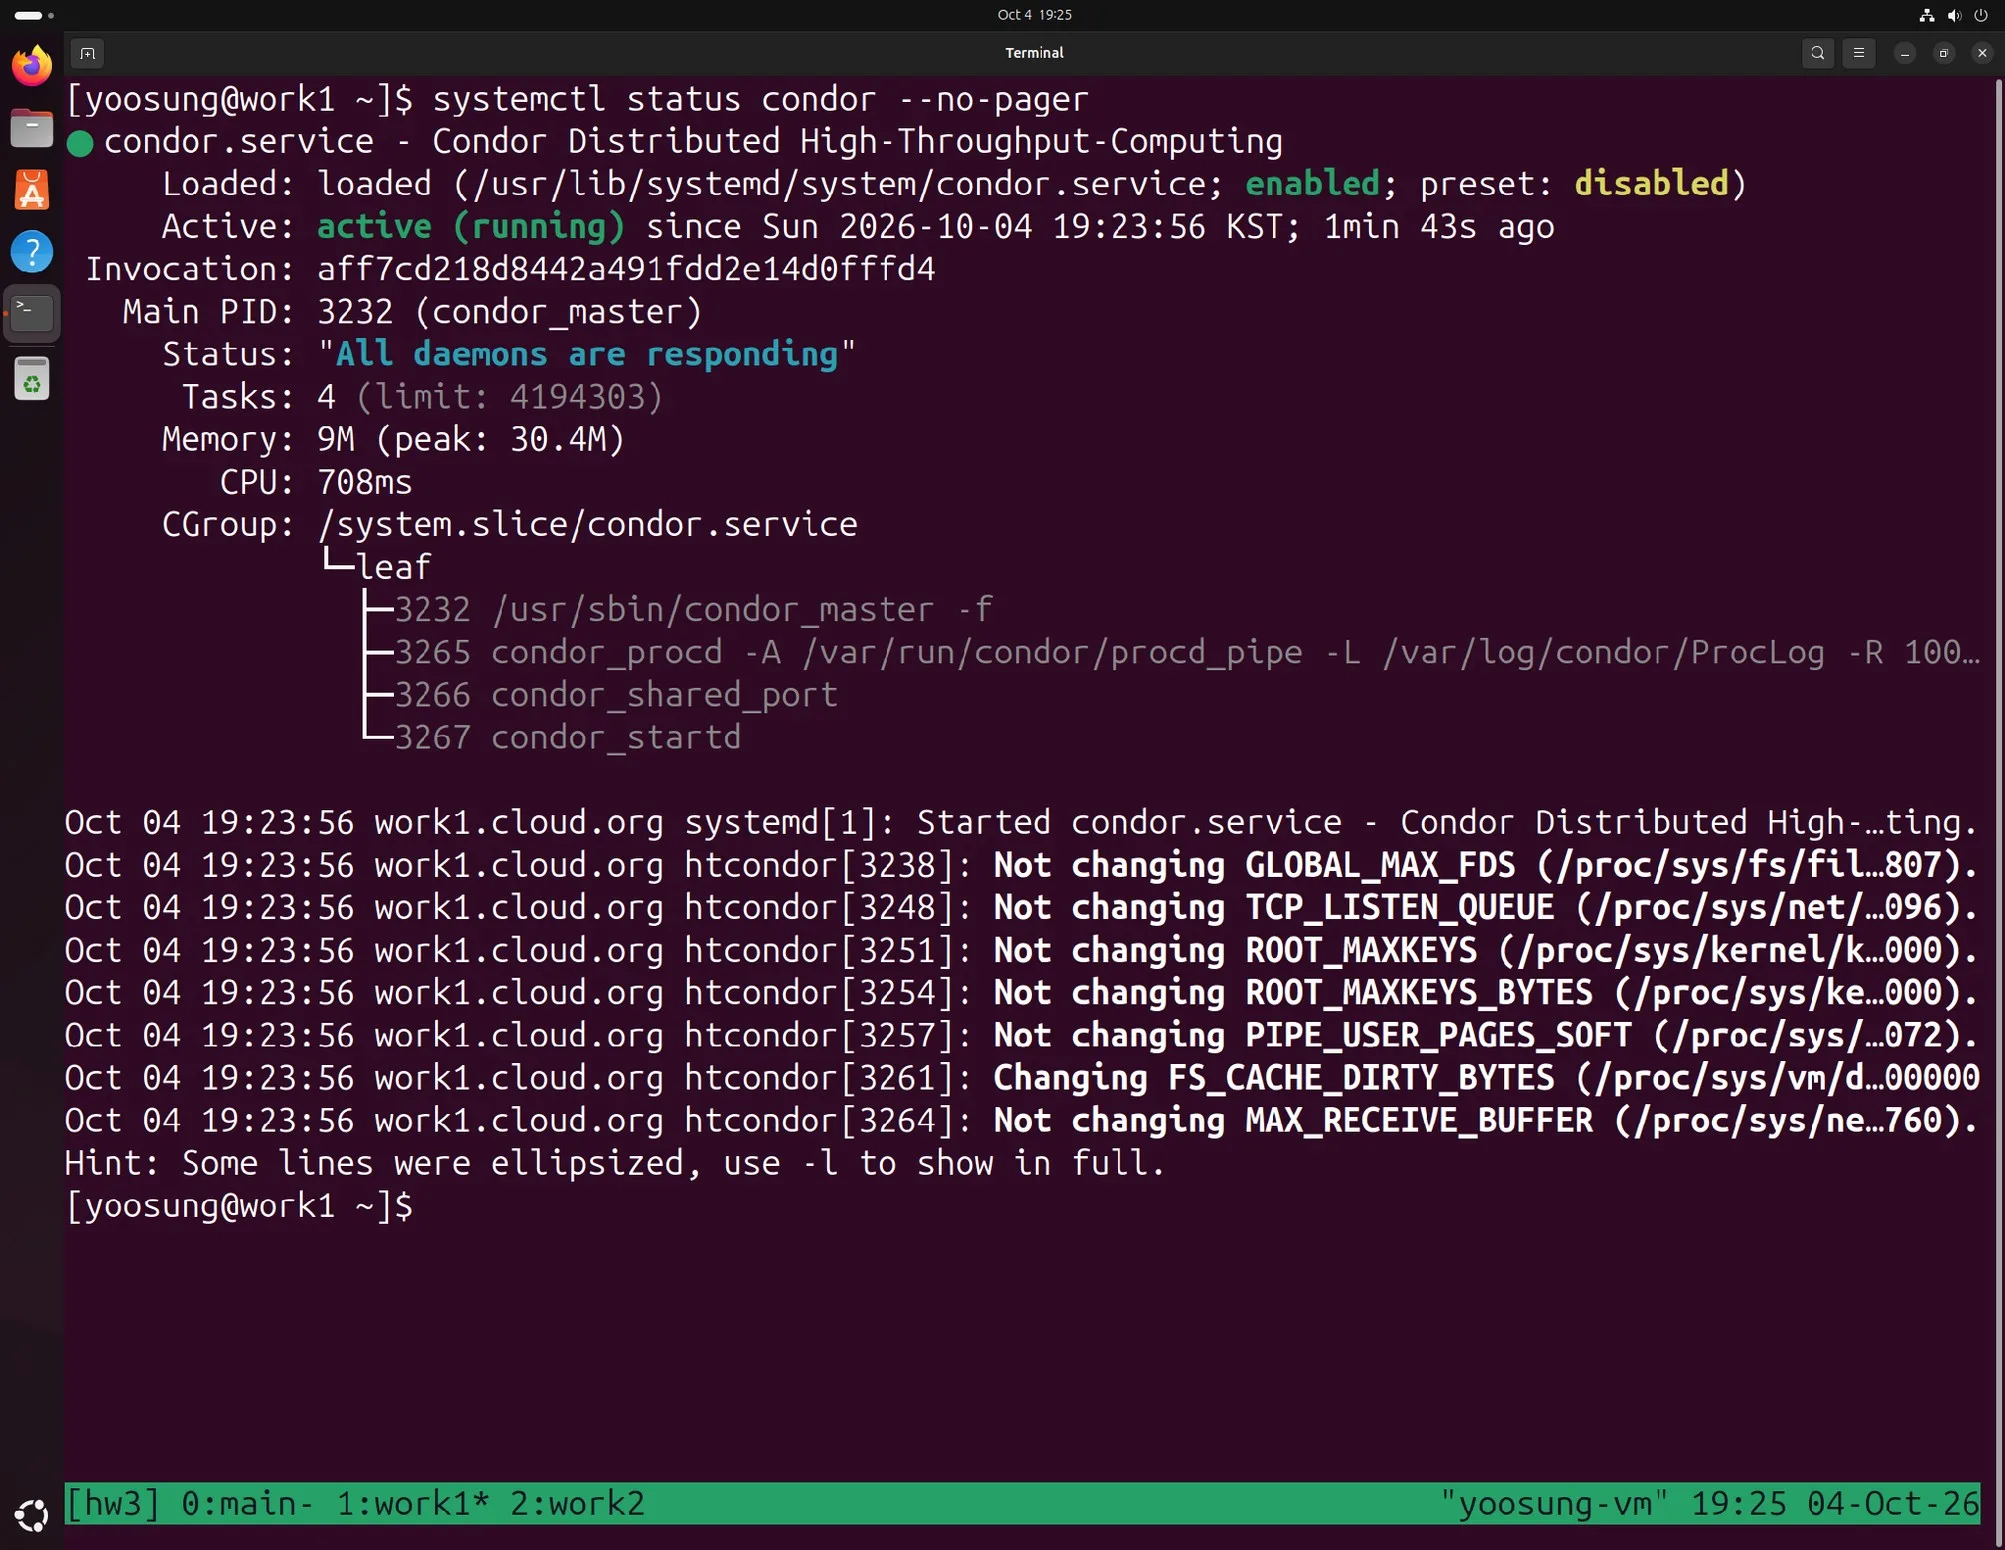
work1: condor service active, startd running (execute)
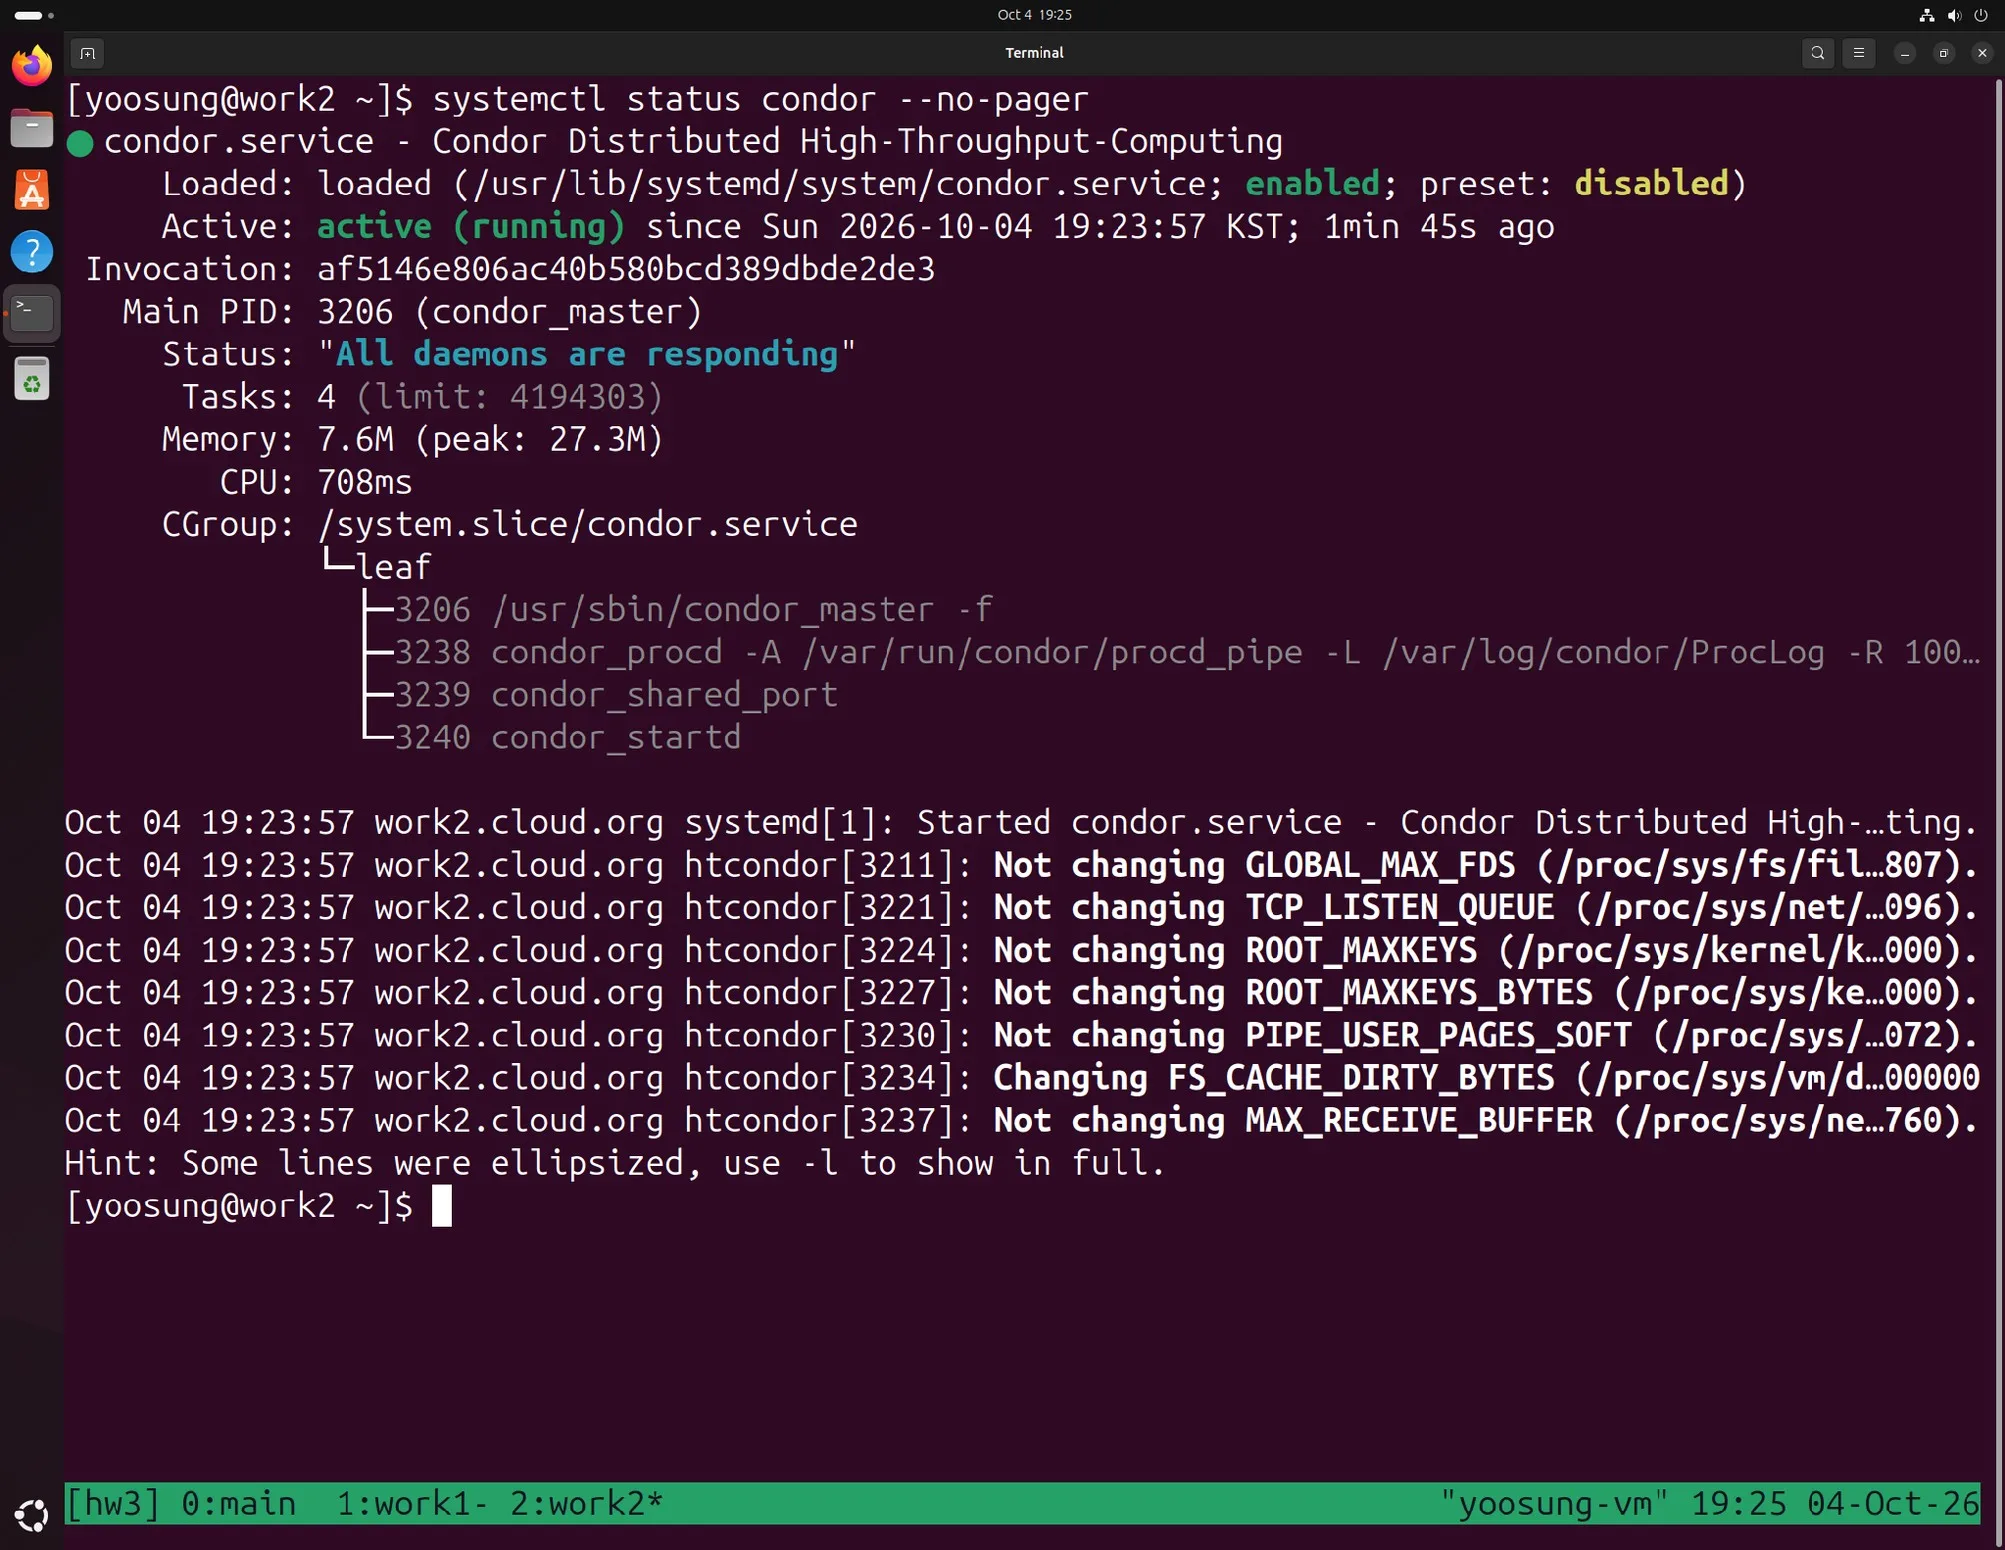
work2: condor service active, startd running (execute)
Checking the Cluster
Running condor_status on main shows the two execute nodes (slot1@work1.cloud.org, slot1@work2.cloud.org) as Unclaimed / Idle, i.e. ready to accept jobs. It was the same when run on work1 and work2.
Unlike the slides, Arch is aarch64 rather than X86_64, and Mem is 1696 (MB) rather than 3653. That's because this is an ARM64 environment and each VM was given 2GB of memory.
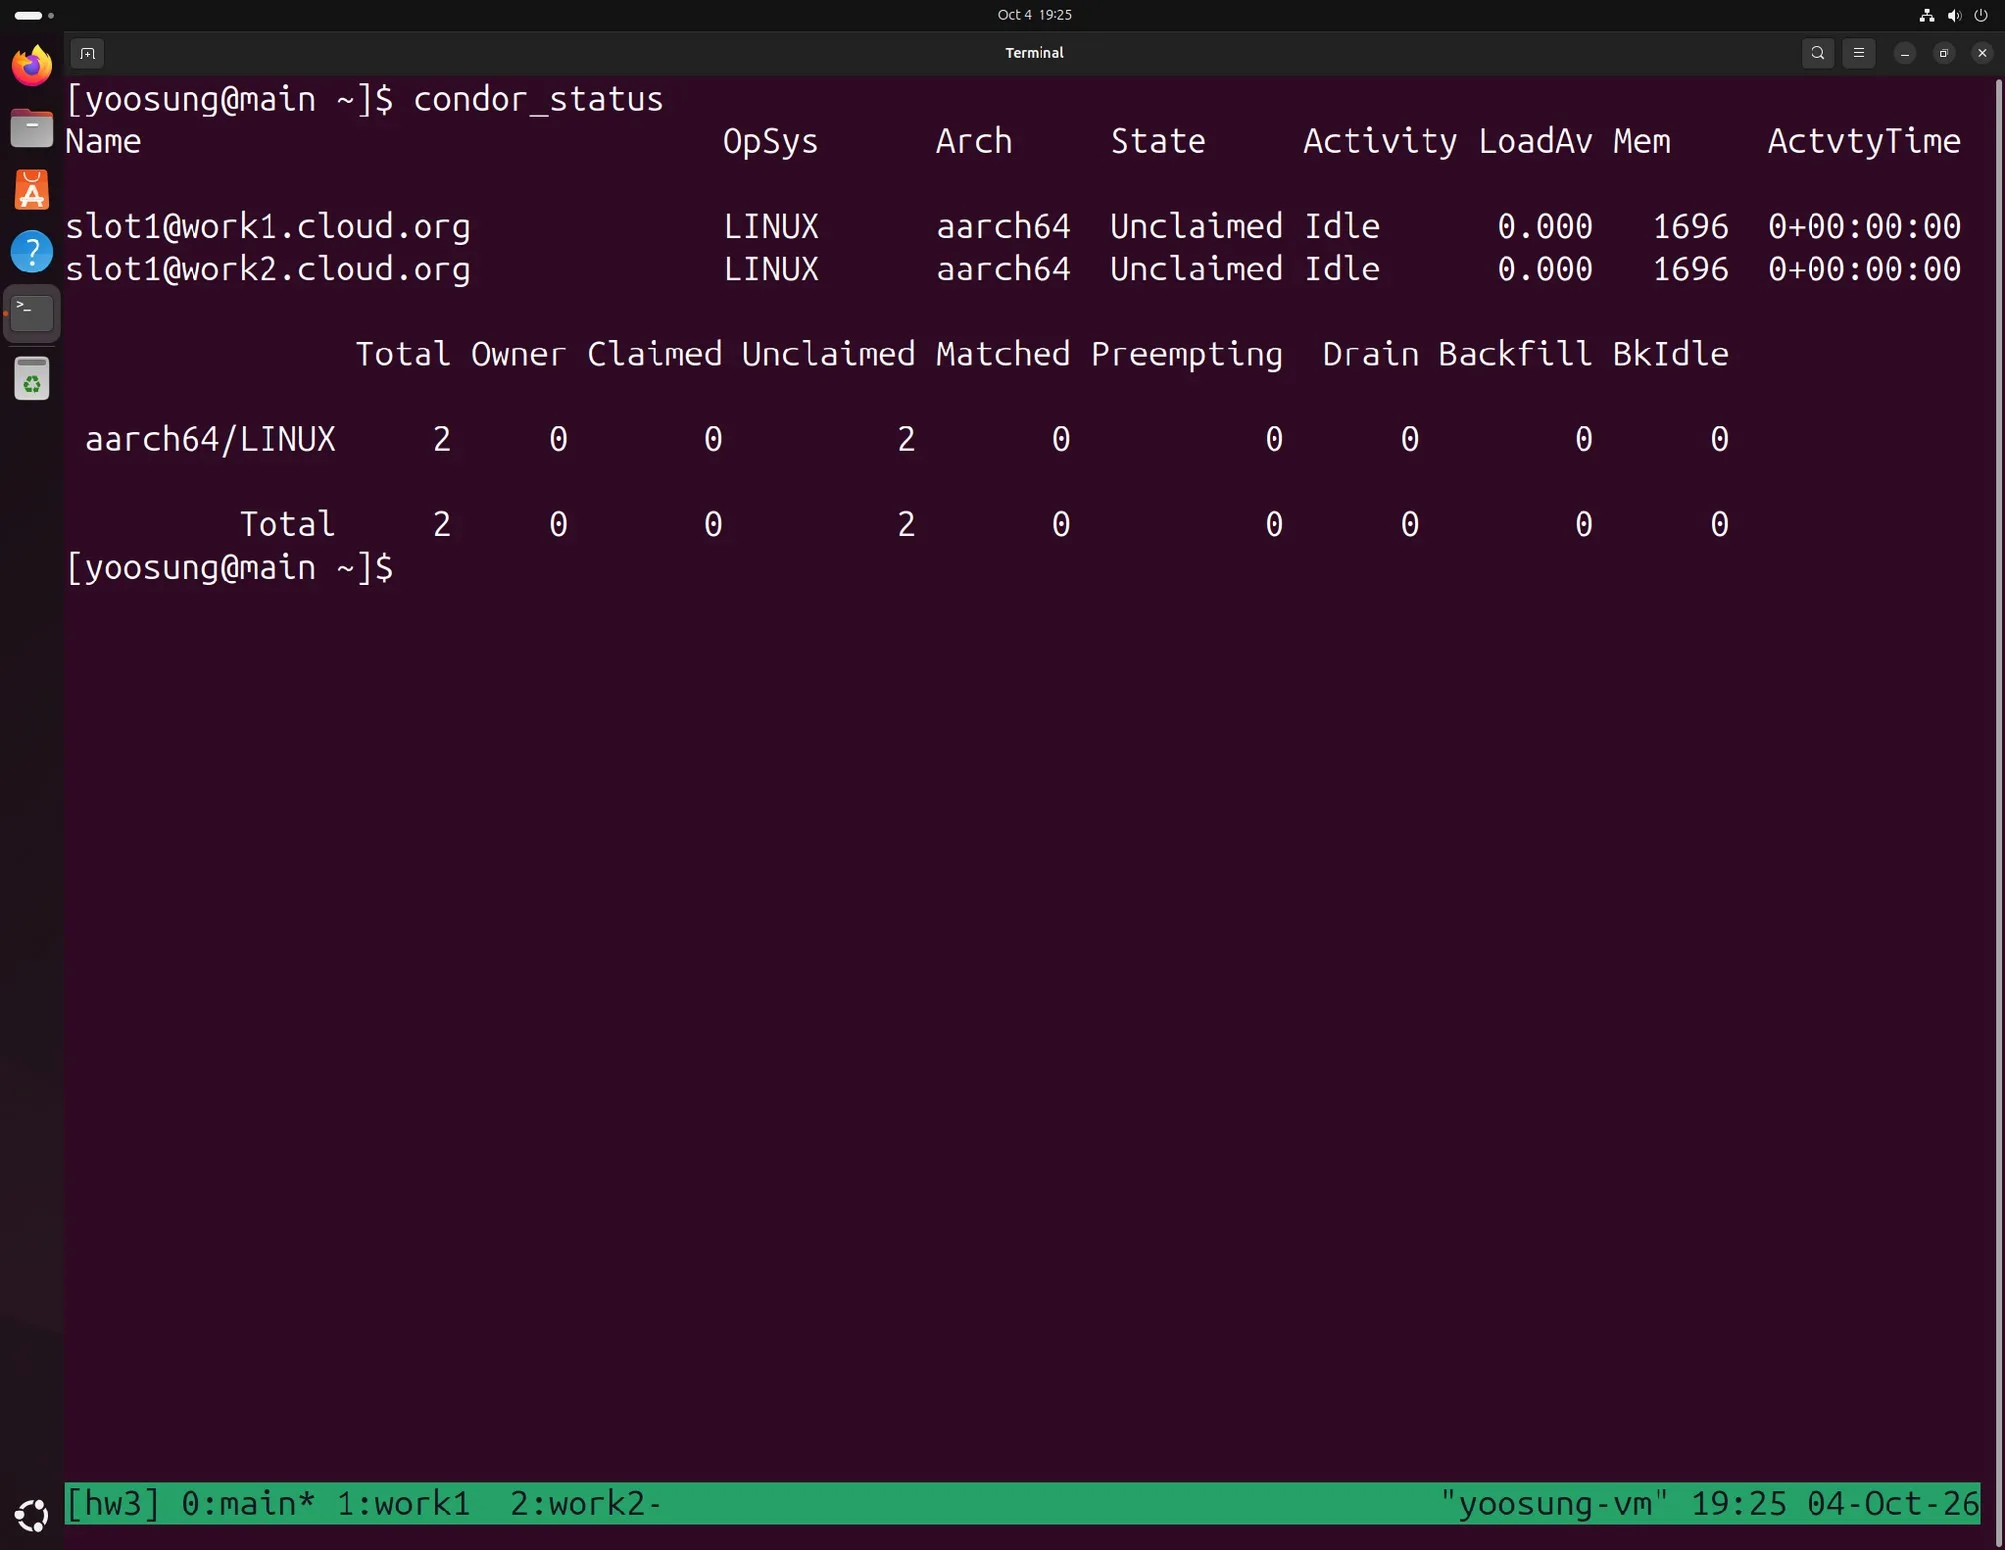
condor_status on main: slot1@work1 and slot1@work2 both Unclaimed / Idle (Arch aarch64)
Problems During Installation
Neither affected how the cluster worked, but I found the causes and fixed them.
Problem 1. exim Permission Error on condor Restart
Right after systemctl restart condor on main, these errors showed up in the systemctl status condor log.
Failed to create spool file /var/spool/exim//input//...: Permission denied
Cannot open main log file "/var/log/exim/main.log": Permission denied: euid=93 egid=93
exim: could not open panic log - aborting: see message(s) above
- Investigation: HTCondor sends notification mail to the administrator (
CONDOR_ADMIN = root@main.cloud.org) when things like a daemon restart happen. exim, which handles this mail, was installed as a dependency along with condor, but couldn't write to its own spool and log directories. The worker install logs also kept printingwarning: user exim does not exist - using root. - Cause: comparing the installed files to the package metadata with
rpm -V eximshowed owner (U) and group (G) mismatches on 5 exim directories, and the actual owner was root:root. When the package unpacked the directories, the exim account didn't exist yet, so they were created as root-owned, and the exim account (uid 93) created later couldn't write to them.
sudo rpm -V exim
.....UG..    /var/log/exim
.....UG..    /var/spool/exim
.....UG..    /var/spool/exim/db
.....UG..    /var/spool/exim/input
.....UG..    /var/spool/exim/msglog
- Fix: I restored the owners recorded in the package metadata with
rpm --setugids. After that,rpm -V eximfinished with no mismatches and the directory owner became exim exim. I applied the same to work1 and work2, which were in the same state.
sudo rpm --setugids exim
sudo rpm -V exim; echo "rpm -V exit=$?"
rpm -V exit=0
ls -ld /var/spool/exim /var/log/exim
drwxr-x---. 2 exim exim 6 Jan 3 2026 /var/log/exim
drwxr-x---. 5 exim exim 43 Jan 3 2026 /var/spool/exim
- Verification: sending a test mail with
/usr/sbin/sendmail, exim accepted it normally and put it in the queue. Final delivery to root is deferred by exim's default policy (never_users, no delivery to root), but that's normal behavior unrelated to the permission error, so I left it. After restarting condor on all three nodes, the exim errors no longer appeared.
Problem 2. VM Clocks About 32 Minutes Behind
- Symptom: the service log time on main (18:35) was about 30 minutes behind the host time (19:06).
- Investigation: checking chrony status, all three VMs were behind by the same amount and not synchronized.
chronyc tracking
System time     : 1957.179077148 seconds slow of NTP time
timedatectl show -p NTPSynchronized
NTPSynchronized=no
- Cause: chrony only corrects the clock in one jump (step) for the first few updates after boot; after that it slowly catches up by running the clock slightly fast (slew). Closing about 1957 seconds by slewing takes several hours. I couldn't find why the gap appeared in the first place.
- Fix: before configuring the workers, I corrected it right away with
chronyc makestepon all three VMs. After that the offset was on the order of nanoseconds. Since all three VMs were behind by the same amount it didn't affect the cluster, but I wanted the log and screenshot times to match reality.
sudo chronyc makestep
chronyc tracking | grep "System time"
System time     : 0.000000001 seconds slow of NTP time
2. Processing Jobs with HTCondor (Chapter 6)
To hand a job to HTCondor, you write what to run and how in a Job Description File (jds) and submit it with condor_submit. The schedd on main puts the submitted job in the queue, the negotiator picks a matching execute node and pairs them, and the startd on that node runs it.
| jds item | Meaning |
|---|---|
| executable | File to run |
| universe | Execution environment. Everything in this lab is a shell script, so vanilla |
| arguments / input | Arguments passed to the executable / file given as standard input |
| output / error / log | Files for standard output, standard error and the HTCondor execution log |
| initialdir | The job's base directory (input/output files are found and written relative to it) |
| requirements | Conditions the machine running the job must satisfy |
| queue [N] | Submit N jobs |
All jobs were submitted from per-job directories (01.date – 07.requirment) in the home directory of main, which has the submit role, and work1 and work2 shared the execution. This time submission happens on main, so I only need to SSH into main. The slides create files with vi, but I wrote the same contents with cat > file <<'EOF'.
| Execute node | Slot | Concurrent runs |
|---|---|---|
| work1, work2 | 1 Partitionable slot each (2 CPUs, 1696MB memory) | Each job requests 1 CPU and 128MB memory, so up to 4 across both nodes |
The UID_DOMAIN and FILESYSTEM_DOMAIN of main and the workers differ (main.cloud.org / work1.cloud.org, etc.), so they are treated as not sharing a file system. So HTCondor ran in file transfer mode, sending the executable and input files to the worker and getting the result files back to main (Started transferring input files in the log).
Job 1. A Simple Job (01.date)
A script that prints the current time, sleeps 10 seconds, and prints it again.
#!/bin/bash

echo `date`
sleep 10
echo `date`
executable = date.sh
universe = vanilla
output = out.txt
error = error.txt
log = log.txt
queue
condor_submit date.jds
condor_q
cat out.txt; cat error.txt; ls -l error.txt
head -n 20 log.txt
It started running on work2 within 1 second of submission and finished about 10 seconds later. The two times in out.txt are 10 seconds apart and error.txt is 0 bytes. log.txt records submit (000) → input file transfer (040) → execution start (001, work2.cloud.org), in that order.
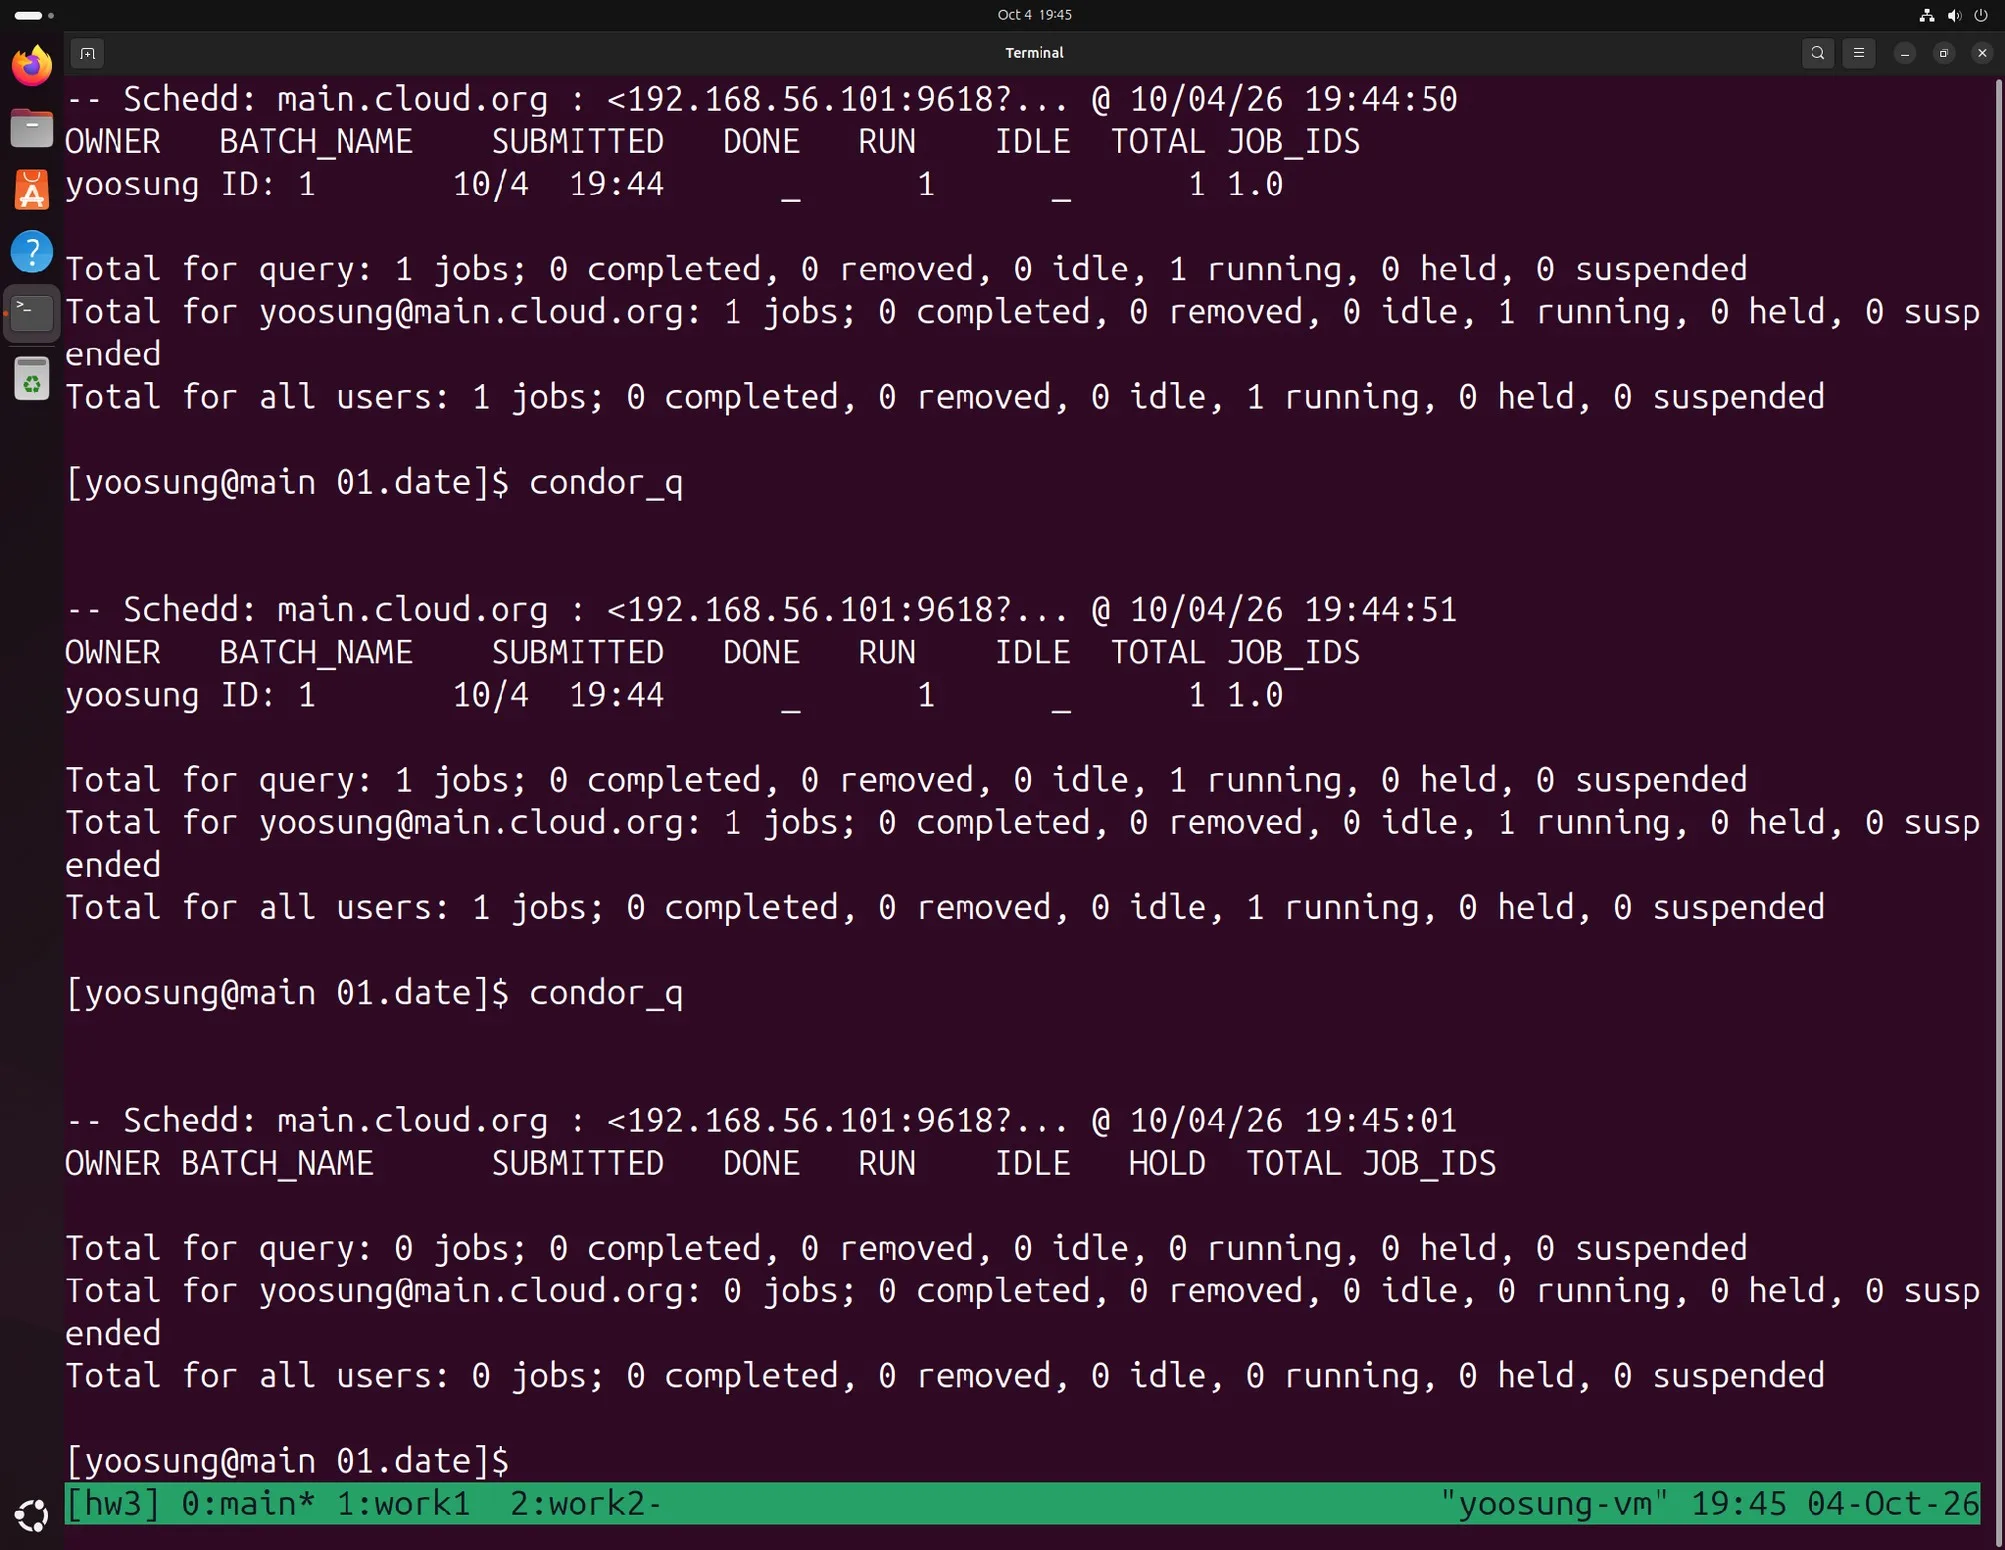
Job 1 submission and condor_q: running (RUN 1) → done (queue empty)
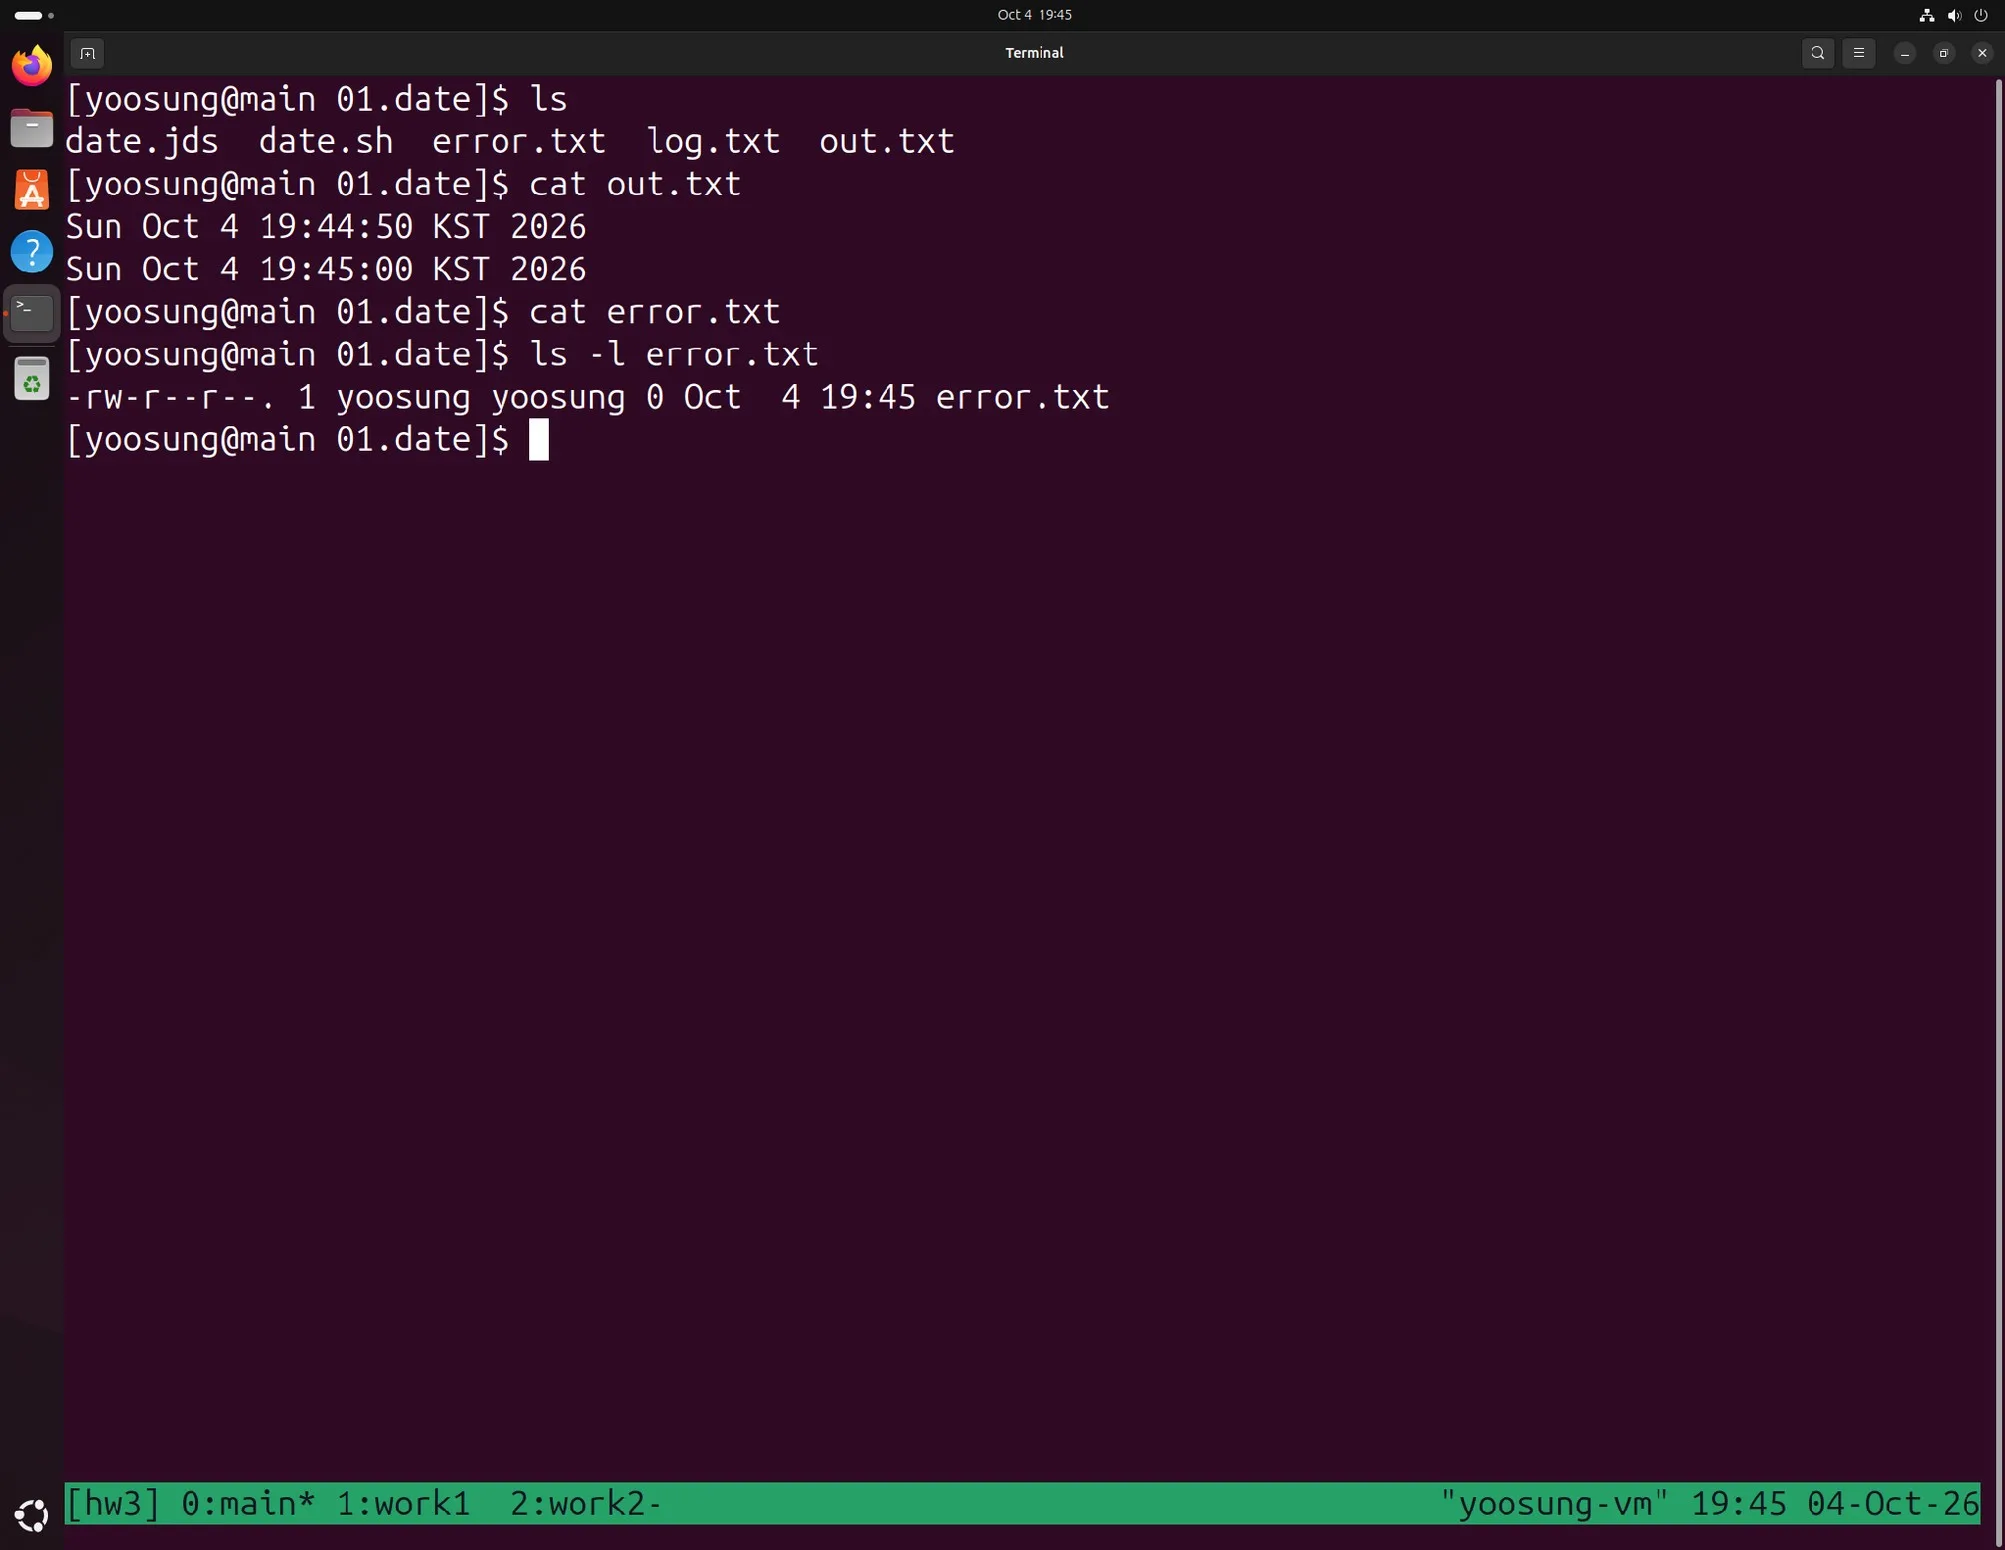
Job 1 result: 2 timestamps 10 seconds apart in out.txt, error.txt 0 bytes
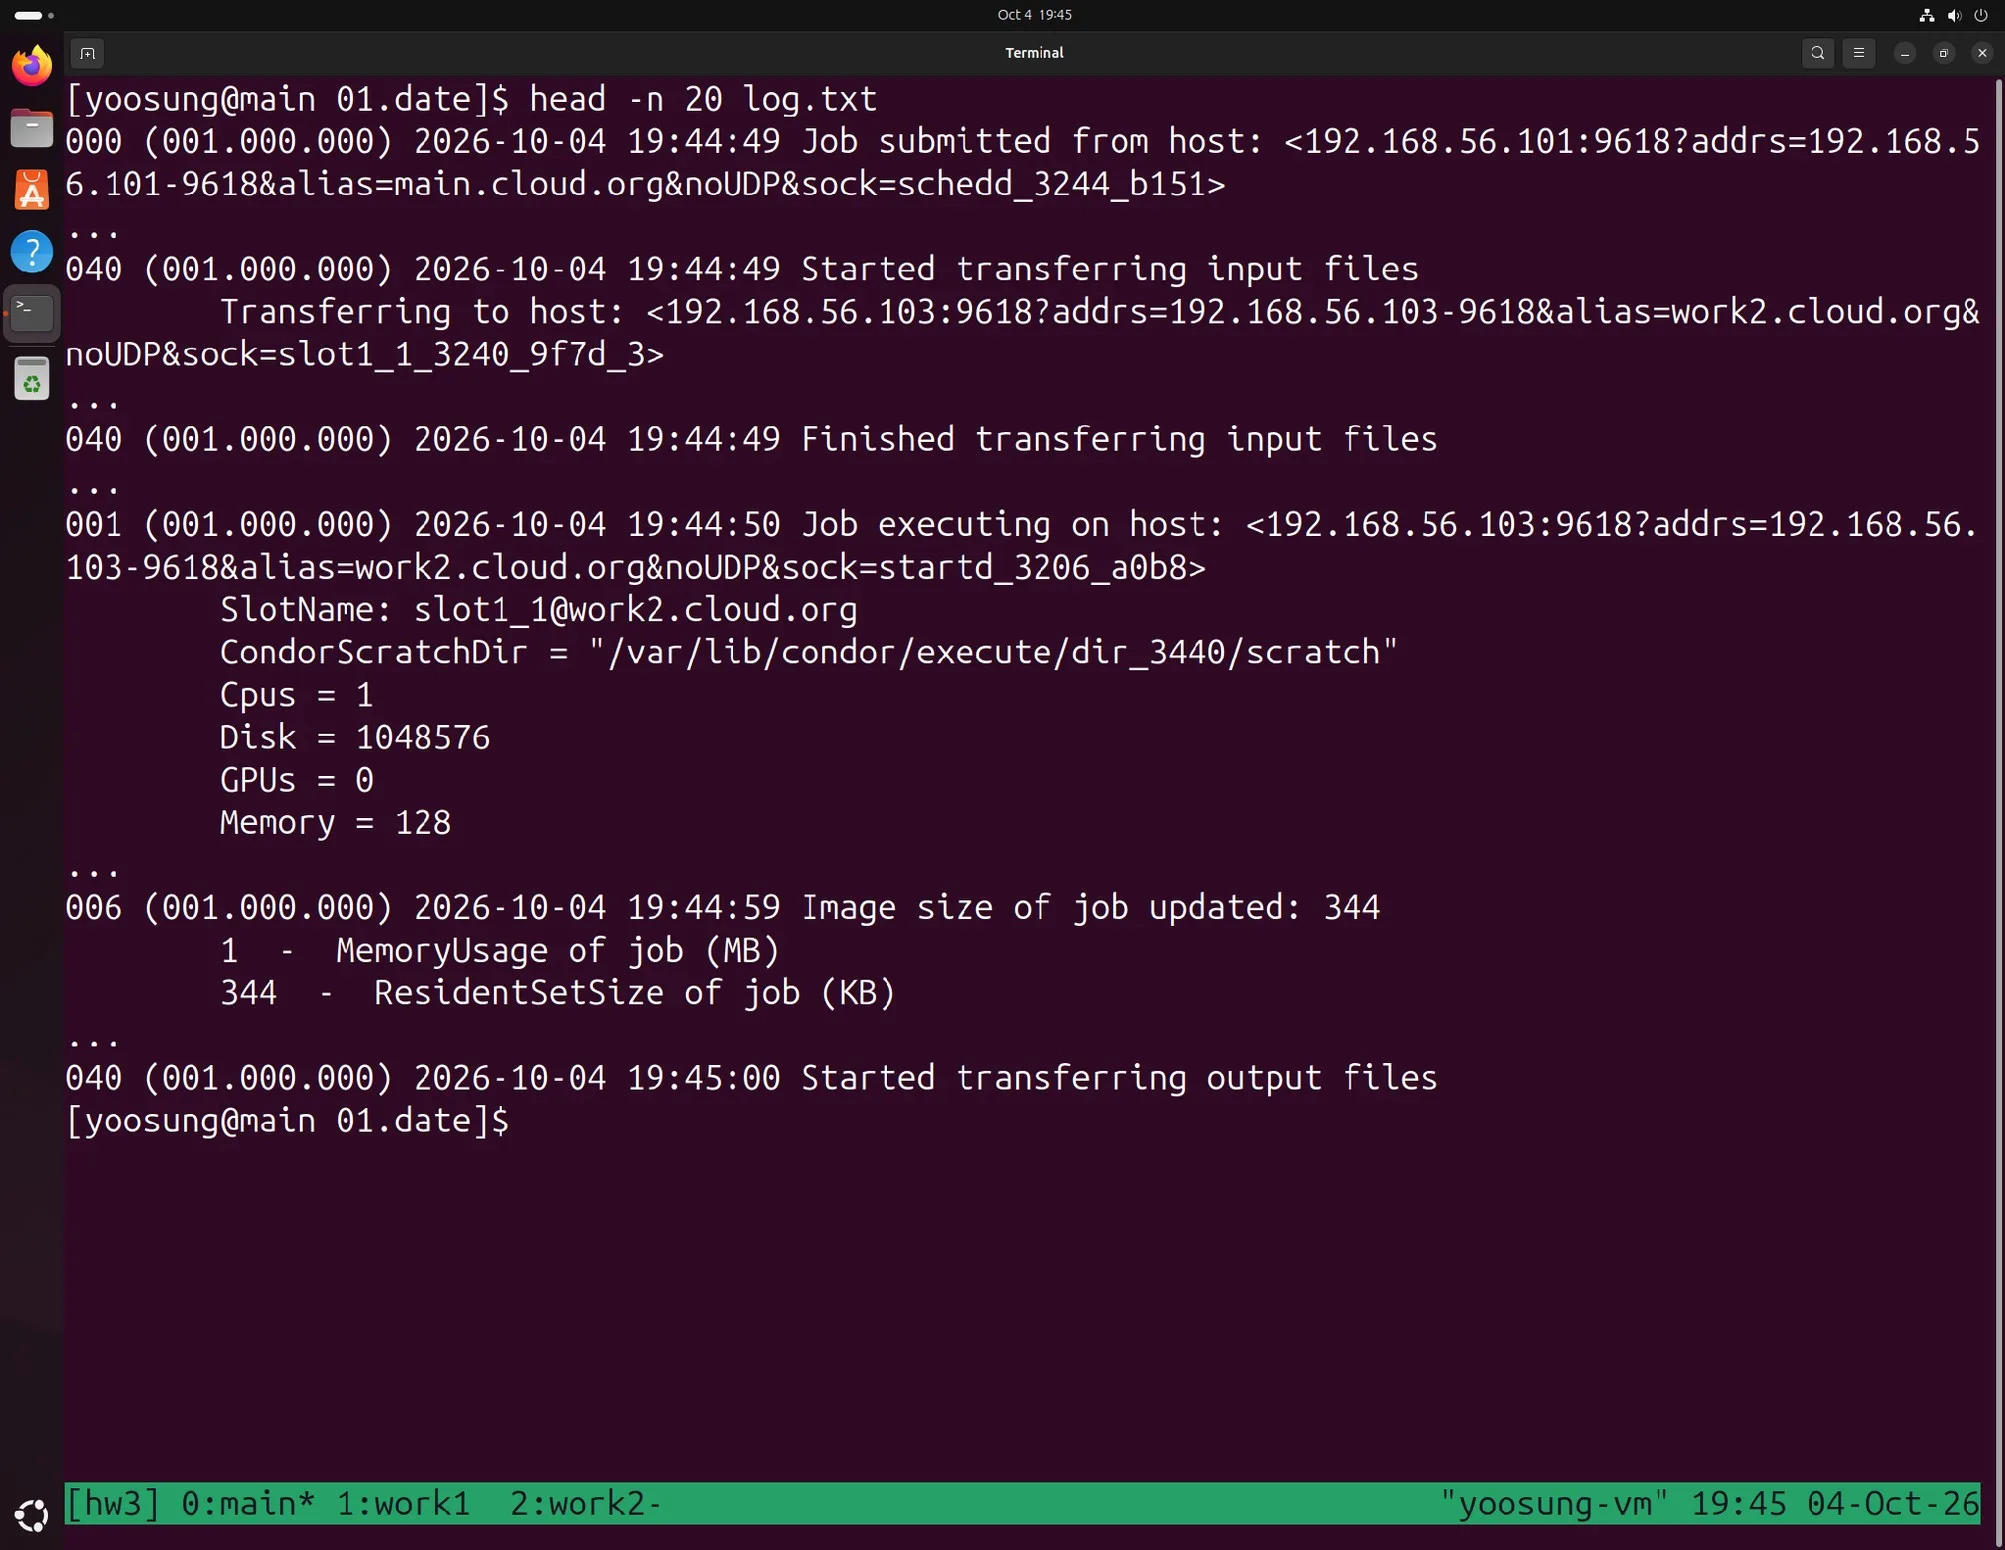
Job 1 log.txt: ran on work2.cloud.org (192.168.56.103)
Job 2. A Job with Arguments (02.argument)
I passed arguments = 1 10 to a script that takes a start and end value as arguments and computes the sum.
#!/bin/bash
NUM_START=$1
NUM_END=$2
LOOP_COUNT=$NUM_START
SUM=0
echo "Sum from $NUM_START to $NUM_END"
while [ $LOOP_COUNT -le $NUM_END ]
do
        SUM=`expr $SUM + $LOOP_COUNT`
        LOOP_COUNT=`expr $LOOP_COUNT + 1`
done
echo "Total Sum = $SUM"
executable = count.sh
universe = vanilla
arguments = 1 10
output = out.txt
error = error.txt
log = log.txt
queue
condor_q showed idle (IDLE 1) → running (RUN 1) → done in turn, and the result was Total Sum = 55.
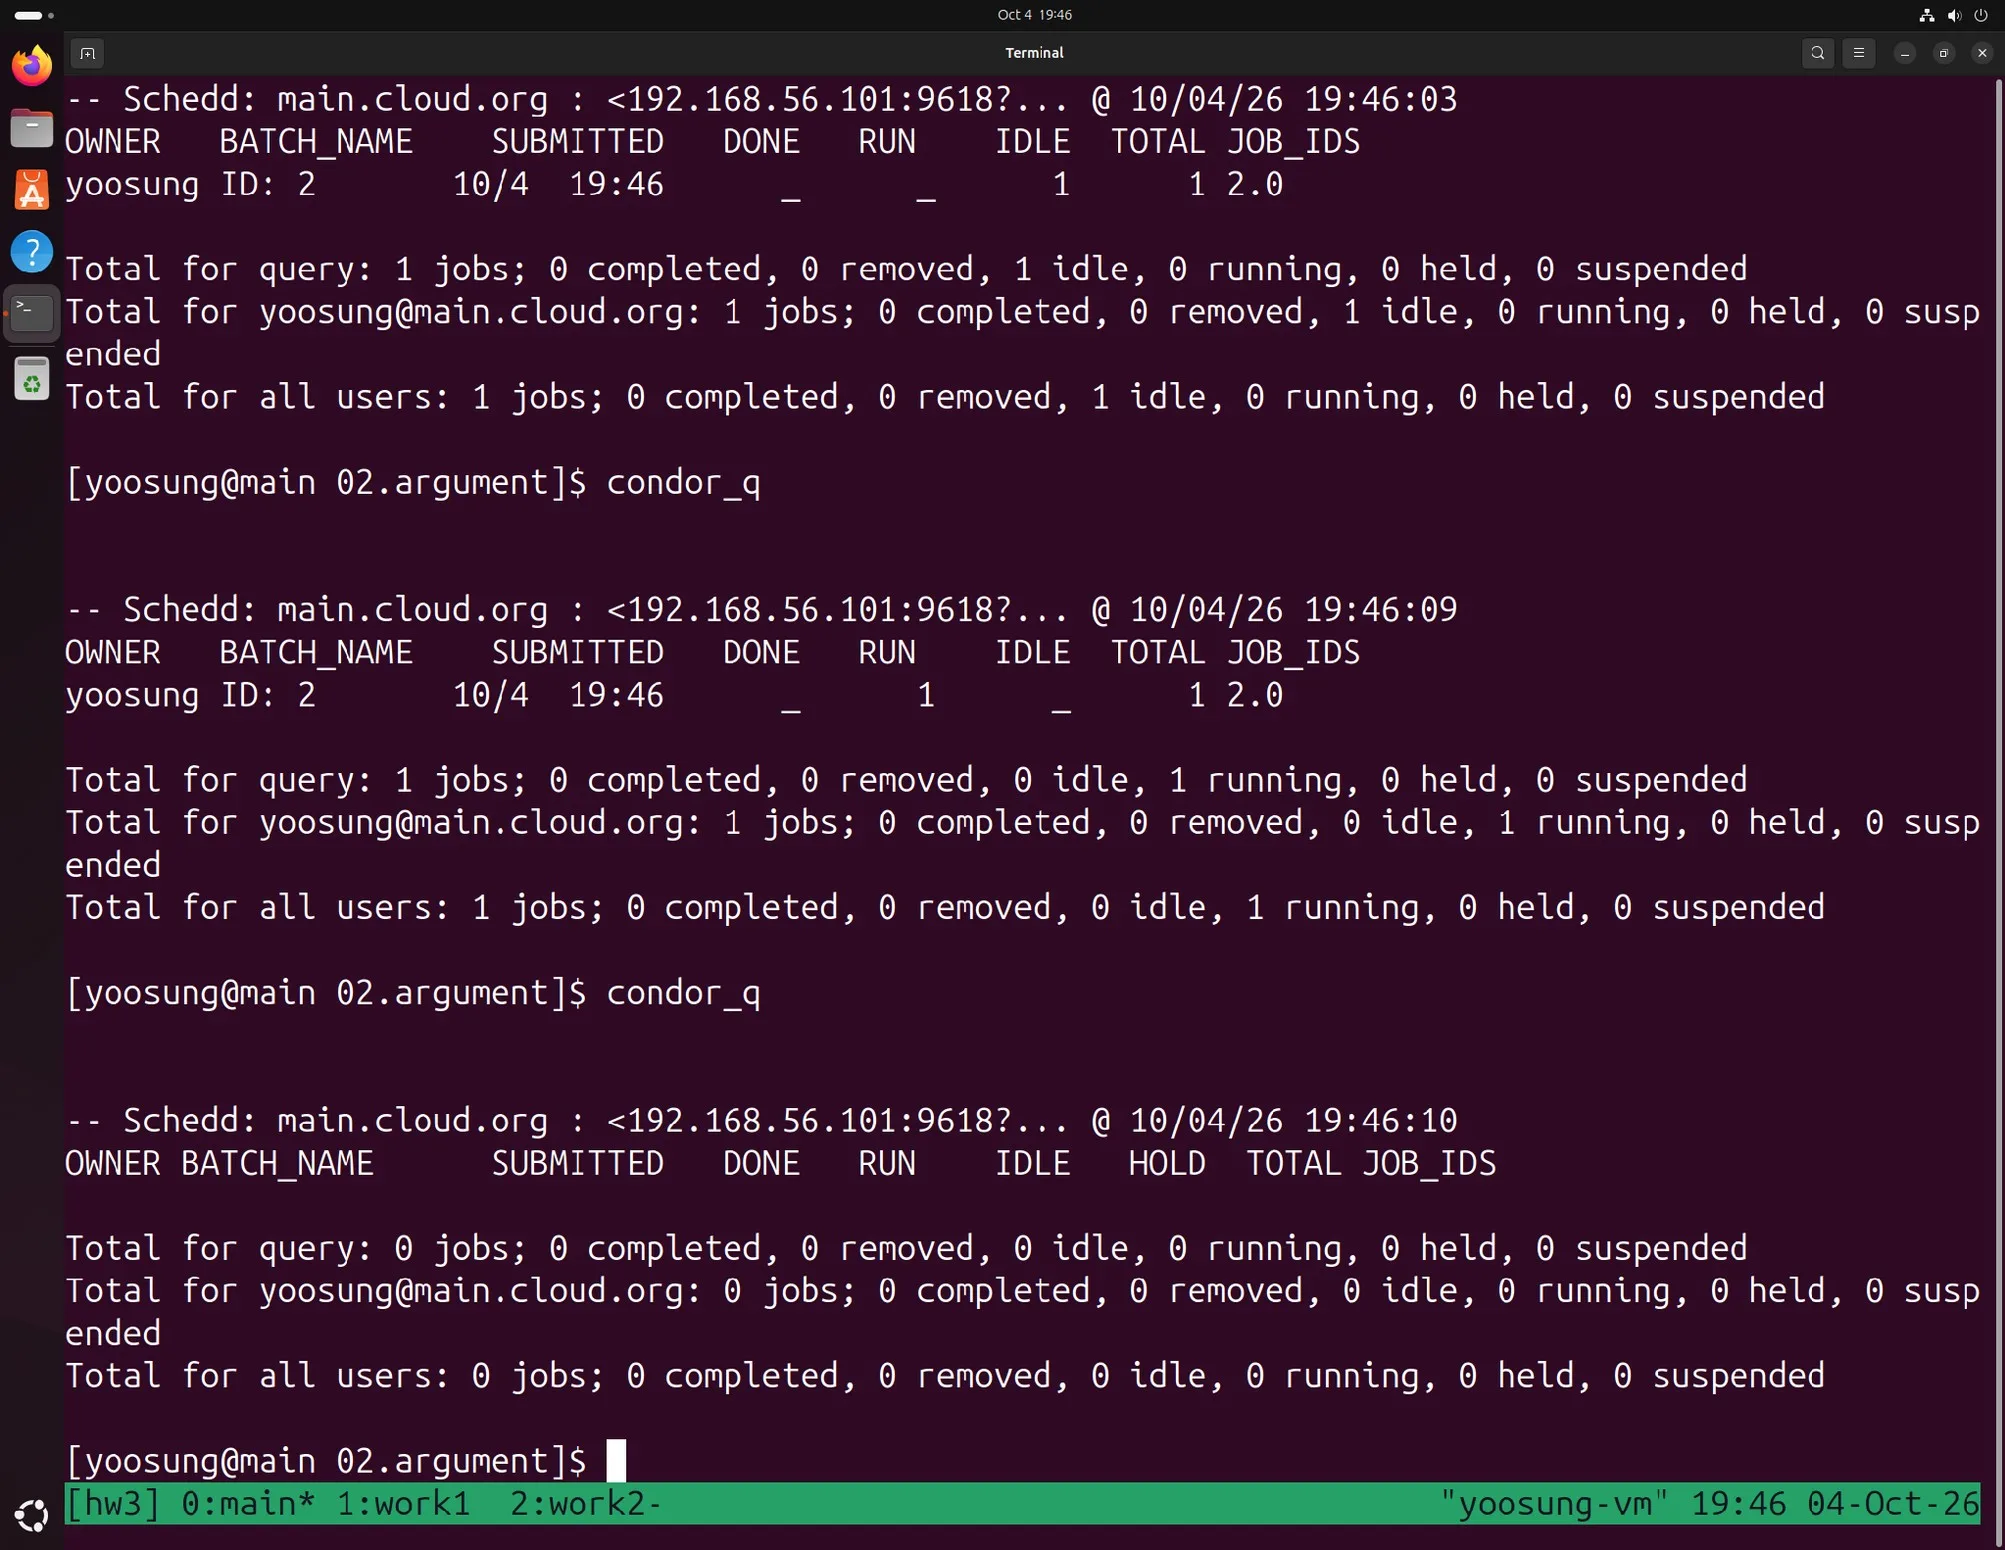
Job 2 submission and condor_q: IDLE → RUN → done
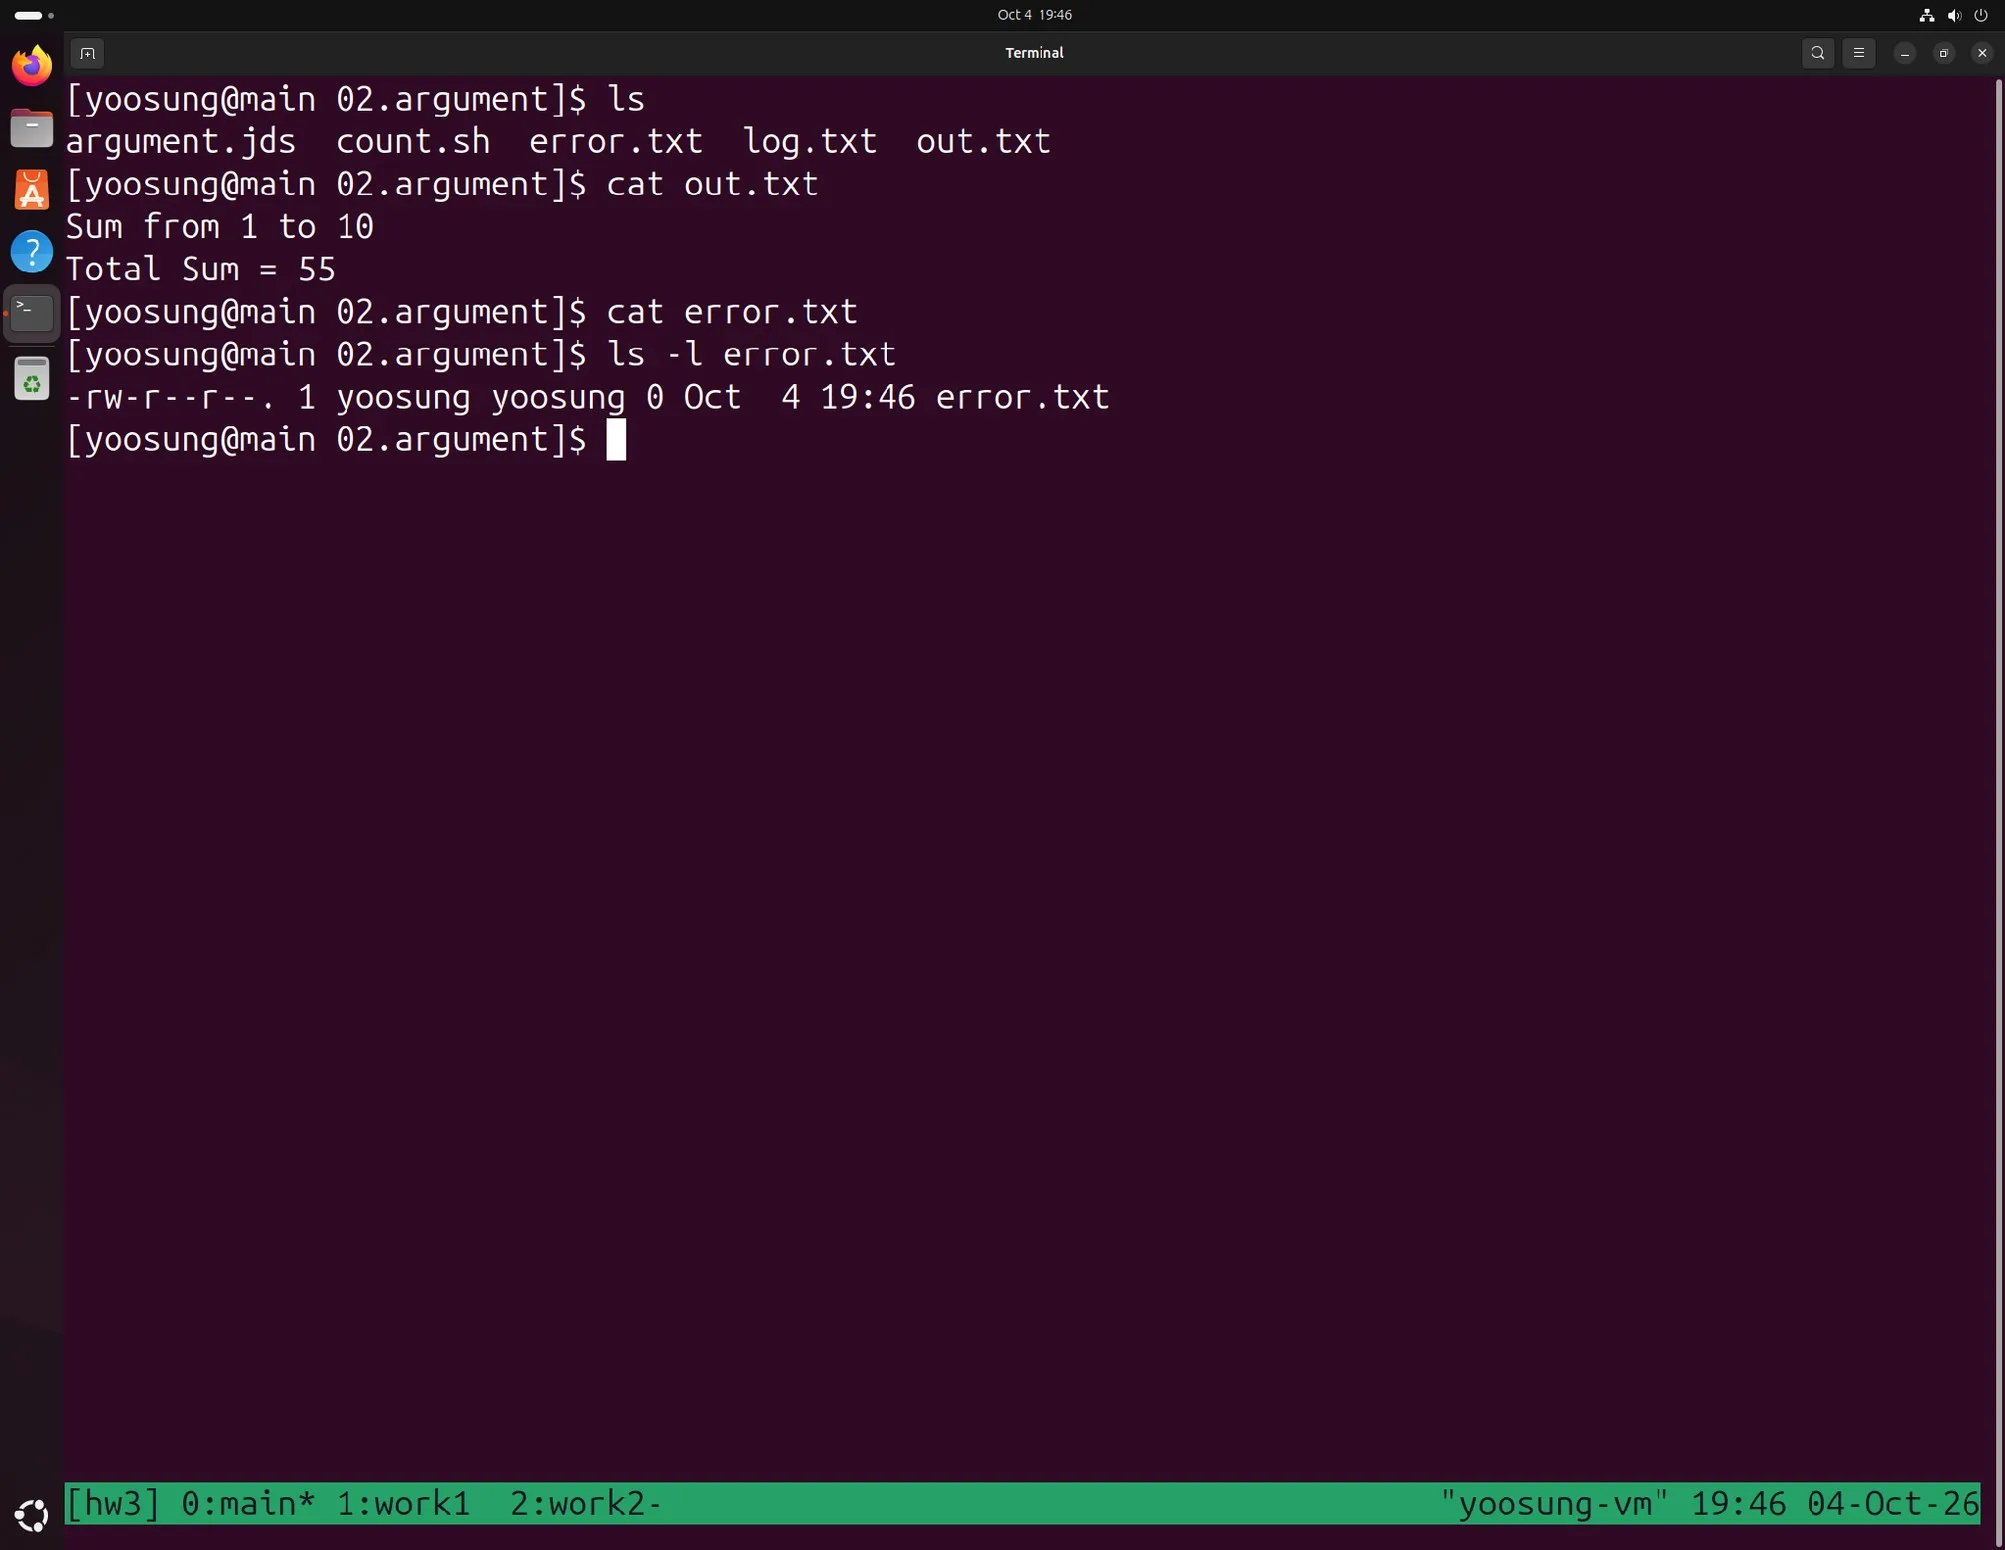
Job 2 result: Sum from 1 to 10, Total Sum = 55
Job 3. Running Multiple Jobs at Once (03.multiple)
I changed only the last line of Job 2's jds to queue 10 and submitted 10 jobs.
The execute nodes have 4 CPUs in total, so they ran 4 at a time (DONE 2 / RUN 4 / IDLE 4). The 10 jobs were split 5 each between work1 and work2.
But all 10 write to the same out.txt, error.txt and log.txt. So only one out.txt and error.txt remain, overwriting each other, and log.txt piles up the records of all 10 jobs mixed in one file. Jobs 4–6 solve this problem.
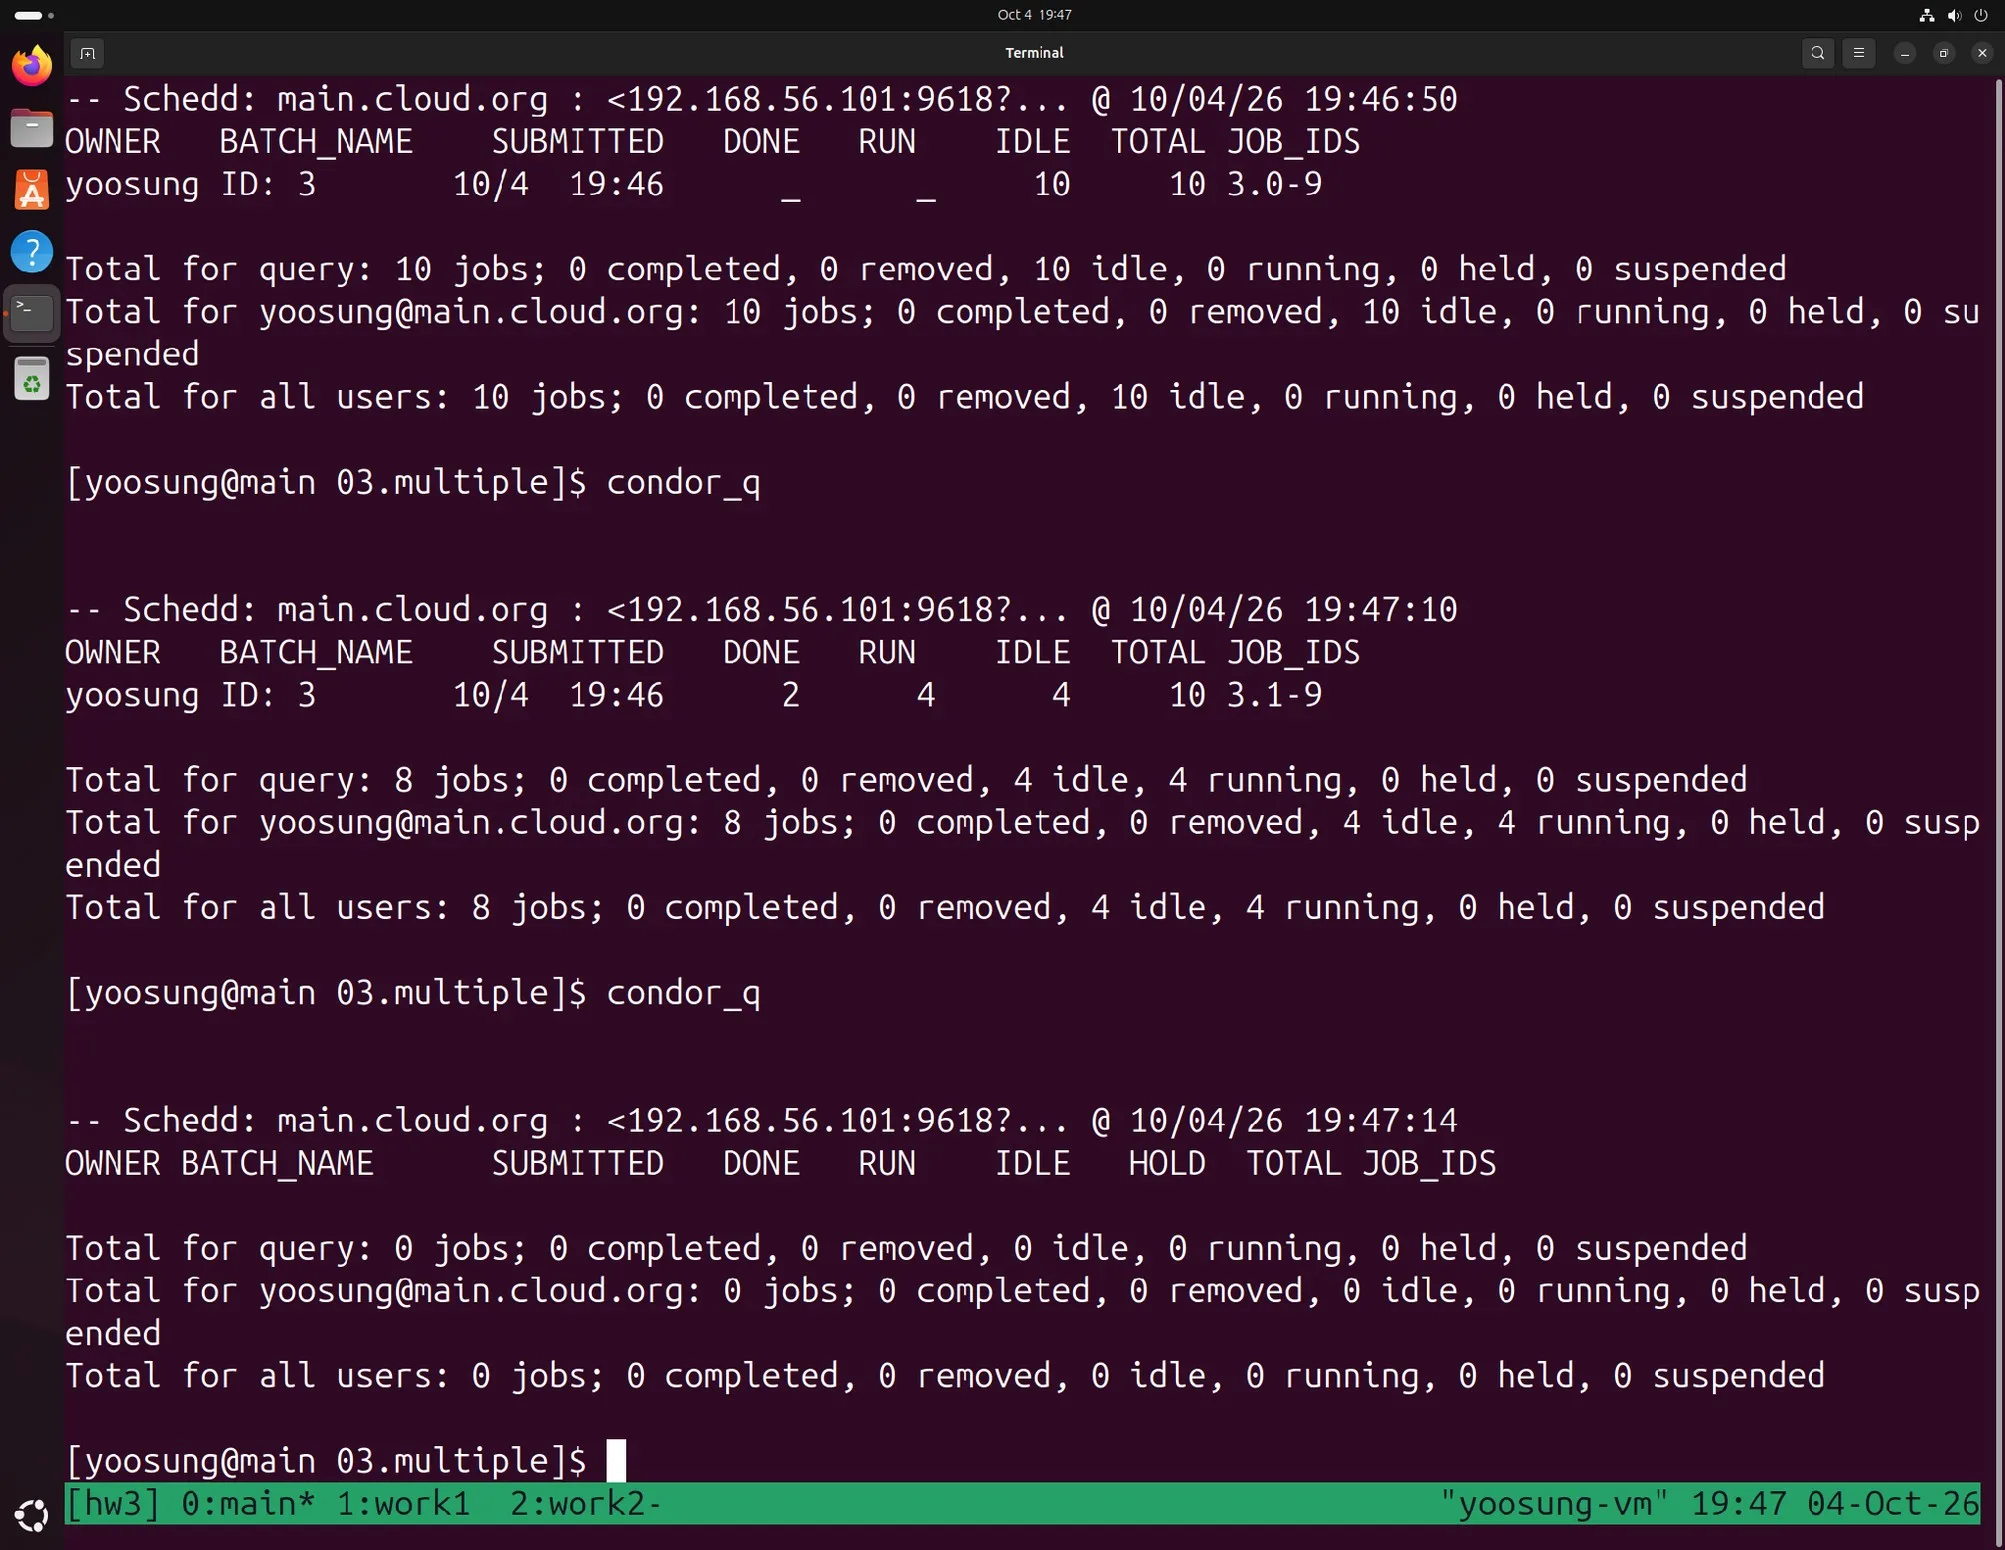
Job 3 condor_q: 10 submitted, run 4 at a time (DONE 2, RUN 4, IDLE 4)
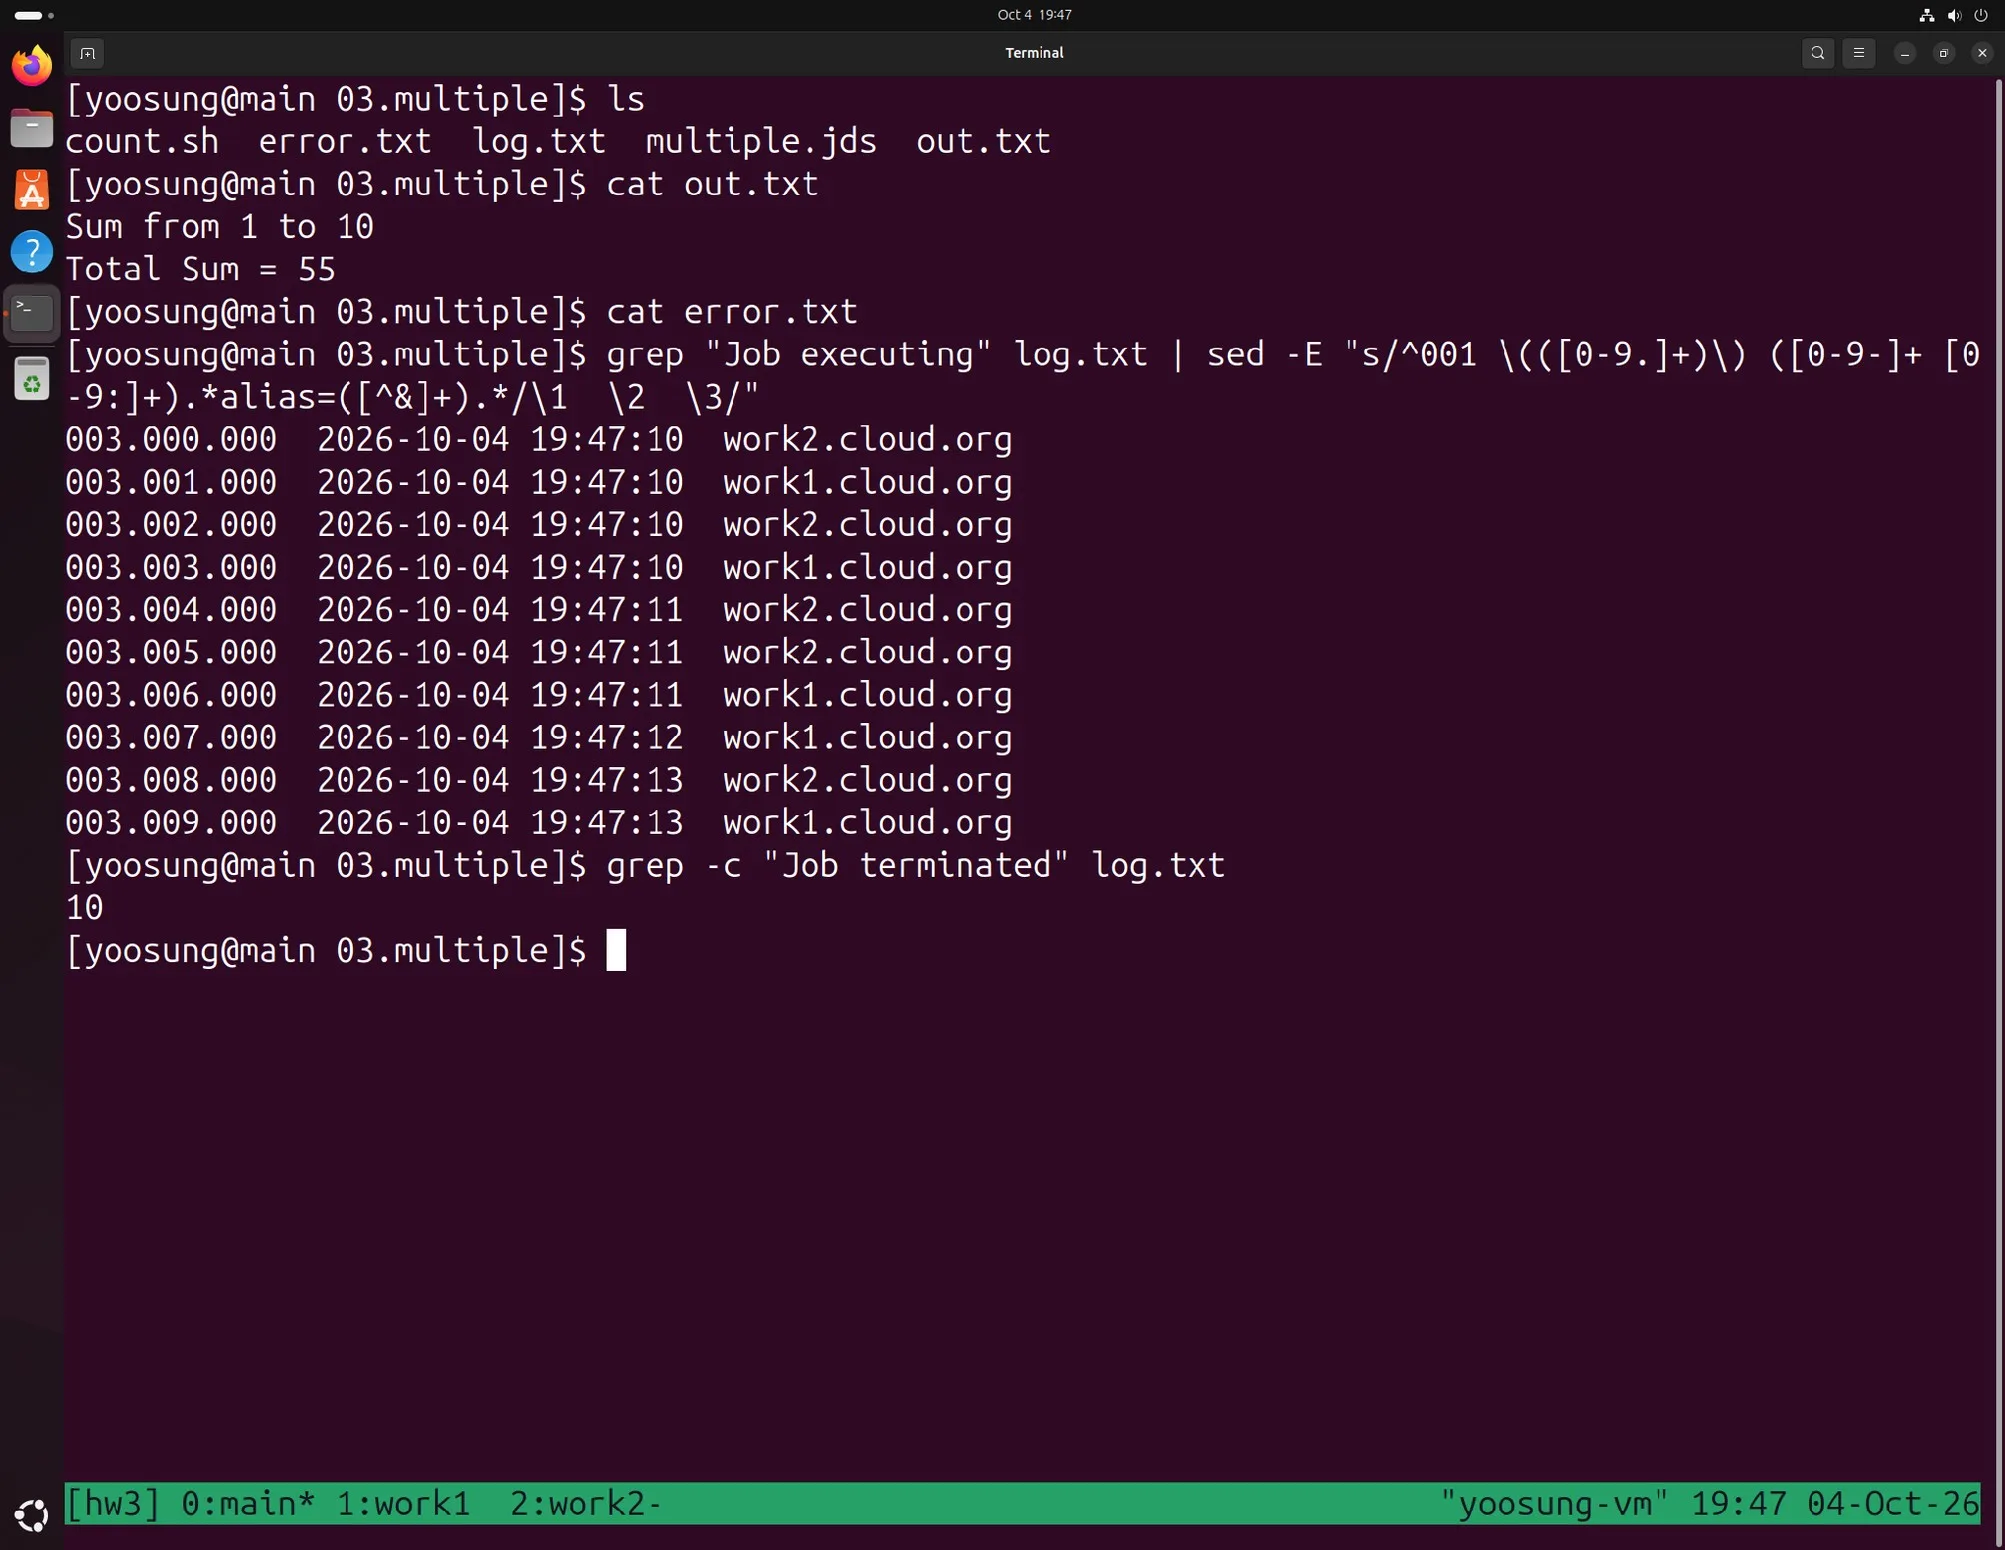
Job 3 result: only one out.txt; 10 jobs ran 5 each on work1 and work2
Job 4. Running at Once with Separate Directories (04.multiple)
I made read.sh, which reads file.txt line by line and prints it, and gave each job a different initialdir, run_0 and run_1.
#!/bin/bash

while read line
do
        echo "$line"
done < file.txt
Problem: Extra data found after queue statement
The slide's read.jds uses queue twice, changing initialdir in between. Submitting it as-is, the submission itself was rejected.
condor_submit read.jds
ERROR: on Line 12 of read.jds: Extra data found after queue statement
ERROR: Failed to parse command file (line 12).
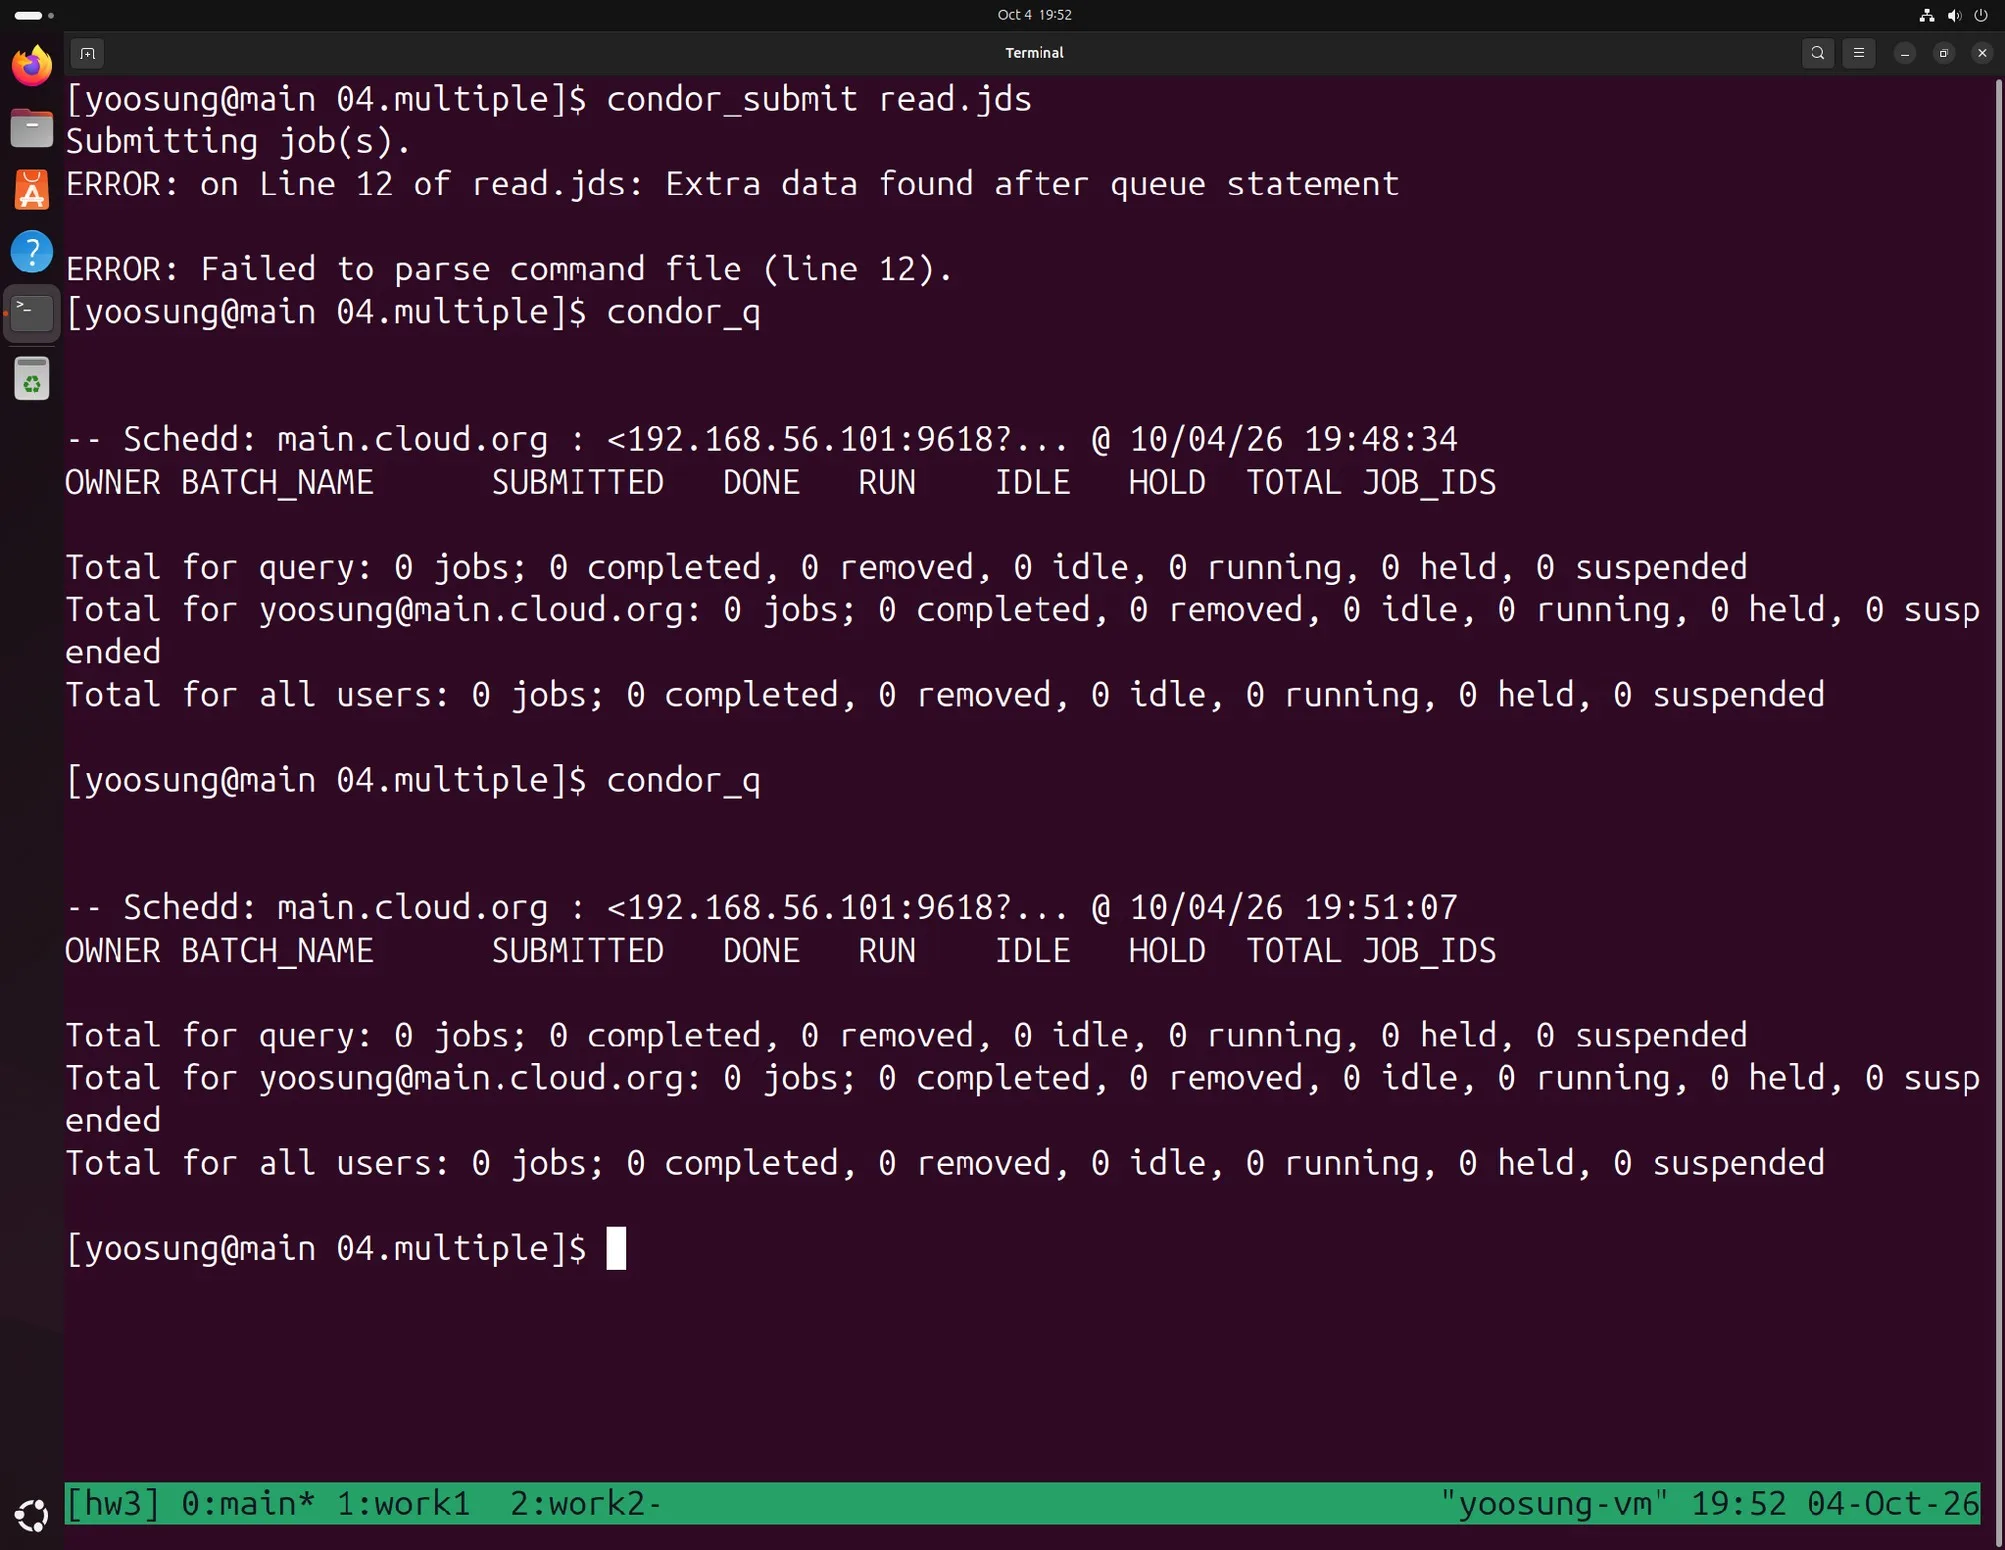
The slide's jds (queue twice) gives a submission error
Investigation: line 12 is the second
initialdir = run_1. I confirmed withcat -A read.jdsthat no invisible characters were mixed in, andcondor_submit -dry-rungave the same error. Searching for the error message, I found this in the HTCondor 25.x release notes.The condor_submit warning about submit files with multiple QUEUE statements has been changed to an error by changing the default value for SUBMIT_PREVENT_MULTI_QUEUE to True. (Version 25.14.1)
Cause: the installed HTCondor is exactly this 25.14.1. In earlier versions, using queue multiple times only gave a warning; from this version it became an error.
Fix: following the official HTCondor FAQ "Convert Multi-Queue Statements into One", I changed it to give a single queue a list of initialdir values. There's also the option of re-allowing the old syntax with
SUBMIT_PREVENT_MULTI_QUEUE = False, but I didn't use it since it is slated for removal.
executable = read.sh
universe = vanilla
input = file.txt
output = out.txt
error = error.txt
log = log.txt
queue initialdir from (
    run_0
    run_1
)
Submitting the fixed jds, 2 jobs ran at the same time, and separate result files appeared in run_0 and run_1. The logs show run_0 ran on work2 and run_1 on work1.
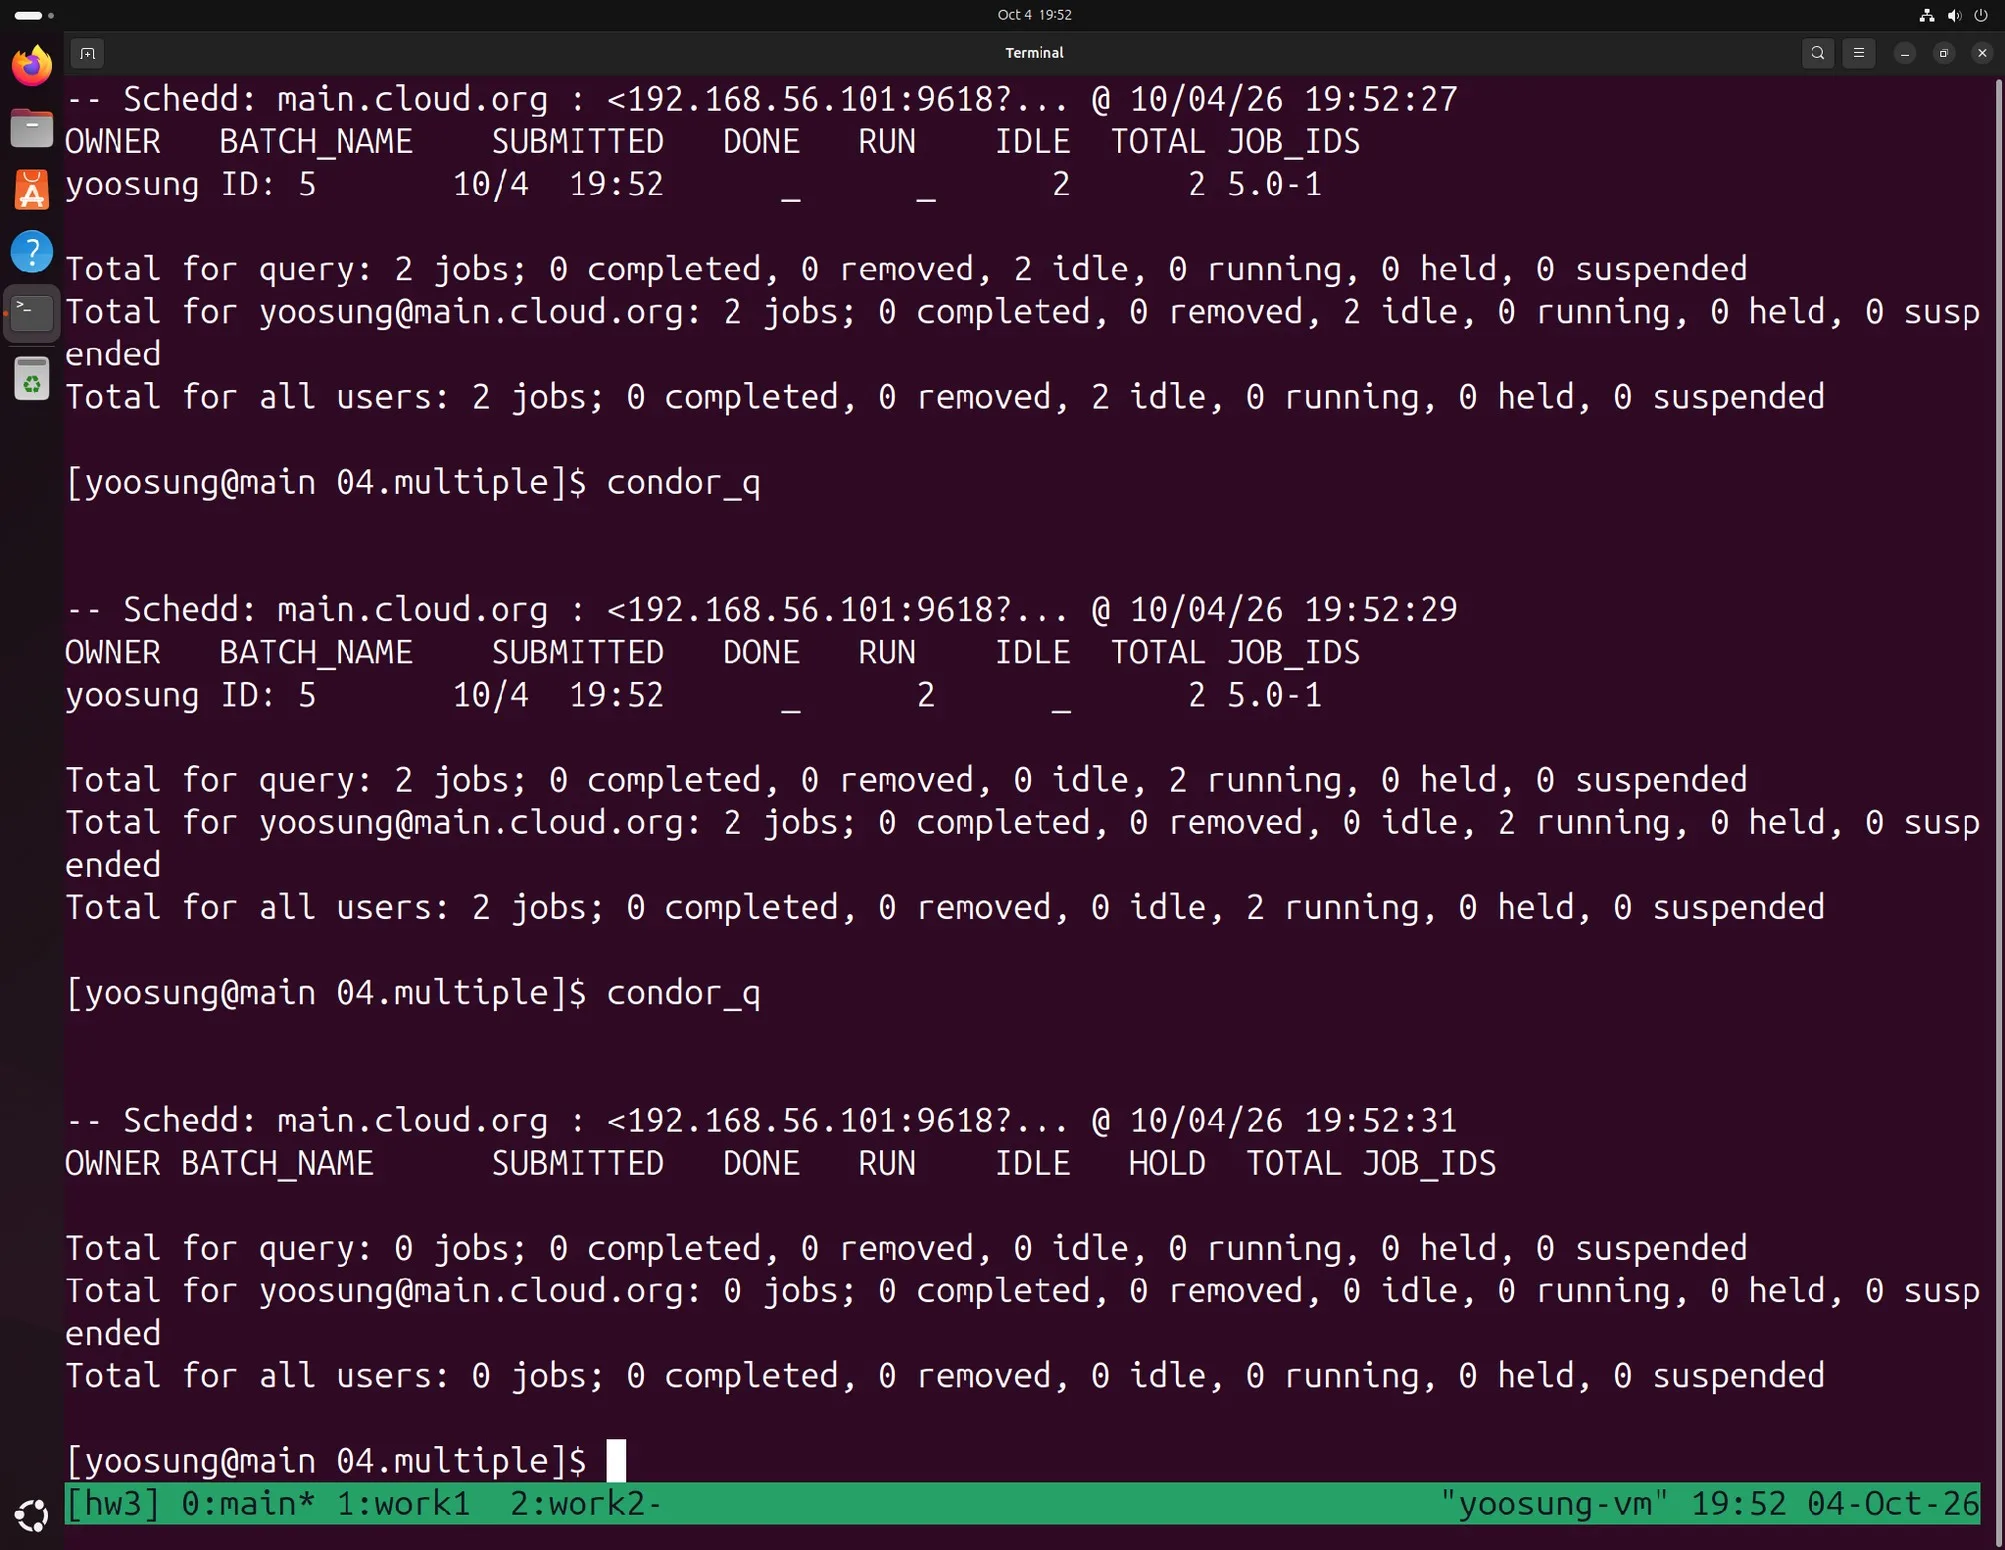
Submitted with the fixed jds, 2 jobs IDLE → RUN 2 → done
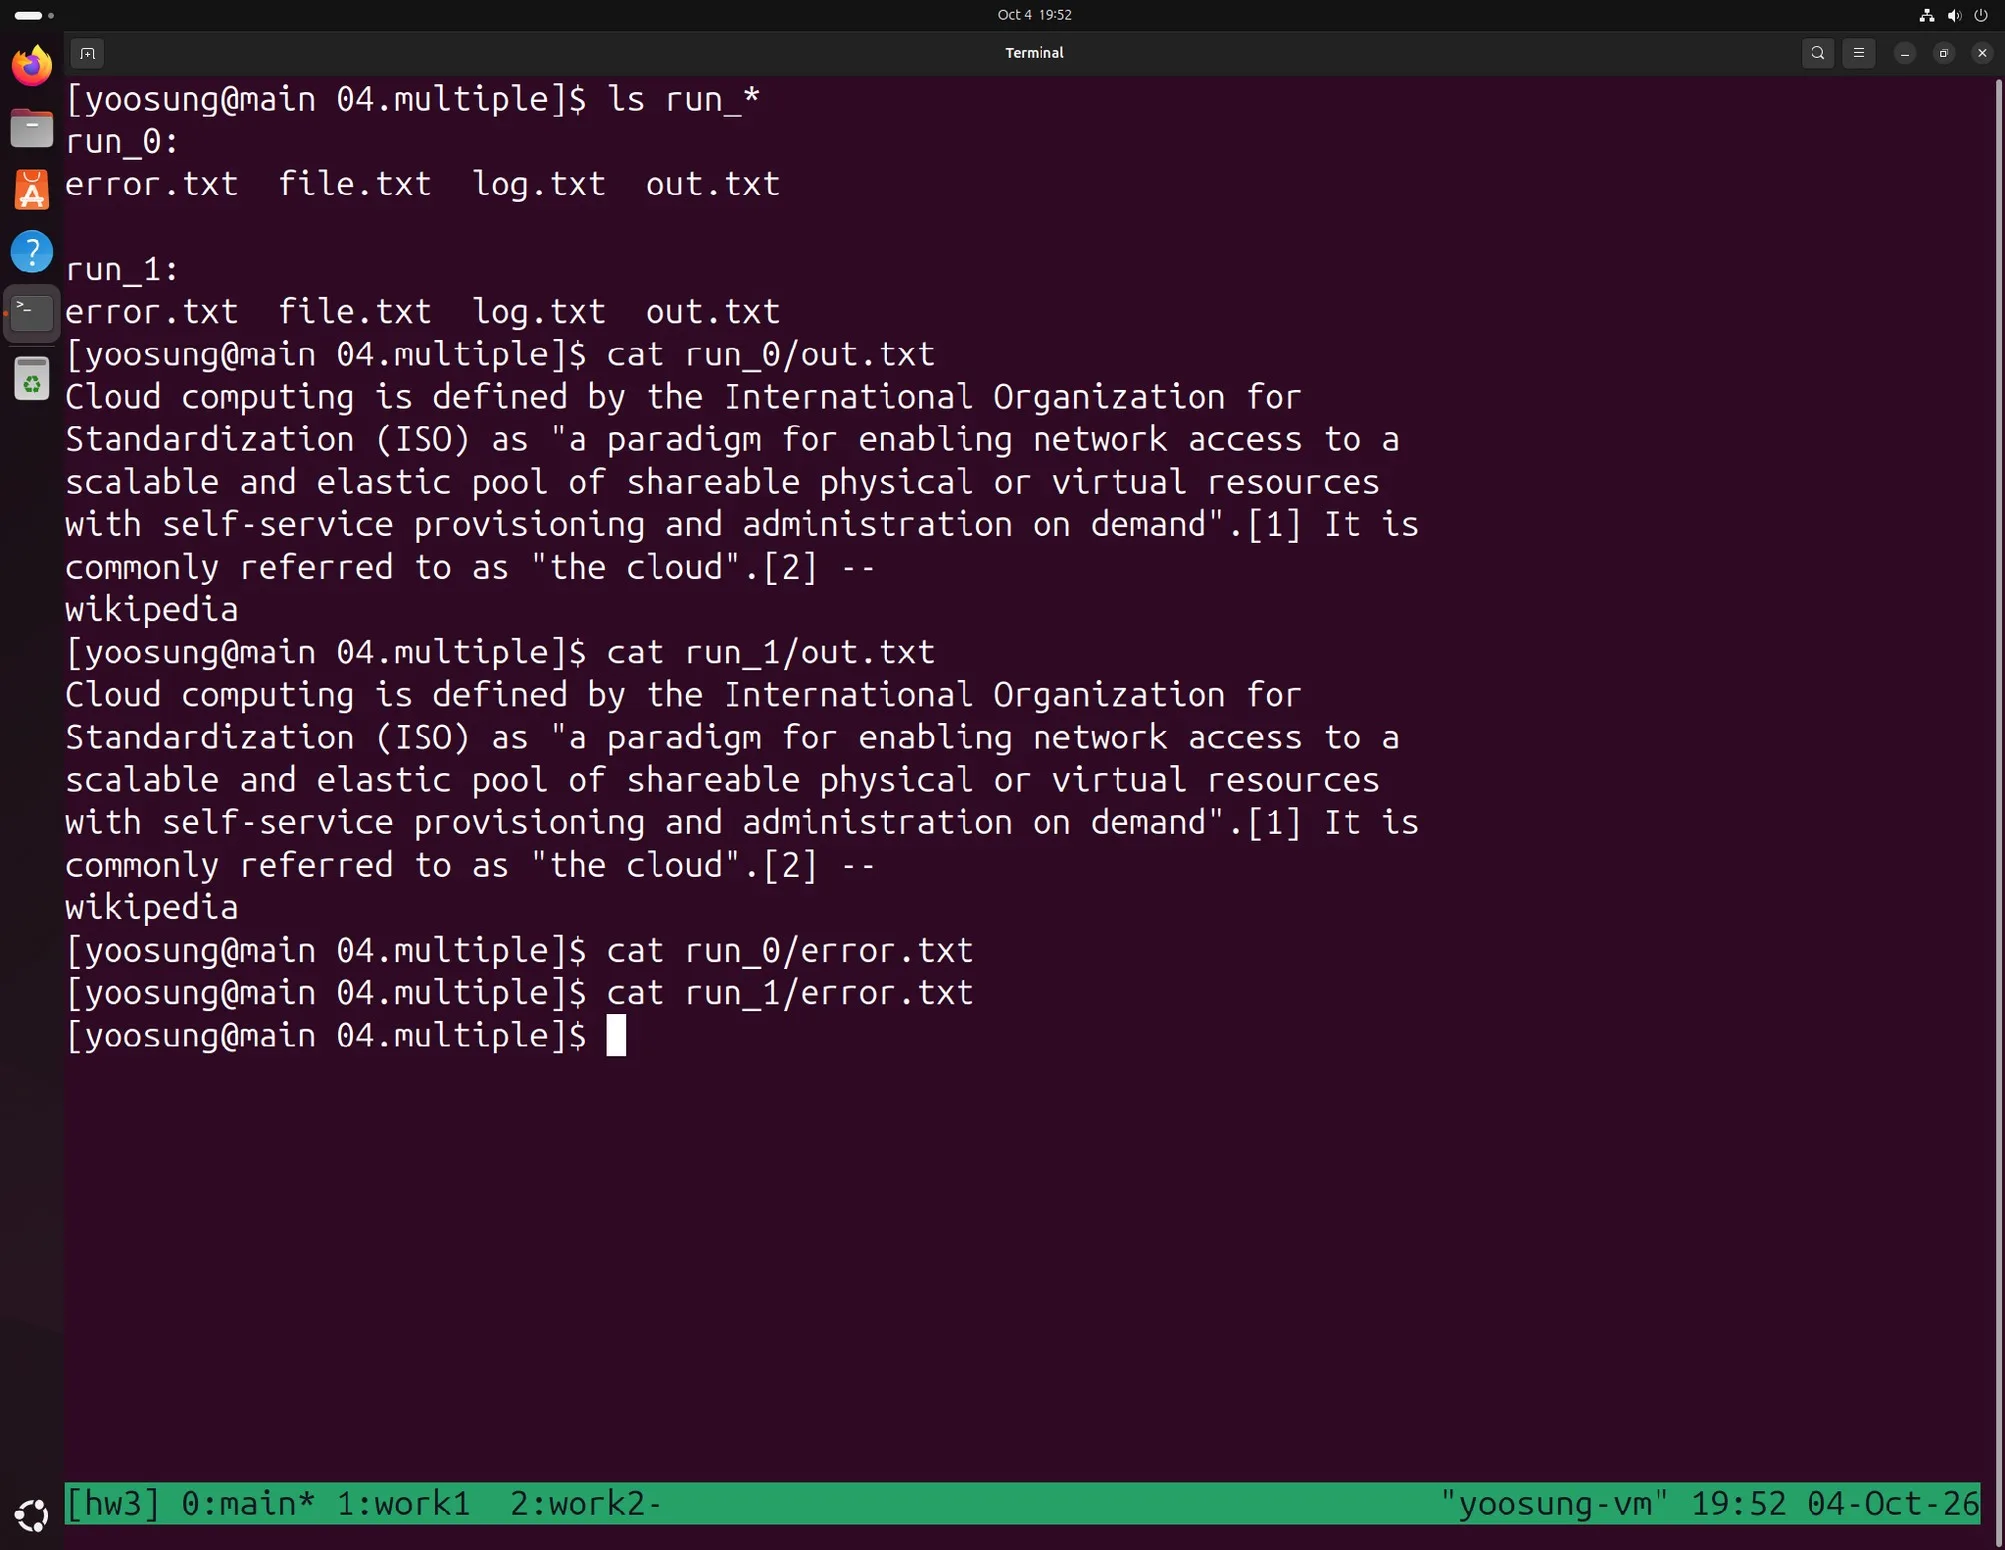
Separate result files appear in run_0 and run_1, and error.txt is empty.
Reference: HTCondor Version 25.x Feature Releases, Convert Multi-Queue Statements into One
Job 5. Running at Once with Separate File Names (05.multiple)
$(Process) is a number 0, 1, 2… assigned to each job created by the same submission. Putting it in the output file names makes each job write to a different file.
executable = count.sh
universe = vanilla
arguments = 1 10
output = out.$(Process).txt
error = error.$(Process).txt
log = log.$(Process).txt
queue 10
30 separate out, error and log files were created for the 10 jobs, and out.0.txt – out.9.txt all had Total Sum = 55.
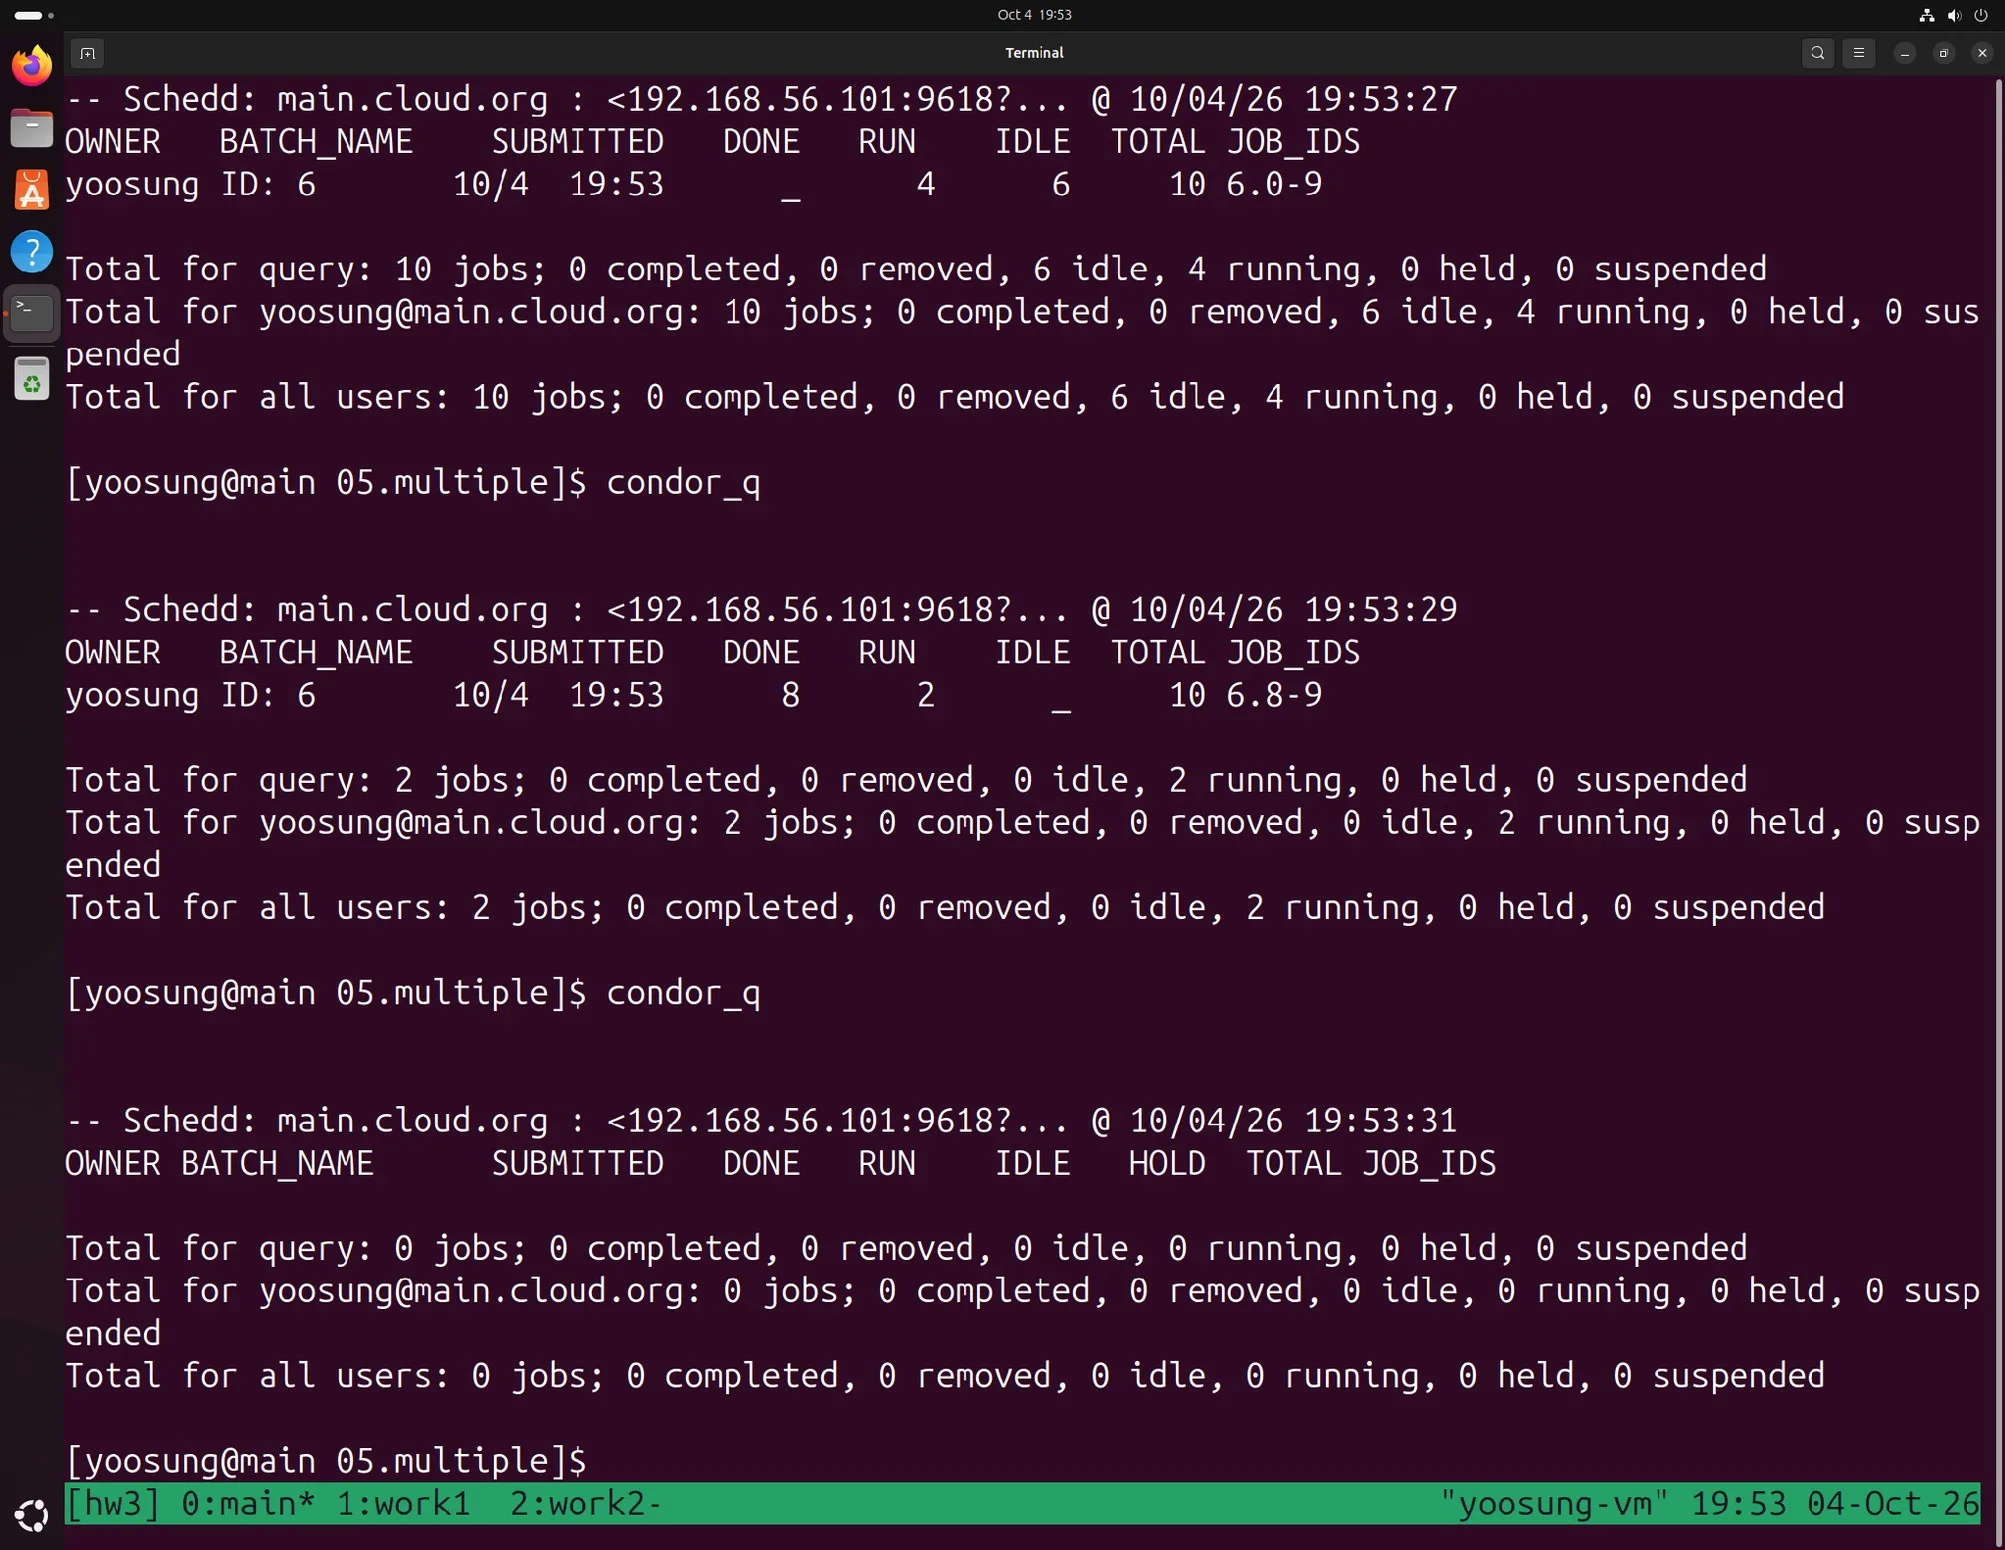
Job 5 condor_q: RUN 4 / IDLE 6 → DONE 8 / RUN 2 → done
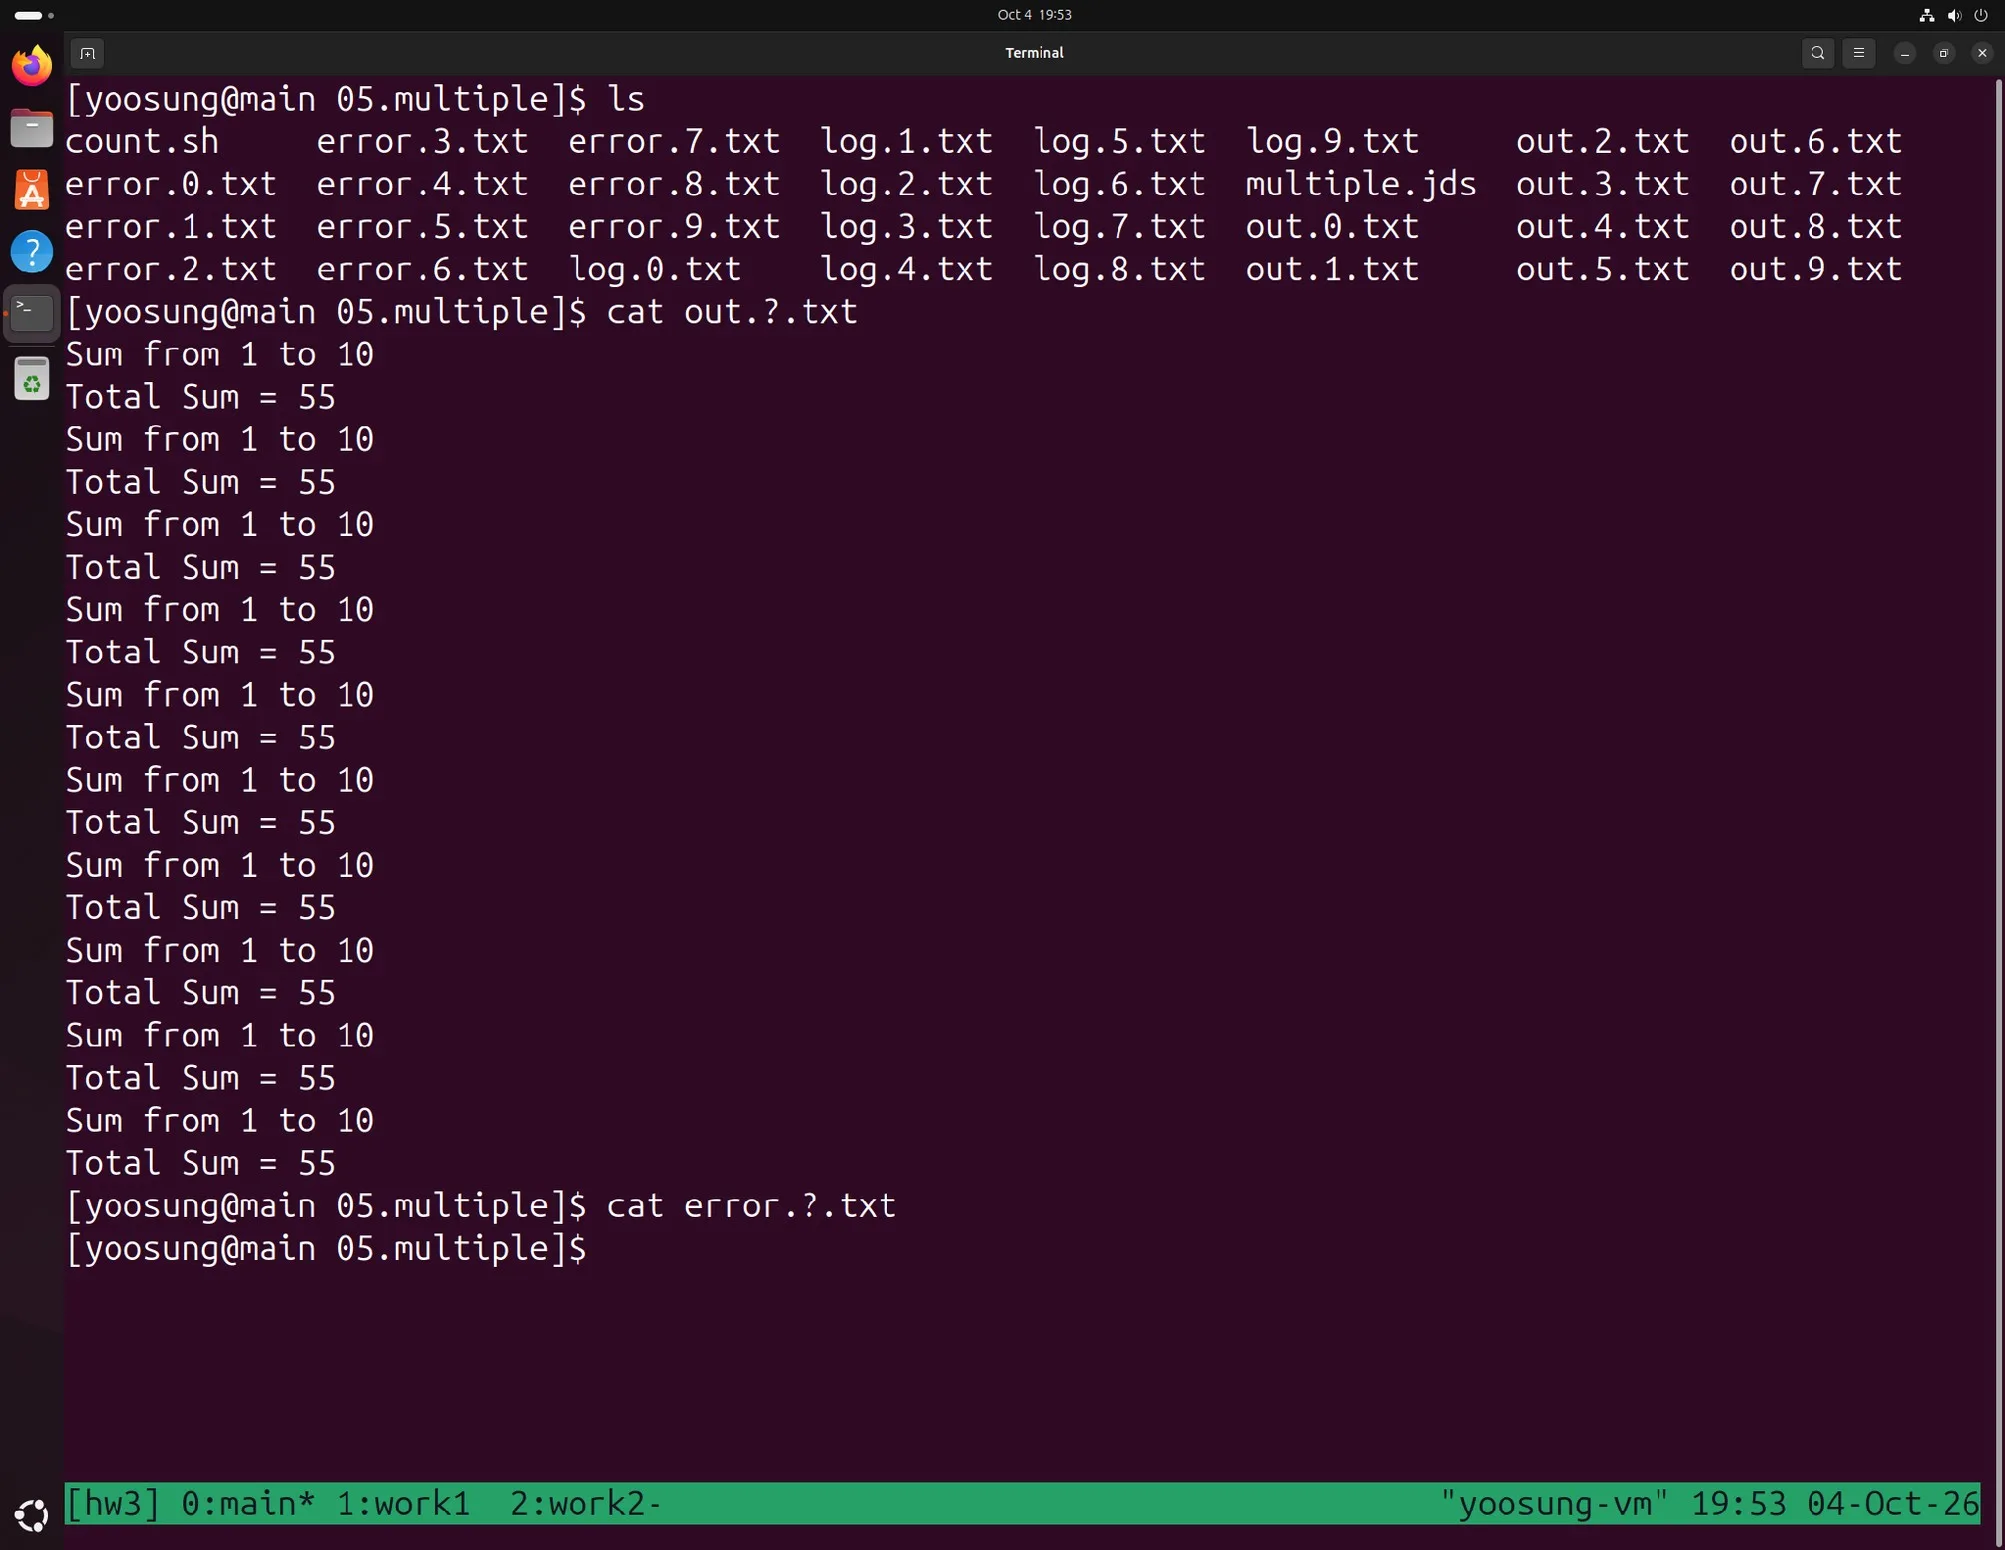
30 files by job number, all 10 out files show 55
Job 6. Separating Directories with $(Process) (06.multiple)
I copied Job 4's files and put $(Process) in initialdir, splitting into run_0 and run_1 with a single queue 2. It's another way of doing Job 4, and since there's only one queue it's unaffected by the error above.
executable = read.sh
universe = vanilla
input = file.txt
output = out.txt
error = error.txt
log = log.txt
initialdir = run_$(Process)
queue 2
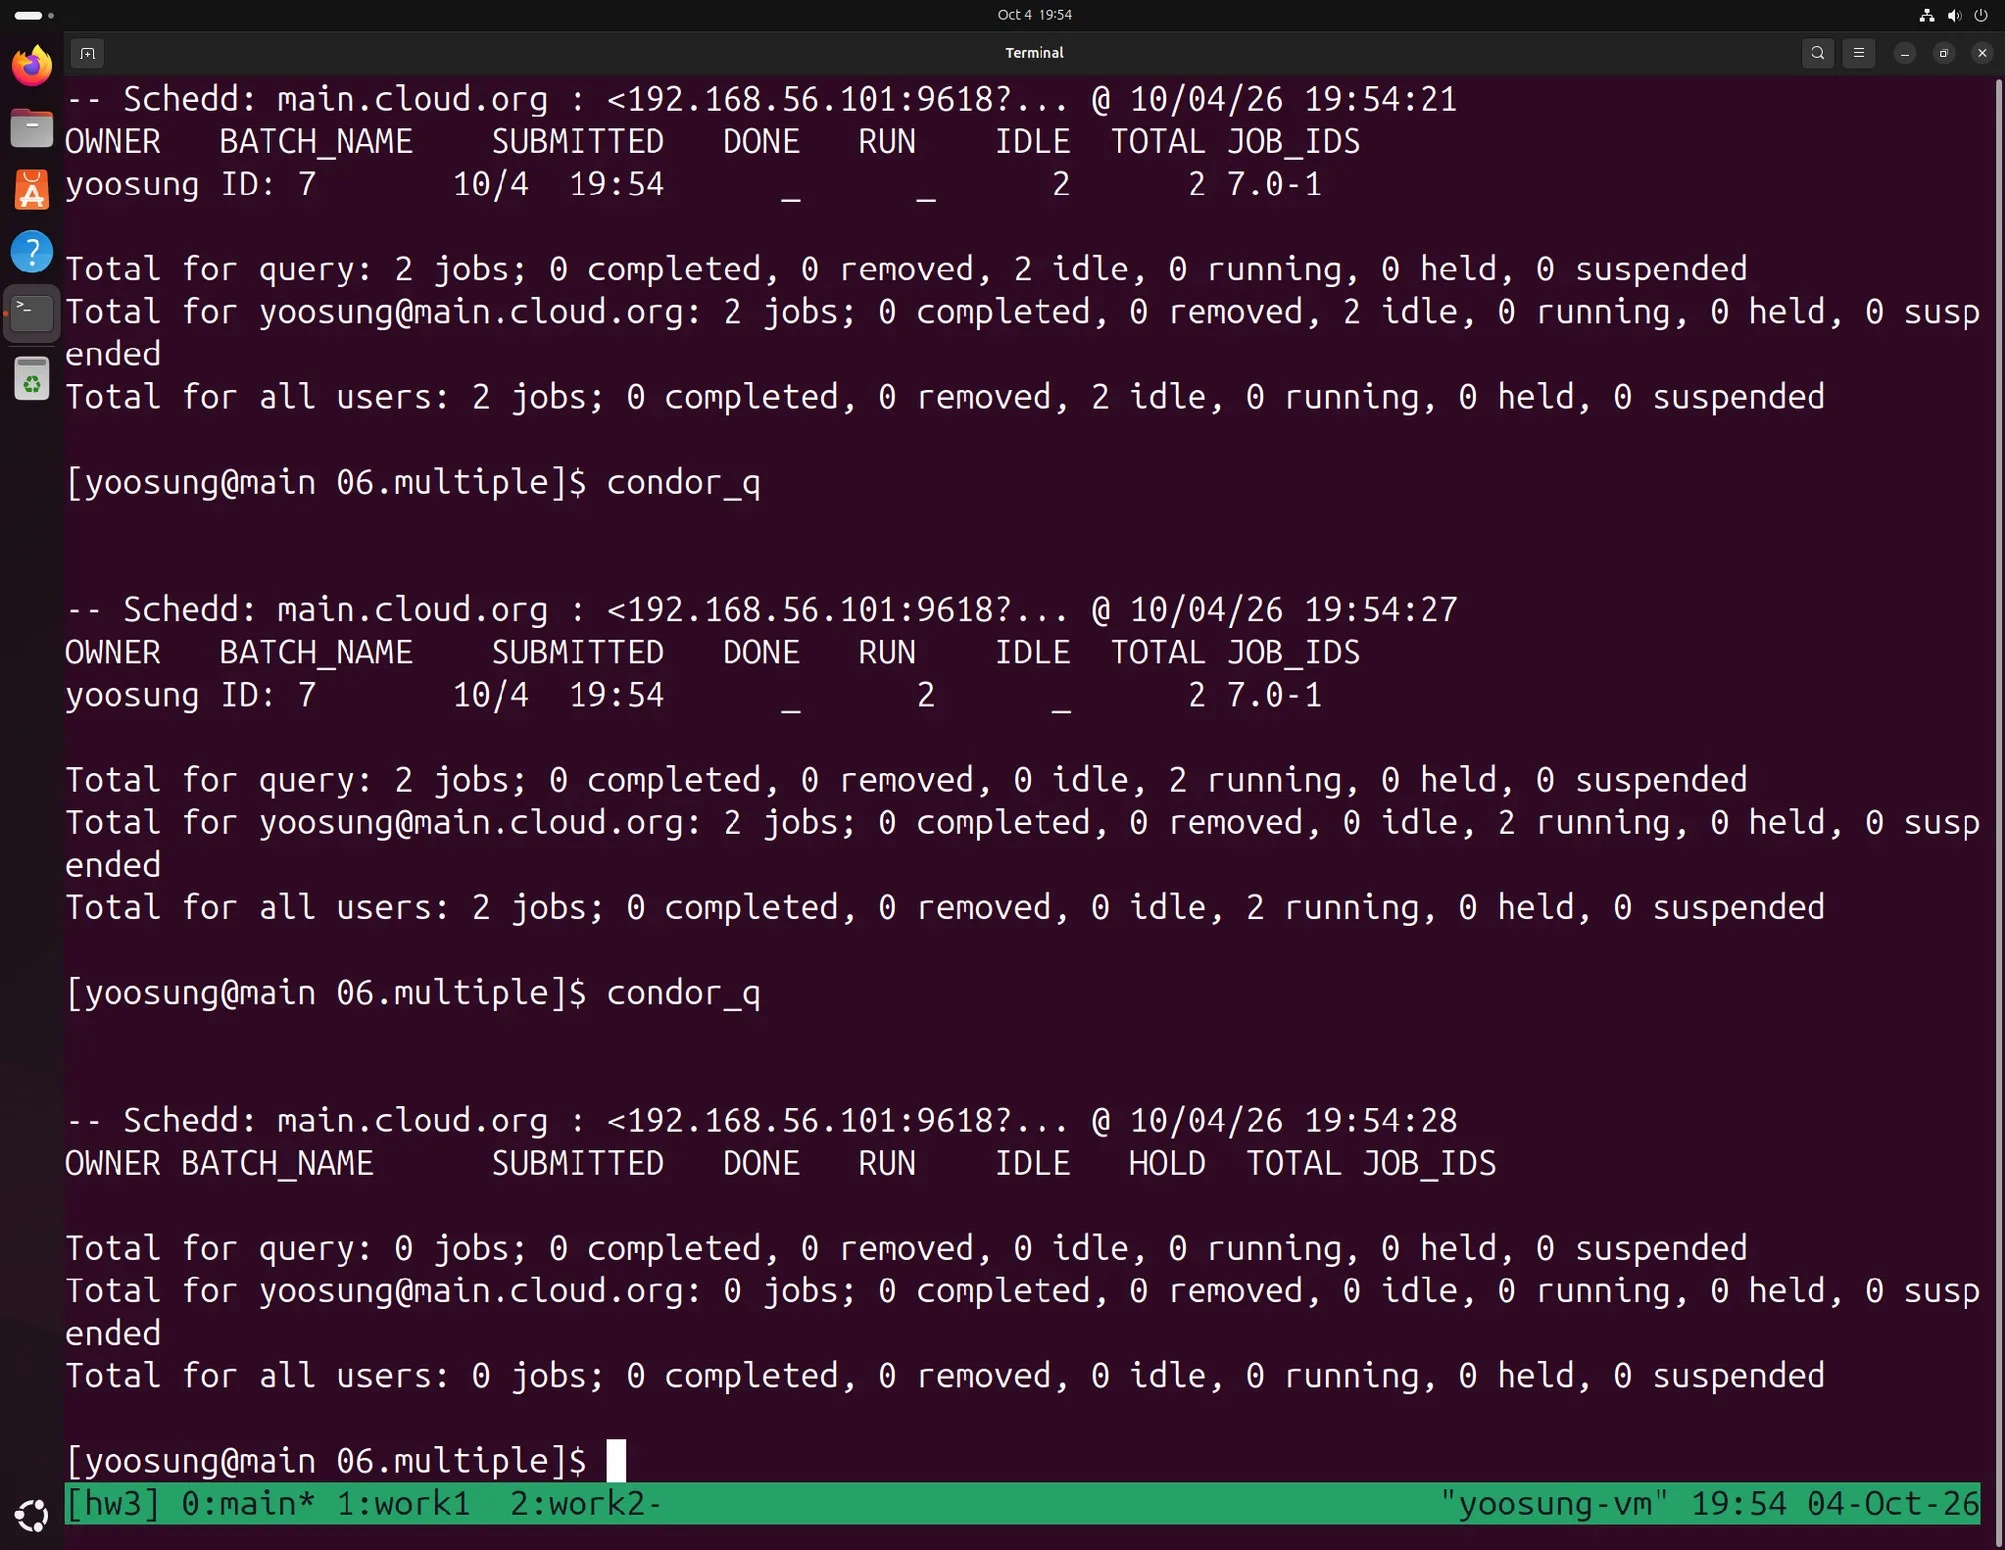
Job 6 submission and condor_q: 2 jobs IDLE → RUN 2 → done
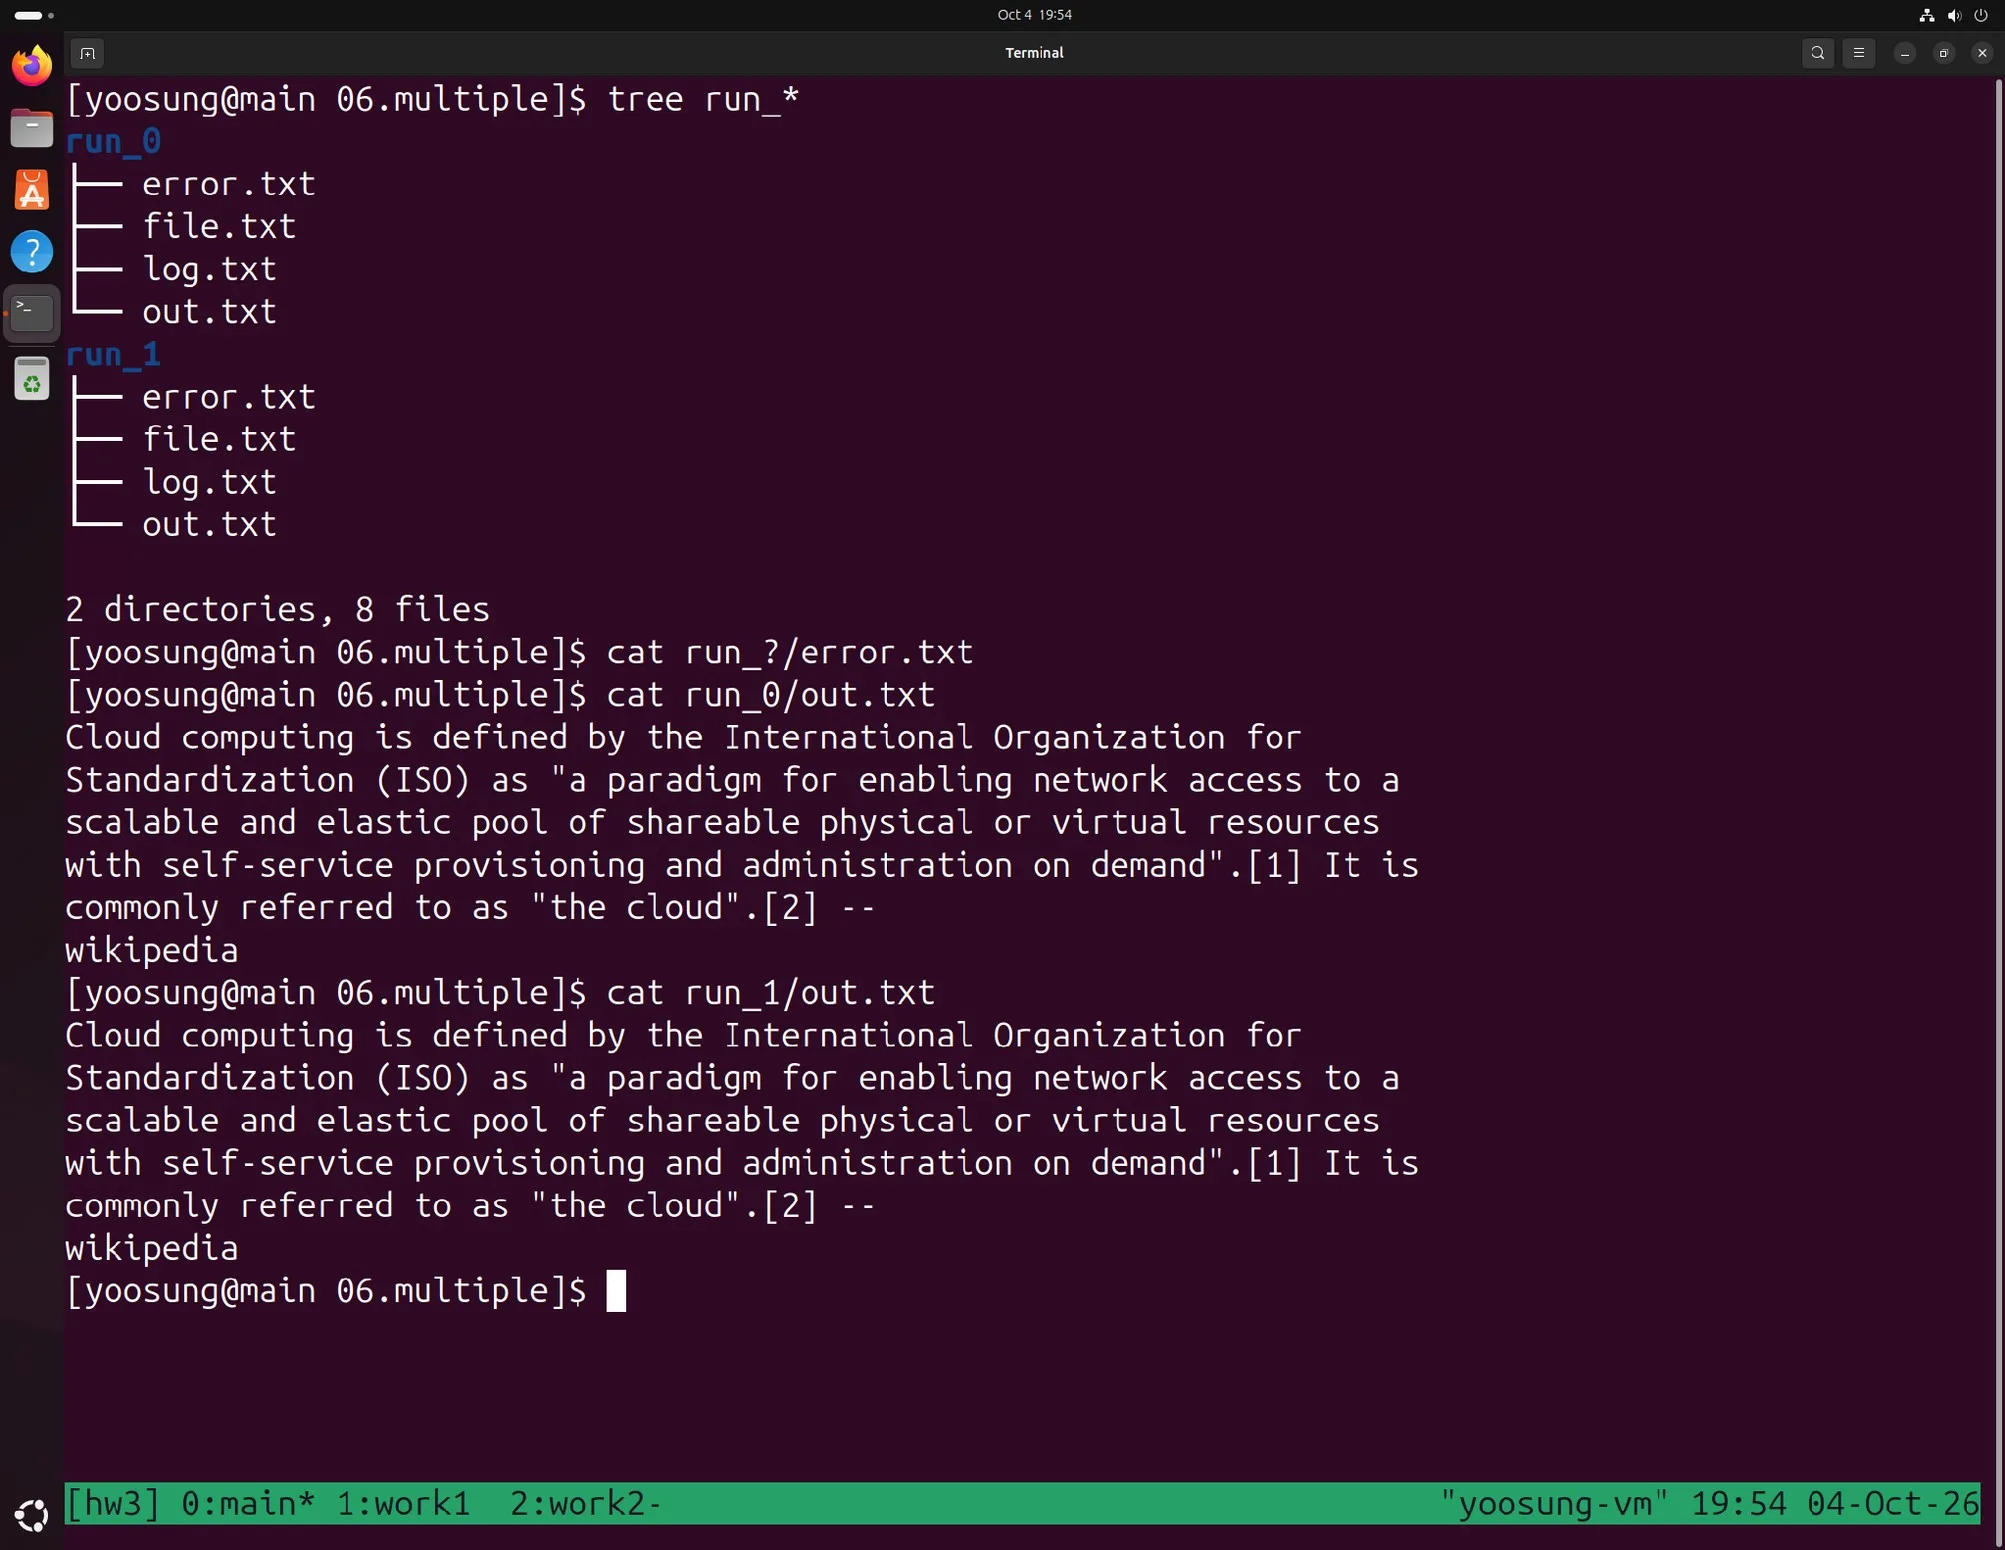
out, error and log created in each of run_0 and run_1
Job 7. A Job with Requirements (07.requirment)
First I deliberately submitted with a condition no machine matches (Arch == "INTEL"). Even checking 76 seconds later, past the negotiation cycle (60 seconds), the job was still IDLE, and log.txt had only the submit record.
requirements = (OpSys == "LINUX" && Arch == "INTEL")
image_size = 28
The rest of the lines are the same as Job 2's argument.jds.
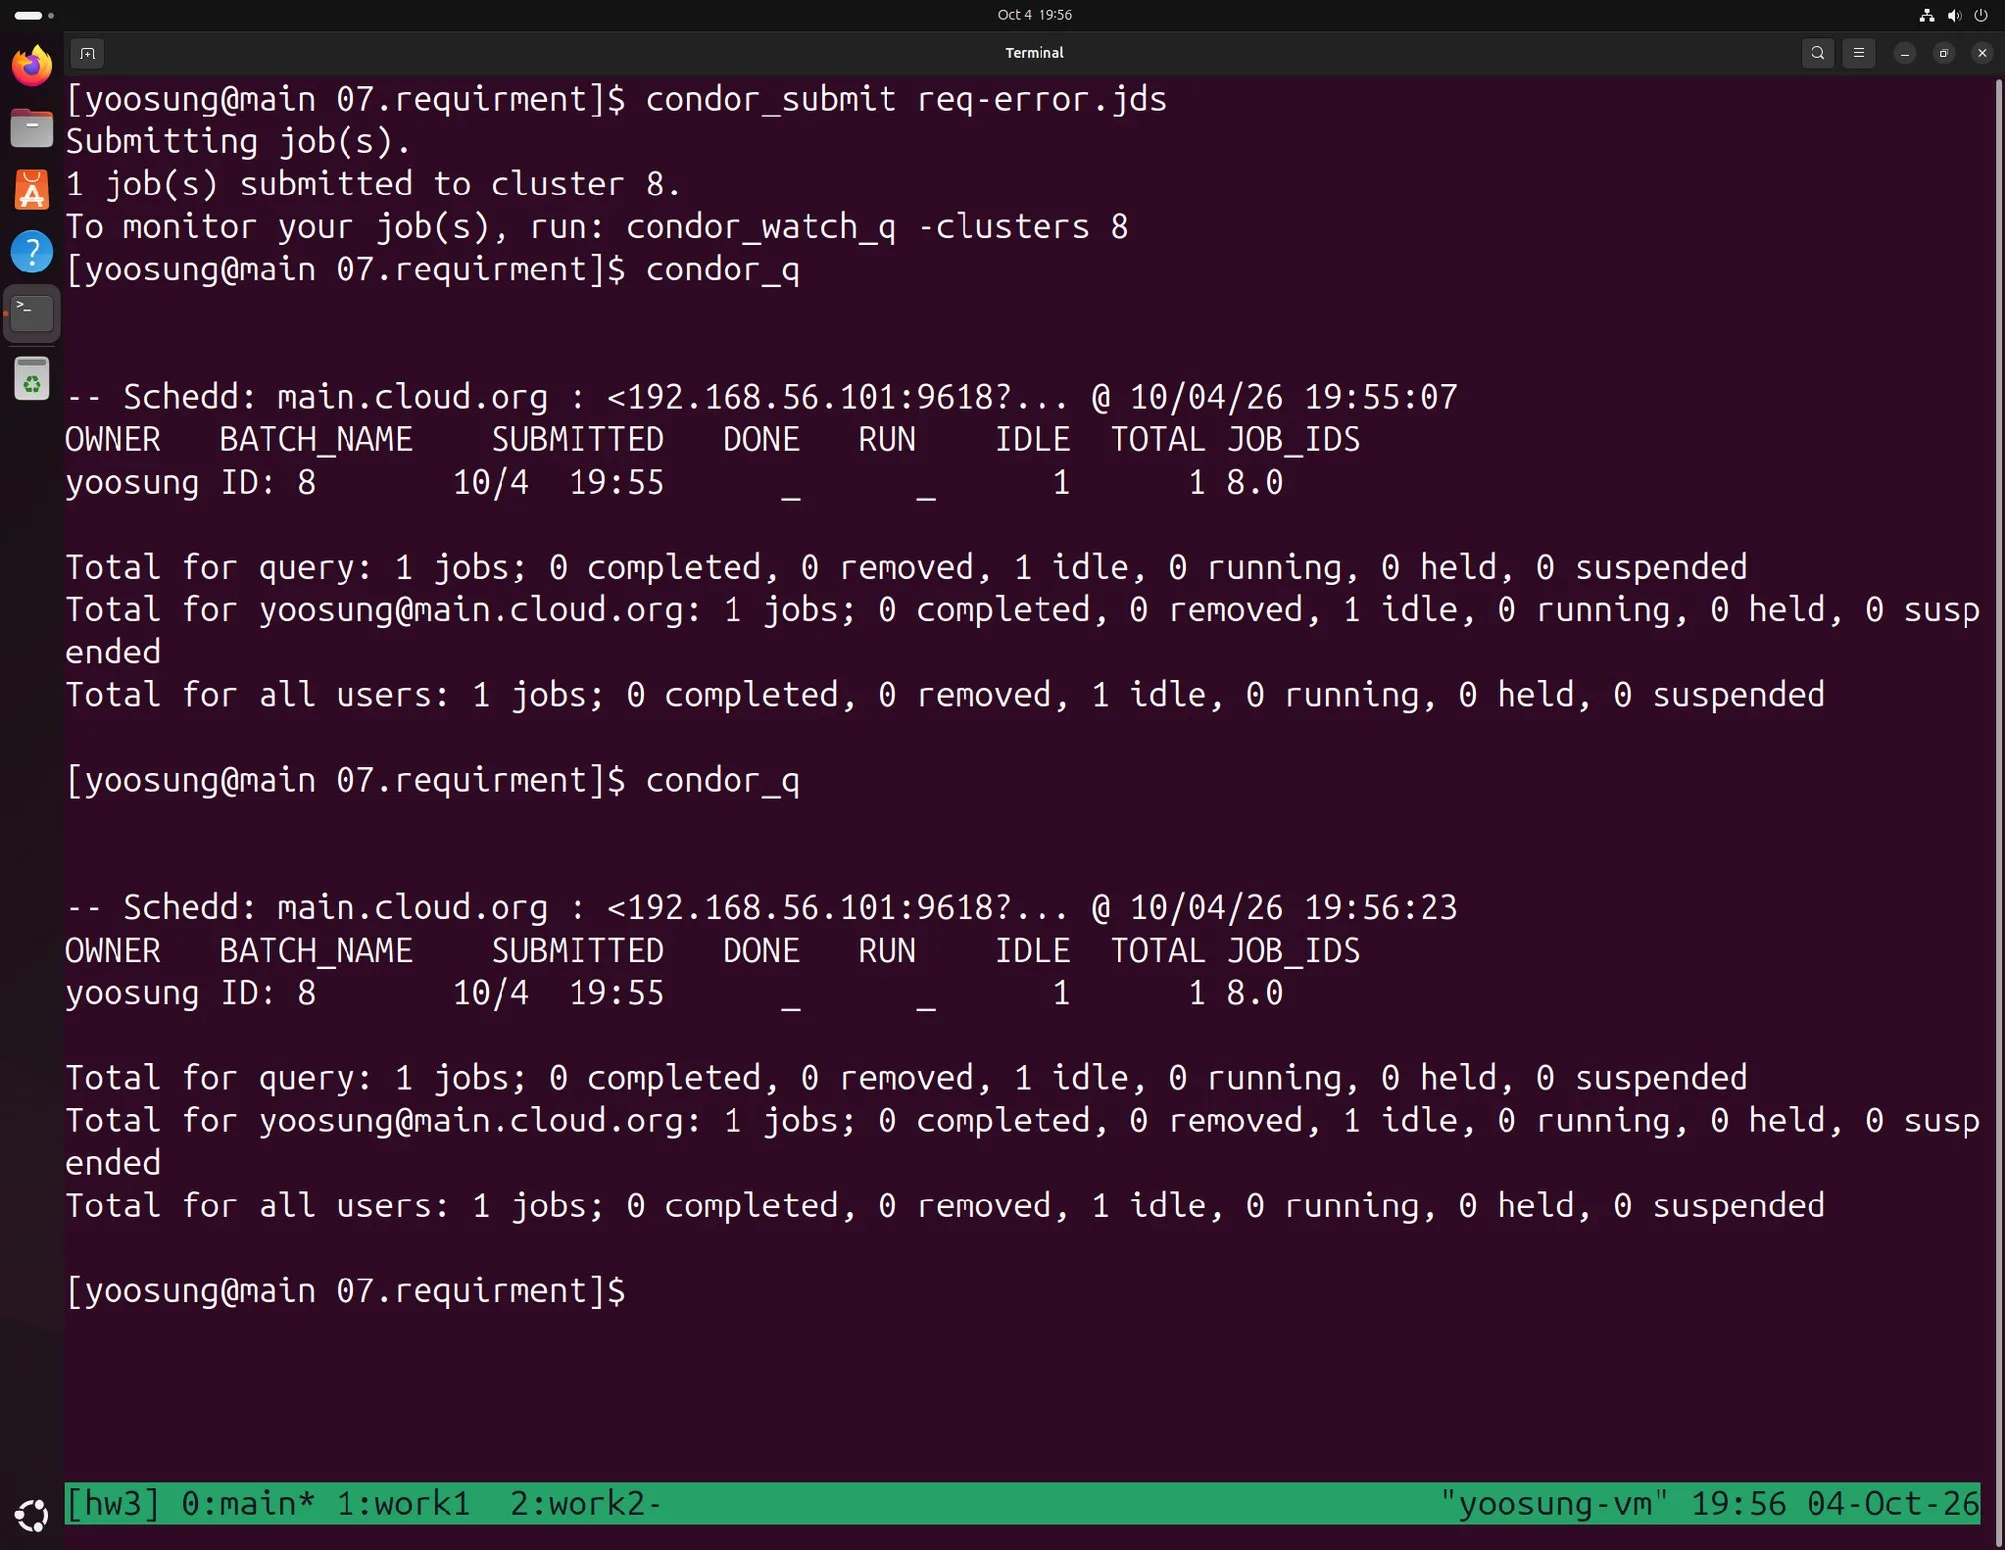
Arch == "INTEL" condition, still IDLE after 76 seconds
Running condor_q -better-analyze gives the reason. 0 slots match Arch == "INTEL", and both slots rejected it because of the job's requirements.
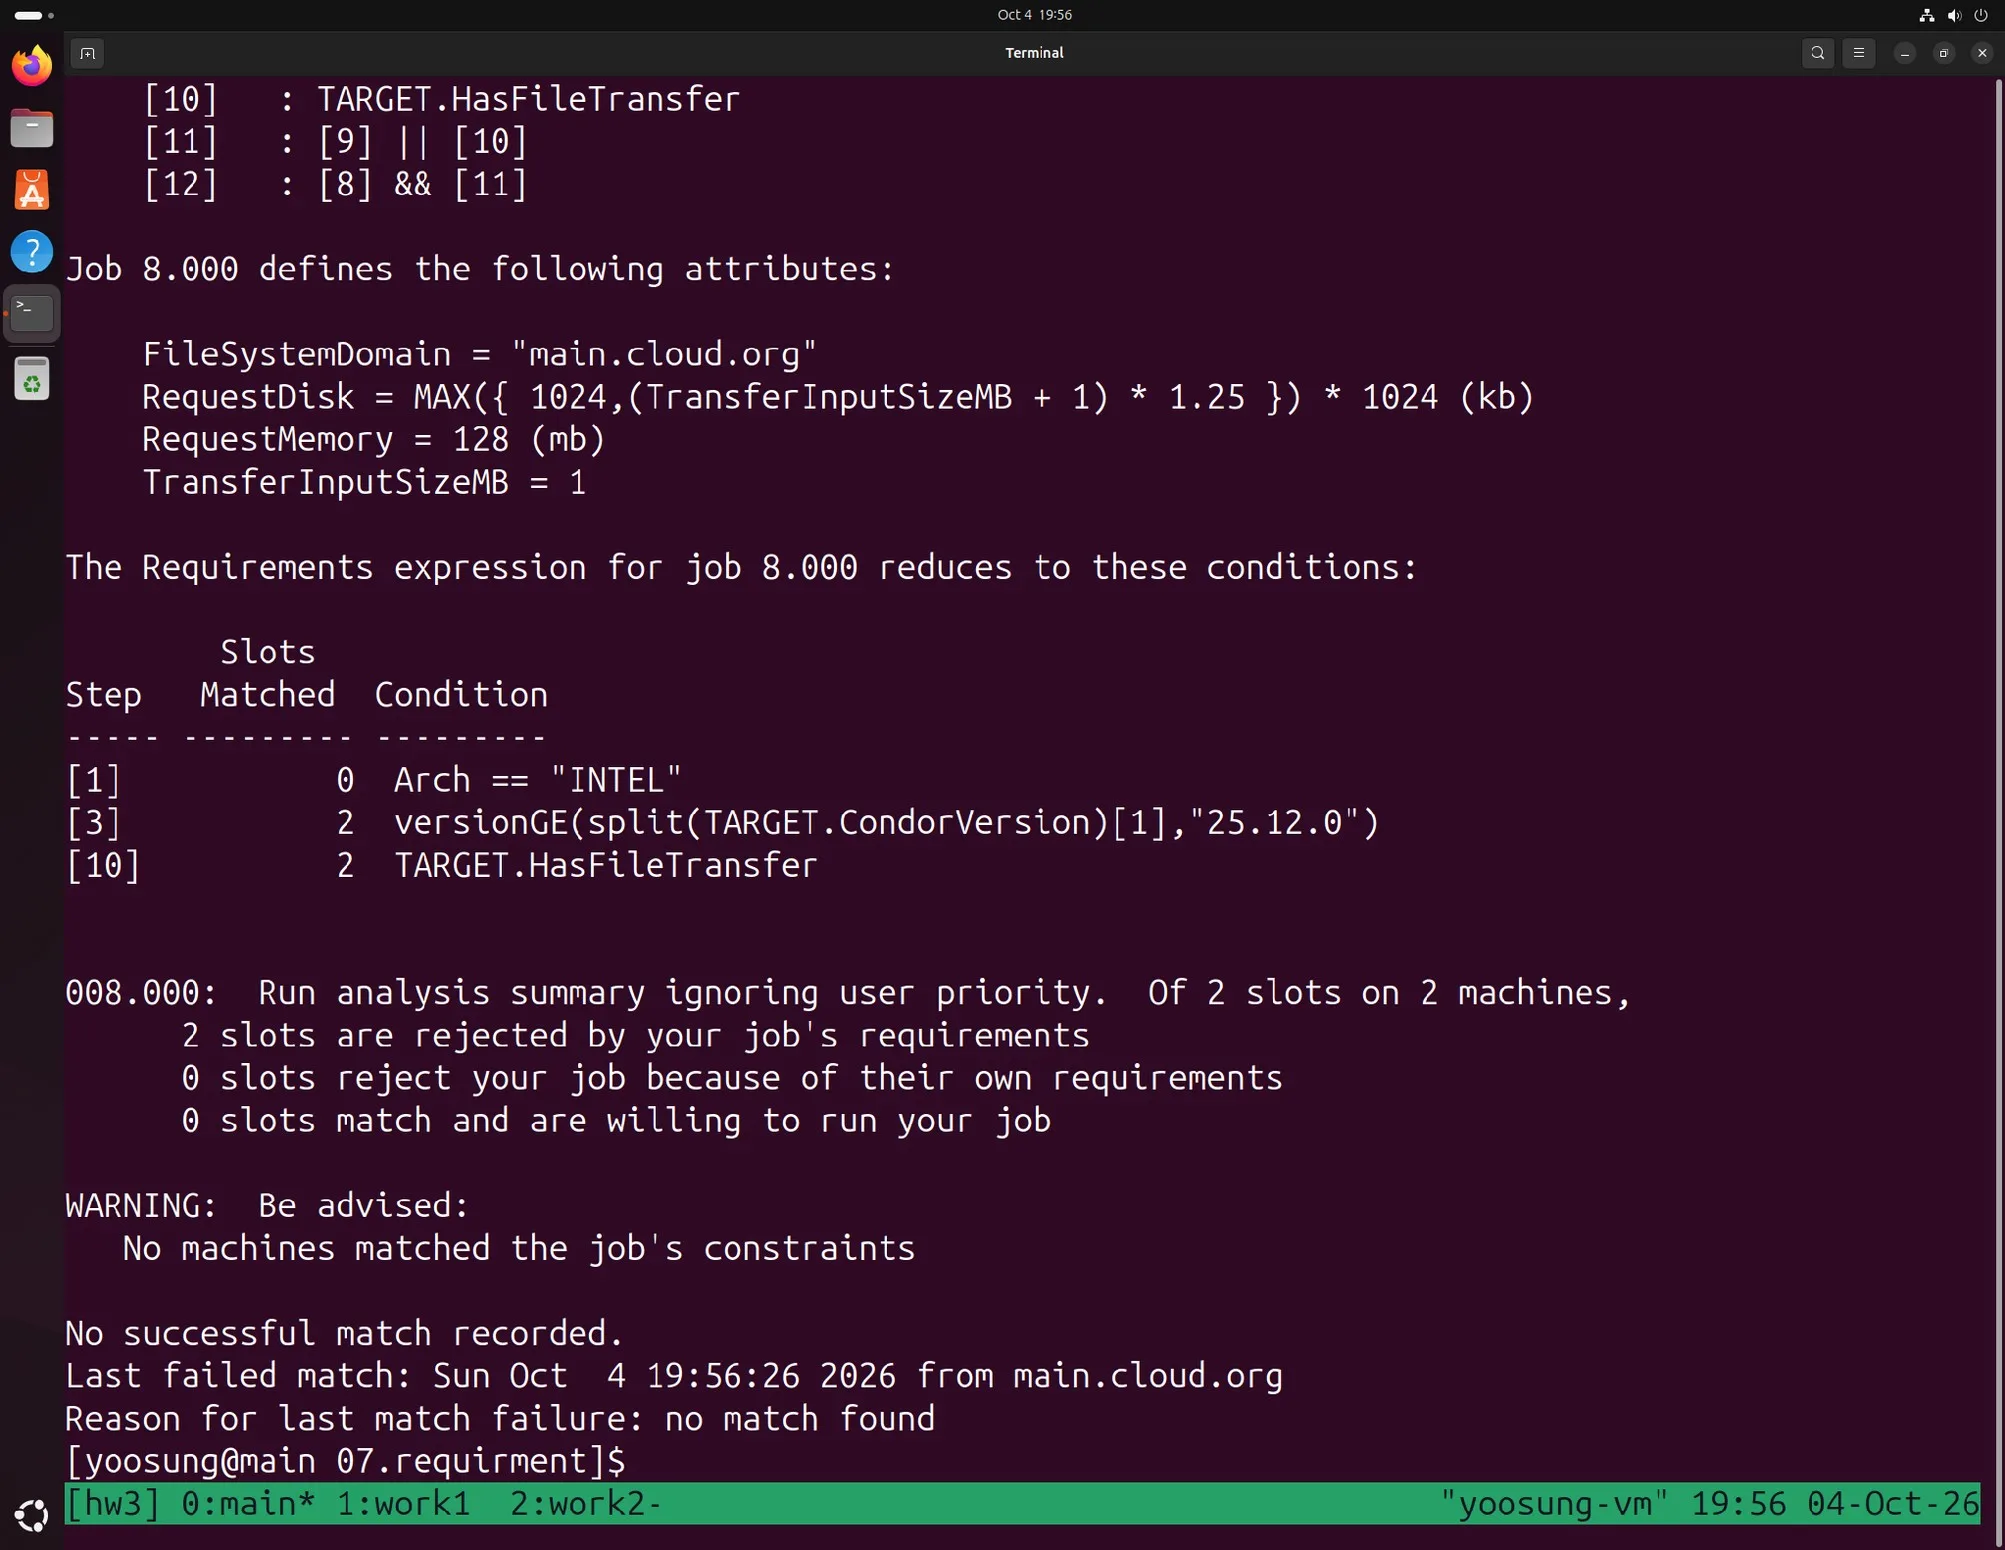
condor_q -better-analyze: 0 matching slots, both slots rejected
Problem: The Slide's Fixed Version Doesn't Match Either
The slides fix it to Arch == "X86_64" and run it. But the execute nodes in this environment are ARM64, so condor_status -l | grep Arch shows Arch = "aarch64". Even changed to X86_64 there's no matching node and it keeps waiting. So I removed it with condor_rm 8.0, changed it to aarch64, and resubmitted.
requirements = (OpSys == "LINUX" && Arch == "aarch64")
image_size = 28
condor_submit req-error.jds
condor_q                         # still IDLE after 76 seconds
condor_status -l | grep Arch     # Arch = "aarch64"
condor_q -better-analyze 8.0
condor_rm 8.0
condor_submit requirement.jds
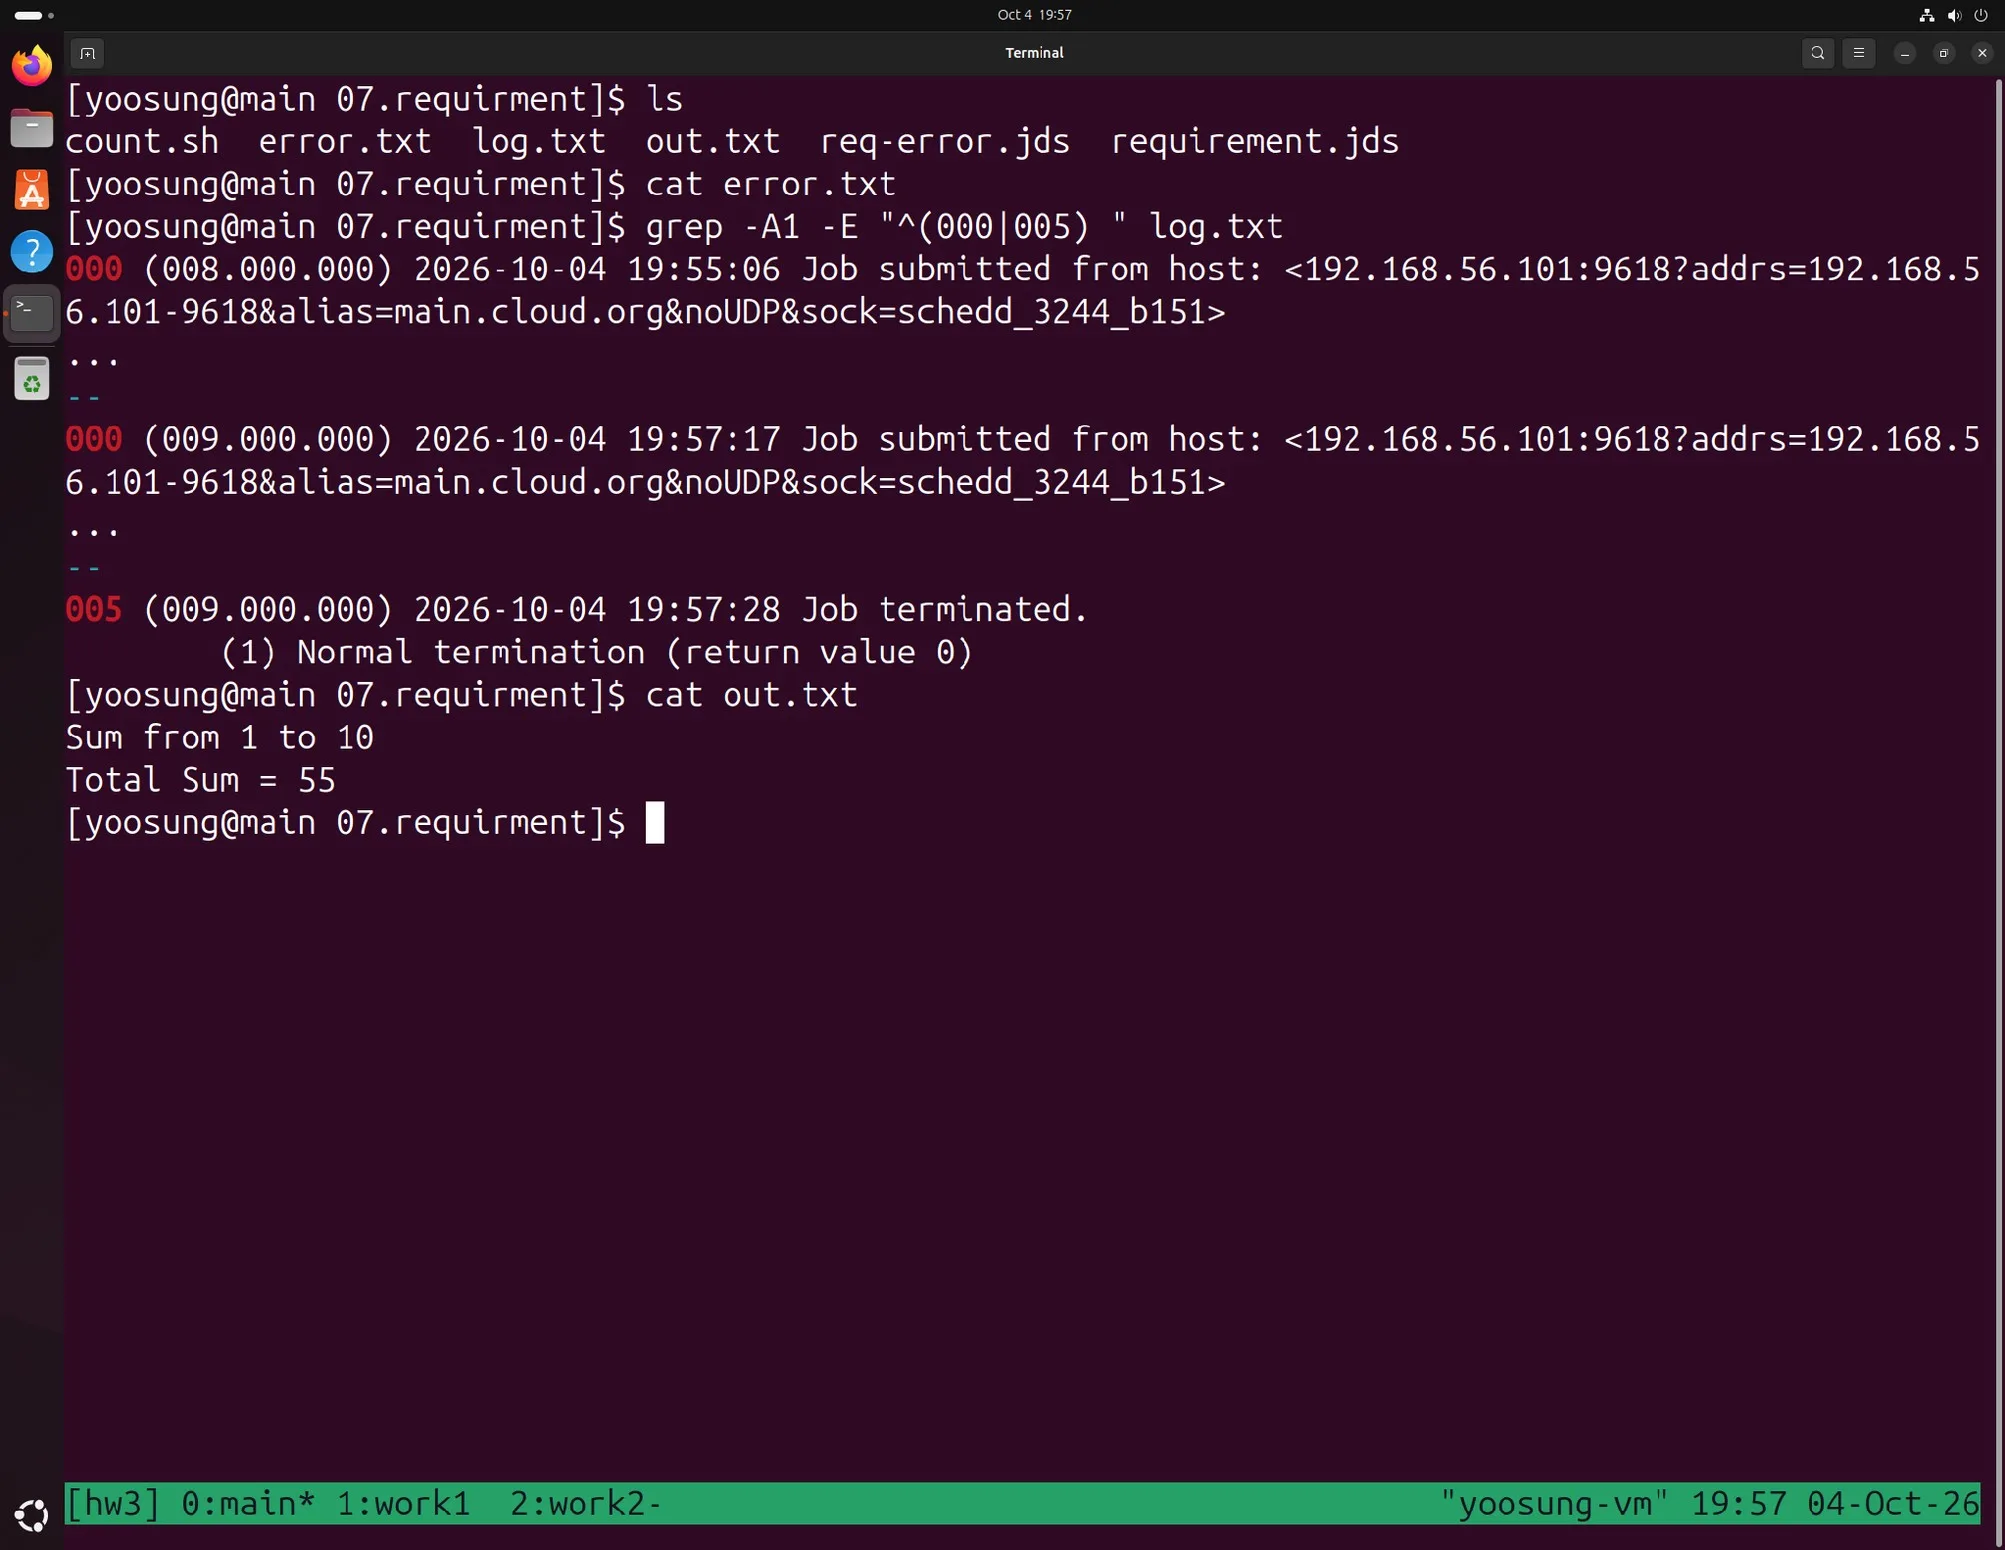
Job 9.0, fixed to Arch == "aarch64": completed normally, Total Sum = 55
3. Exercises
Ch2-4. Pros and Cons of the Multitenancy Model
Multitenancy is a model that comes from resource pooling, one of NIST's 5 essential characteristics. Computing resources are pooled together and shared by different users (tenants). Each tenant is logically isolated so it only sees its own resources, but the actual servers, storage and network are shared.
Pros
- Resource utilization: resources one user isn't using can be used by another, so fewer resources sit idle. It's the foundation for raising server utilization from only 10–15% of capacity up to 70%.
- Cost savings: infrastructure build costs and operating costs like power, cooling and admin staff are split among many users, so each one pays less.
- Management and scaling: when the provider applies a patch or upgrade once, it applies to all tenants. The pool has headroom, so you can scale up immediately when needed (rapid elasticity).
Cons
- Security: you share infrastructure with other organizations, so if isolation has a flaw, my data can be exposed to other tenants. This is the "conflict of security policies" that arises when services of different organizations share the same infrastructure.
- Performance interference: if another tenant on the same physical server uses a lot of CPU, disk or network, my service slows down too. It's a reason it becomes hard for the provider to keep promised performance.
- Limited customization: everyone uses the same platform, so it's hard to change settings or versions for just one user, and the provider decides update timing.
Summary: the pros are all efficiency that comes from "dividing up" resources, and the cons are isolation problems that come from "sharing" them. For general services where cost matters, a multitenant public cloud is better; for data where isolation and control matter, a private cloud or dedicated resources fit.
Ch2-6. A Cloud Development Environment Case in a Large Project
If each developer has a different OS, library versions and settings, code that works on one person's computer doesn't work on another's, and new team members take a long time just setting up their environment. If you build the same development environment in the cloud and everyone connects to it, this problem shrinks.
Case: GitHub's engineering team moving to Codespaces (2021)
- Background: the GitHub.com repository was about 13GB on disk, and cloning alone took 20 minutes. Including dependency installation, preparing one development environment took over 45 minutes, and if a local environment broke, you had to do it all again.
- Approach: they moved development environments to Codespaces, cloud VMs. The environment configuration is written as code in config files inside the repository, so everyone gets the same environment. Environments with the repository clone and initial setup already done (prebuilds) are made into a pool and kept waiting.
- Result: the time to get a new development environment dropped from 45 minutes to 10 seconds. Get one when you need it; if something goes wrong, throw it away and get a new one.
- Connection to the lecture: taking an environment from a pre-built pool when needed is on-demand self-service and resource pooling, and replacing a broken environment with a new VM is the same approach as resilience, restoring a service from virtual machine files.
Reference: GitHub Blog, "GitHub's Engineering Team has moved to Codespaces" (2021-08-11)
Ch2-15. Data Disputes in Multinational Cloud Services
In the cloud, the country where data is stored, the country of the service company and the country of the user can all differ. Then disputes arise over which country's law applies.
Case 1. United States v. Microsoft (the Ireland email case, 2013–2018)
- US investigators obtained a warrant to produce the contents of an email account, but the emails were in a data center in Ireland.
- Microsoft refused, arguing that a US warrant doesn't reach data stored abroad, and the appeals court agreed. The government appealed, and it went to the Supreme Court.
- Before the ruling, in March 2018, the US Congress passed the CLOUD Act, requiring US companies to produce data they possess or control regardless of where it's stored. When the government obtained a new warrant under this law, the Supreme Court closed the case in April 2018.
Case 2. The Schrems II ruling (Court of Justice of the European Union, 2020)
- Max Schrems of Austria raised the issue that when Facebook moves European users' data to the US, it's exposed to surveillance by US intelligence agencies.
- In July 2020 the Court of Justice of the European Union invalidated the EU-US Privacy Shield, which had been the basis for transferring personal data to the US. The reason was that US law doesn't adequately protect European citizens' data.
- In 2023 the Irish Data Protection Commission fined Meta €1.2 billion for continuing to transfer European users' data to the US even after this ruling.
Summary: both are cases where countries' laws collided because the data's storage location and the nationalities of company and users differed. Even if data is in an external cloud, the final responsibility for security and integrity lies with the consumer, so when using the cloud you must check in advance which country the data is stored in and which country's law applies.
Reference: SCOTUSblog, "Justices officially declare Microsoft email case moot" (2018-04-17), CJEU C-311/18 (Schrems II, 2020-07-16)
Ch3-3. How Fast Is the Fastest Supercomputer?
As of June 2026, #1 on the Top500 is LineShine at the National Supercomputing Center in Shenzhen, China. It recorded 2.198 exaflops (Rmax) on HPL (LINPACK).
- Units: FLOPS is the number of floating-point operations (additions, multiplications, etc.) per second, and exa is 10 to the 18th power, i.e. a quintillion. LineShine performs about 2.198 quintillion calculations per second.
- Compared with all of humanity: even if all ~8.2 billion people on Earth each did one calculation per second without rest, finishing what LineShine does in one second would take about 268 million seconds, or roughly 8 years and 6 months.
- Compared with one person: one person doing one calculation per second would take about 69.6 billion years. That's about 5 times the age of the universe (about 13.8 billion years).
This computer ties together about 13.79 million cores with a dedicated high-speed network. It's an HPC architecture where a huge number of cores communicate over a fast network to solve one big problem quickly.
Reference: TOP500, June 2026 list
Ch3-5. When Small Problems Are Not Fully Independent
In HTC, jobs have to be independent of each other so they can run immediately on any core and only failed jobs need rerunning. If there are dependencies between jobs, they're handled differently depending on their shape.
- When an earlier job's result is a later job's input: group them into stages by dependency. Jobs within the same stage are independent, so run them concurrently with HTC, and run the next stage once the previous stage has fully finished. For assignment plagiarism checking, that's three stages: preprocess 100 assignments → compare 4,950 pairs → aggregate results, and the 4,950 comparisons in the middle are independent of each other. In HTCondor this ordering is automated with DAGMan.
- When common data is needed: build the common data first and hand it out as each job's input file. If jobs don't exchange data directly but receive the same data through HTCondor input file transfer, they become independent jobs again.
- When they need to exchange data frequently while running: splitting makes communication cost even larger, so tightly coupled jobs are merged into one. If that's still too big, handle it the HPC way (MPI, a fast network like InfiniBand) rather than HTC. HTCondor also has a parallel universe for MPI jobs.
In short, analyze the dependencies, split the independent parts as much as possible and run them with HTC, and for the dependent parts, control execution order or merge jobs. The two approaches can also be mixed.
Ch3-7. InfiniBand Topology and Operation
InfiniBand is the representative "fast, expensive network" in HPC. It's used to connect servers in supercomputers and data centers, and Mellanox (now NVIDIA) is the main equipment vendor.
Topology
- Switched fabric: every node connects point-to-point to a switch, and switches are linked in structures like a fat-tree. There are multiple paths between two nodes, so total bandwidth grows as nodes are added.
- Components: the HCA (Host Channel Adapter) plugged into each server, switches, and the Subnet Manager, which assigns addresses and routes for the whole network.
Operation
- RDMA (Remote Direct Memory Access): one node's HCA reads and writes directly to another node's memory. With TCP/IP the kernel copies data several times and the CPU processes it, but RDMA bypasses the kernel and CPU, so latency is low and the CPU can be used purely for computation.
- Queue-based communication: the program puts requests into a pair of send and receive queues (Queue Pair), the HCA sends them in hardware, and when done it notifies the Completion Queue.
- Lossless transmission: credit-based flow control only sends when the receiver's buffer has room, so packets aren't dropped. There's almost no retransmission, so latency is consistent.
In HPC, all cores solve one problem together while nodes constantly exchange messages via MPI. If even one node is late, everyone waits, so InfiniBand's low and consistent latency is needed. It isn't strictly necessary for HTC, which processes independent jobs.
Ch4-2. How an SSH Server and Client Connect
SSH is a protocol that encrypts remote access sessions, and its default port is 22. When the client (ssh) connects to the server (sshd), the connection proceeds in this order.
- TCP connection and version exchange: the client opens a TCP connection to the server's port 22, and both sides exchange the SSH protocol version (SSH-2.0) and software name.
- Algorithm negotiation: both sides send lists of the key exchange, server key, encryption and integrity check (MAC) algorithms they support, and pick one of each that both support.
- Key exchange: with Diffie-Hellman (or ECDH), each side makes its own secret value, exchanges only public values, and computes the same shared secret. The shared secret itself never goes over the network. From this value, the symmetric key (session key) for subsequent communication is derived.
- Server authentication: the server signs the key exchange data with its host private key and sends it, and the client verifies the signature with the server's public key. It then checks whether that public key matches the one stored in
~/.ssh/known_hosts. On first connection there is no stored key, so "The authenticity of host ... can't be established" appears, and typing yes stores it. If the server key changes later, a warning appears, which blocks attacks that impersonate the server in the middle. - User authentication: now the user is verified inside the encrypted channel. Password authentication sends the password over the encrypted channel. Public key authentication has the client sign session data with its private key, and the server verifies it with the public key in
~/.ssh/authorized_keys. Logging in without a password afterssh-copy-idin HW2 was public key authentication. - Using the session: once authenticated, channels are opened inside the single connection for a shell, command execution, scp file transfer, etc. All data is encrypted with the session key from step 3 and checked for tampering with a MAC.
Ch4-3. How Public Key Cryptography Works
Public key cryptography creates keys in pairs. The public key is shared with anyone and the private key is held only by its owner. In RSA, something processed with one key can only be undone with the matching other key, and deriving the private key from the public key is practically impossible. RSA relies on the difficulty of factoring large numbers, and elliptic curve schemes on the difficulty of the discrete logarithm problem on elliptic curves.
- Encryption: encrypting with the recipient's public key means only the recipient's private key can decrypt it. Unlike symmetric key schemes, where the same key has to be secretly shared in advance, there's no key distribution problem.
- Digital signatures: signing a message hash with your own private key lets anyone verify it with the public key. Only the holder of the private key can create the signature, so it confirms both the sender and that the content hasn't changed.
- In practice: public key operations are slow, so the public key is used to verify the other party and safely agree on a symmetric key, and then the actual data is encrypted with the fast symmetric key. SSH above works this way.
In the Ch04-Extra slides, the cloud.key created by ssh-keygen is the private key and cloud.key.pub is the public key. If you put the public key in the VM's authorized_keys, then on login the client signs with the private key and the server verifies with the public key. The private key never goes over the network and must not leak, so its permissions are set to -rw------- (600) so only the owner can read it.
Ch4-9. Can You Log In to the Master Node as root?
The textbook's Master node is main (192.168.56.101) in this environment. I logged in to main with a regular account and checked the settings the SSH server is actually applying and the state of the root account.
sudo sshd -T | grep -i -E "^permitrootlogin|^passwordauthentication"
permitrootlogin without-password
passwordauthentication yes
sudo ls -l /etc/ssh/sshd_config.d/
-rw-------. 1 root root 412 May 19 09:00 40-redhat-crypto-policies.conf
-rw-------. 1 root root 307 May 19 09:00 50-redhat.conf
sudo passwd -S root
root P never 0 99999 7 -1
PermitRootLogin controls whether root may log in over SSH.
| Value | Meaning |
|---|---|
yes | Both password and key authentication allowed |
prohibit-password | Key authentication only |
no | All root logins denied |
main's value without-password is the old name for prohibit-password and is the OpenSSH default. Nothing in sshd_config.d/ changed it either. The P from passwd -S means root has a password, so the account is usable but SSH password login is blocked.
Trying the root password from the Ubuntu host was indeed rejected.
ssh root@192.168.56.101
root@192.168.56.101's password:
Permission denied, please try again.
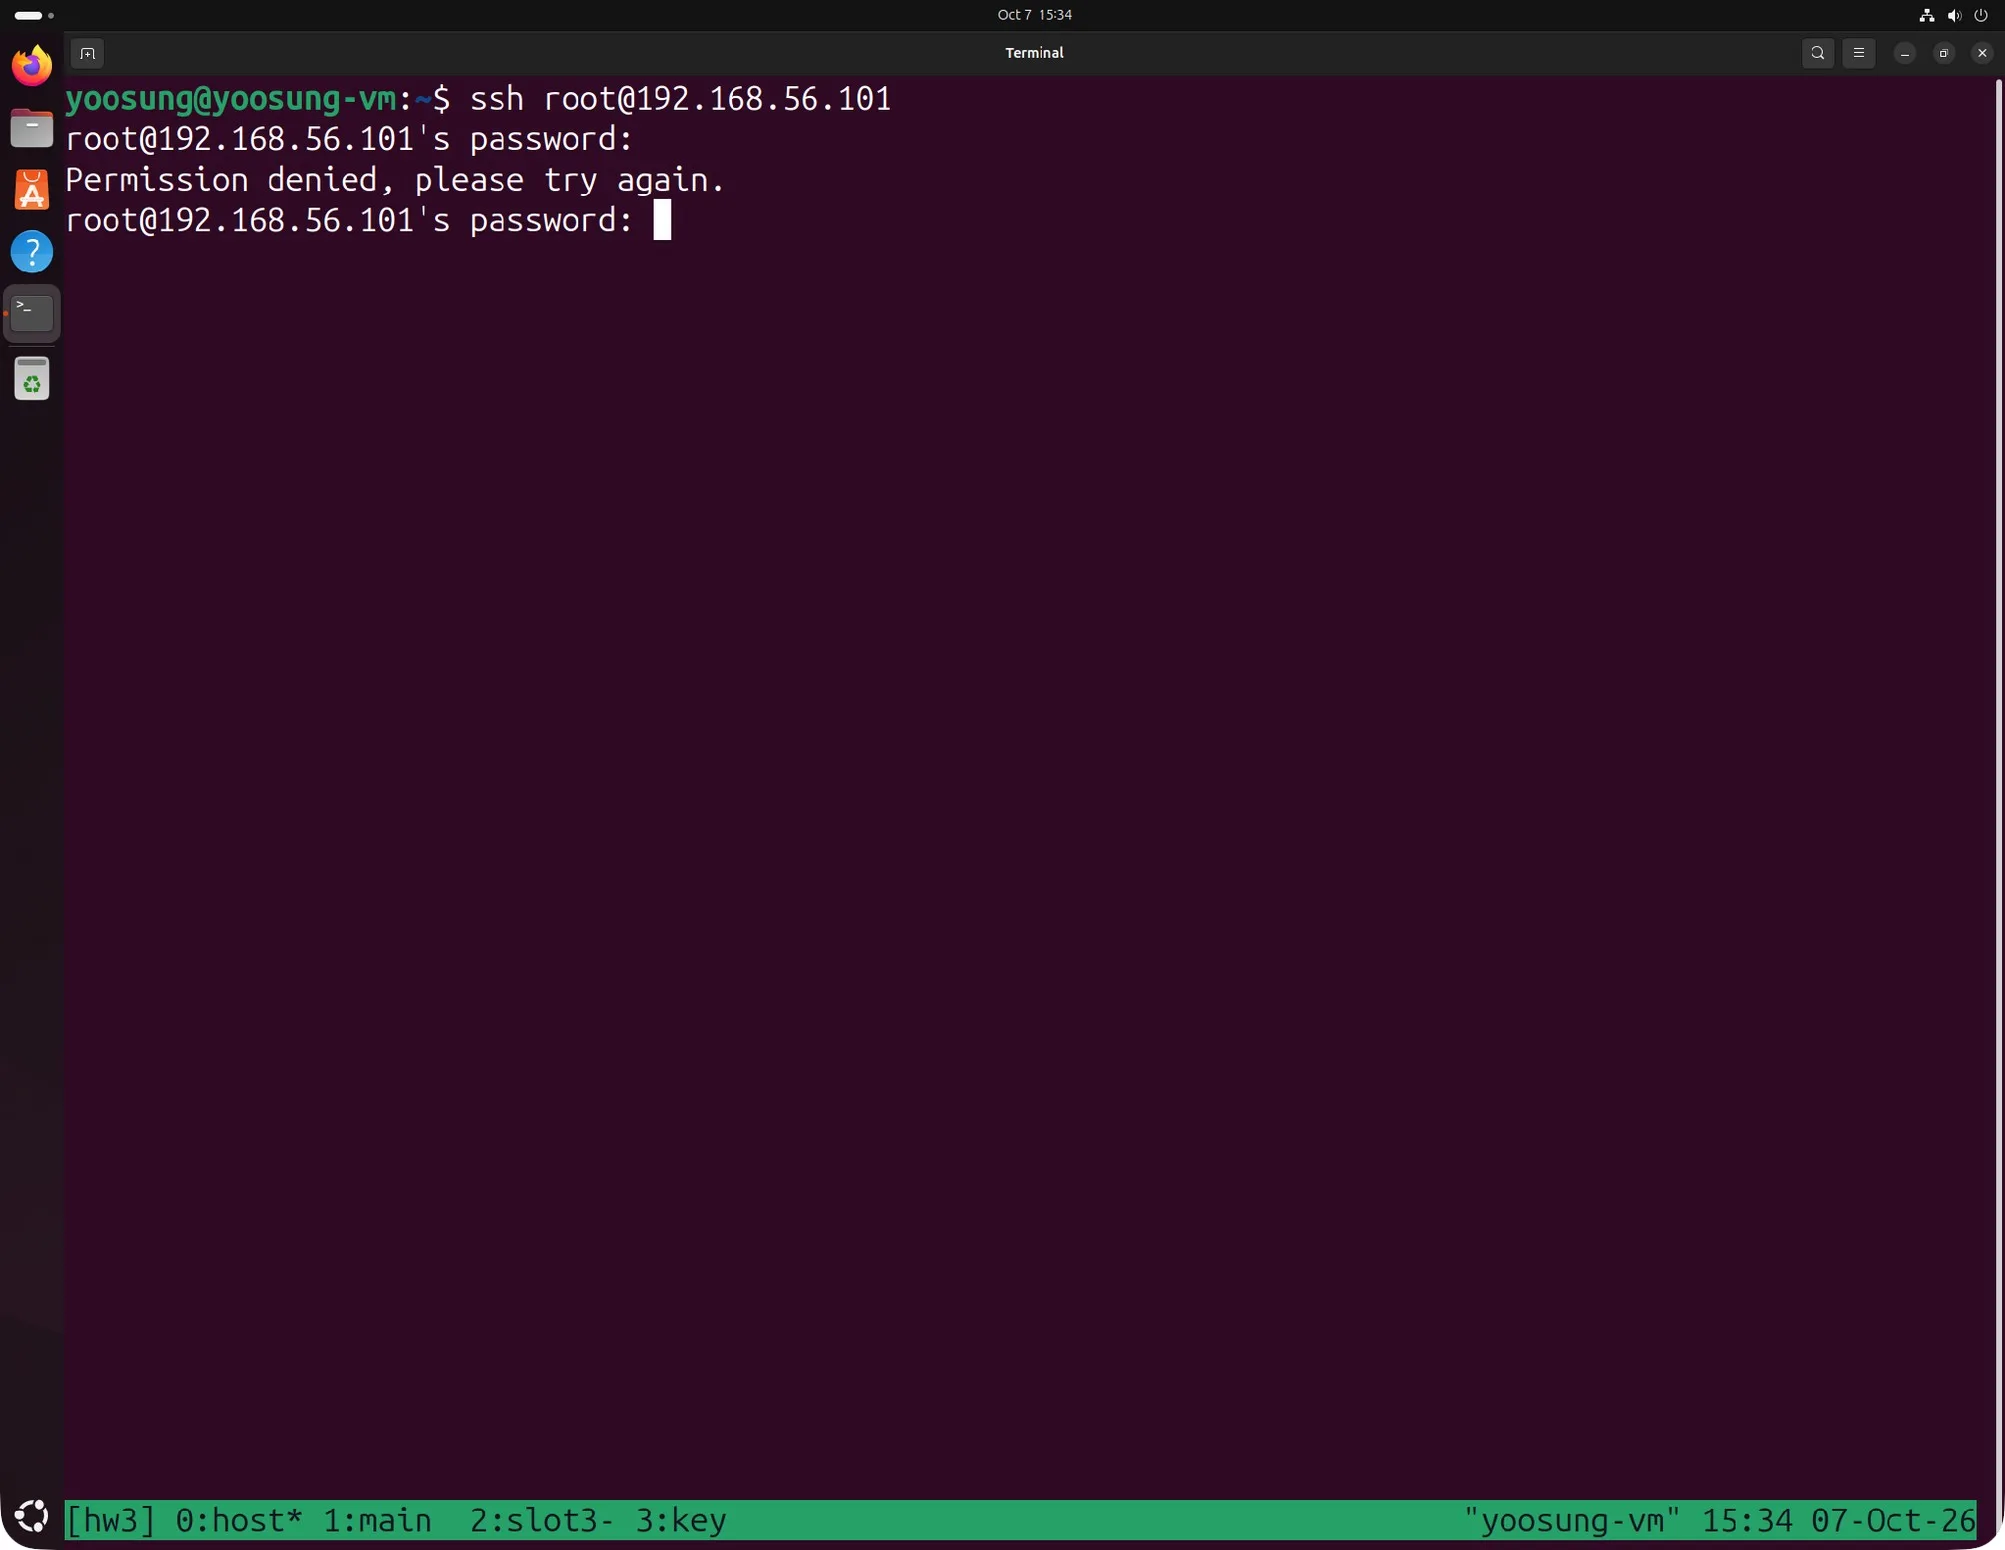
Default setting (permitrootlogin without-password): root login from the host denied
Since access didn't work, I changed it so it would. When the same setting appears multiple times in sshd_config, the first value read is used, and files in sshd_config.d/ are read first, in name order. So I put it in a 00- file so it's read before the existing files (40-, 50-).
echo "PermitRootLogin yes" | sudo tee /etc/ssh/sshd_config.d/00-root-login.conf
sudo sshd -t && echo syntax OK
syntax OK
sudo systemctl restart sshd
sudo sshd -T | grep -i ^permitrootlogin
permitrootlogin yes
Typing ssh root@192.168.56.101 again, I logged in with the root password and the prompt changed to [root@main ~]#. The "1 failed login attempt" in the login message is the attempt that was rejected before the change.
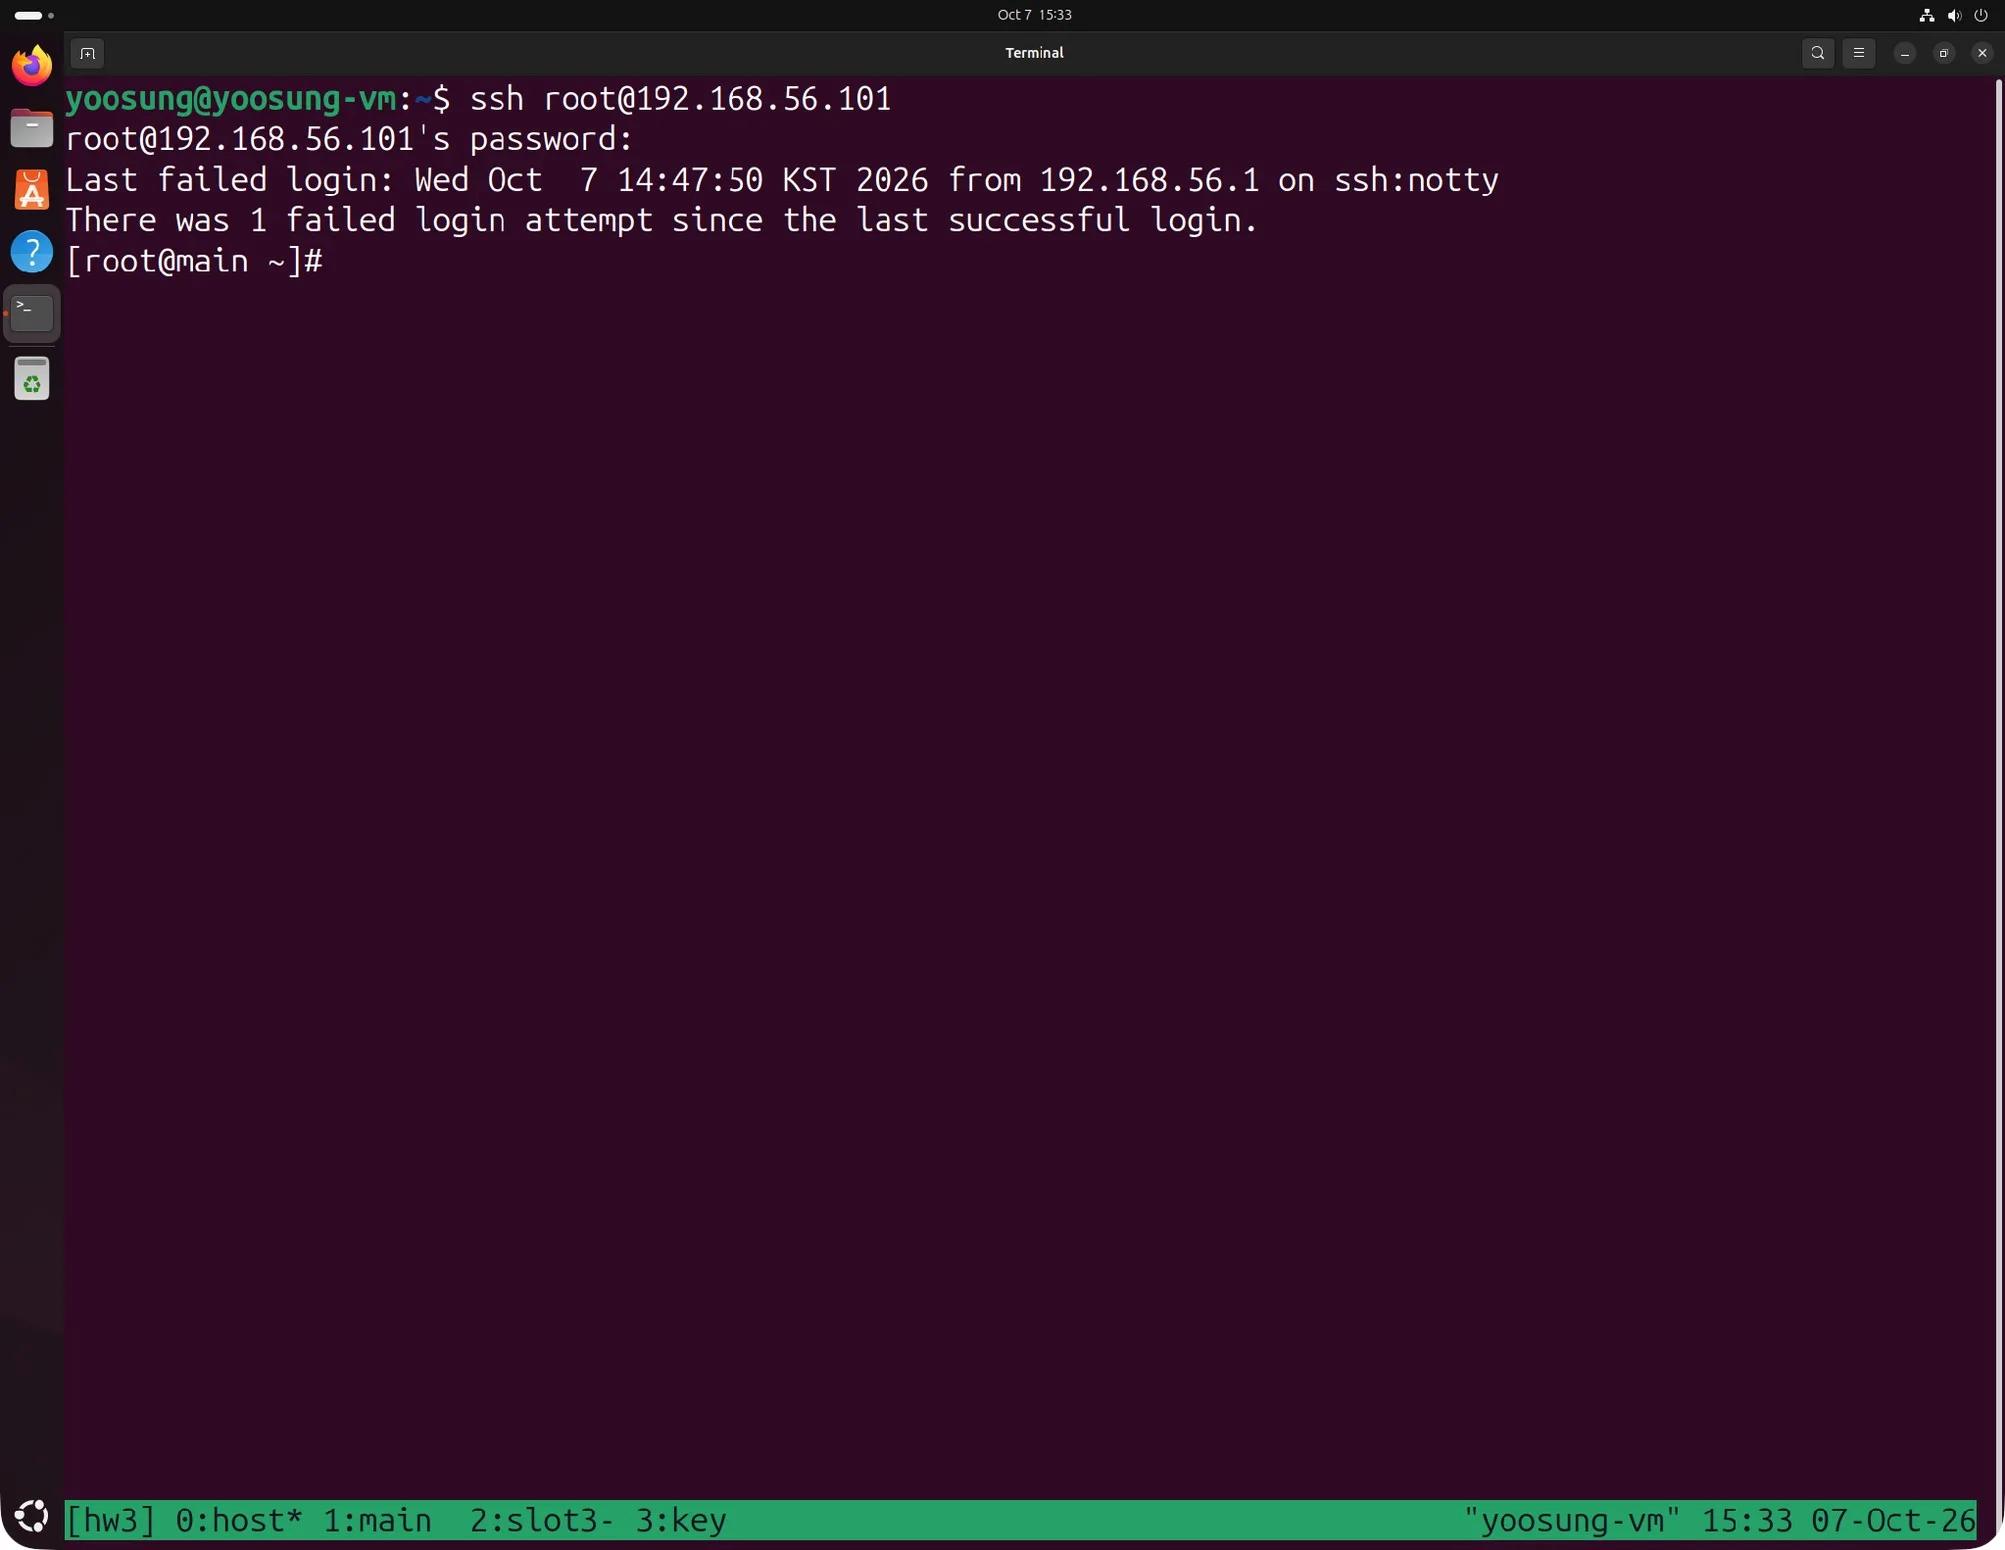
After applying PermitRootLogin yes, root login from the host succeeds
Remote root login is a target for password-guessing attacks, so after checking I deleted the added file and restored the original setting.
sudo rm /etc/ssh/sshd_config.d/00-root-login.conf
sudo systemctl restart sshd
sudo sshd -T | grep -i ^permitrootlogin
permitrootlogin without-password
Ch5-2. Relationship Between CPU Count and Slot Count
The textbook's Slave1 and Slave2 are work1 and work2. Both VMs already have 2 vCPUs each, so condor_status with 2 CPUs is the same as the cluster check screen above. The slots are two lines, slot1@work1.cloud.org and slot1@work2.cloud.org, and Total is 2.
But this Total of 2 is the number of slots, i.e. the number of nodes, not the number of CPUs. I checked CPUs per node separately with condor_status -af Name Cpus Memory. The screen below was taken after adding the execute role to main in Ch5-5, so it shows three lines including main, but Cpus is 2 for both work1 and work2. Each node has 2 CPUs, yet only one slot is shown per node.
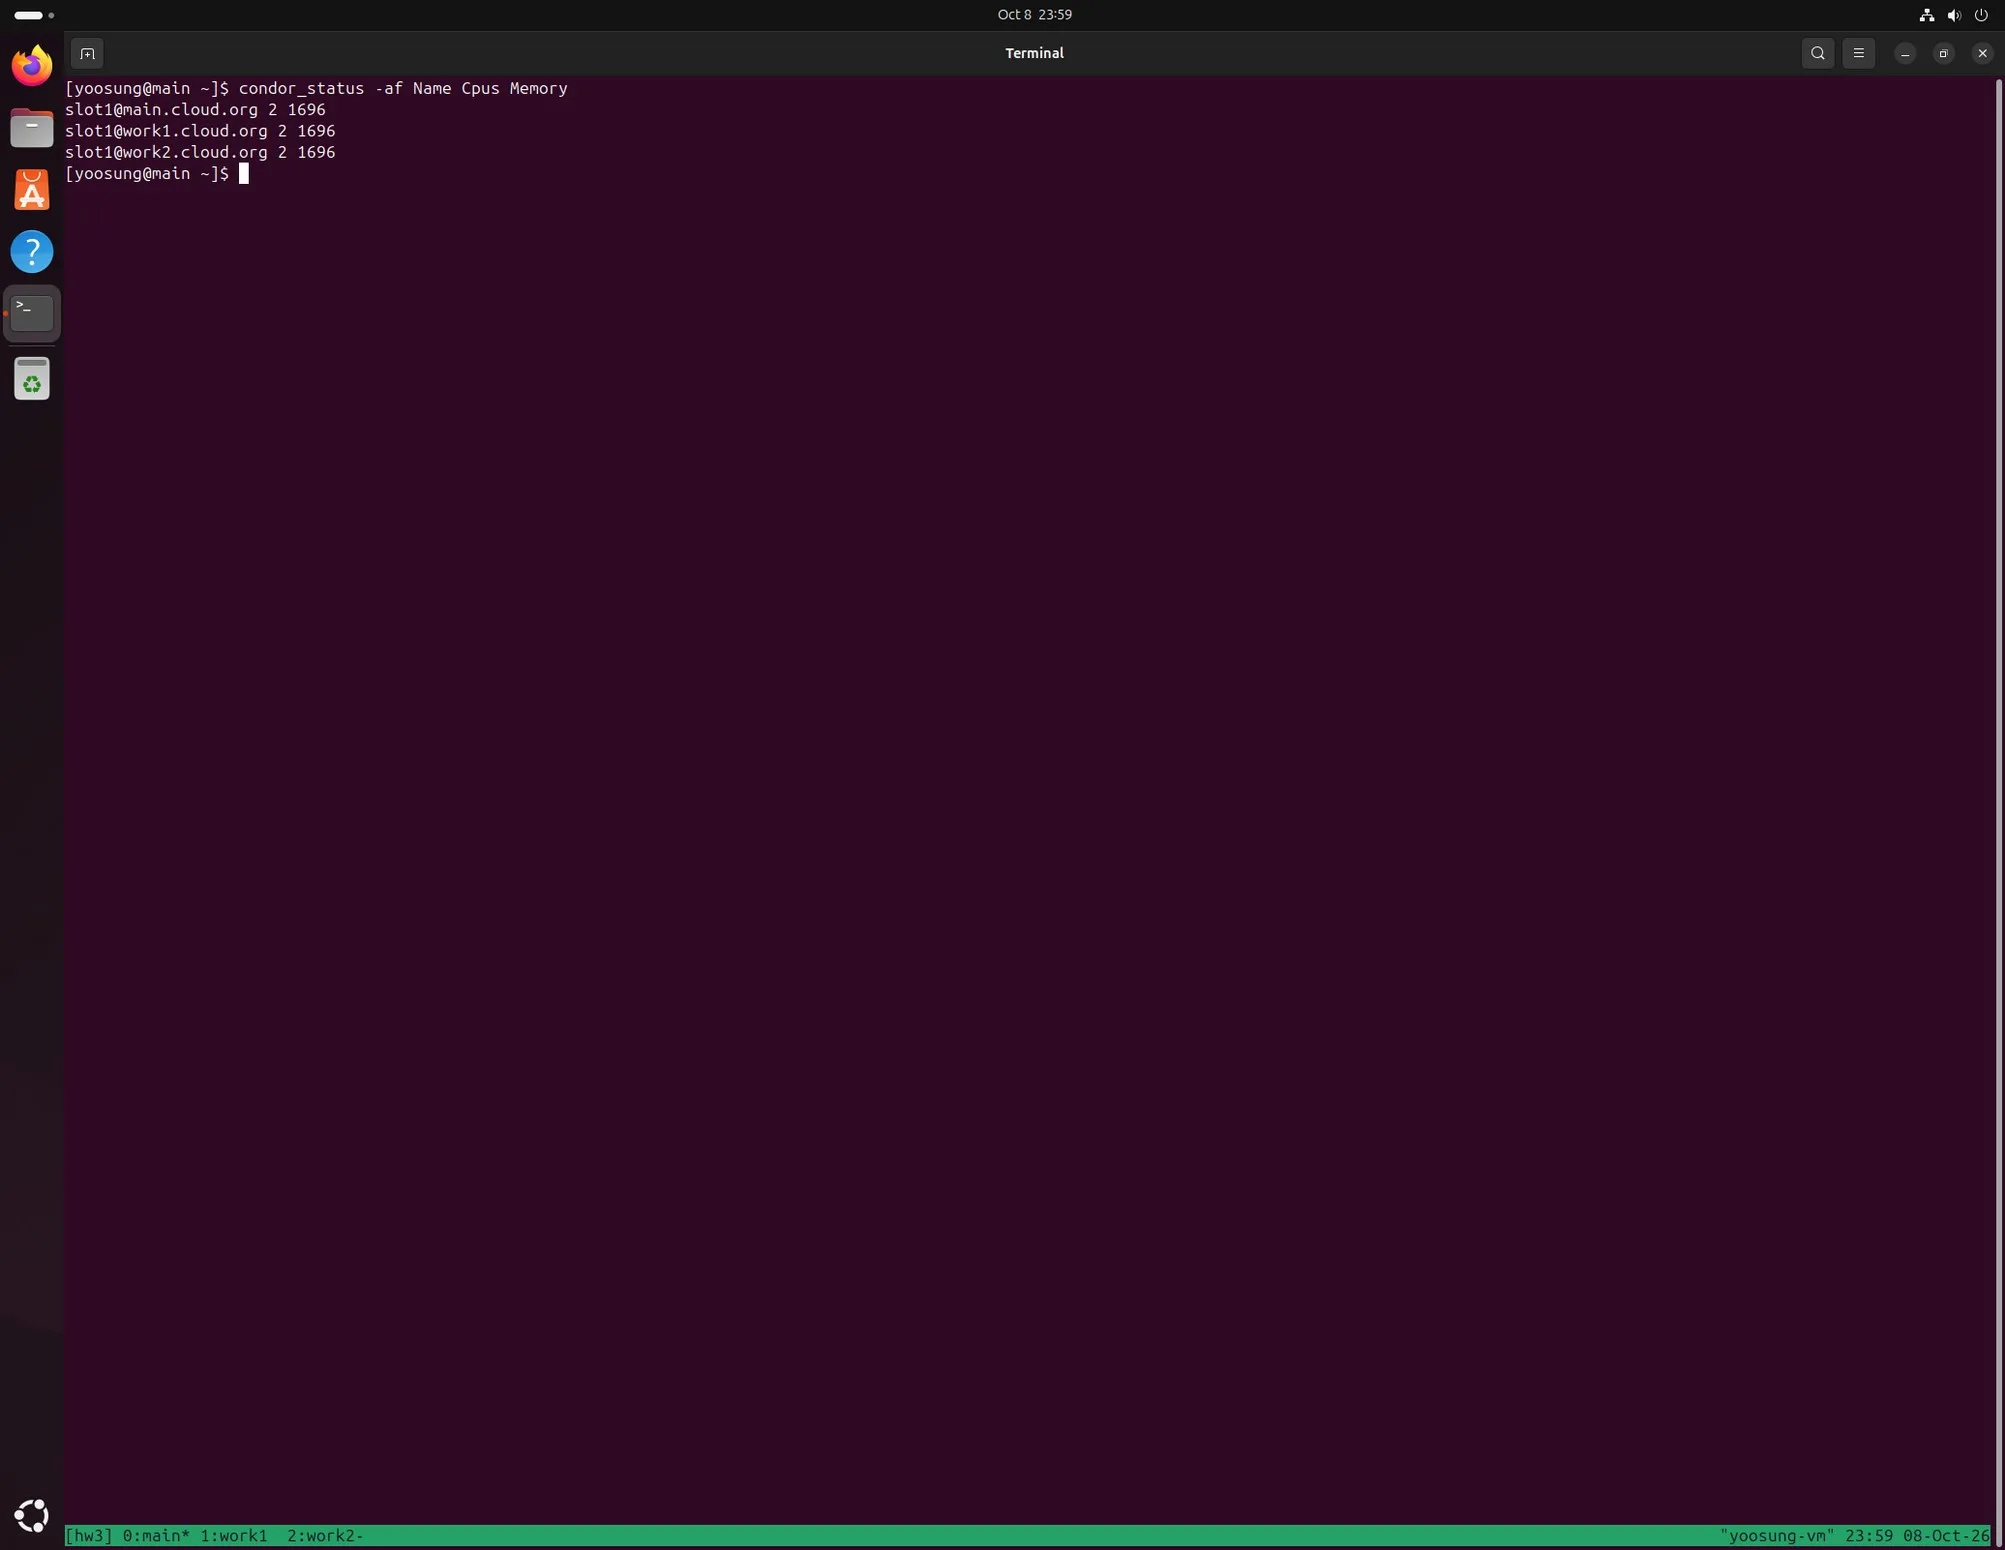
condor_status -af Name Cpus Memory: Cpus 2 and Memory 1696MB per node, a single slot1
- Partitionable slot: since HTCondor 23.0, in the default configuration a node's entire CPU and memory becomes one Partitionable slot (slot1). When a job arrives, the requested amount (in this lab, 1 CPU and 128MB memory) is carved out of this slot to create a Dynamic slot (
slot1_1,slot1_2). - Number of jobs running at once: so the number of
condor_statuslines equals the number of nodes, but the number of jobs running at once follows the CPU count. Job 3 running 4 jobs at a time with 4 CPUs is the result of this. - Static slots: in the default configuration before 23.0, or with
use FEATURE : StaticSlotsenabled in the current version, one slot is created per CPU. Then a 2-CPU node gets slot1 and slot2, and two lines appear per node.
In short, a slot is the place where one job runs, and if each job requests 1 CPU, one CPU corresponds to one slot. With static slots, number of slots = number of CPUs; with a Partitionable slot, each node shows as 1 while idle, but as jobs come in, up to as many Dynamic slots as CPUs are created.
Ch5-5. Making the Master Process Jobs Too
main only has the central manager and submit roles, so it has no condor_startd to run jobs. That's why there are only 2 slots, from work1 and work2. Adding the execute role to main makes startd run and brings the slots to 3.
First I checked which line specifies the execute role in work1's configuration.
grep -r "use role" /etc/condor/config.d/
/etc/condor/config.d/01-execute.config:use role:get_htcondor_execute
I appended the same line to main's config file, as when adding the submit role, and restarted condor.
cd /etc/condor/config.d
echo "use role:get_htcondor_execute" | sudo tee -a 01-central-manager.config
sudo systemctl restart condor
CONDOR_HOST = main.cloud.org
# For details, run condor_config_val use role:get_htcondor_central_manager
use role:get_htcondor_central_manager
use role:get_htcondor_submit
use role:get_htcondor_execute
After the restart, condor_startd came up on main along with collector, negotiator and schedd. Right after the restart, condor_status showed only slot1@main.cloud.org, because restarting the collector wiped work1's and work2's information. Execute nodes periodically re-report their state to the collector, so about 2 minutes later all three nodes appeared and Total became 3.
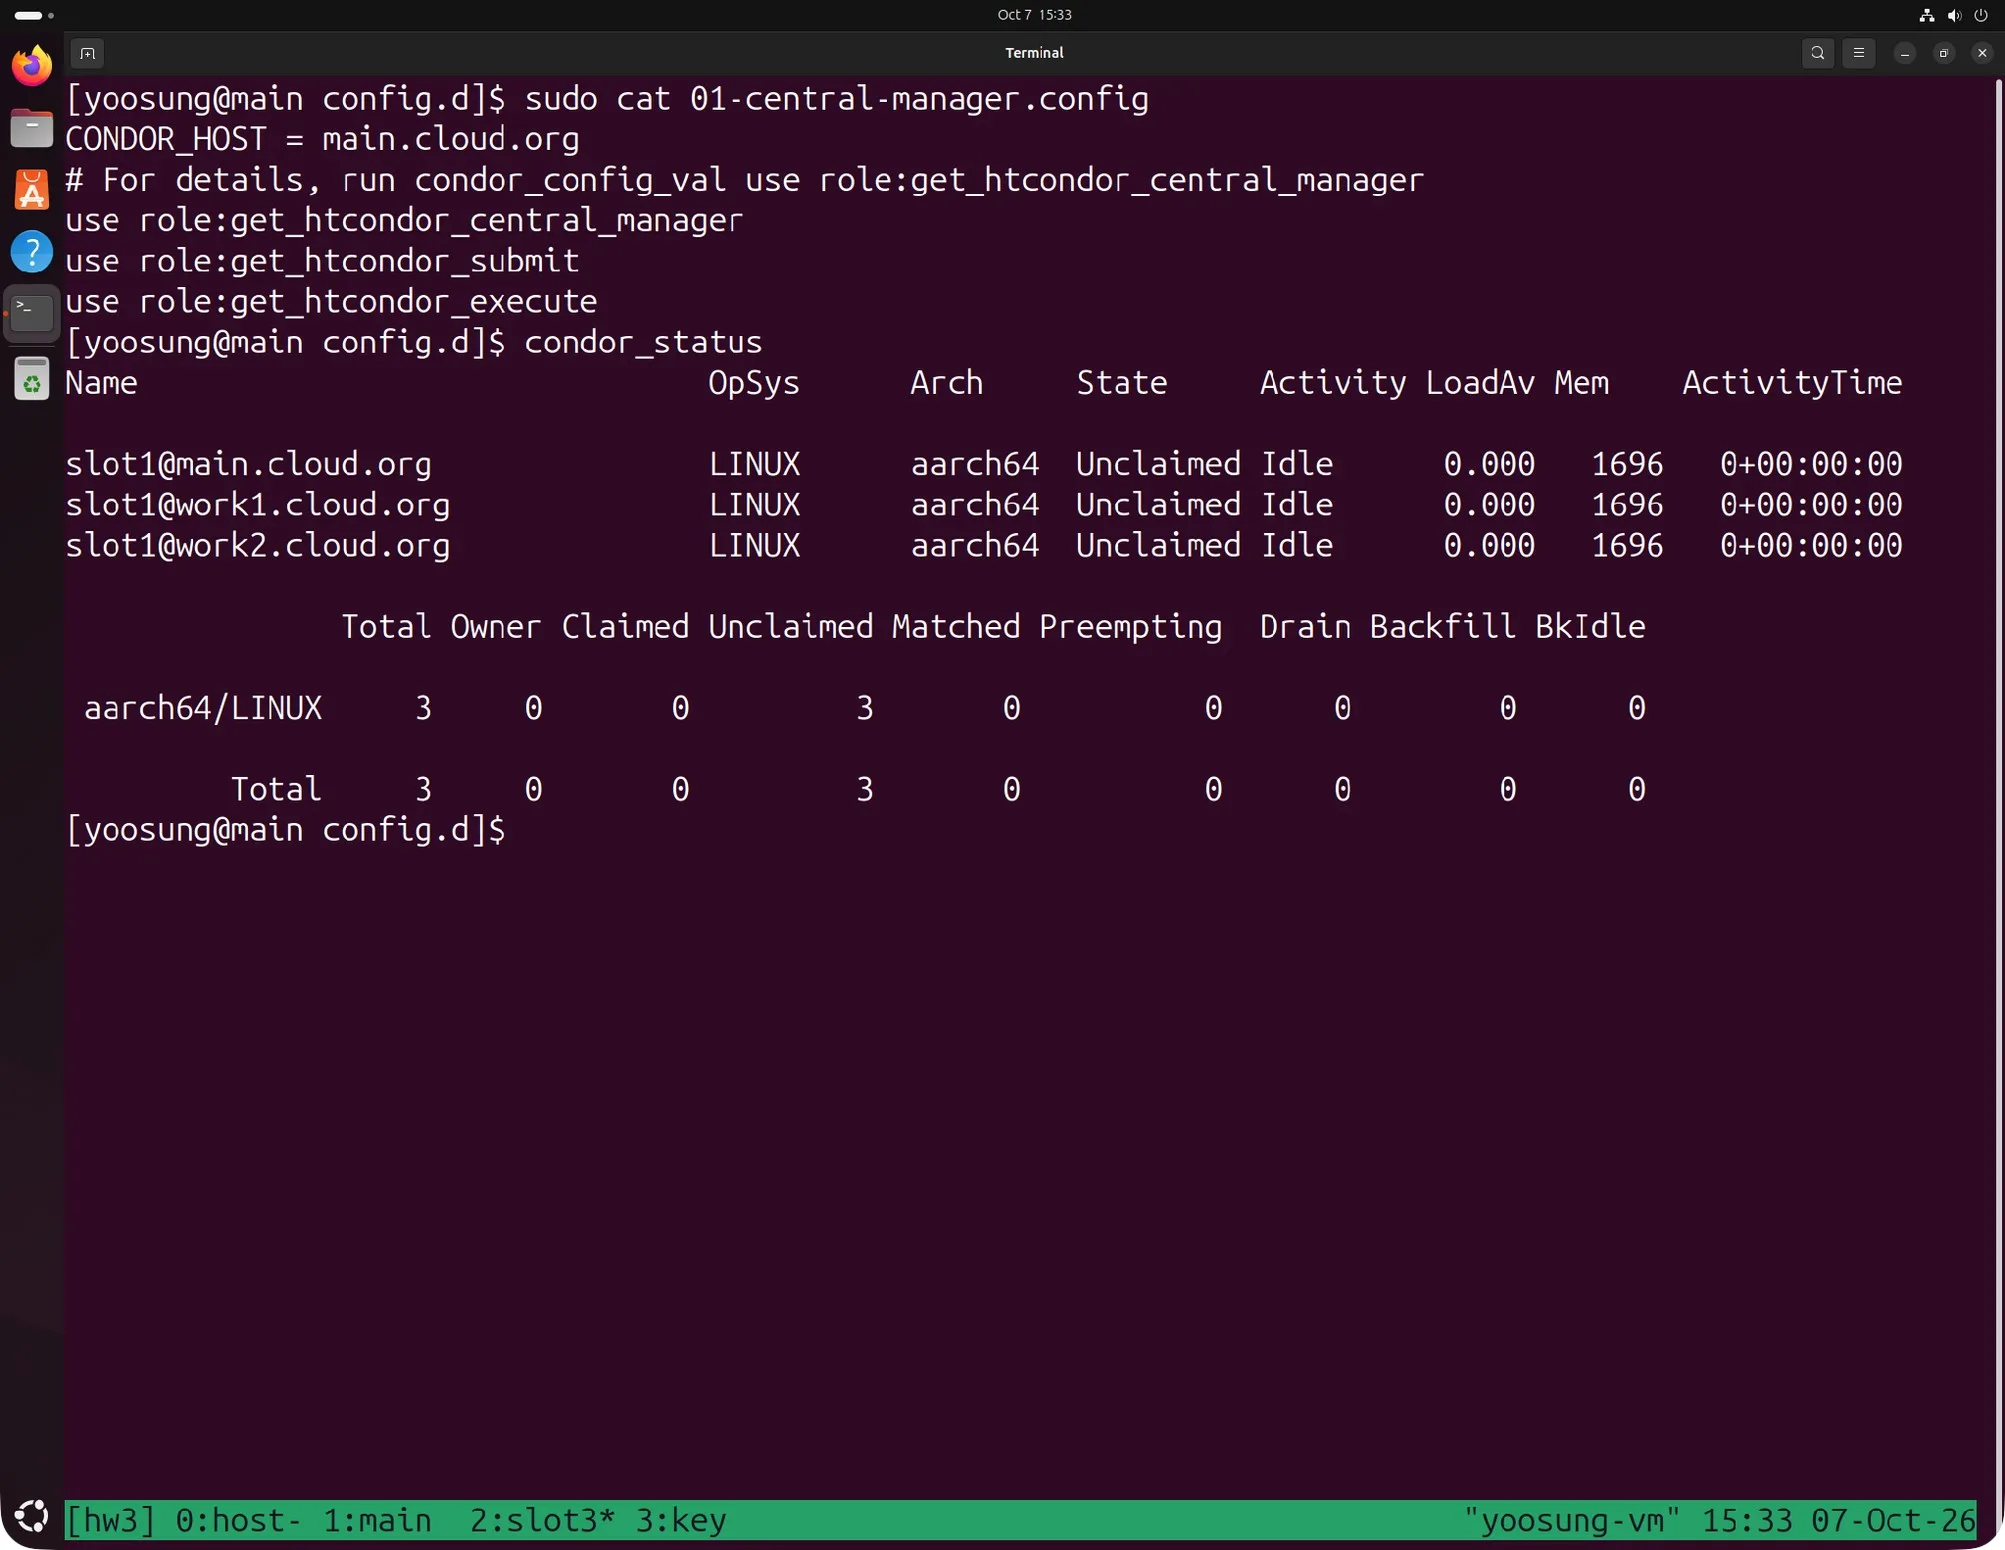
condor_status after adding the execute role to main: slot1@main, slot1@work1, slot1@work2, Total 3
Ch5-6. How GPG Works
GPG (GNU Privacy Guard) is free software implementing the OpenPGP standard; it encrypts and signs files and messages with public key cryptography.
- Key management:
gpg --full-generate-keycreates a public/private key pair. The public key is distributed via key servers or websites, and other people's public keys are received and stored in a keyring. Keys are distinguished by fingerprint. - Encryption: it creates a random symmetric key (session key), encrypts the content with the fast symmetric key, and attaches the session key encrypted with the recipient's public key. The recipient extracts the session key with their private key and decrypts the content.
- Signing: it makes a hash of the file and signs it with your private key. The recipient verifies the signature with the signer's public key and recomputes and compares the hash, confirming both who made it and that the file hasn't changed.
- Establishing trust: whether a received public key really belongs to that person is decided by comparing fingerprints directly, or by trusting keys signed by people you already trust (Web of Trust).
GPG was also used when installing HTCondor with dnf in Chapter 5. RPM packages carry the distributor's GPG signature, and if the repository config in /etc/yum.repos.d/ has gpgcheck=1 and gpgkey=, dnf fetches the distributor's public key and verifies the signature before installing. If the signature doesn't match, installation is refused, which guarantees the downloaded package wasn't altered along the way.
Ch6-2. Checkpointing and Remote System Calls
Both are features of the standard universe. If you relink a program with condor_compile, the HTCondor library is linked in and you can use them.
Checkpoint
- Saving the entire state of a running program (memory, CPU registers, open files and read positions, etc.) to a file.
- HTCondor is a system that borrows idle computers (a "cycle scavenger"), so a running job can be interrupted when the owner comes back or a higher-priority job arrives. With a checkpoint, instead of starting over, it continues on another machine from the saved point.
- Saving periodically means that even if a machine fails, it can restart from the last checkpoint, so the longer the job, the bigger the benefit.
Remote System Call
- When a job makes system calls like opening, reading or writing files, they are sent to the submit node to be handled instead of being handled on the execute node.
- The HTCondor library linked into the job intercepts system calls and sends them over the network, and the
condor_shadowprocess on the submit node executes them on its behalf and returns the results. - So no matter which machine the job runs on, it behaves as if it were using the submit node's files directly, and the execute node needs no user account or shared file system. Even when moved to another machine via checkpointing, file access isn't interrupted.
However, the standard universe and condor_compile were removed in HTCondor 9.0, so they can't be used in the 25.x installed this time. That's why this lab used the vanilla universe. In vanilla, the file transfer method seen earlier is used instead of remote system calls, and checkpointing isn't automatic either. Instead, you can use self-checkpointing: if the program saves its own state to a file and exits with a designated exit code (checkpoint_exit_code), HTCondor keeps that file and runs the program again to continue.
Ch6-9. DAGMan
DAGMan (Directed Acyclic Graph Manager) is a tool that runs multiple interdependent HTCondor jobs in a defined order. It uses a graph where jobs are nodes and the relation "this job must finish before that one starts" is a directed edge. If there's a cycle, no job can start first, so only acyclic graphs are allowed.
JOB A a.jds
JOB B b.jds
JOB C c.jds
JOB D d.jds
PARENT A CHILD B C
PARENT B C CHILD D
condor_submit_dag example.dag
When A finishes, B and C are submitted at the same time, and when both finish, D is submitted. Each node's jds is the same kind of job description file used so far. Running condor_submit_dag makes DAGMan itself run as one HTCondor job on the submit node, watching each job's log file and submitting the next jobs after finished ones.
Usefulness
- Automated ordering: nobody has to watch whether the previous job finished and then submit the next one. Jobs that are "independent within a stage and dependent between stages" can be expressed directly.
- Parallelism preserved: nodes that don't depend on each other are submitted at the same time, so the advantages of HTC aren't lost.
- Failure handling:
RETRYautomatically reruns failed nodes. If it still fails, a rescue DAG file recording the already-succeeded nodes is created, so resubmitting continues from the point of failure. - Pre- and post-processing: each node can have scripts before and after execution (
SCRIPT PRE,SCRIPT POST) to prepare input or check results. - Use cases: scientific computing pipelines that go data preprocessing → many independent analyses → result aggregation. Assignment plagiarism checking can also be made into one DAG: preprocessing, 4,950 comparisons, and result aggregation.