
- Published on
HW5. AWS Dynamic Resource Management Programming
- Authors

- Name
- seren-wib
Contents
- 0. Lab environment
- Steps
- 1. Preparing AWS
- Installing the AWS CLI
- Setting credentials
- Security group
- Key pair
- 2. Building the HTCondor cluster
- Creating and connecting to the main instance
- Installing and configuring HTCondor on main
- Creating the worker instance and installing HTCondor
- SSH key from main to worker
- Sharing the pool password and checking 2 nodes
- Creating the worker machine image
- 3. The dynamic management program
- Written with Python boto3
- Menu layout
- Compared with the Java SDK
- How it relates to the REST API
- 4. Watching the Condor pool change
- stop — leaving the pool
- start — rejoining the pool
- create — a new node joins on its own
- Scaling back down
- reboot
- 5. Problems during the lab
- Problem 1. Worker missing even after matching the pool password
- Problem 2. AWS requests suddenly failing authentication
- Typos and traps in the slides
- 6. Exercises
- Ch8-9. The Various AMIs AWS Offers
- Ch8-13. AWS Instance Types and Their Characteristics
- Ch9-3. Running condor_status Directly from the Tool
- Ch9-12. Korean Cloud Providers with VM APIs
Up to HW4 I built the HTCondor cluster out of VMs on my Mac. This time, following Chapter 9 of the textbook, I moved the cluster to AWS EC2. I created a main and a worker instance, saved the worker as a machine image (AMI), and then checked that the number of nodes in the Condor pool follows along when an SDK program on the Ubuntu host starts, stops and creates instances. The textbook uses the Java SDK, but the assignment allowed SDKs in other languages, so I wrote it in Python with boto3. At the end are my answers to the Chapter 8 and 9 exercises.
0. Lab environment
The HTCondor cluster runs on AWS EC2, and the program that controls the instances runs on the Ubuntu host I used in HW2–HW4 (an Ubuntu 24.04 ARM64 VM on UTM). All instances are x86_64 (t3.small), but the control program only calls the AWS API over HTTPS, so an ARM64 host is fine.
macOS (Apple M3)
└─ UTM ─ Ubuntu 24.04 ARM64 (yoosung-vm, the "Ubuntu host" in the lectures)
         ├─ AWS CLI v2 (aarch64), Python 3.12 + boto3  ← aws_control.py
         └─ SSH (cloud-test.pem), HTTPS (EC2 API)
                │
AWS Seoul region ap-northeast-2, default VPC 172.31.0.0/16
├─ htcondor-main    t3.small  Rocky 10.2  172.31.12.47  main
├─ htcondor-worker  t3.small  Rocky 10.2  172.31.11.85  worker
└─ worker created from AMI aws-htcondor-worker   172.31.6.235  worker
| Textbook (slides) | This environment |
|---|---|
| Ubuntu host x86_64, account cloudman@abelia | Ubuntu 24.04.5 aarch64, account yoosung@yoosung-vm |
| Region us-east-1 (N. Virginia) | ap-northeast-2 (Seoul). The assignment doesn't require a region, so I picked a nearby one with low SSH latency |
| Root user access key | Access key of IAM user cloud-hw, which only has EC2 permissions (AmazonEC2FullAccess) |
| Java SDK v1 (1.11.643) + libs/ + OpenJDK | Python boto3 (AWS SDK for Python, Ubuntu package 1.34.46) |
| Security group, key pair and instances via console | Created with the AWS CLI. Same settings, and commands and results stay on one screen so they can be rerun |
| Search and subscribe to Rocky Linux 10 in Marketplace | Community AMI Rocky-10-EC2-Base-10.2-20260525.0.x86_64 published by the official Rocky account (792107900819), specified directly (no subscription) |
Private DNS ip-172-31-17-242.ec2.internal | ip-172-31-12-47.ap-northeast-2.compute.internal (only us-east-1 uses ec2.internal) |
| HTCondor version not specified | condor-25.0.14-1.el10.x86_64 (25.0 repository) |
Steps
The goal is the architecture on slide 5. The steps were:
| Step | What | Slides | Figures |
|---|---|---|---|
| 1 | Install AWS CLI, set credentials | Ch9 66–70 | 1–2 |
| 2 | Security group, key pair | Ch8 18–21·28–29 | 3–4 |
| 3 | Create main instance and install HTCondor | Ch9 6–19 | 5–10 |
| 4 | Create worker instance and install HTCondor | Ch9 20–28 | 11–14 |
| 5 | SSH keys, share pool password, check 2 nodes | Ch9 29–35 | 15–21 |
| 6 | Create worker AMI | Ch9 36–38 | 22 |
| 7 | Write and run the dynamic management program | Ch9 39–64·71–76 | 23–37 |
1. Preparing AWS
Installing the AWS CLI
Slide 66 downloads the x86_64 installer, but this host is aarch64, so I downloaded awscli-exe-linux-aarch64.zip. Also, in the slide's -o "awscliv2.zip“ the closing quote is a curly quote (U+201C), so if you paste it as is the shell never closes the string. I typed plain quotes instead.
uname -m
curl "https://awscli.amazonaws.com/awscli-exe-linux-aarch64.zip" -o "awscliv2.zip"
sudo apt install unzip -y
unzip -q awscliv2.zip
sudo ./aws/install
aws --version

Installing AWS CLI v2 for aarch64 — aws-cli/2.38.5 ... exe/aarch64.ubuntu.24
Setting credentials
Slides 67–70 create an access key for the root user. A root key has every permission on the account, down to billing and closing the account, and can't be limited by policies, so AWS itself shows a "not recommended" warning on the creation screen (checkbox 4 on slide 69). Instead I created an IAM user cloud-hw with no console login and only the AmazonEC2FullAccess policy, and issued an access key for that user (use case: CLI). This key can only touch EC2.
Entering the key, region (ap-northeast-2) and output format (json) in aws configure saves them to ~/.aws/credentials and ~/.aws/config, and both the AWS CLI and boto3 read these files. aws sts get-caller-identity confirmed that the key authenticates as user/cloud-hw. The keys are printed masked, showing only the last four characters.
aws configure
aws configure list; aws sts get-caller-identity
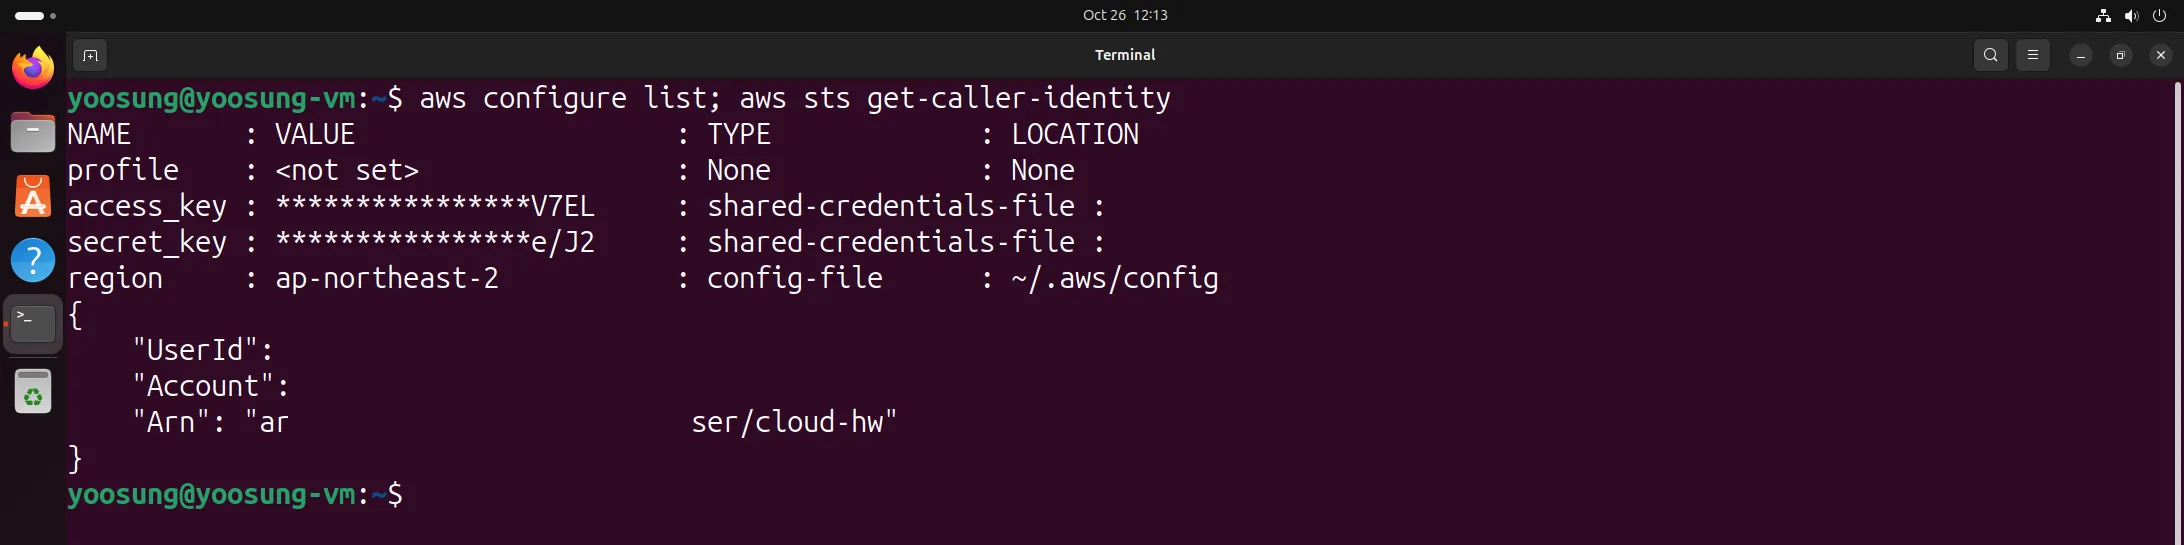
Checking credentials — Seoul region, IAM user cloud-hw (account ID hidden)
Security group
As on Chapter 8 slides 18–21, I created a security group named HTCondor with two inbound rules. SSH (22) is open to Anywhere (0.0.0.0/0) because I connect from the Ubuntu host. The HTCondor port (9618) is Anywhere on the slides, but the nodes talk to each other over private VPC addresses and the config has ALLOW_WRITE = *, so opening it to the whole internet would let anyone attach a node to the pool. So I only allowed the default VPC range (172.31.0.0/16).
SG=$(aws ec2 create-security-group --group-name HTCondor --description "HTCondor pool (SSH + 9618)" --query GroupId --output text); echo $SG
aws ec2 authorize-security-group-ingress --group-id $SG --protocol tcp --port 22   --cidr 0.0.0.0/0     --query Return
aws ec2 authorize-security-group-ingress --group-id $SG --protocol tcp --port 9618 --cidr 172.31.0.0/16 --query Return
aws ec2 describe-security-groups --group-ids $SG --query "SecurityGroups[0].IpPermissions[].[IpProtocol,FromPort,ToPort,IpRanges[0].CidrIp]" --output table
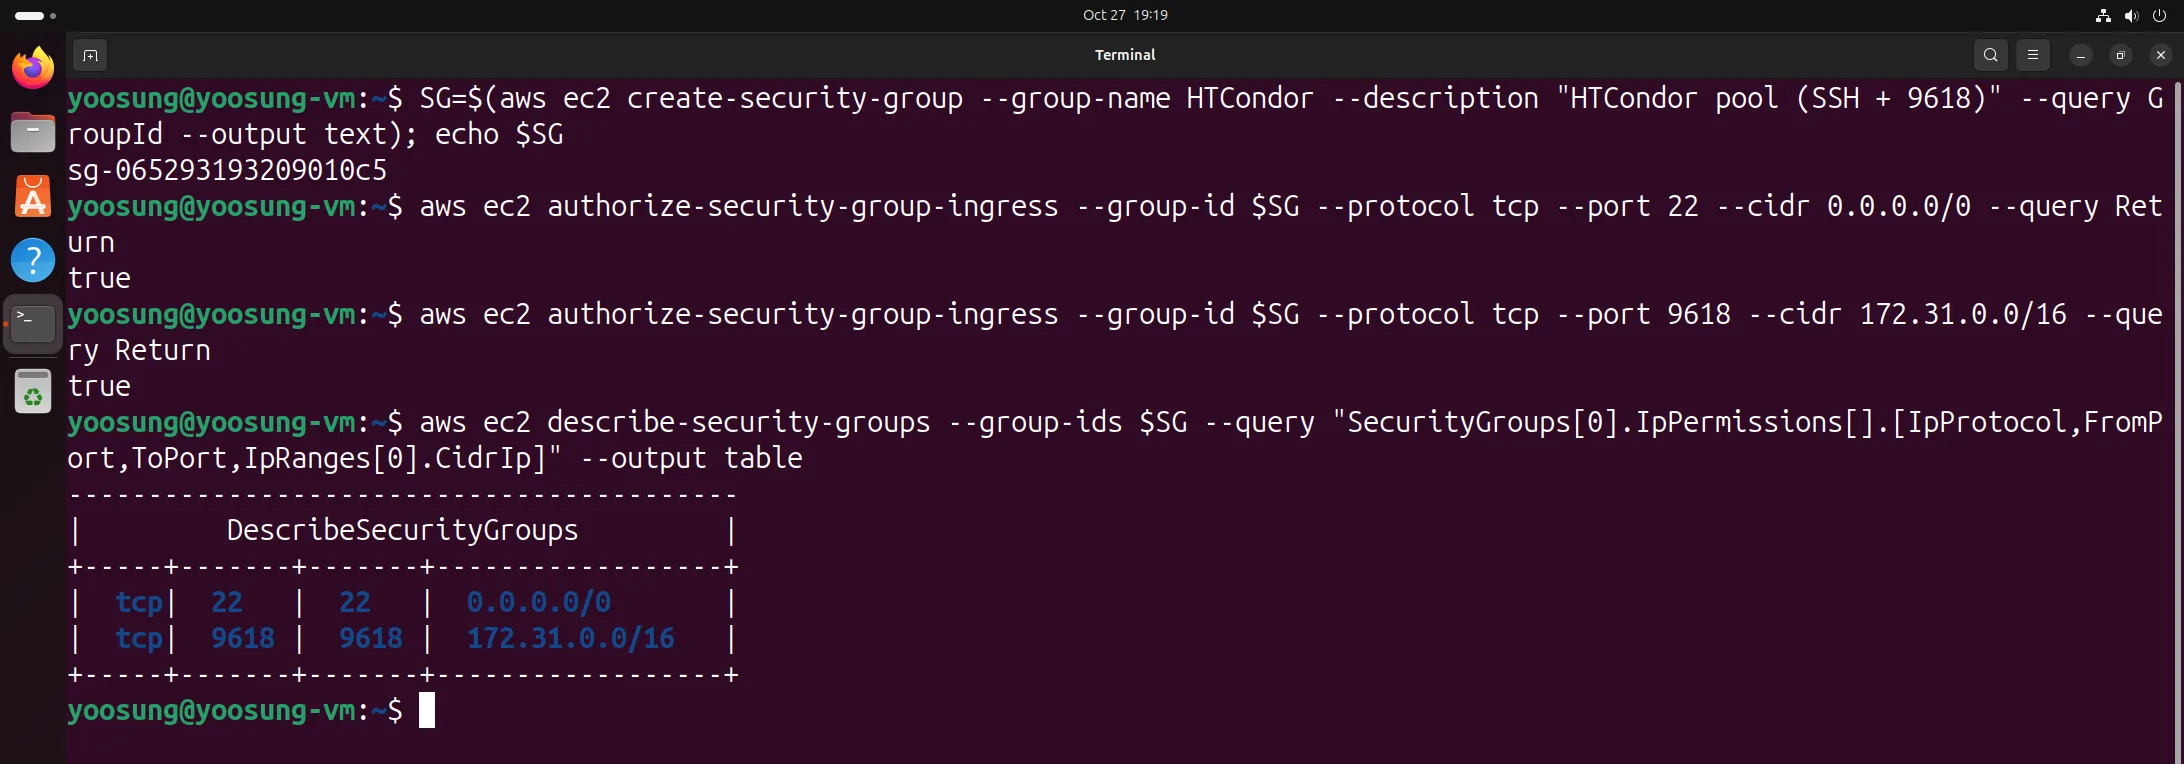
Security group HTCondor — port 22 from anywhere, port 9618 only inside the VPC
Key pair
Following Chapter 8 slides 28–29 and 34, I created the RSA key pair cloud-test, saved the private key to ~/Downloads/cloud-test.pem, and ran chmod 400 so only the owner can read it, which SSH requires. The slides print the whole private key with cat, but I only checked the first line so the private key doesn't end up on screen.
aws ec2 create-key-pair --key-name cloud-test --key-type rsa --key-format pem --query KeyMaterial --output text > cloud-test.pem
ls -l cloud-test.pem; head -1 cloud-test.pem
chmod 400 cloud-test.pem; ls -l cloud-test.pem
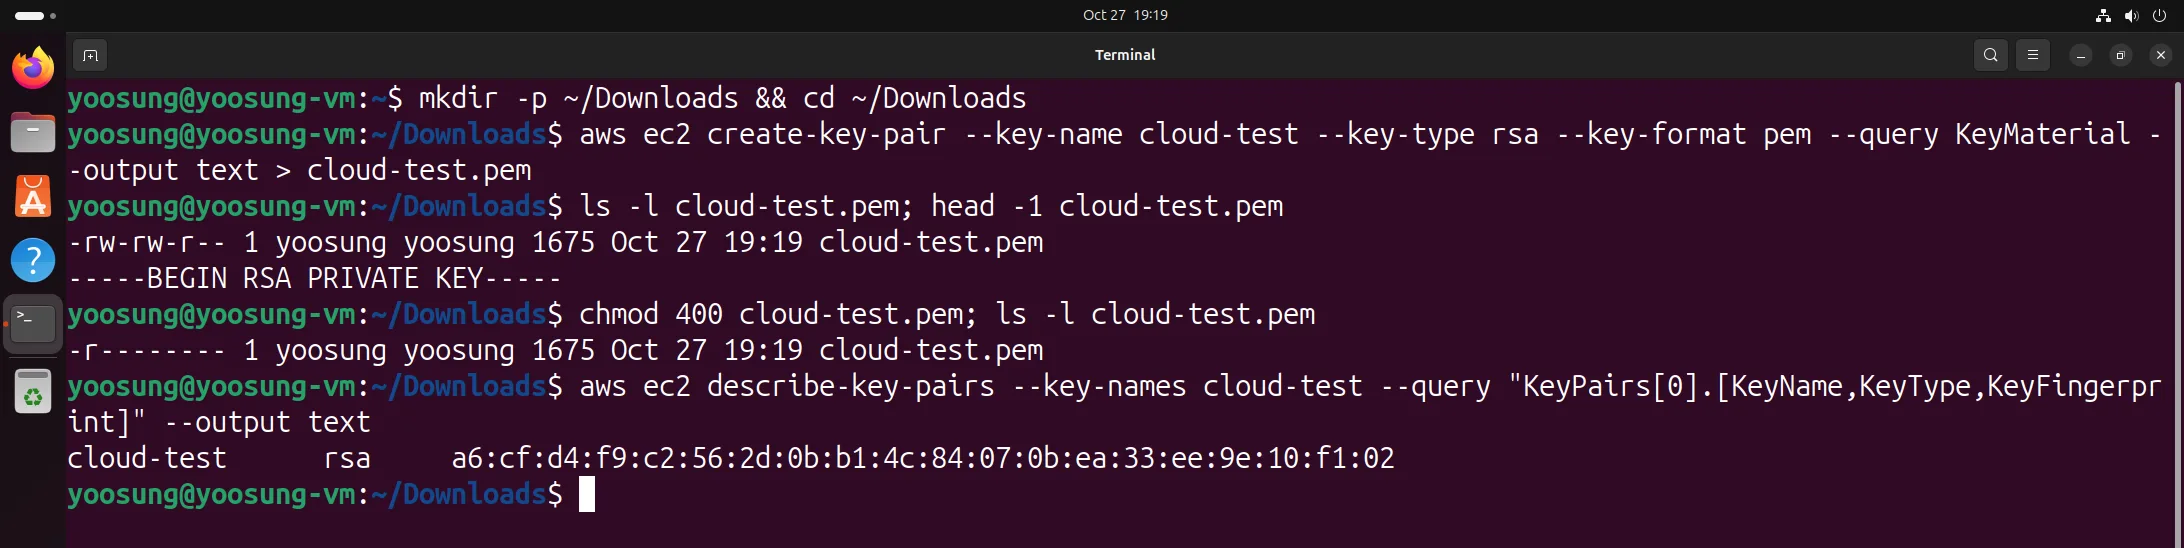
Creating key pair cloud-test and changing permissions (-rw-rw-r-- → -r--------)
2. Building the HTCondor cluster
Creating and connecting to the main instance
I created an instance with the Rocky Linux 10.2 x86_64 AMI, t3.small, key pair cloud-test and security group HTCondor, and tagged it htcondor-main (slides 6–15). After waiting for Pending → Running with wait instance-running, I checked the private and public DNS and connected as the rocky account like the slides. Root login is disabled on the Rocky image.
AMI=ami-0e86f920feb0e6b17      # Rocky-10-EC2-Base-10.2-20260525.0.x86_64
MAIN=$(aws ec2 run-instances --image-id $AMI --instance-type t3.small --key-name cloud-test --security-groups HTCondor \
       --tag-specifications "ResourceType=instance,Tags=[{Key=Name,Value=htcondor-main}]" --query "Instances[0].InstanceId" --output text)
aws ec2 wait instance-running --instance-ids $MAIN
aws ec2 describe-instances --instance-ids $MAIN --query "Reservations[0].Instances[0].[InstanceId,InstanceType,State.Name,PrivateDnsName,PublicDnsName]" --output text
ssh -i "cloud-test.pem" rocky@ec2-15-165-74-33.ap-northeast-2.compute.amazonaws.com
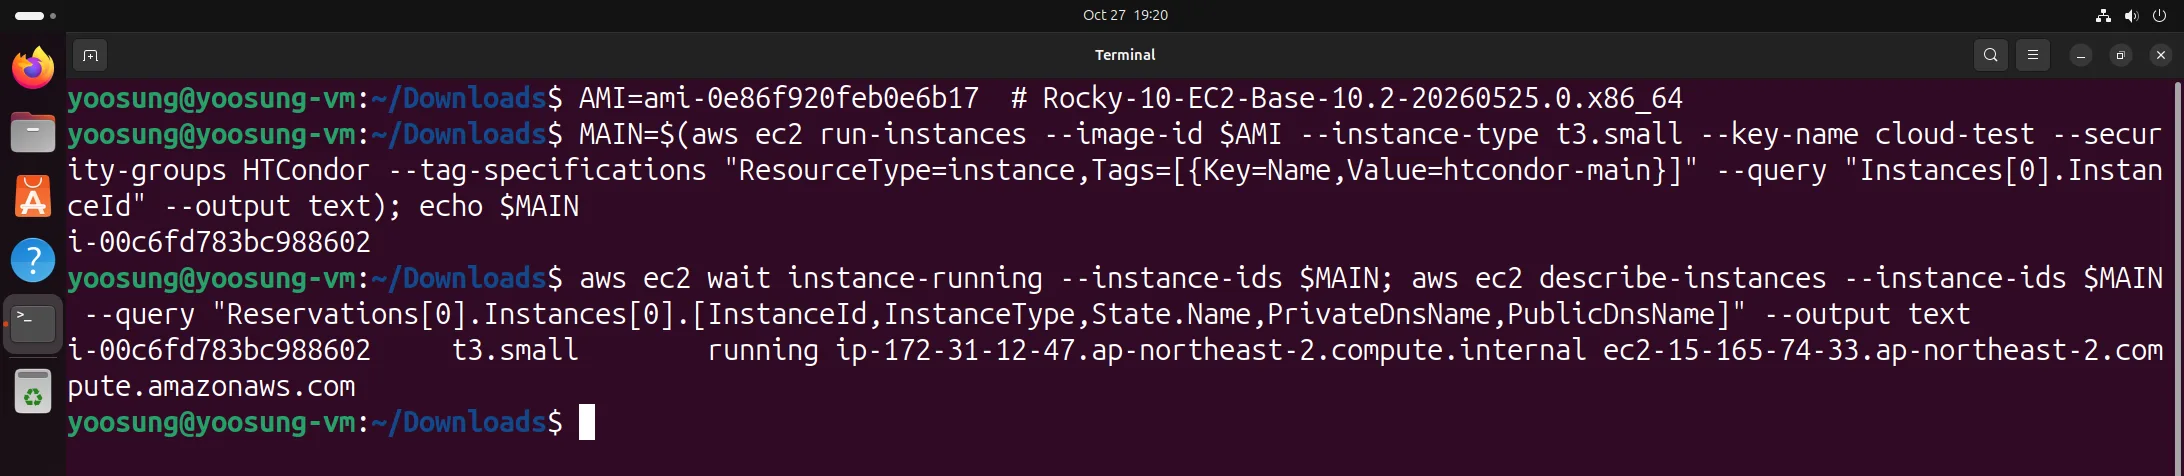
Creating the main instance — t3.small, running, private DNS ip-172-31-12-47.ap-northeast-2.compute.internal
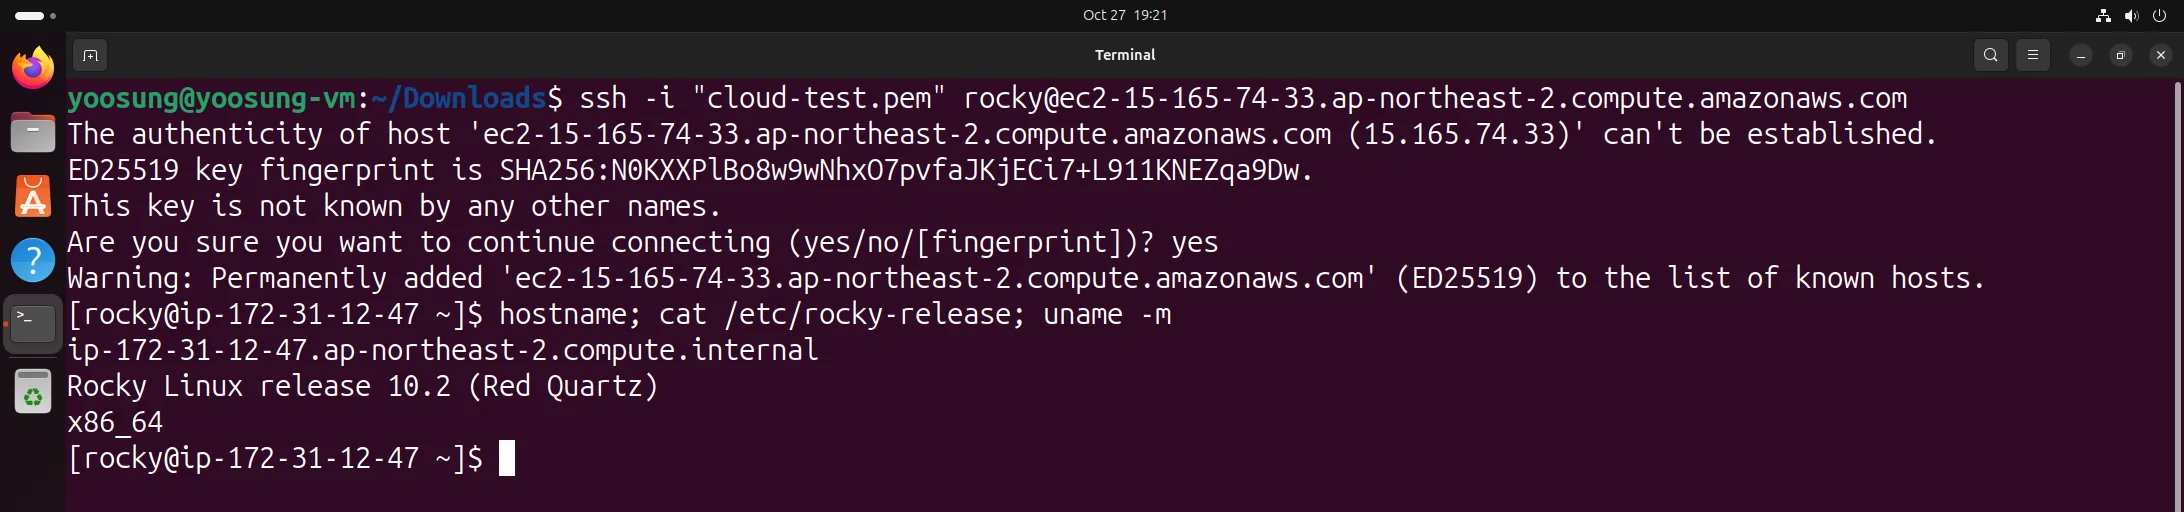
SSH into main — Rocky Linux 10.2, x86_64
Installing and configuring HTCondor on main
I installed the HTCondor 25.0 repository package (EPEL comes along with it) and then condor (slides 16–19). condor_config.local is the same six lines as on the slides, with main's own private DNS name in CONDOR_HOST. main is the pool's central manager, so COLLECTOR and NEGOTIATOR run; it accepts job submissions, so SCHEDD runs; and it also runs jobs, so STARTD runs too. Once the service started, condor_status showed one main slot, and I enabled the service so it comes up after reboots.
sudo su -
dnf install -y https://research.cs.wisc.edu/htcondor/repo/25.0/htcondor-release-current.el10.noarch.rpm
dnf install -y condor
cd /etc/condor/config.d
printf "%s\n" "ALLOW_WRITE = *" "CONDOR_HOST = $(hostname)" "DAEMON_LIST = MASTER, SCHEDD, STARTD, COLLECTOR, NEGOTIATOR" \
  "SEC_PASSWORD_FILE = /etc/condor/passwords.d/POOL" "SEC_DEFAULT_AUTHENTICATION_METHODS = PASSWORD,FS" \
  "SEC_DAEMON_AUTHENTICATION_METHODS = PASSWORD,FS" > condor_config.local
systemctl start condor; condor_status
systemctl enable condor; systemctl status condor
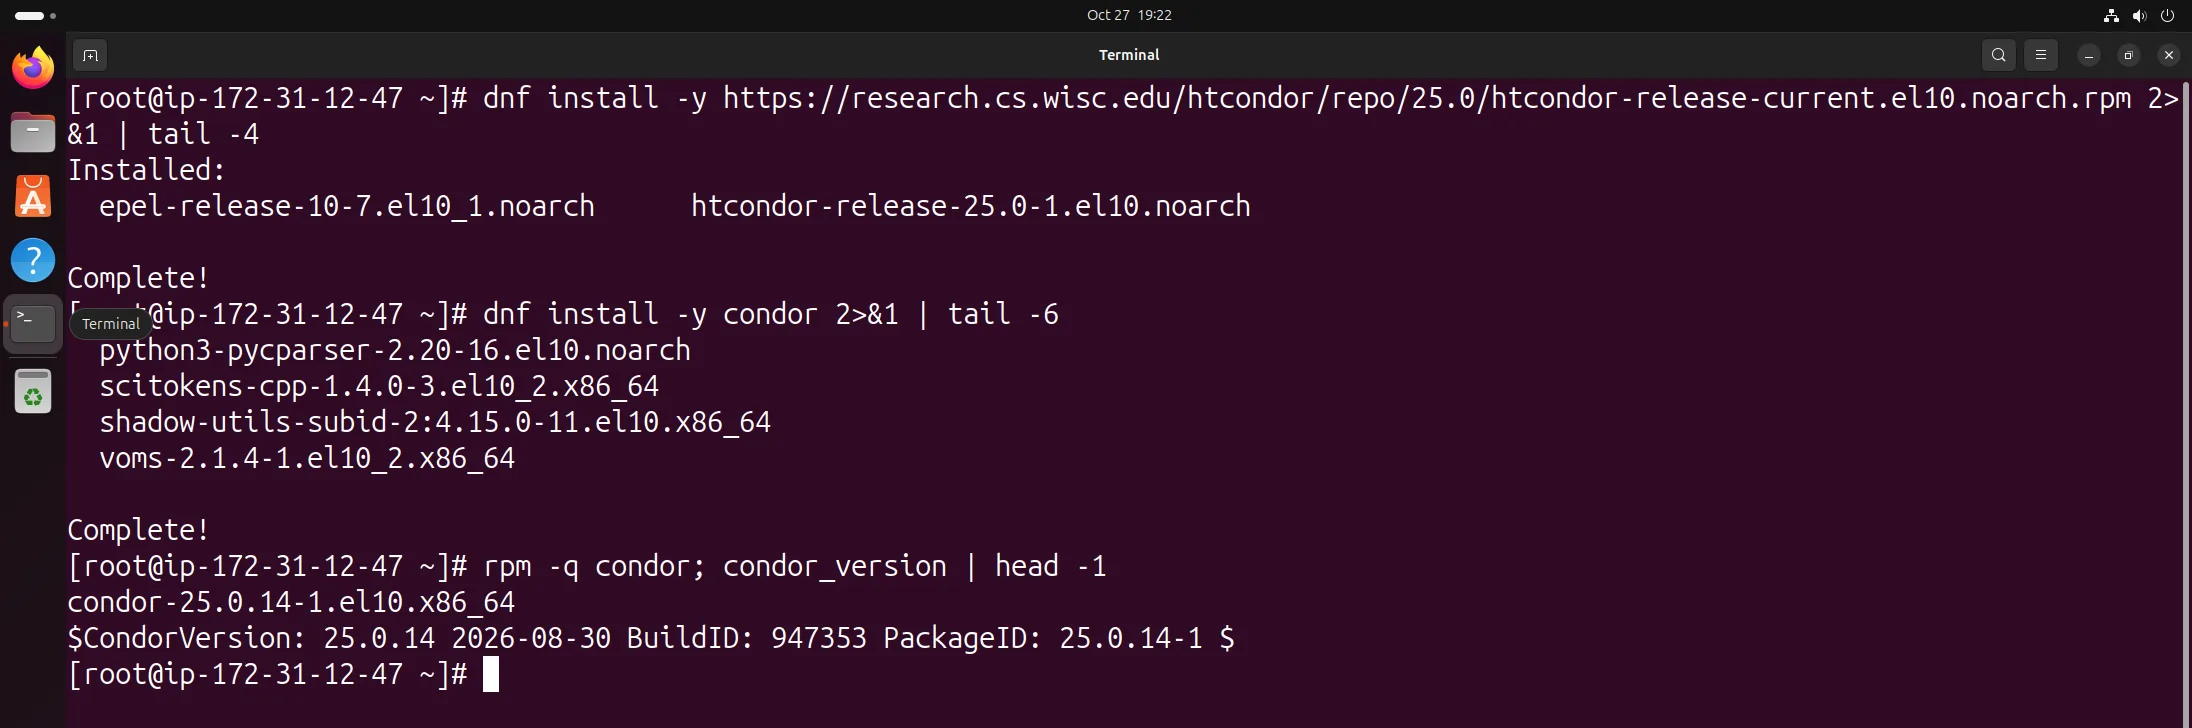
Installing HTCondor 25.0.14 on main

condor_config.local on main
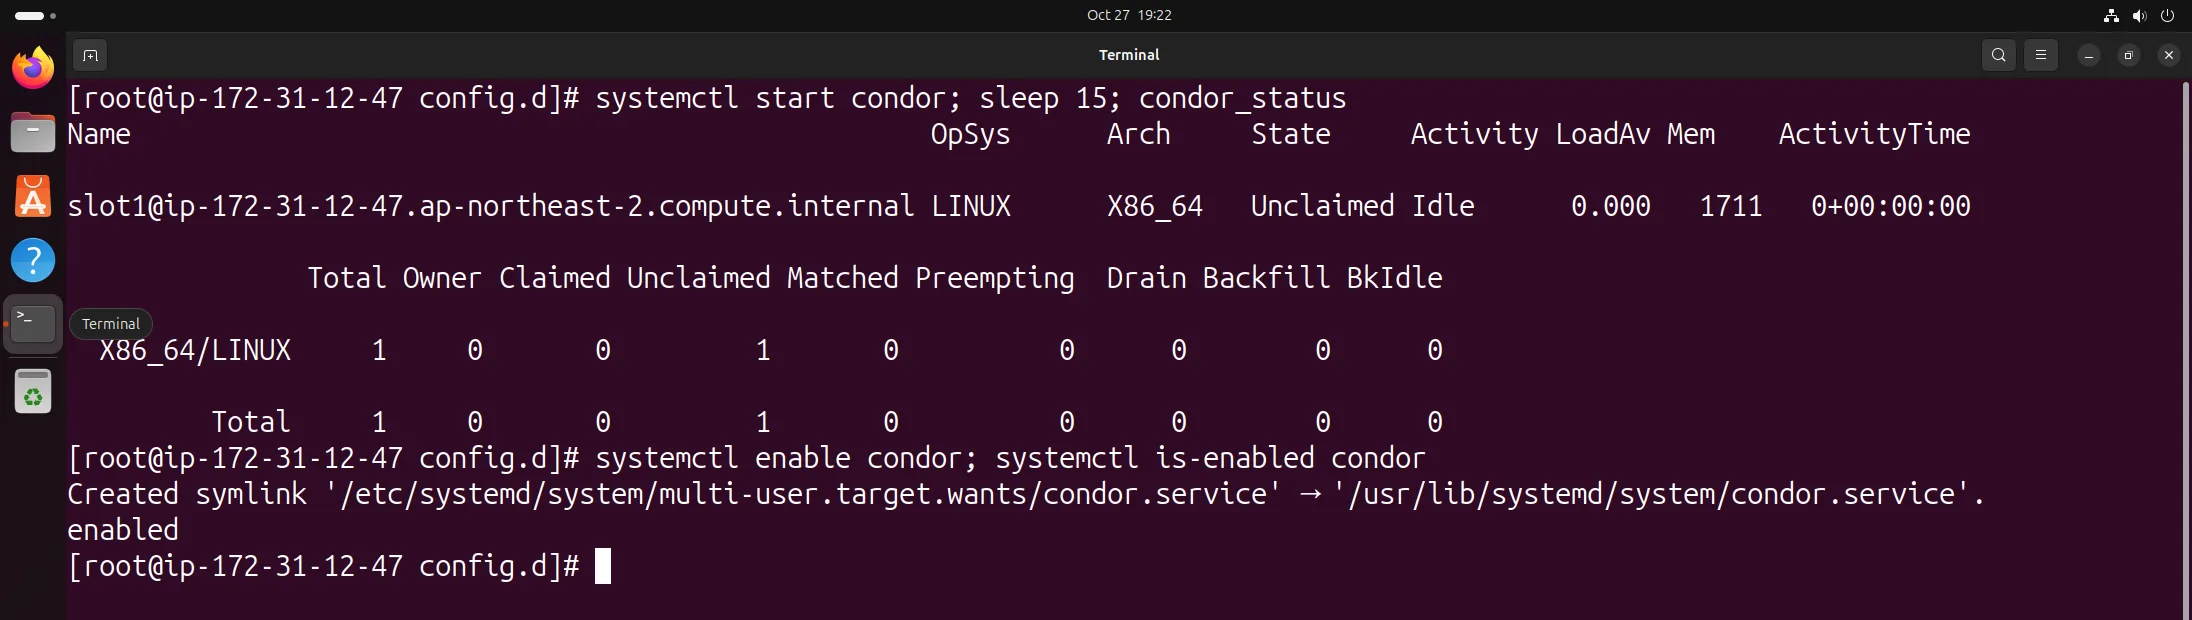
condor_status after starting condor — 1 main slot, enabled
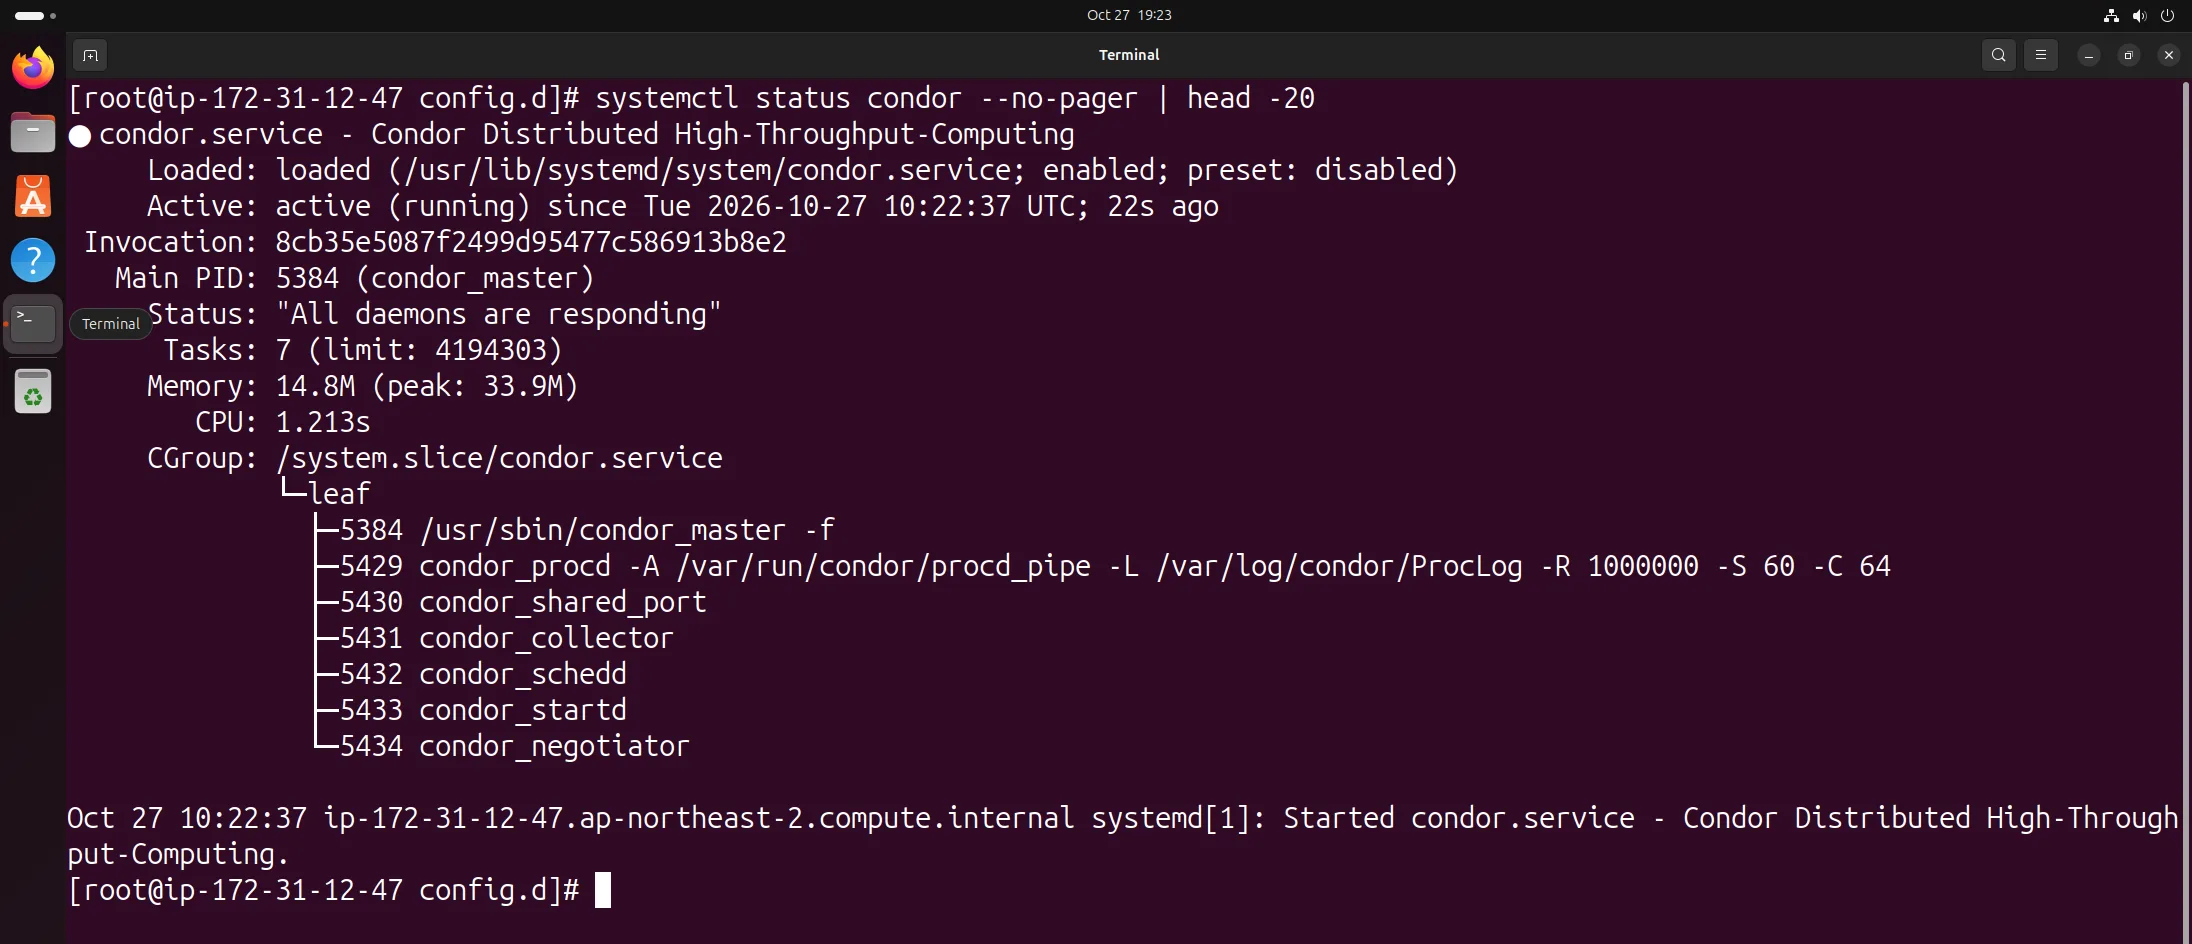
condor service on main — master, collector, schedd, startd and negotiator running
Creating the worker instance and installing HTCondor
I created htcondor-worker with the same AMI, type, key and security group as main, and installed HTCondor the same way (slides 20–28). On the worker, CONDOR_HOST in condor_config.local is main's private DNS, and since it only runs jobs, the daemons are just MASTER and STARTD.
WORKER=$(aws ec2 run-instances --image-id $AMI --instance-type t3.small --key-name cloud-test --security-groups HTCondor \
         --tag-specifications "ResourceType=instance,Tags=[{Key=Name,Value=htcondor-worker}]" --query "Instances[0].InstanceId" --output text)
ssh -i "cloud-test.pem" rocky@ec2-3-34-139-76.ap-northeast-2.compute.amazonaws.com
sudo su -
dnf install -y https://research.cs.wisc.edu/htcondor/repo/25.0/htcondor-release-current.el10.noarch.rpm
dnf install -y condor
cd /etc/condor/config.d
printf "%s\n" "ALLOW_WRITE = *" "CONDOR_HOST = ip-172-31-12-47.ap-northeast-2.compute.internal" "DAEMON_LIST = MASTER, STARTD" \
  "SEC_PASSWORD_FILE = /etc/condor/passwords.d/POOL" "SEC_DEFAULT_AUTHENTICATION_METHODS = PASSWORD" \
  "SEC_DAEMON_AUTHENTICATION_METHODS = PASSWORD" > condor_config.local
systemctl start condor; systemctl enable condor; systemctl status condor

Creating the worker instance — 2 instances running
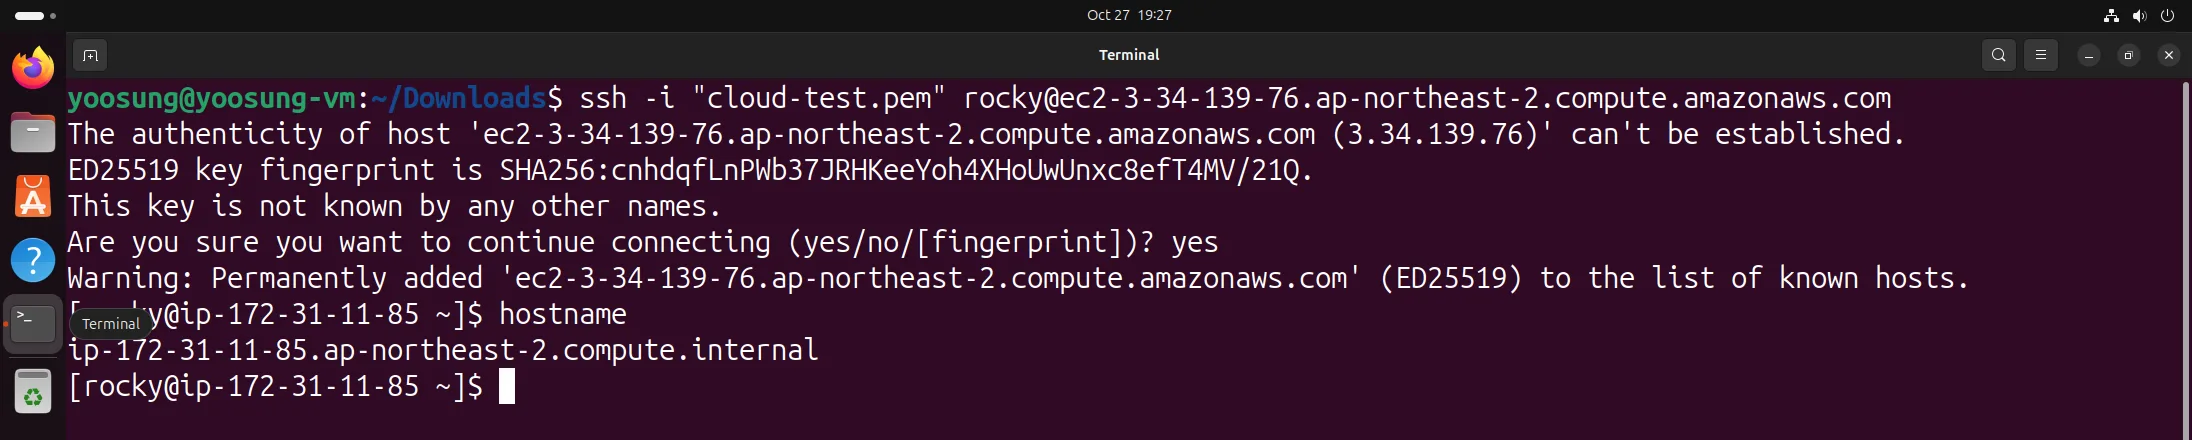
SSH into worker
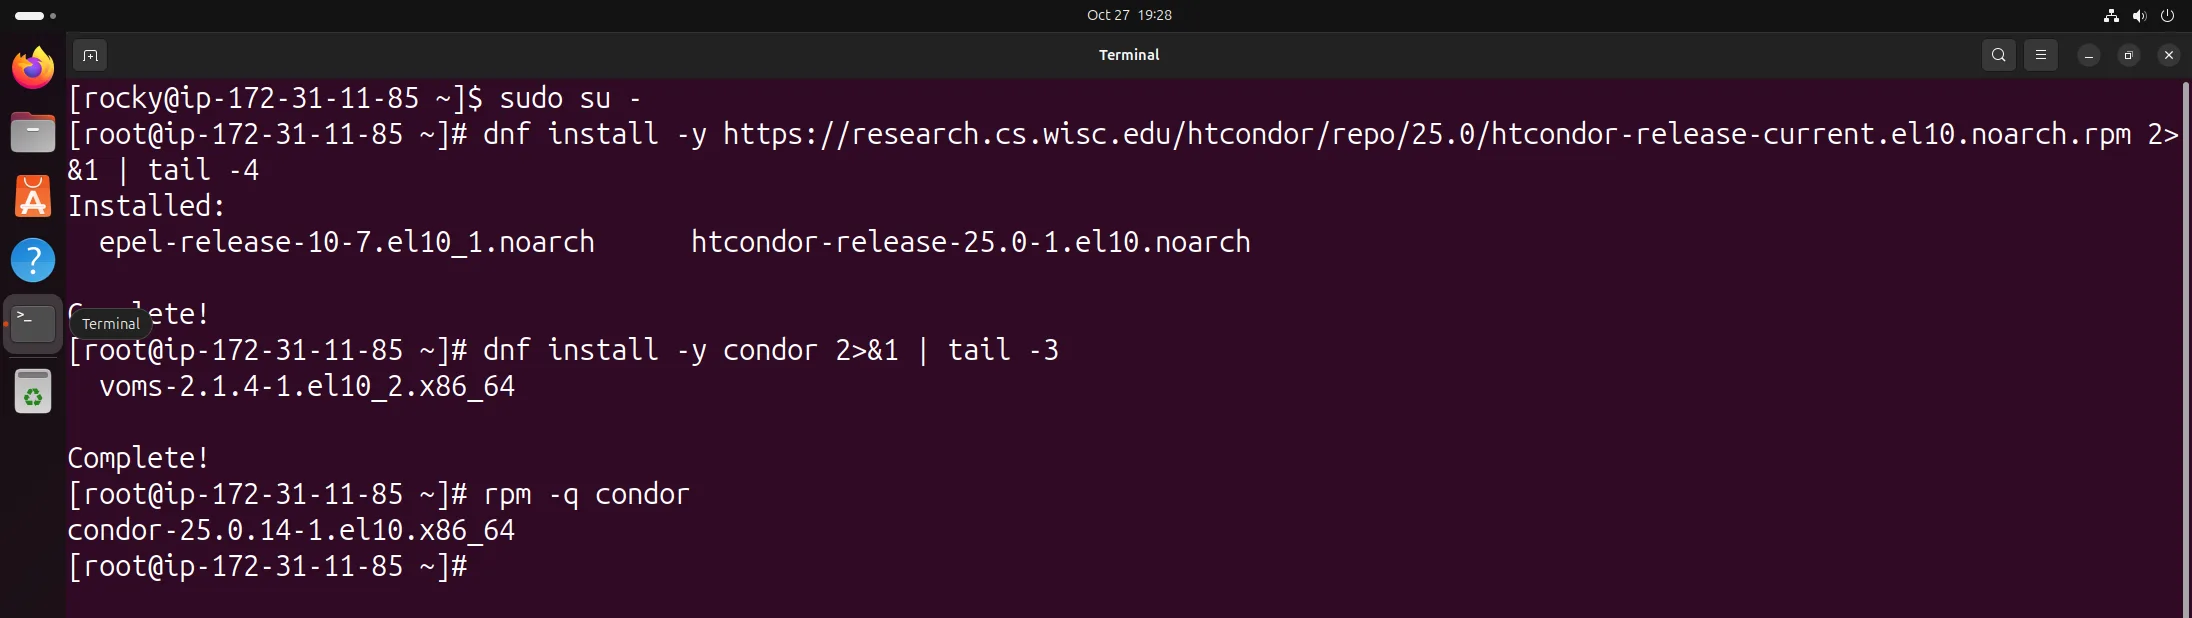
Installing HTCondor on worker
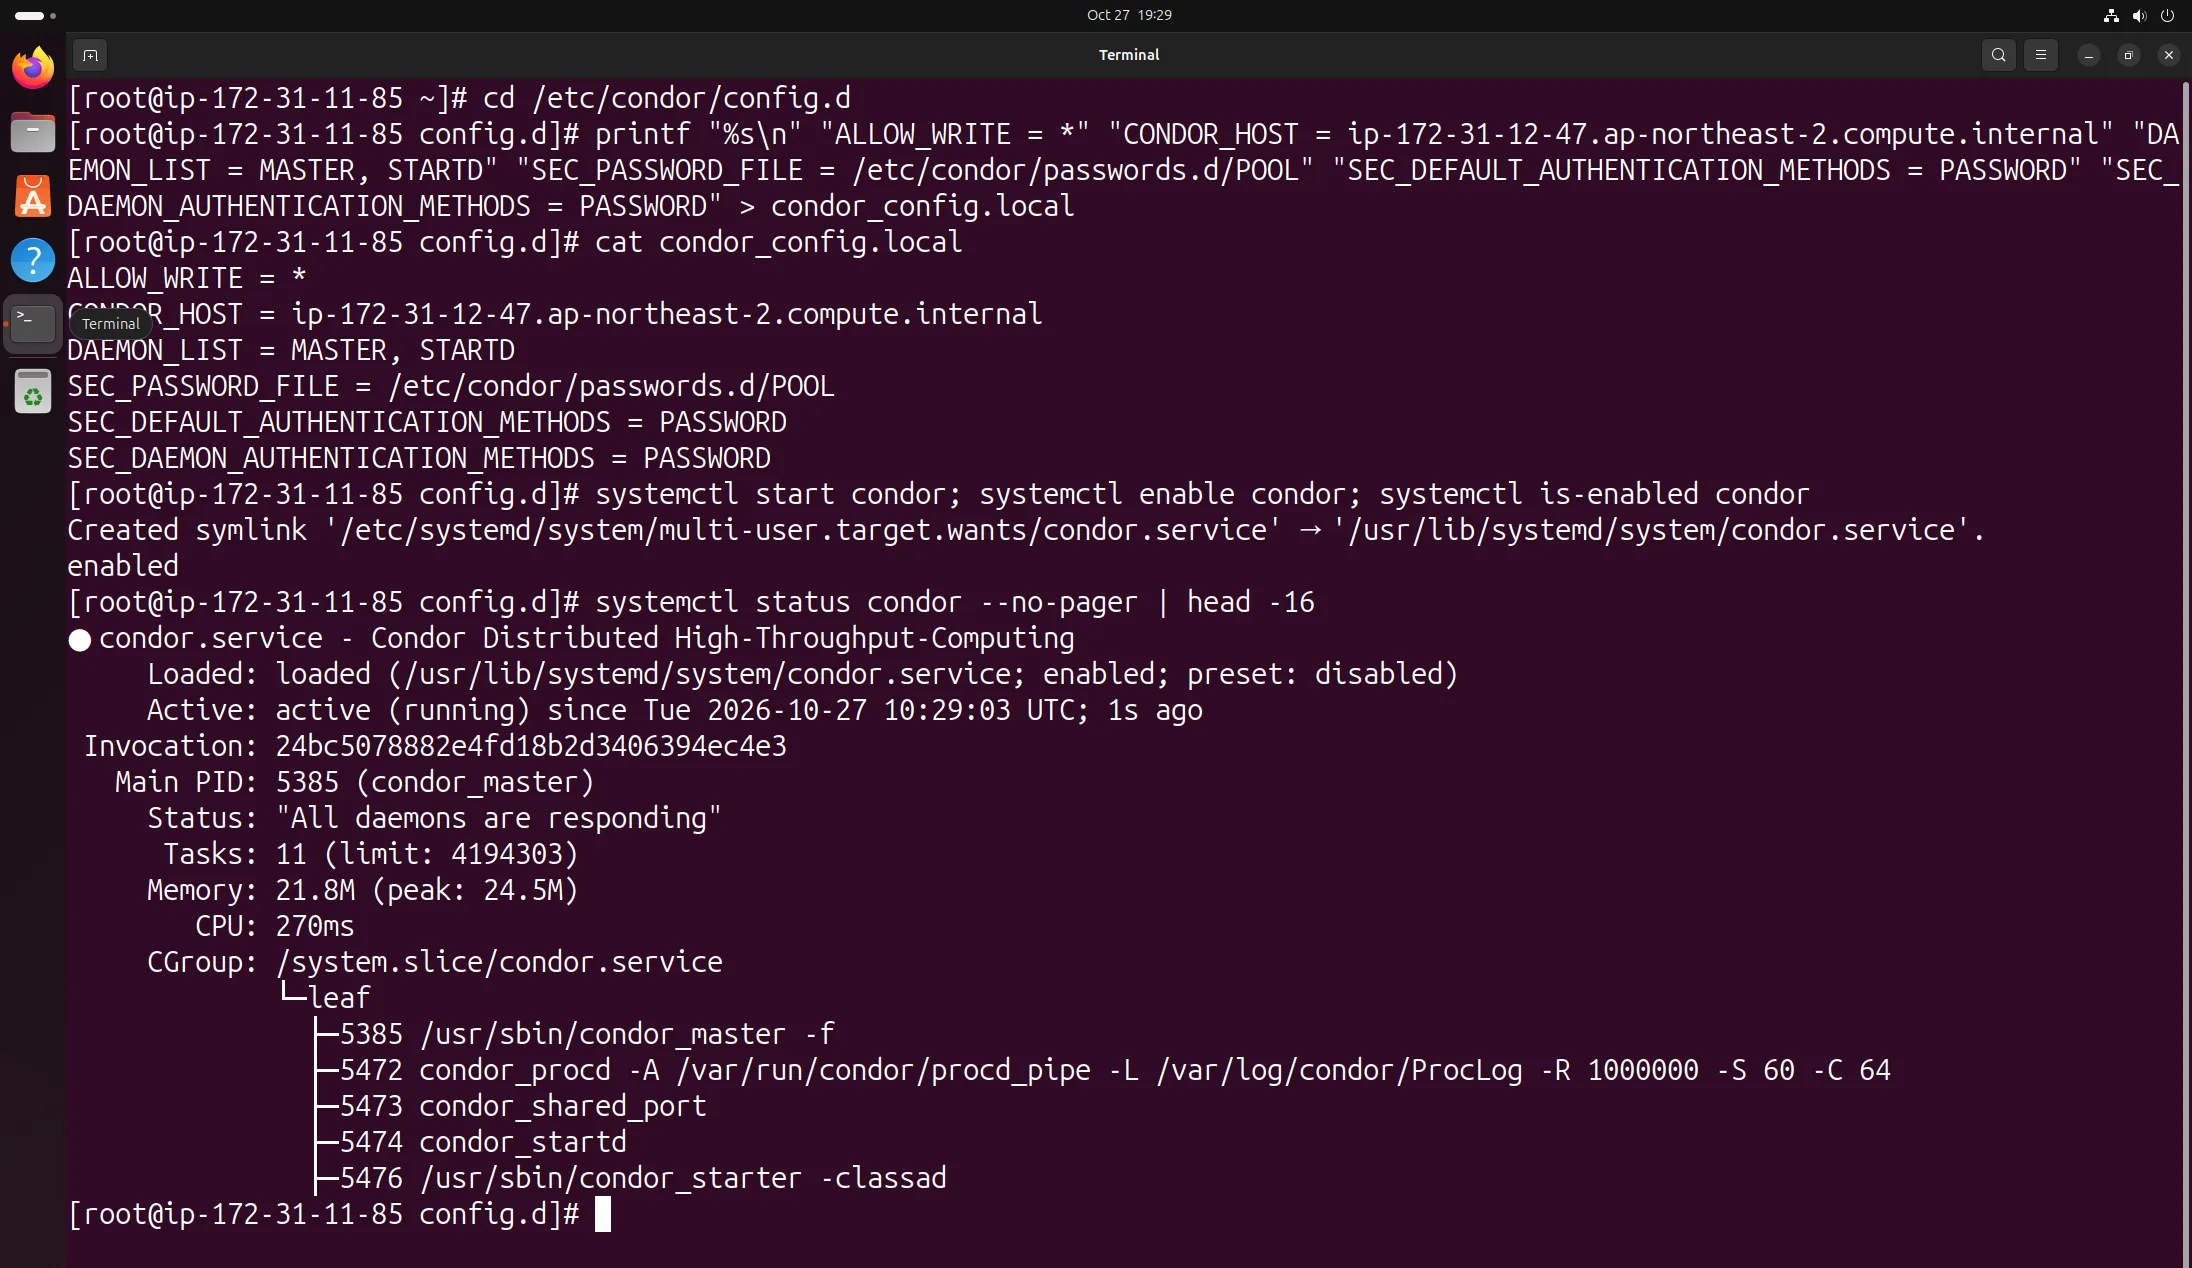
condor_config.local on worker and starting the service — only master and startd running
SSH key from main to worker
To copy the pool password file from main to worker, I let main's rocky account log in to worker with a key (slides 29–31). I generated ed25519 keys on both nodes (empty passphrase) and appended main's public key to ~/.ssh/authorized_keys on worker. The first line of that file is the cloud-test key AWS put there when the instance was created. I confirmed that main can connect to worker by its private DNS. The port 22 rule in the security group also allows connections from inside the VPC.
ssh-keygen -t ed25519 -N "" -f ~/.ssh/id_ed25519          # on main and worker
cat ~/.ssh/id_ed25519.pub                                   # main
echo "ssh-ed25519 AAAA... rocky@ip-172-31-12-47..." >> ~/.ssh/authorized_keys   # worker
ssh rocky@ip-172-31-11-85.ap-northeast-2.compute.internal   # main → worker
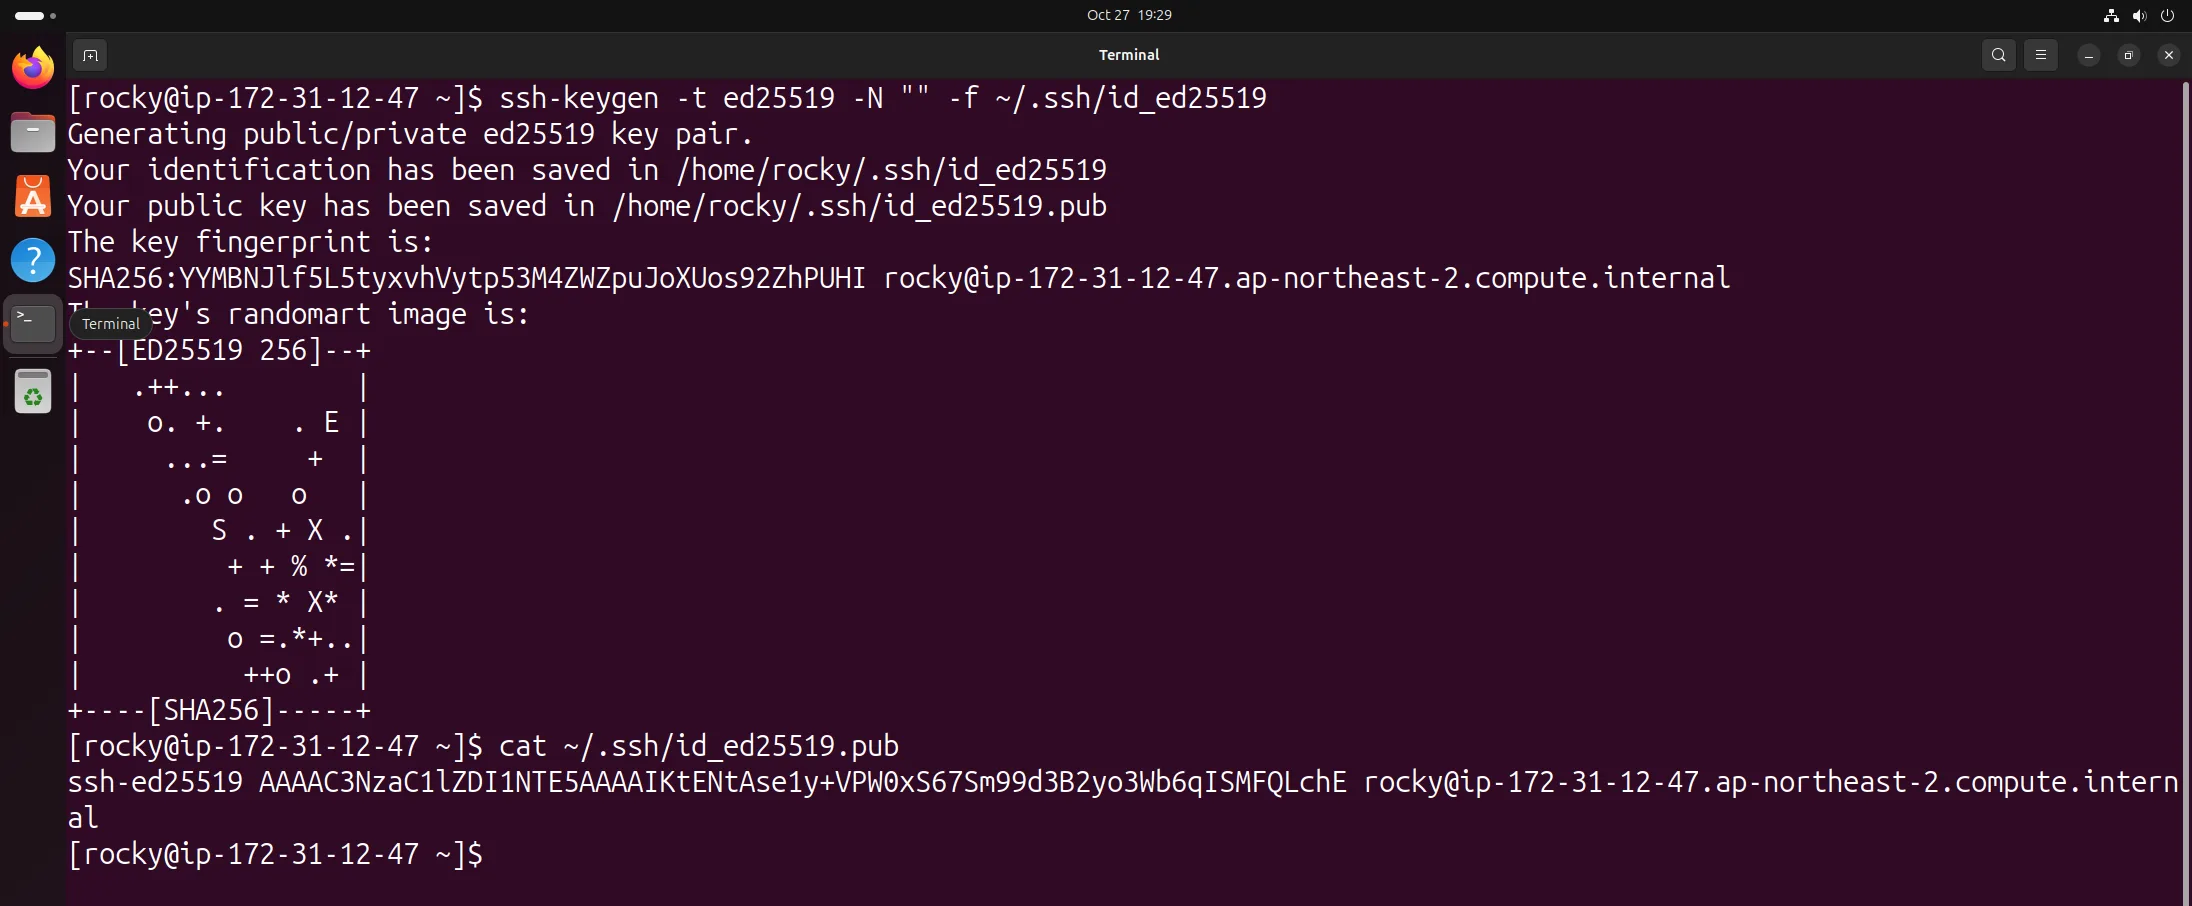
Generating the key on main and its public key
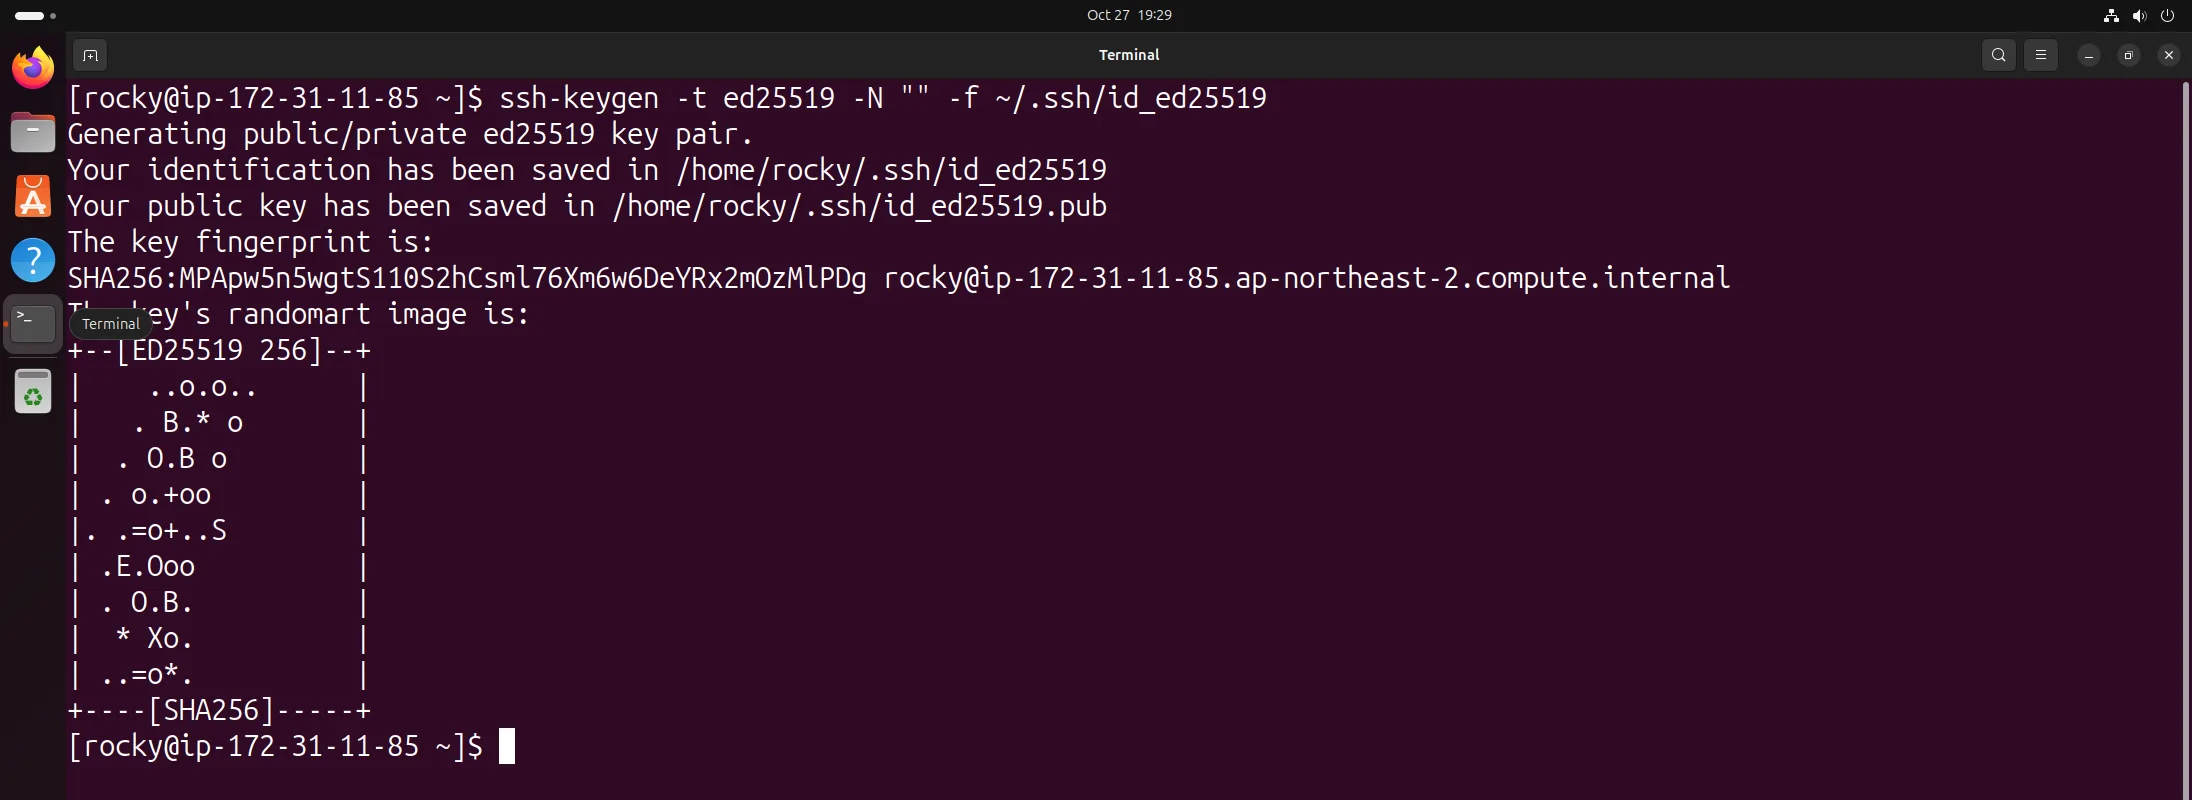
Generating the key on worker
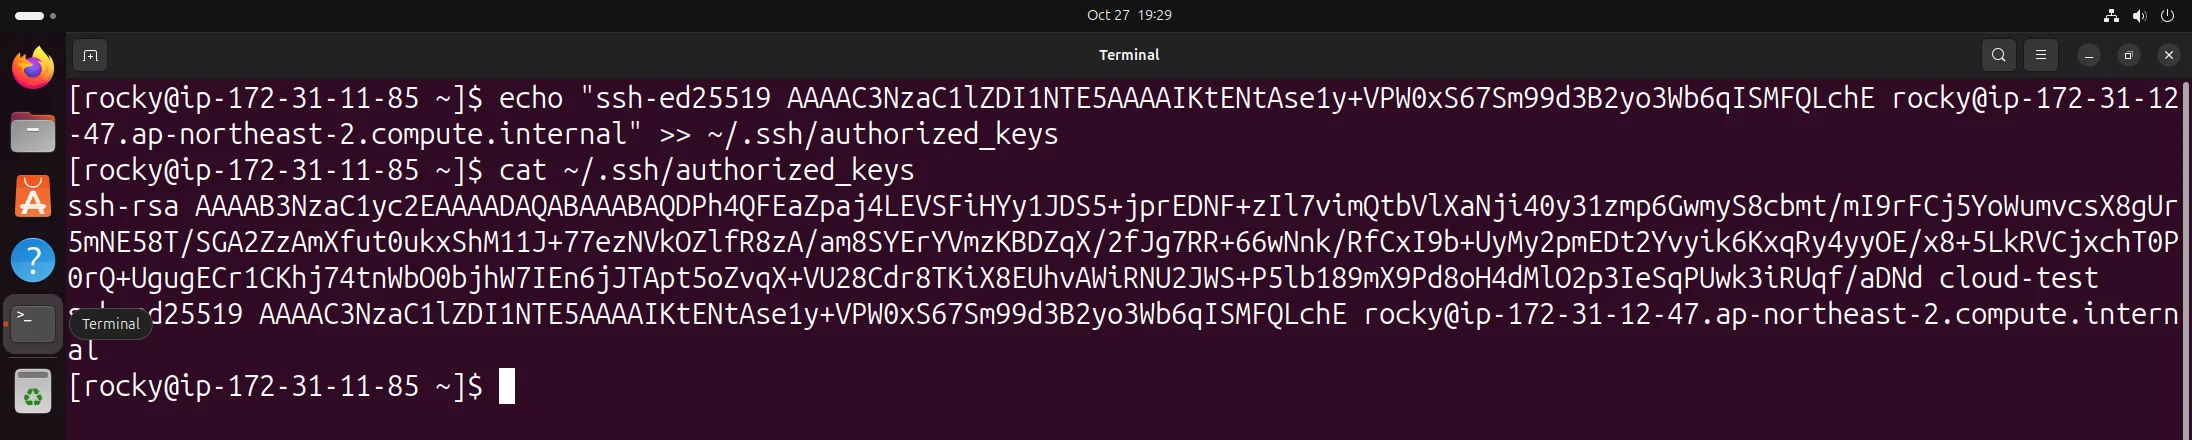
authorized_keys on worker — the cloud-test key and main's key
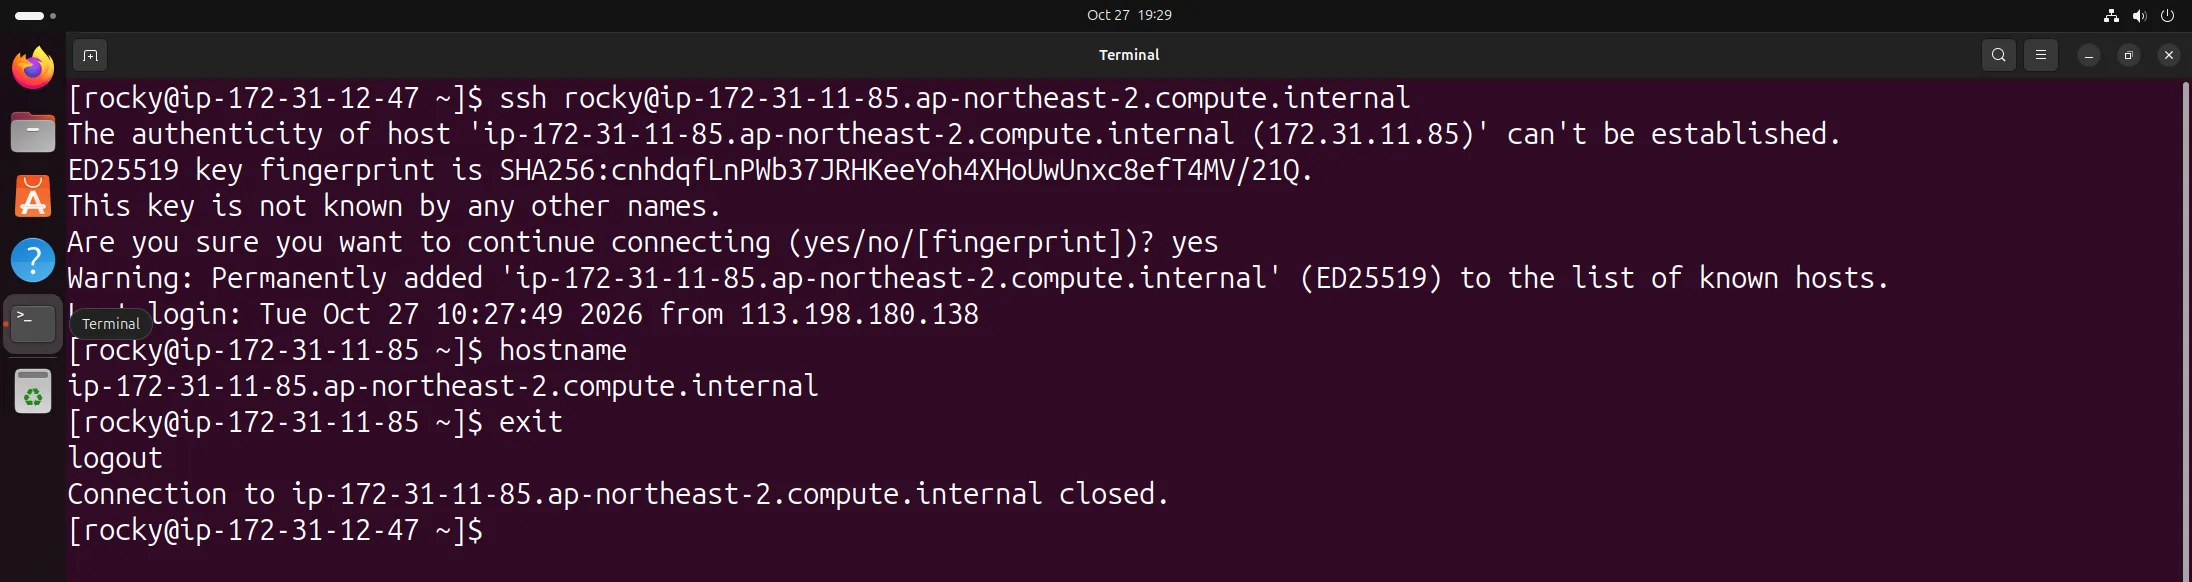
SSH from main to worker
Sharing the pool password and checking 2 nodes
Both nodes are configured to authenticate daemons with PASSWORD, so they only trust each other if they hold the same pool password file (slides 32–35). Running condor_store_cred add -c on main creates the pool password at /etc/condor/passwords.d/POOL (readable by root only). I typed a random string as the password and didn't record it. I copied the file as rocky-owned, sent it to /tmp on worker with scp, moved it to the same location on worker and set permissions back to 600 and root. After confirming both nodes had the same md5 and restarting condor, condor_status showed 2 nodes (the problem I hit along the way is Problem 1 below).
condor_store_cred add -c                                   # main, root
cp /etc/condor/passwords.d/POOL /home/rocky/POOL; chown rocky:rocky /home/rocky/POOL; exit
scp /home/rocky/POOL rocky@ip-172-31-11-85.ap-northeast-2.compute.internal:/tmp/ && rm /home/rocky/POOL
mkdir -p /etc/condor/passwords.d && mv /tmp/POOL /etc/condor/passwords.d/          # worker, root
chmod 600 /etc/condor/passwords.d/POOL; chown root:root /etc/condor/passwords.d/POOL
md5sum /etc/condor/passwords.d/POOL; systemctl restart condor                    # both
condor_status                                                                    # main
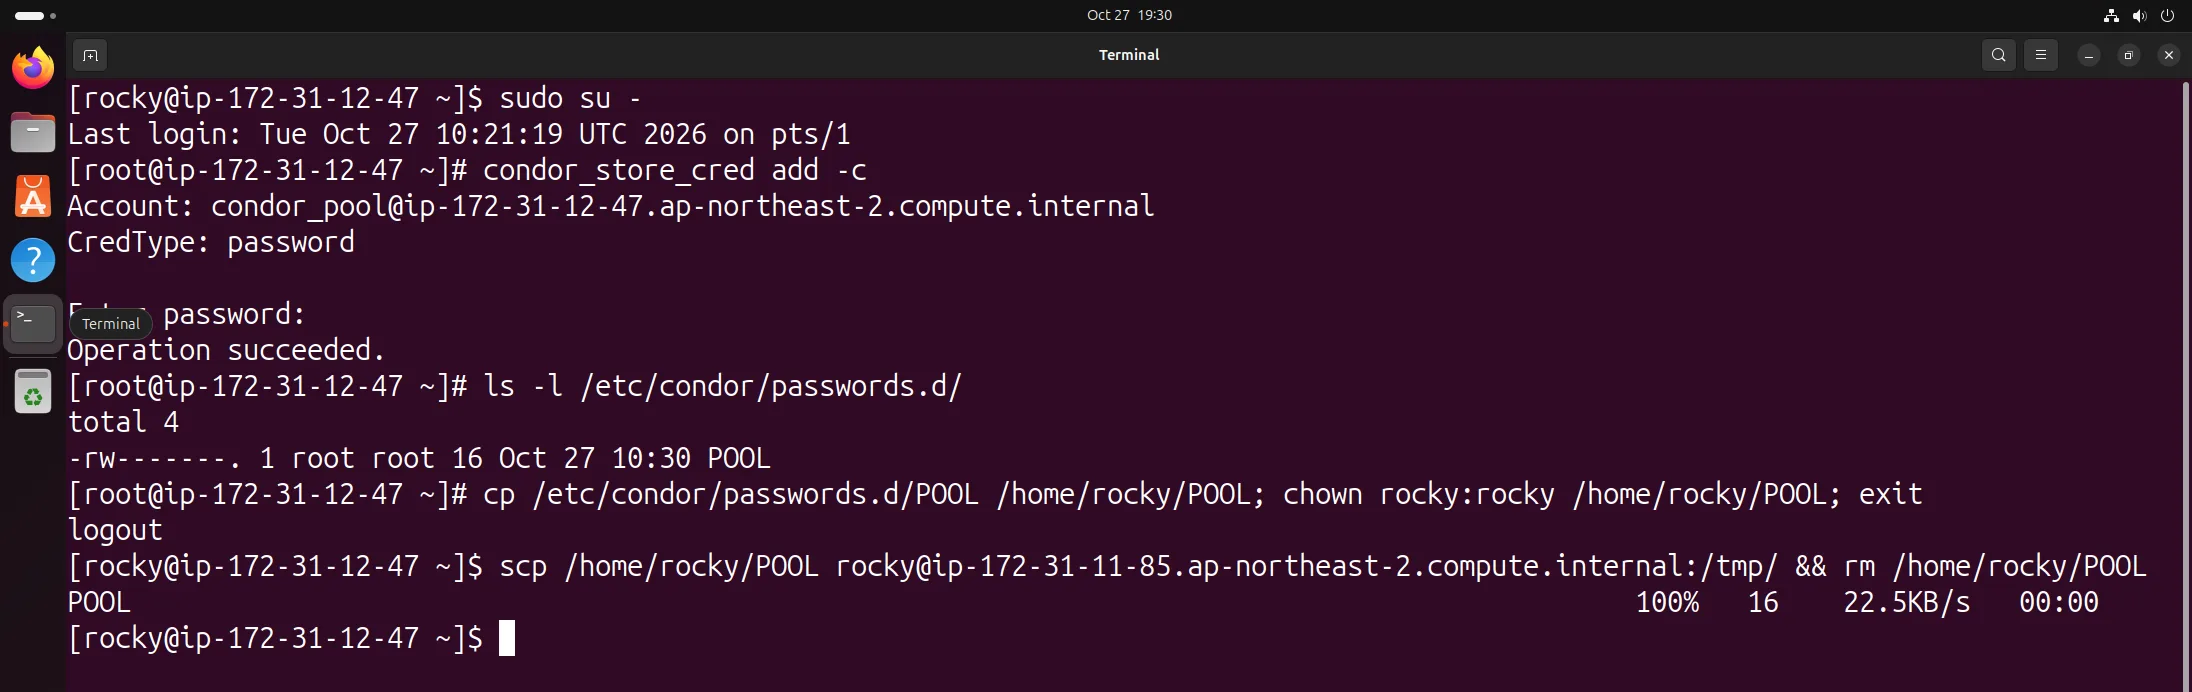
Creating the pool password file on main and sending it to worker
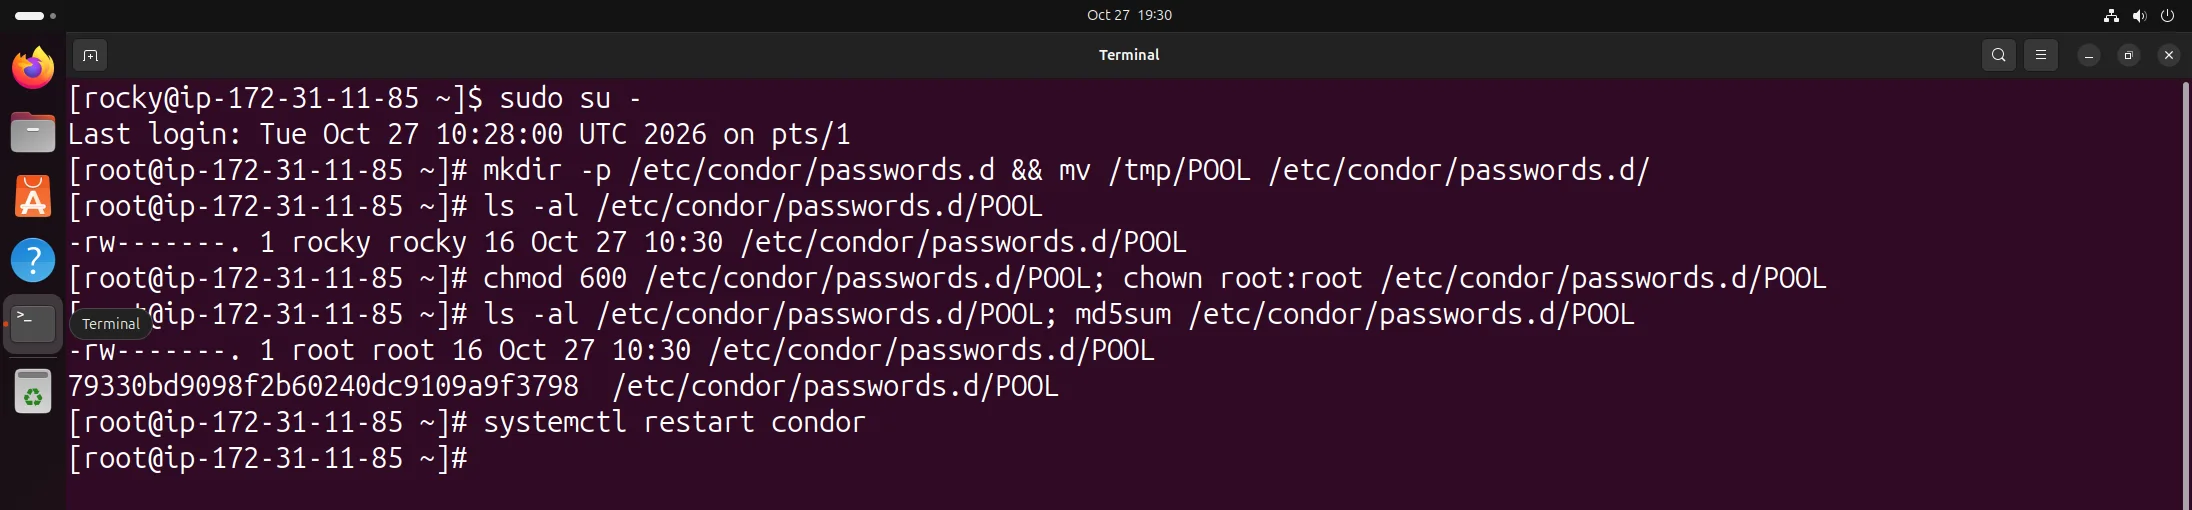
Installing POOL on worker — permissions 600 root, md5 79330bd9…
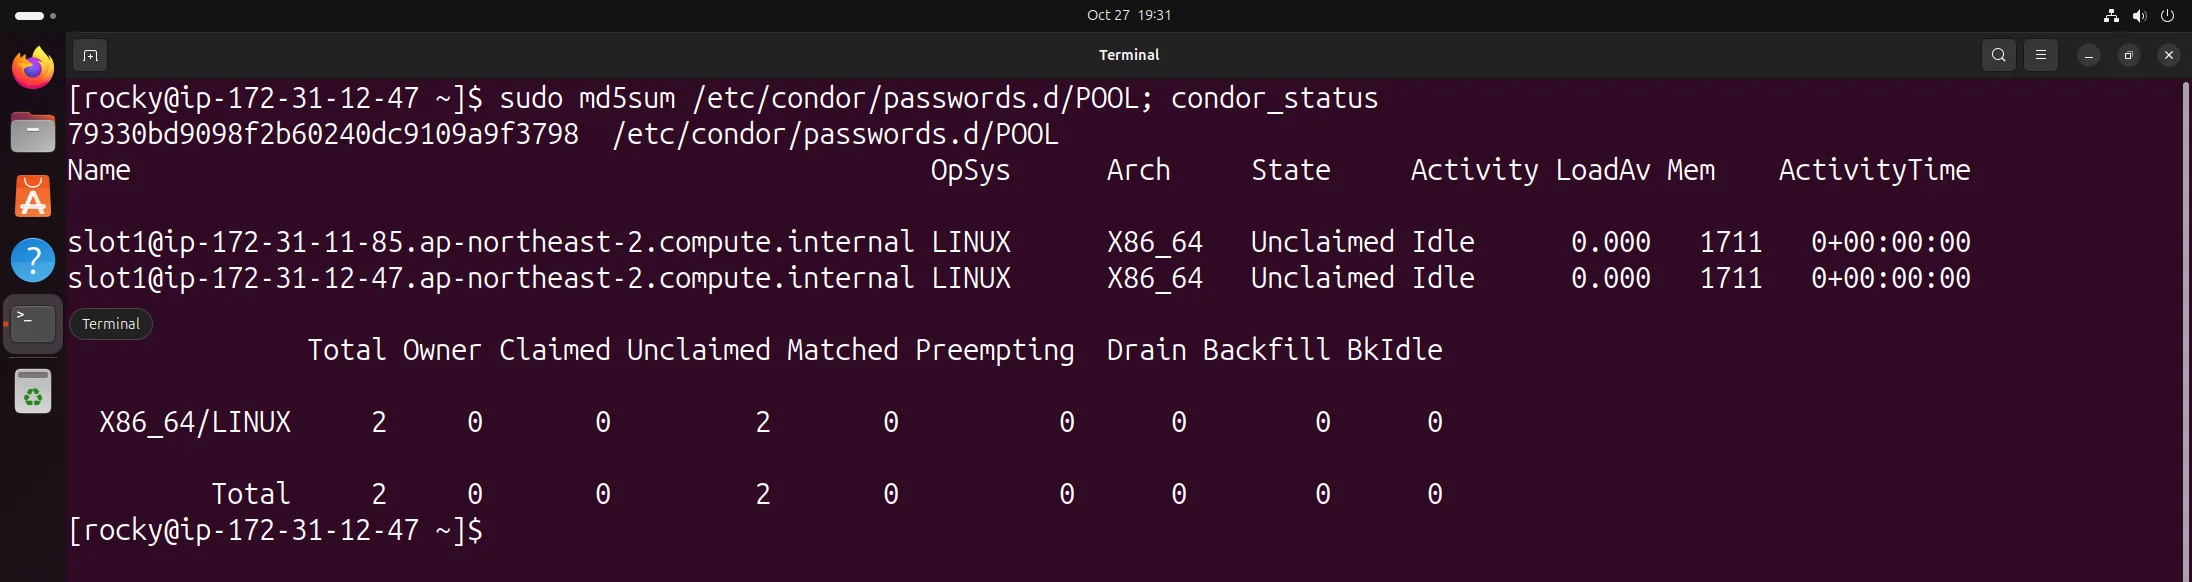
Same md5 on main, and condor_status shows main and worker (slide 35)
Creating the worker machine image
I saved the worker instance as is into the AMI aws-htcondor-worker (slides 36–38). The image contains the HTCondor packages, the config pointing at main, the POOL file and the enabled service, so any instance created from it joins main on its own as soon as it boots. That's what dynamic management builds on. While the image is being created, worker reboots once for a consistent disk snapshot, and I confirmed it rejoined the pool after the reboot.
WIMG=$(aws ec2 create-image --instance-id $WORKER --name aws-htcondor-worker --description "HTCondor worker (Rocky 10.2, condor 25.0)" --query ImageId --output text)
aws ec2 wait image-available --image-ids $WIMG
aws ec2 describe-images --owners self --query "Images[].[ImageId,Name,State,BlockDeviceMappings[0].Ebs.SnapshotId]" --output text

Creating AMI aws-htcondor-worker — pending → available, EBS snapshot
3. The dynamic management program
Written with Python boto3
Instead of Java, I wrote it with boto3, the AWS SDK for Python (~/cloud_project/aws_control.py, 156 lines). The textbook's Java SDK v1 (1.11.x) reached end of support at the end of 2025, and boto3 installs as an Ubuntu package (python3-boto3), so there's no JDK or library bundle to download. The menu and output format match the screens on slides 42–63. The program creates one boto3.client("ec2") at startup and reads credentials and region from the ~/.aws files set up earlier. The EC2 API each menu calls:
| Menu | boto3 call (EC2 API) | What it does |
|---|---|---|
| 1. list instance | describe_instances (paginator) | ID, Name tag, type, state and private IP of every instance |
| 2. available zones | describe_availability_zones | Availability zone IDs and names in the current region, and the count |
| 3. start instance | start_instances | Start the instance with the given ID |
| 4. available regions | describe_regions | Regions the account can use and their EC2 endpoints |
| 5. stop instance | stop_instances | Stop the instance with the given ID |
| 6. create instance | run_instances | Create one t3.small, cloud-test, HTCondor instance from the given AMI, Name tag htcondor-worker |
| 7. reboot instance | reboot_instances | Reboot the instance with the given ID |
| 8. list images | describe_images(Owners=["self"]) | AMIs created by my account |
| 99. quit | — | Exit |
API errors (no permission, bad ID and so on) are caught as ClientError, which prints just the message and goes back to the menu, and non-numeric input prints concentration! and is ignored. The key pair, security group and type for create can be changed with environment variables. The full source:
#!/usr/bin/env python3
"""Amazon AWS Control Panel using SDK (boto3).

HW5 / Ch9 "AWS dynamic resource management" tool. Same menu as the
textbook's Java version (awsTest.java), written with the AWS SDK for Python.

Credentials and default region come from ~/.aws (set with `aws configure`).
Settings for "create instance" can be overridden with environment variables:
  AWS_KEY_NAME        key pair name           (default: cloud-test)
  AWS_SECURITY_GROUP  security group name     (default: HTCondor)
  AWS_INSTANCE_TYPE   instance type           (default: t3.small)
"""
import os
import sys

import boto3
from botocore.exceptions import BotoCoreError, ClientError

KEY_NAME = os.environ.get("AWS_KEY_NAME", "cloud-test")
SECURITY_GROUP = os.environ.get("AWS_SECURITY_GROUP", "HTCondor")
INSTANCE_TYPE = os.environ.get("AWS_INSTANCE_TYPE", "t3.small")

ec2 = boto3.client("ec2")

MENU = """
------------------------------------------------------------
           Amazon AWS Control Panel using SDK
------------------------------------------------------------
  1. list instance                2. available zones
  3. start instance               4. available regions
  5. stop instance                6. create instance
  7. reboot instance              8. list images
                                 99. quit
------------------------------------------------------------"""


def name_tag(tags):
    for t in tags or []:
        if t["Key"] == "Name":
            return t["Value"]
    return "-"


def list_instances():
    print("Listing instances....")
    pages = ec2.get_paginator("describe_instances").paginate()
    for page in pages:
        for res in page["Reservations"]:
            for i in res["Instances"]:
                print(
                    f"[id] {i['InstanceId']}, "
                    f"[name] {name_tag(i.get('Tags')):<15}, "
                    f"[type] {i['InstanceType']}, "
                    f"[state] {i['State']['Name']:>10}, "
                    f"[private IP] {i.get('PrivateIpAddress', '-')}"
                )


def available_zones():
    print("Available zones....")
    zones = ec2.describe_availability_zones()["AvailabilityZones"]
    for z in zones:
        print(f"[id] {z['ZoneId']}, [region] {z['RegionName']:>15}, [zone] {z['ZoneName']:>15}")
    print(f"You have access to {len(zones)} Availability Zones.")


def available_regions():
    print("Available regions ....")
    for r in ec2.describe_regions()["Regions"]:
        print(f"[region] {r['RegionName']:>15}, [endpoint] {r['Endpoint']}")


def start_instance(iid):
    print(f"Starting .... {iid}")
    ec2.start_instances(InstanceIds=[iid])
    print(f"Successfully started instance {iid}")


def stop_instance(iid):
    ec2.stop_instances(InstanceIds=[iid])
    print(f"Successfully stop instance {iid}")


def reboot_instance(iid):
    print(f"Rebooting .... {iid}")
    ec2.reboot_instances(InstanceIds=[iid])
    print(f"Successfully rebooted instance {iid}")


def create_instance(ami):
    res = ec2.run_instances(
        ImageId=ami,
        InstanceType=INSTANCE_TYPE,
        KeyName=KEY_NAME,
        SecurityGroups=[SECURITY_GROUP],
        MinCount=1,
        MaxCount=1,
        TagSpecifications=[{
            "ResourceType": "instance",
            "Tags": [{"Key": "Name", "Value": "htcondor-worker"}],
        }],
    )
    iid = res["Instances"][0]["InstanceId"]
    print(f"Successfully started EC2 instance {iid} based on AMI {ami}")


def list_images():
    print("Listing images....")
    for img in ec2.describe_images(Owners=["self"])["Images"]:
        print(f"[ImageID] {img['ImageId']}, [Name] {img.get('Name', '-')}, "
              f"[Owner] {img['OwnerId']}, [State] {img['State']}")


ACTIONS = {
    1: (list_instances, None),
    2: (available_zones, None),
    3: (start_instance, "Enter instance id: "),
    4: (available_regions, None),
    5: (stop_instance, "Enter instance id: "),
    6: (create_instance, "Enter ami id: "),
    7: (reboot_instance, "Enter instance id: "),
    8: (list_images, None),
}


def main():
    while True:
        print(MENU)
        try:
            choice = int(input("Enter an integer: ").strip())
        except ValueError:
            print("concentration!")
            continue
        except EOFError:
            return
        if choice == 99:
            print("bye!")
            return
        if choice not in ACTIONS:
            print("concentration!")
            continue
        func, prompt = ACTIONS[choice]
        try:
            if prompt:
                arg = input(prompt).strip()
                if not arg:
                    continue
                func(arg)
            else:
                func()
        except (ClientError, BotoCoreError) as e:
            print(f"Error: {e}")


if __name__ == "__main__":
    sys.exit(main())
sudo apt install -y python3-boto3
cd ~/cloud_project && python3 aws_control.py
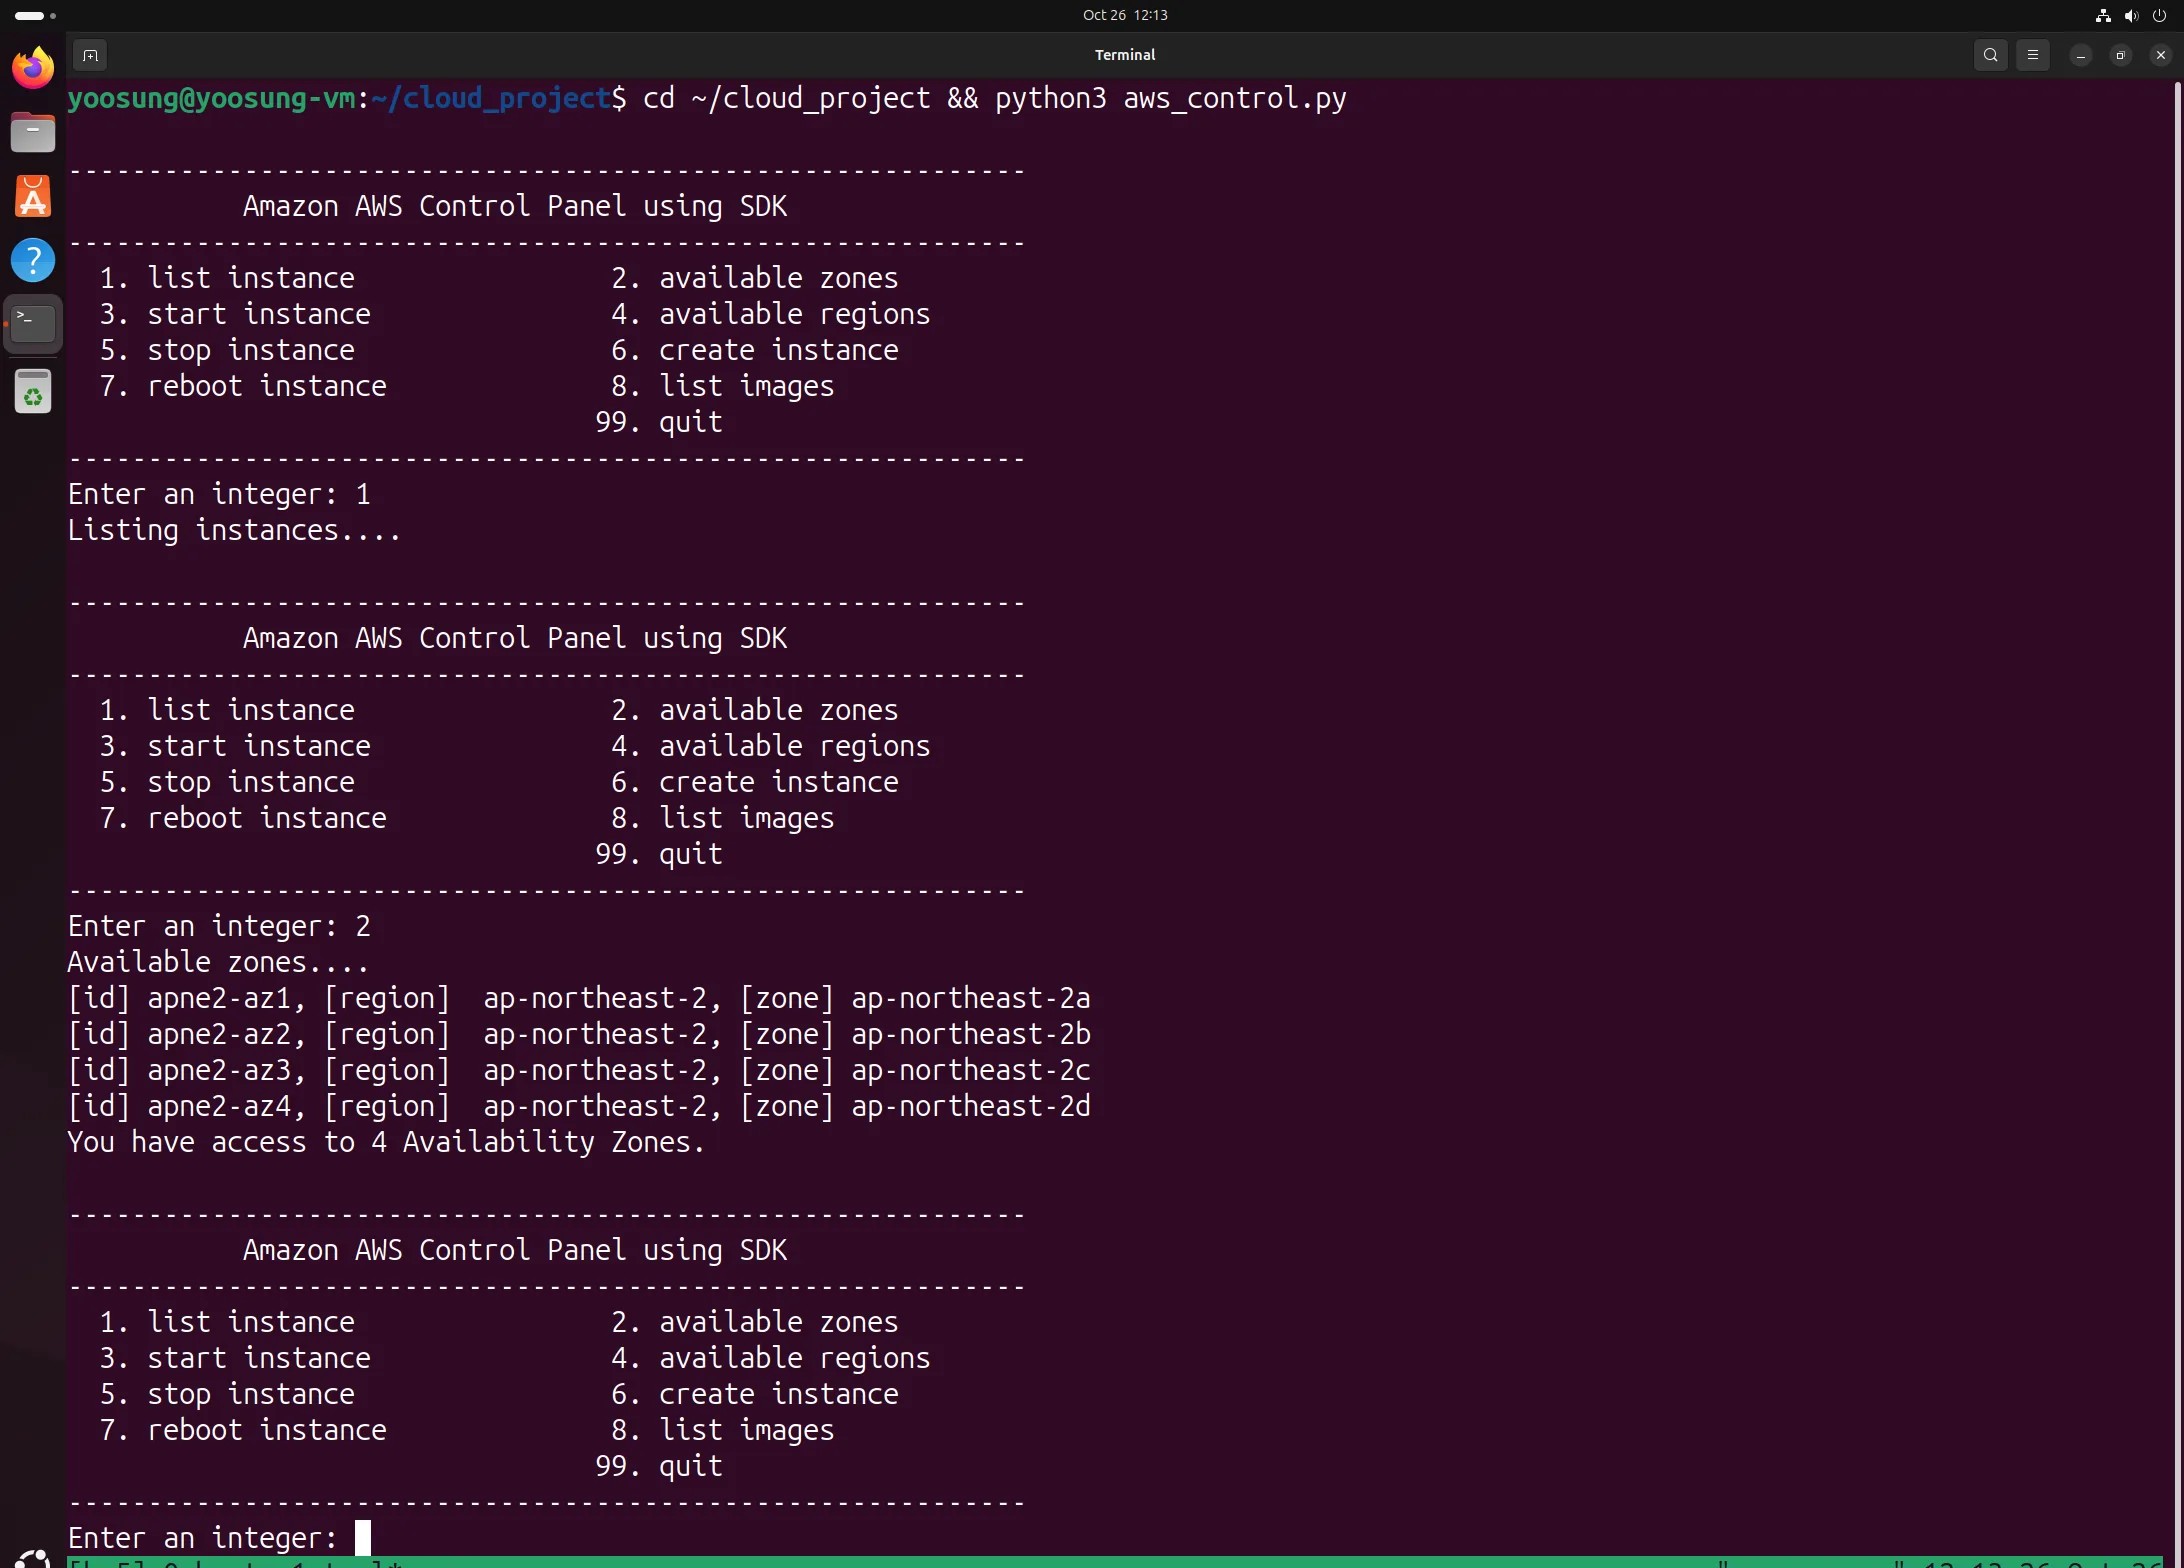
Running the program — menu, 1 list instance (empty since no instances yet), 2 available zones (4 zones in Seoul)
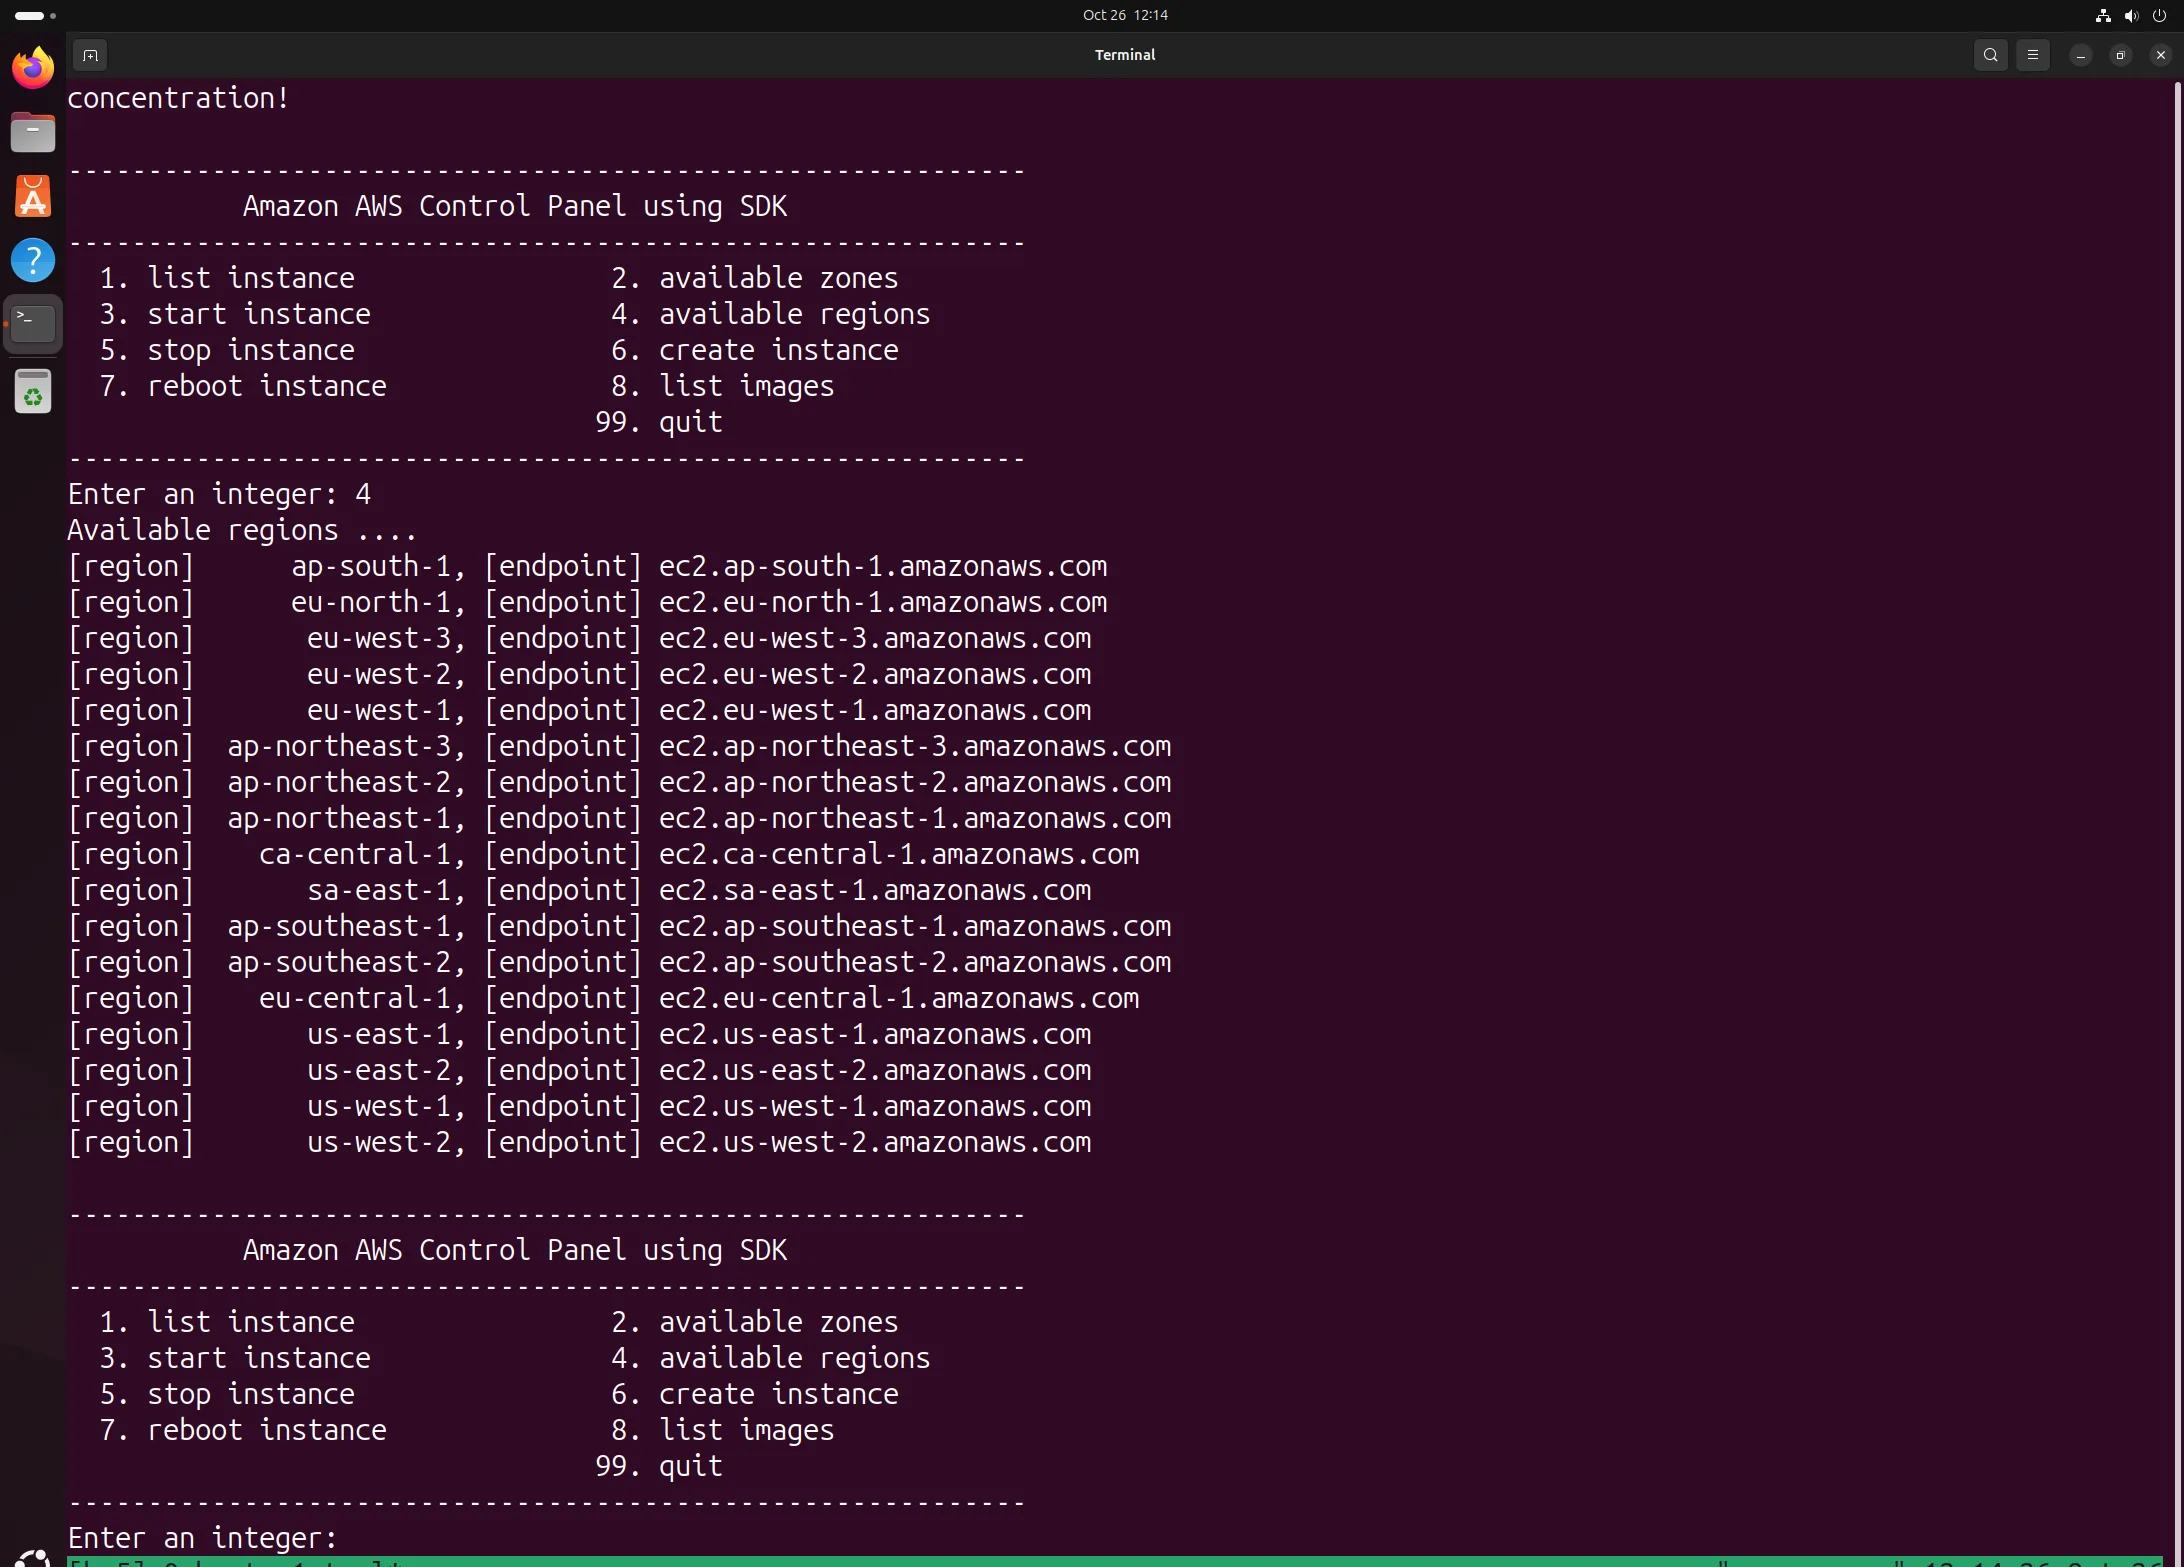
4 available regions — 17 regions and their endpoints (the top line is the message for non-numeric input)
Menu layout
I implemented menus 1–8 and 99 with the same numbers and layout as the assignment. The EC2 API each menu calls is in the table above. Results for 2 and 4 are in the two figures above, and results for 1, 3, 5, 6, 7 and 8 appear in the Condor pool check below.
Compared with the Java SDK
boto3 exposes the same EC2 API as the Java SDK under the same names (in snake_case), so the structure maps 1:1 to the Java program on the slides. The Java version builds a client with AmazonEC2ClientBuilder and passes a DescribeInstancesRequest object, while boto3 is called with keyword arguments like client.describe_instances() and returns dictionaries. There's no compiling or classpath setup (slide 75), so running it is simpler.
How it relates to the REST API
I didn't call the REST API directly. But boto3 and the AWS CLI send requests to EC2's HTTPS API under the hood (requests like Action=DescribeInstances to https://ec2.ap-northeast-2.amazonaws.com/), and sign every request with the access key (Signature Version 4). That signature includes the request time, which is why requests were rejected when the Ubuntu host's clock fell behind during the lab (Problem 2 below). The endpoint list from menu 4 is the list of these API addresses.
4. Watching the Condor pool change
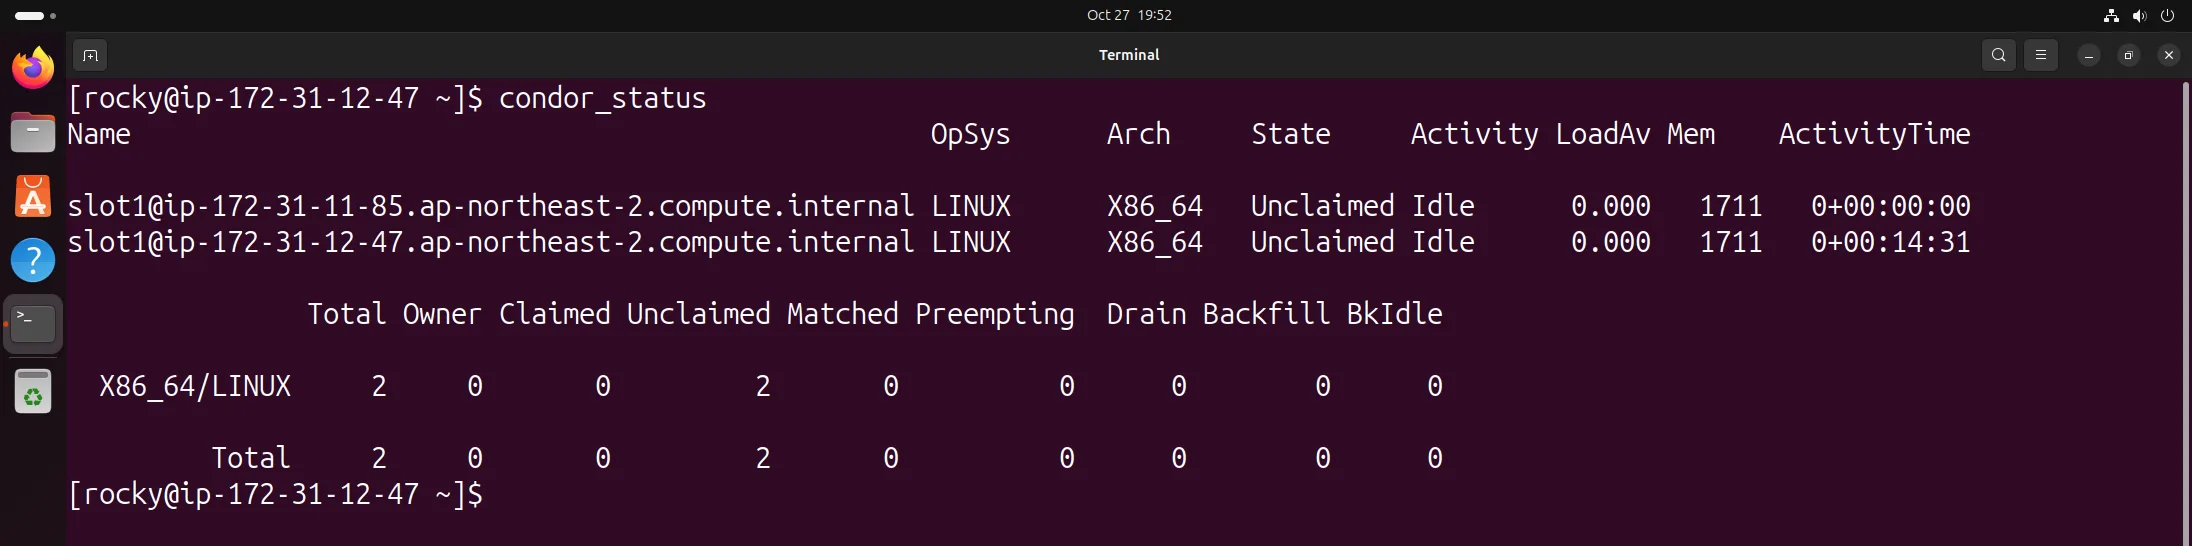
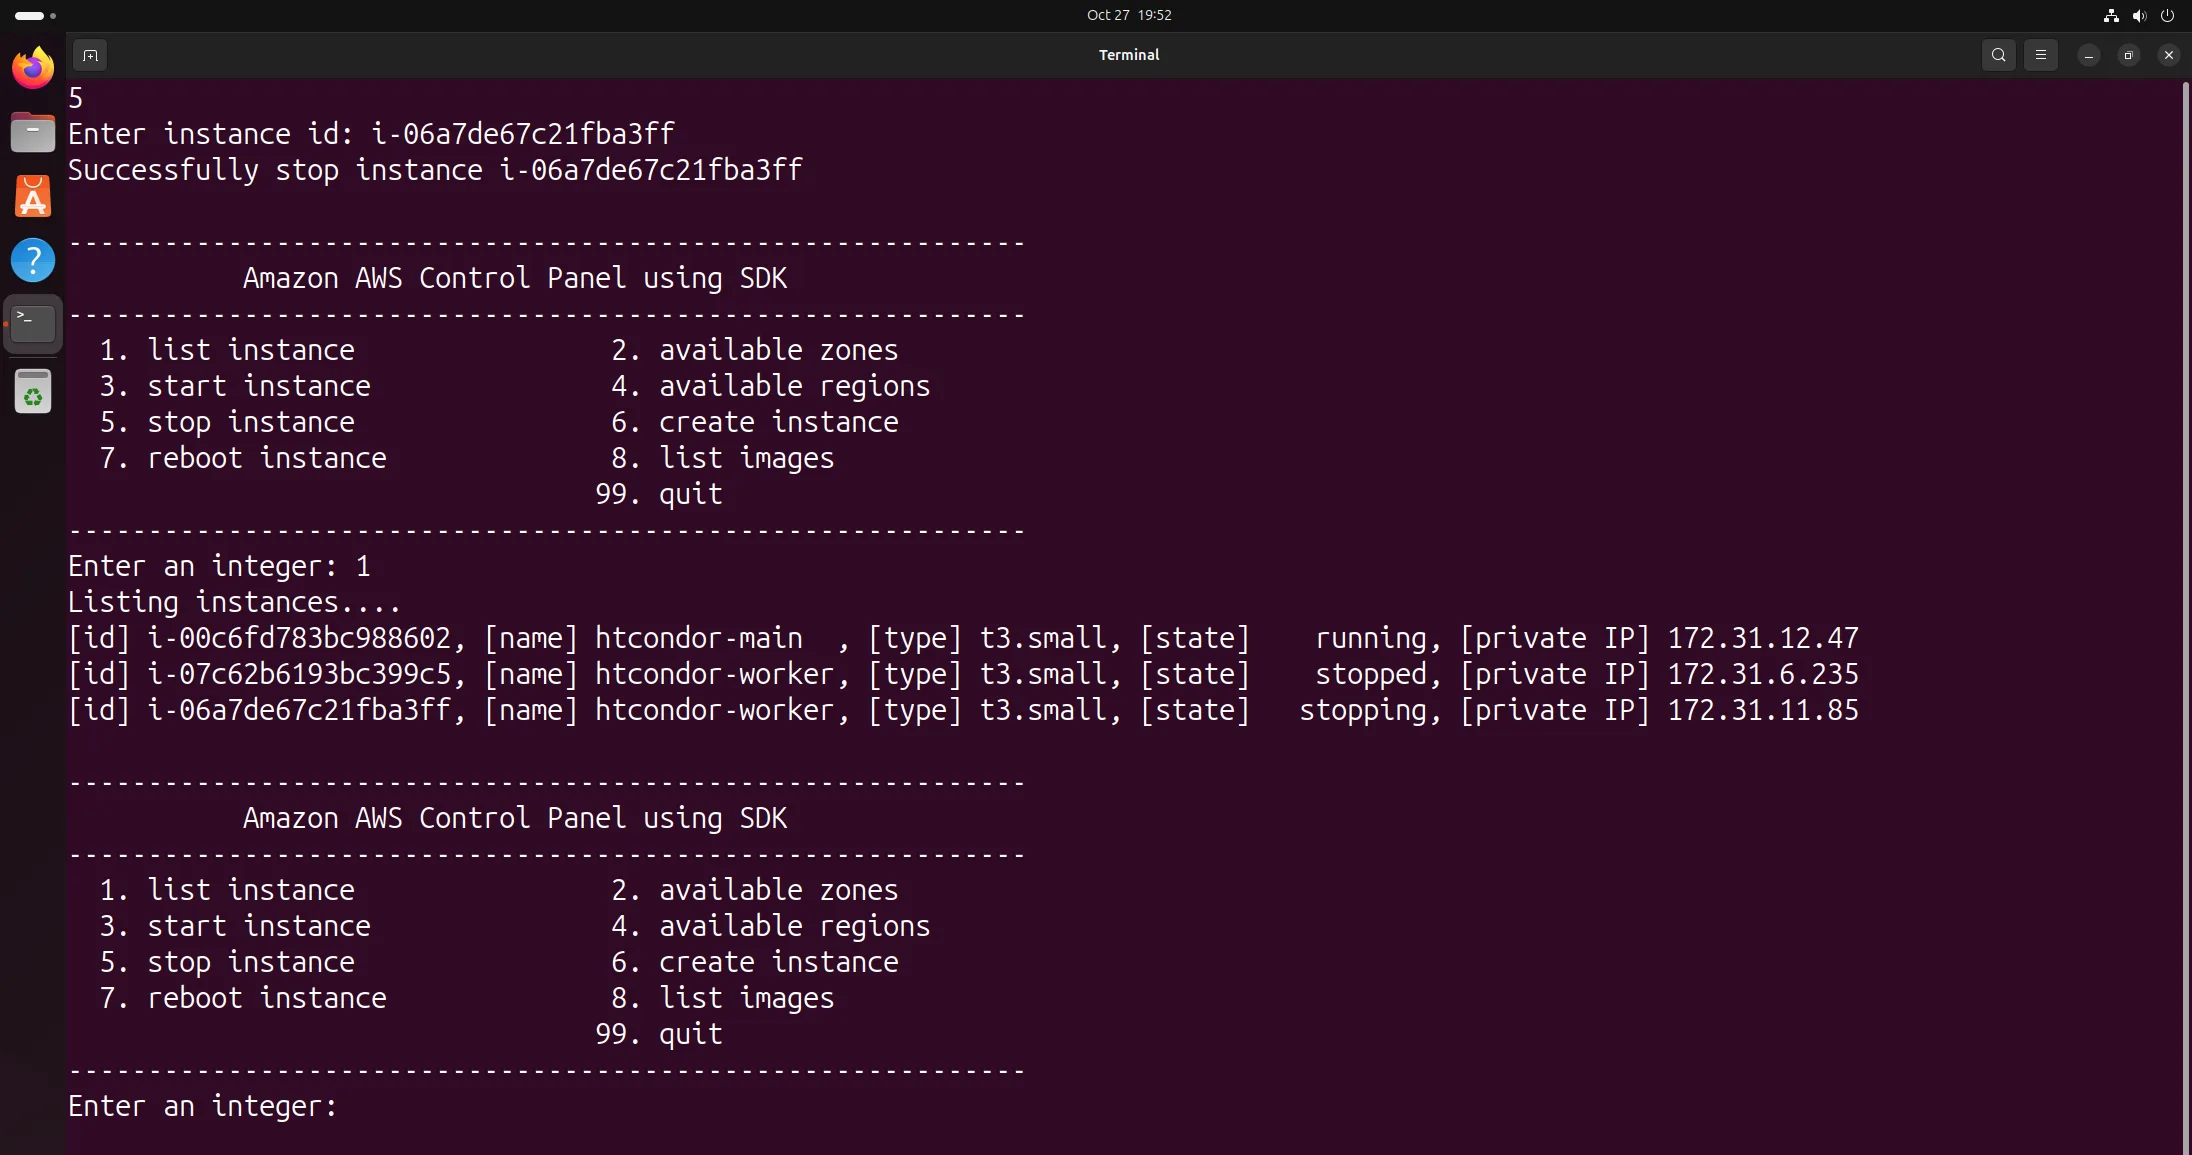
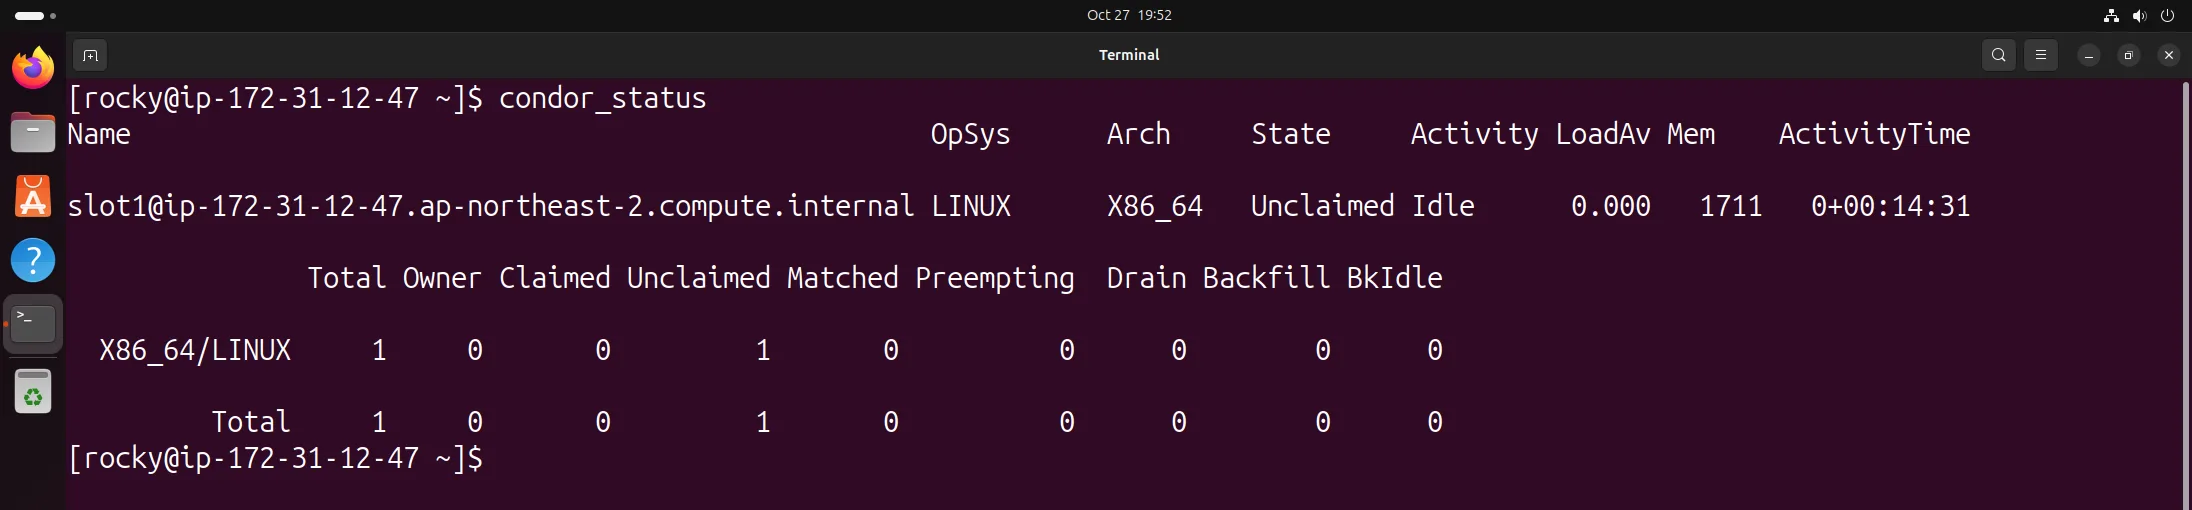
I operated the instances with the program (the tool window on the left in tmux) and ran condor_status on the main node each time to count the slots in the pool. The count went 2 → 1 → 2 → 3 → 2 → 1.
| Action (menu) | Instance state | Pool | Figures |
|---|---|---|---|
| Starting state (1 list) | main, worker running | 2 nodes | 25 (Fig. 21) |
| Stop worker (5 stop) | worker stopping | 1 node | 26, 27 |
| Start worker (3 start) | worker pending | 2 nodes | 28, 29 |
| Create from AMI (8 list images, 6 create) | new worker running | 3 nodes | 30, 31 |
| Stop new worker (5 stop) | new worker stopping | 2 nodes | 32, 33 |
| Stop first worker (5 stop) | worker stopping | 1 node | 34, 35 |
| Reboot main (7 reboot) | main rebooting | 1 node | 36, 37 |
stop — leaving the pool
When stop is requested, the instance goes to stopping and the OS shuts down, and as systemd stops condor, the worker's startd withdraws its ad from the collector. So within a few seconds the worker disappeared from condor_status on main (slides 53–58).
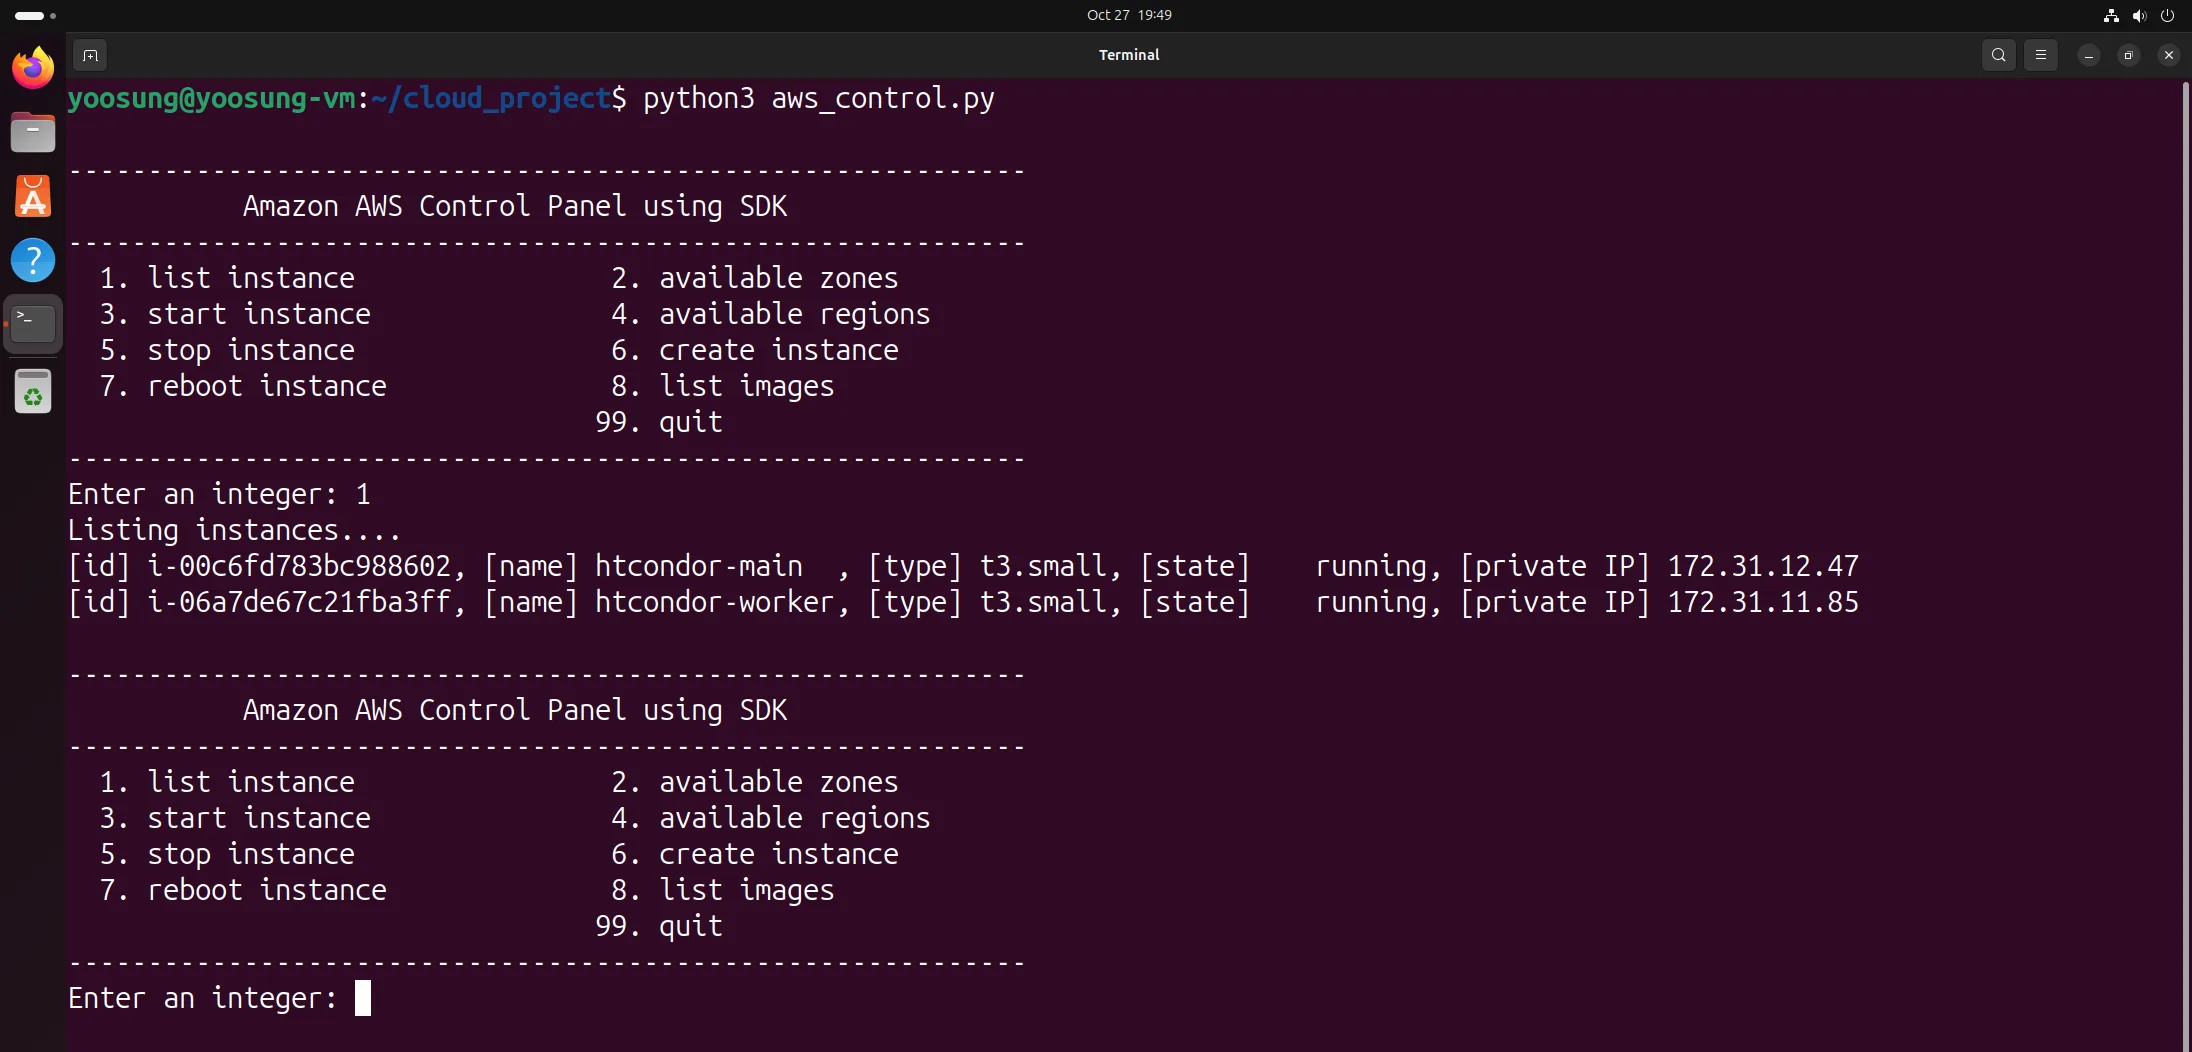
1 list instance — main and worker running
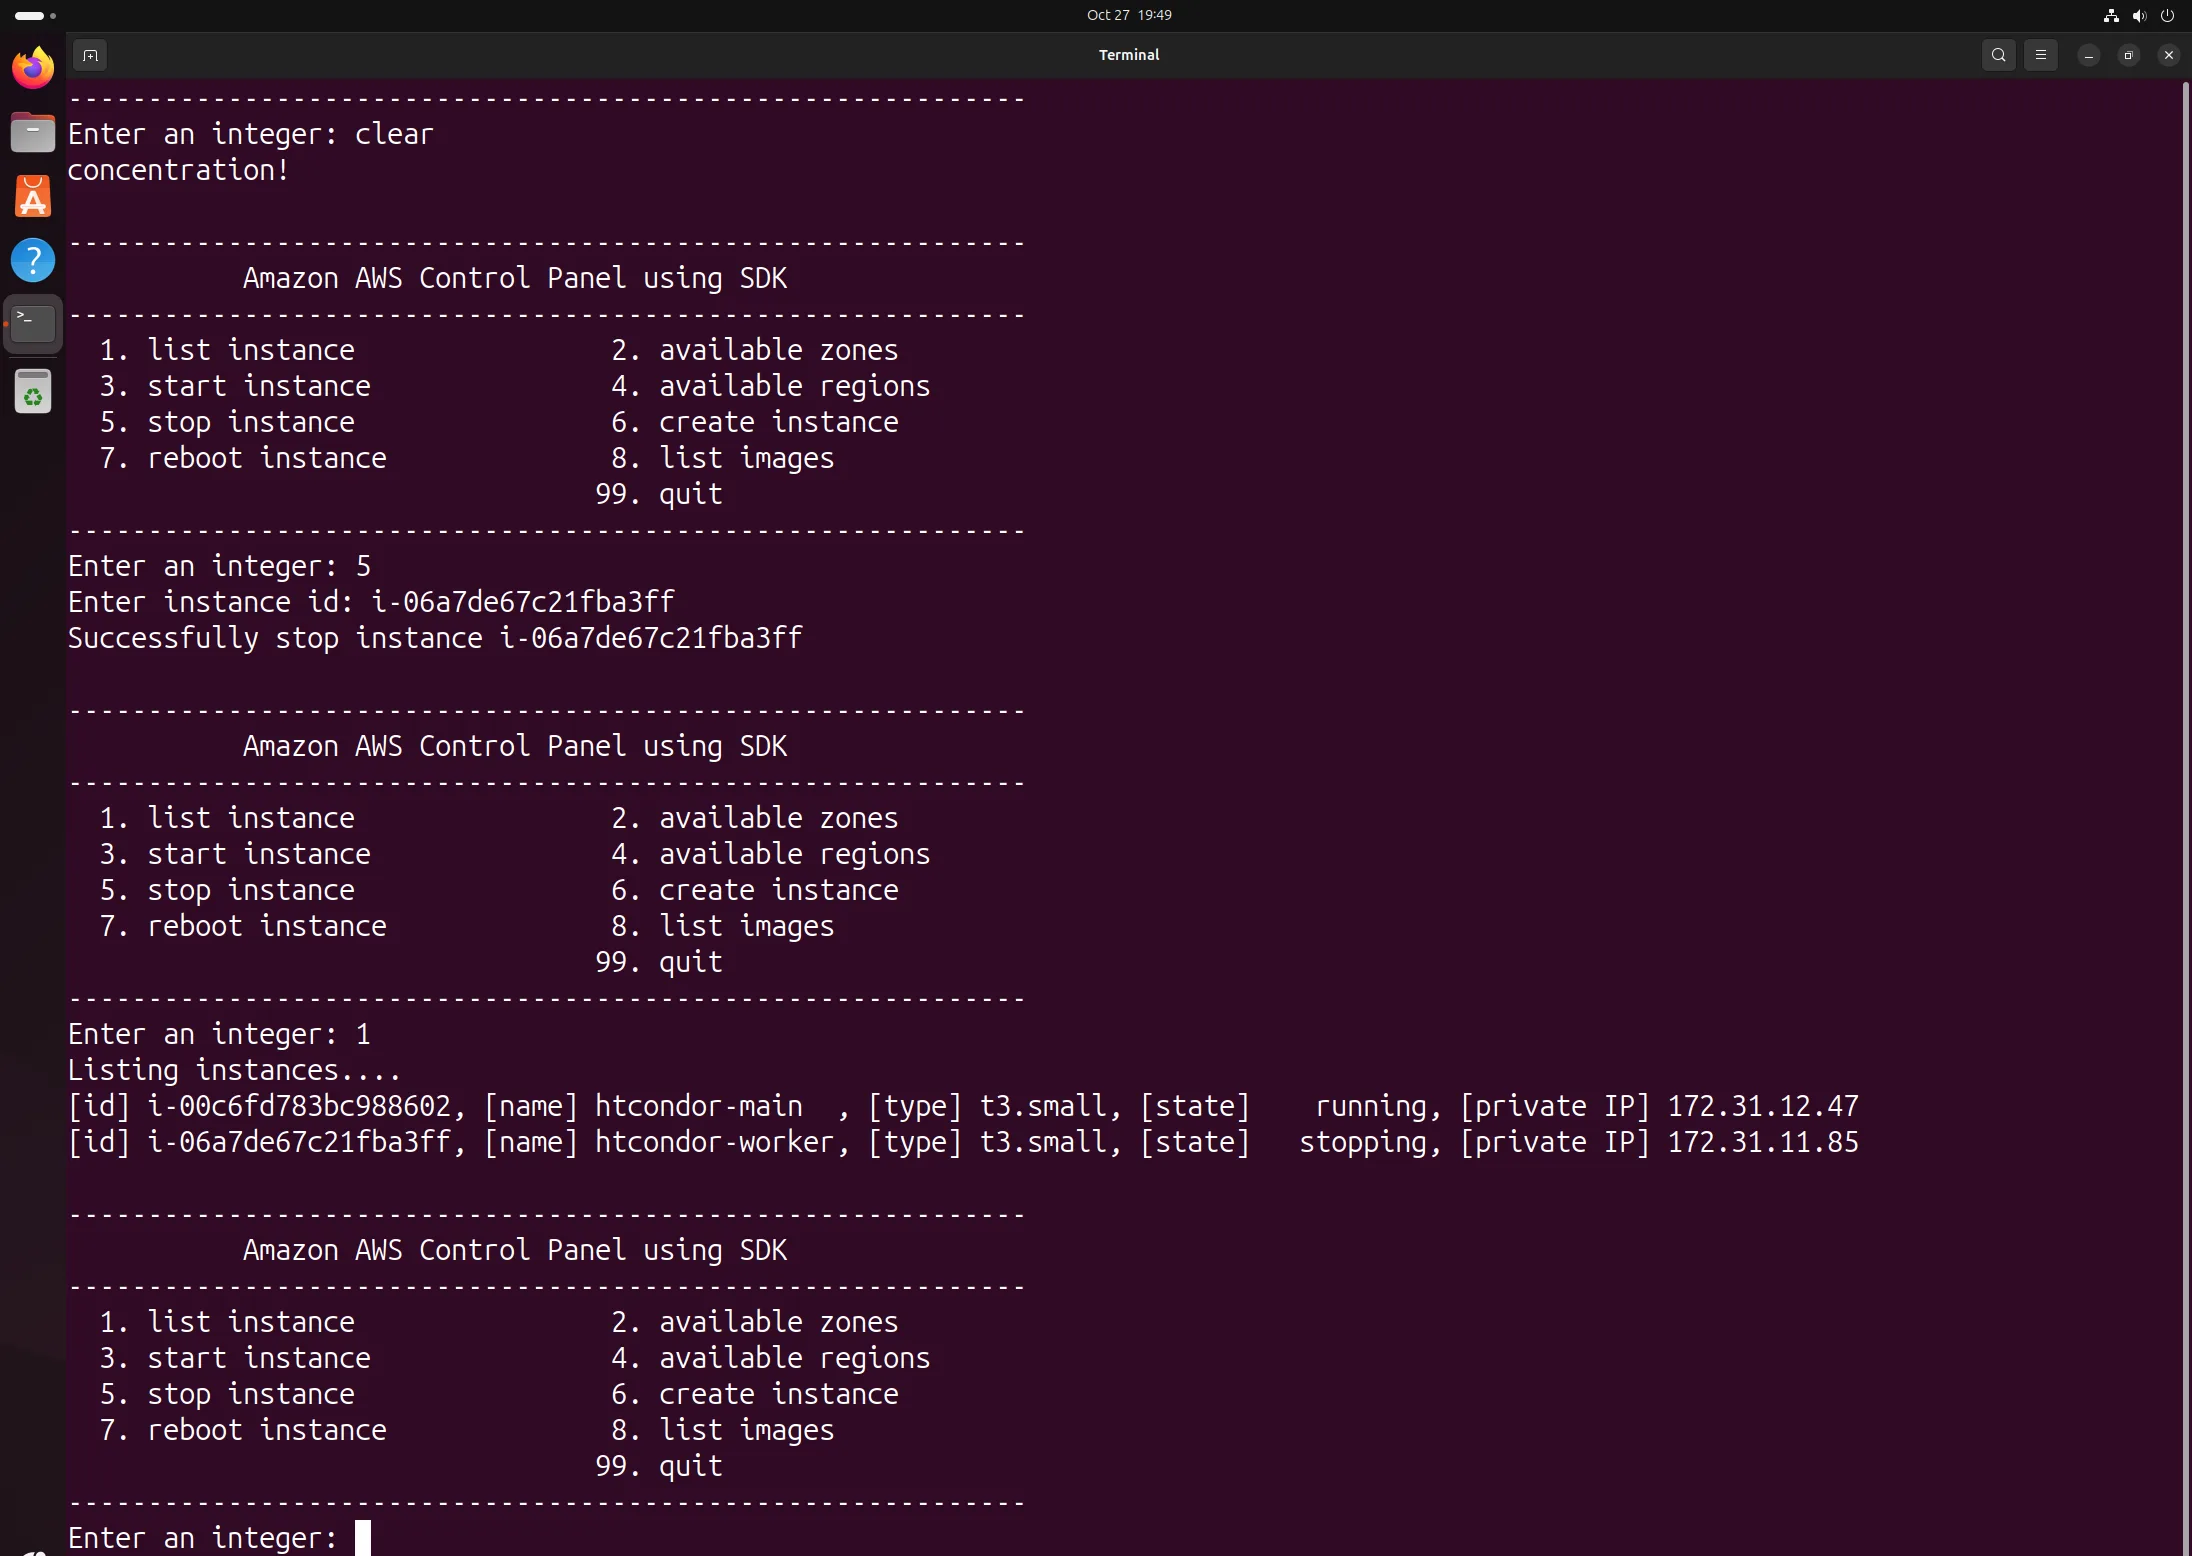
Stopping worker with 5 stop instance → stopping in the list (the top two lines are messages for non-numeric input)
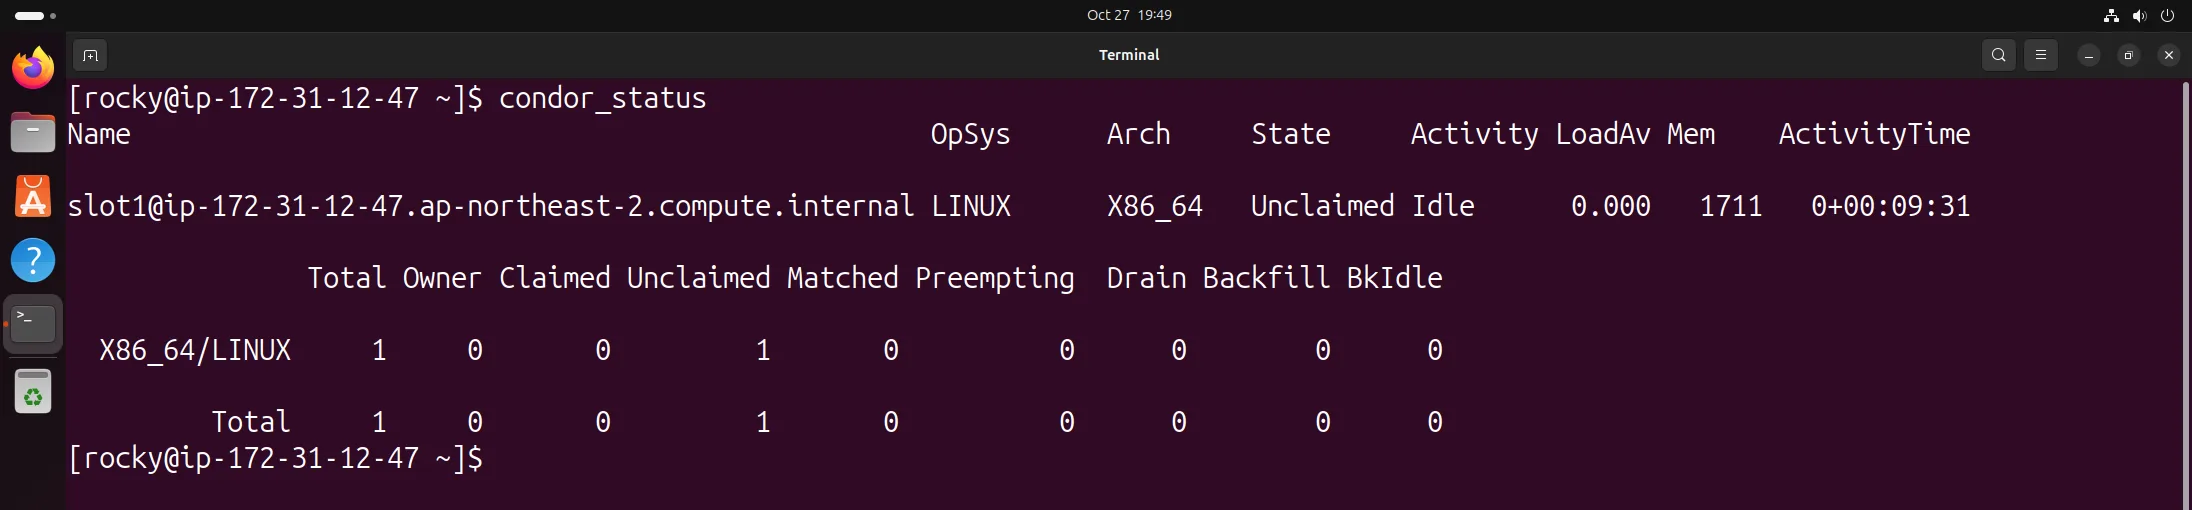
condor_status after stopping worker — main only
start — rejoining the pool
When the stopped worker starts, the enabled condor comes up on boot and startd sends its information to CONDOR_HOST (main) from the config. About 20 seconds after the start request, the pool was back to 2 nodes. The private IP stays the same across stop and start, so main sees it as the same node (slides 43–48).
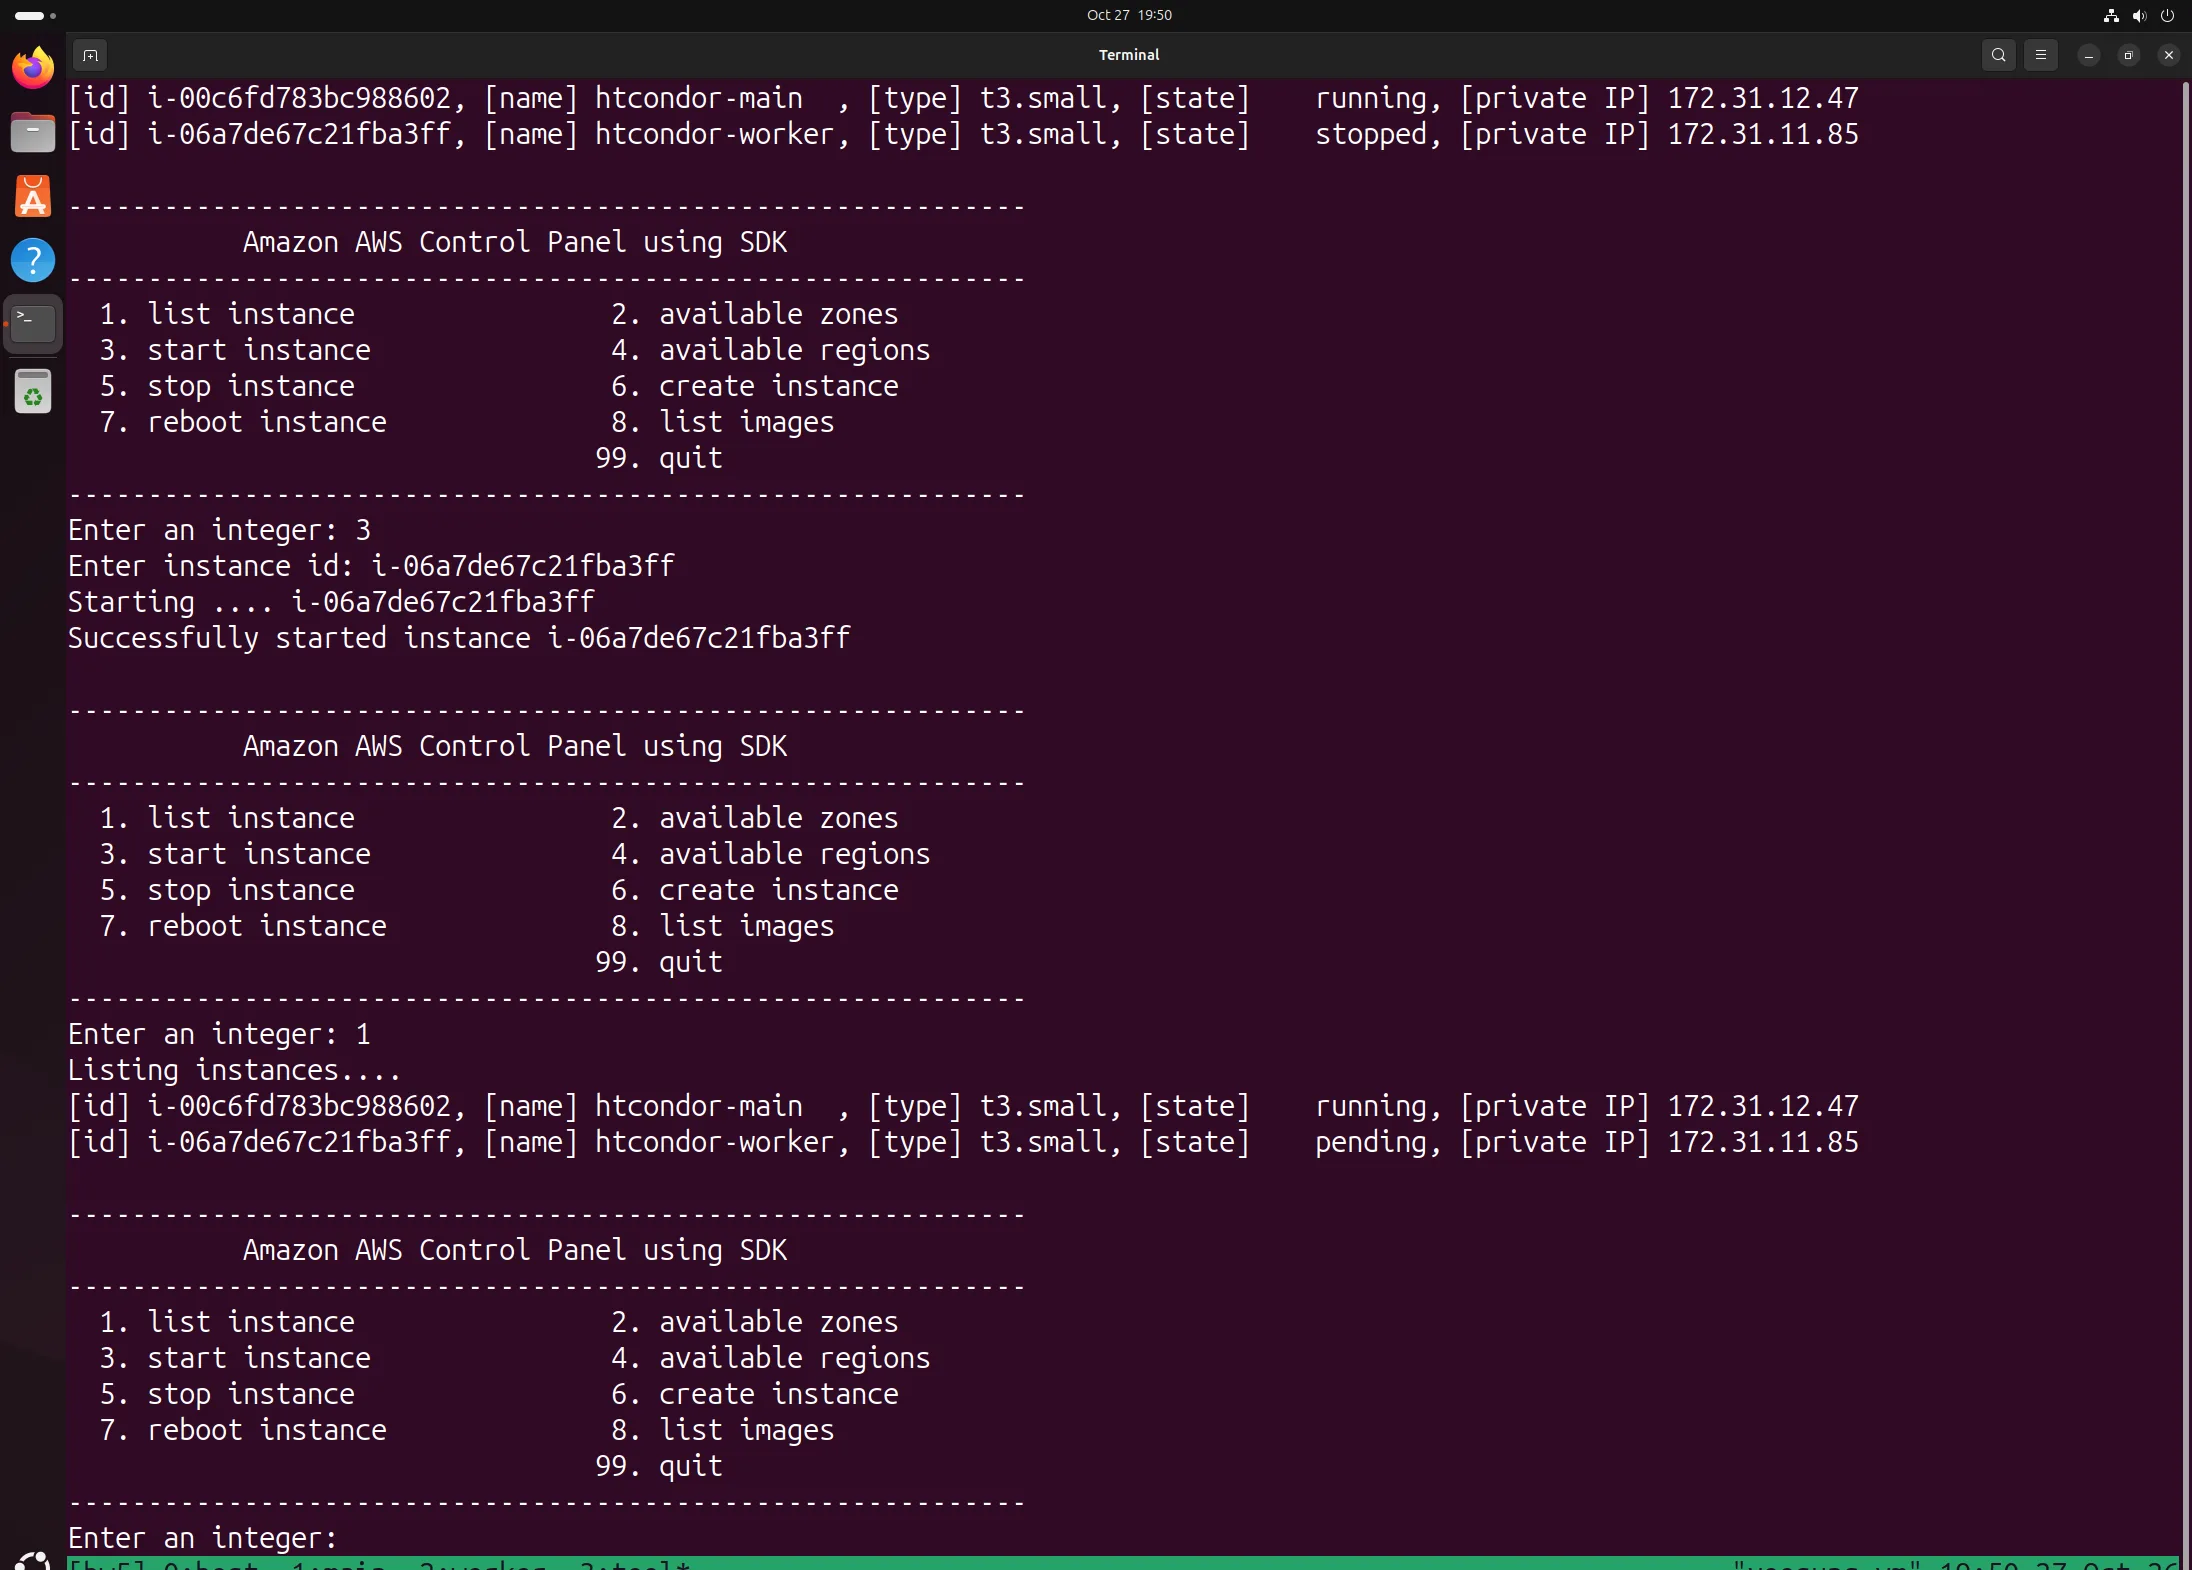
Checking stopped → 3 start instance → pending in the list
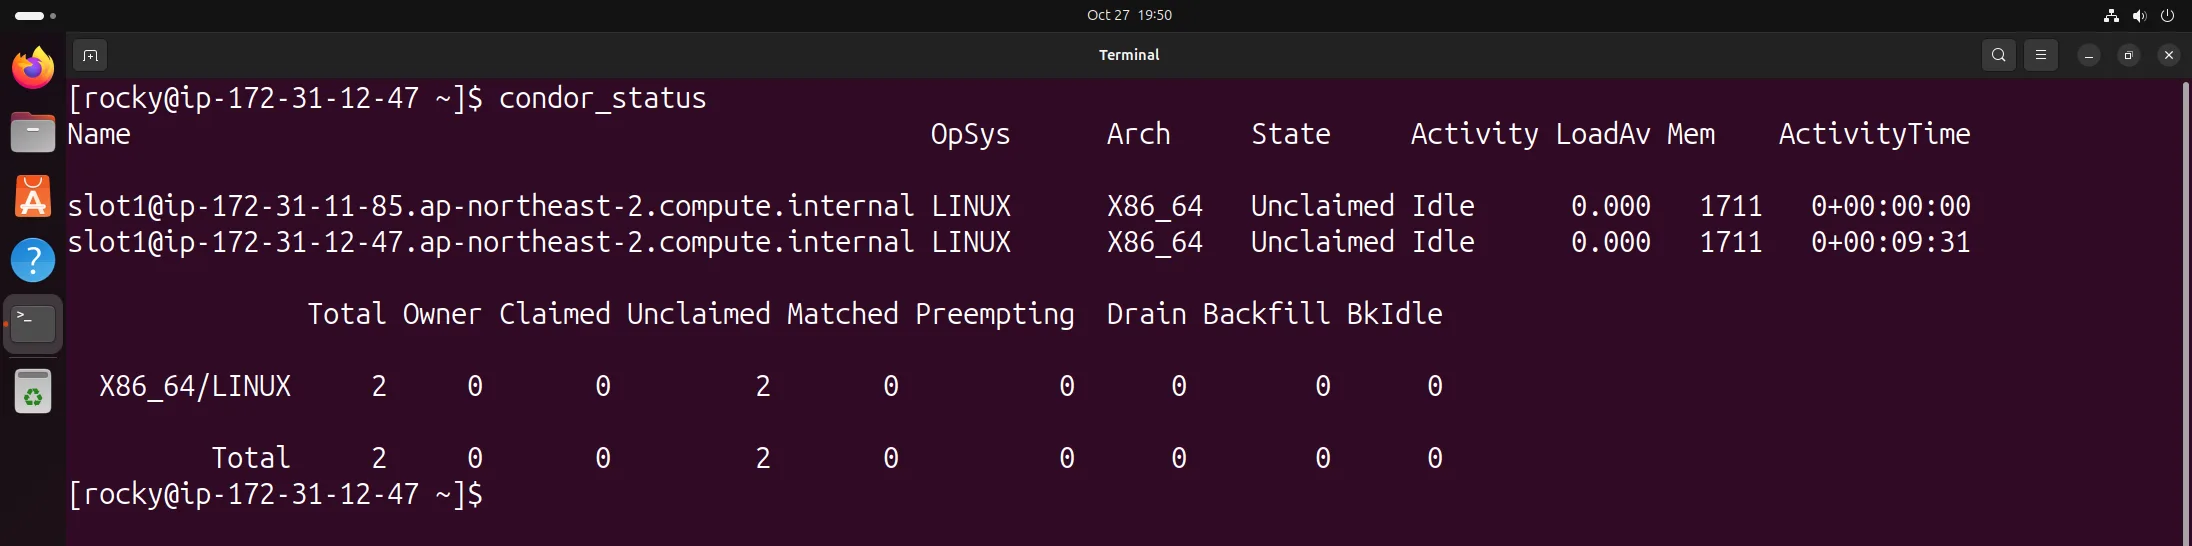
condor_status after starting worker — 2 nodes
create — a new node joins on its own
I looked up the AMI ID with 8 list images and fed it to 6 create instance, which created a new instance (i-07c62b6193bc399c5, 172.31.6.235) (slides 49–52). I didn't configure anything on this node, but thanks to the config and POOL file baked into the image, it joined main right after booting and the pool reached 3 nodes in about 40 seconds. Not having to SSH in to add a node is the whole point of dynamic resource management.
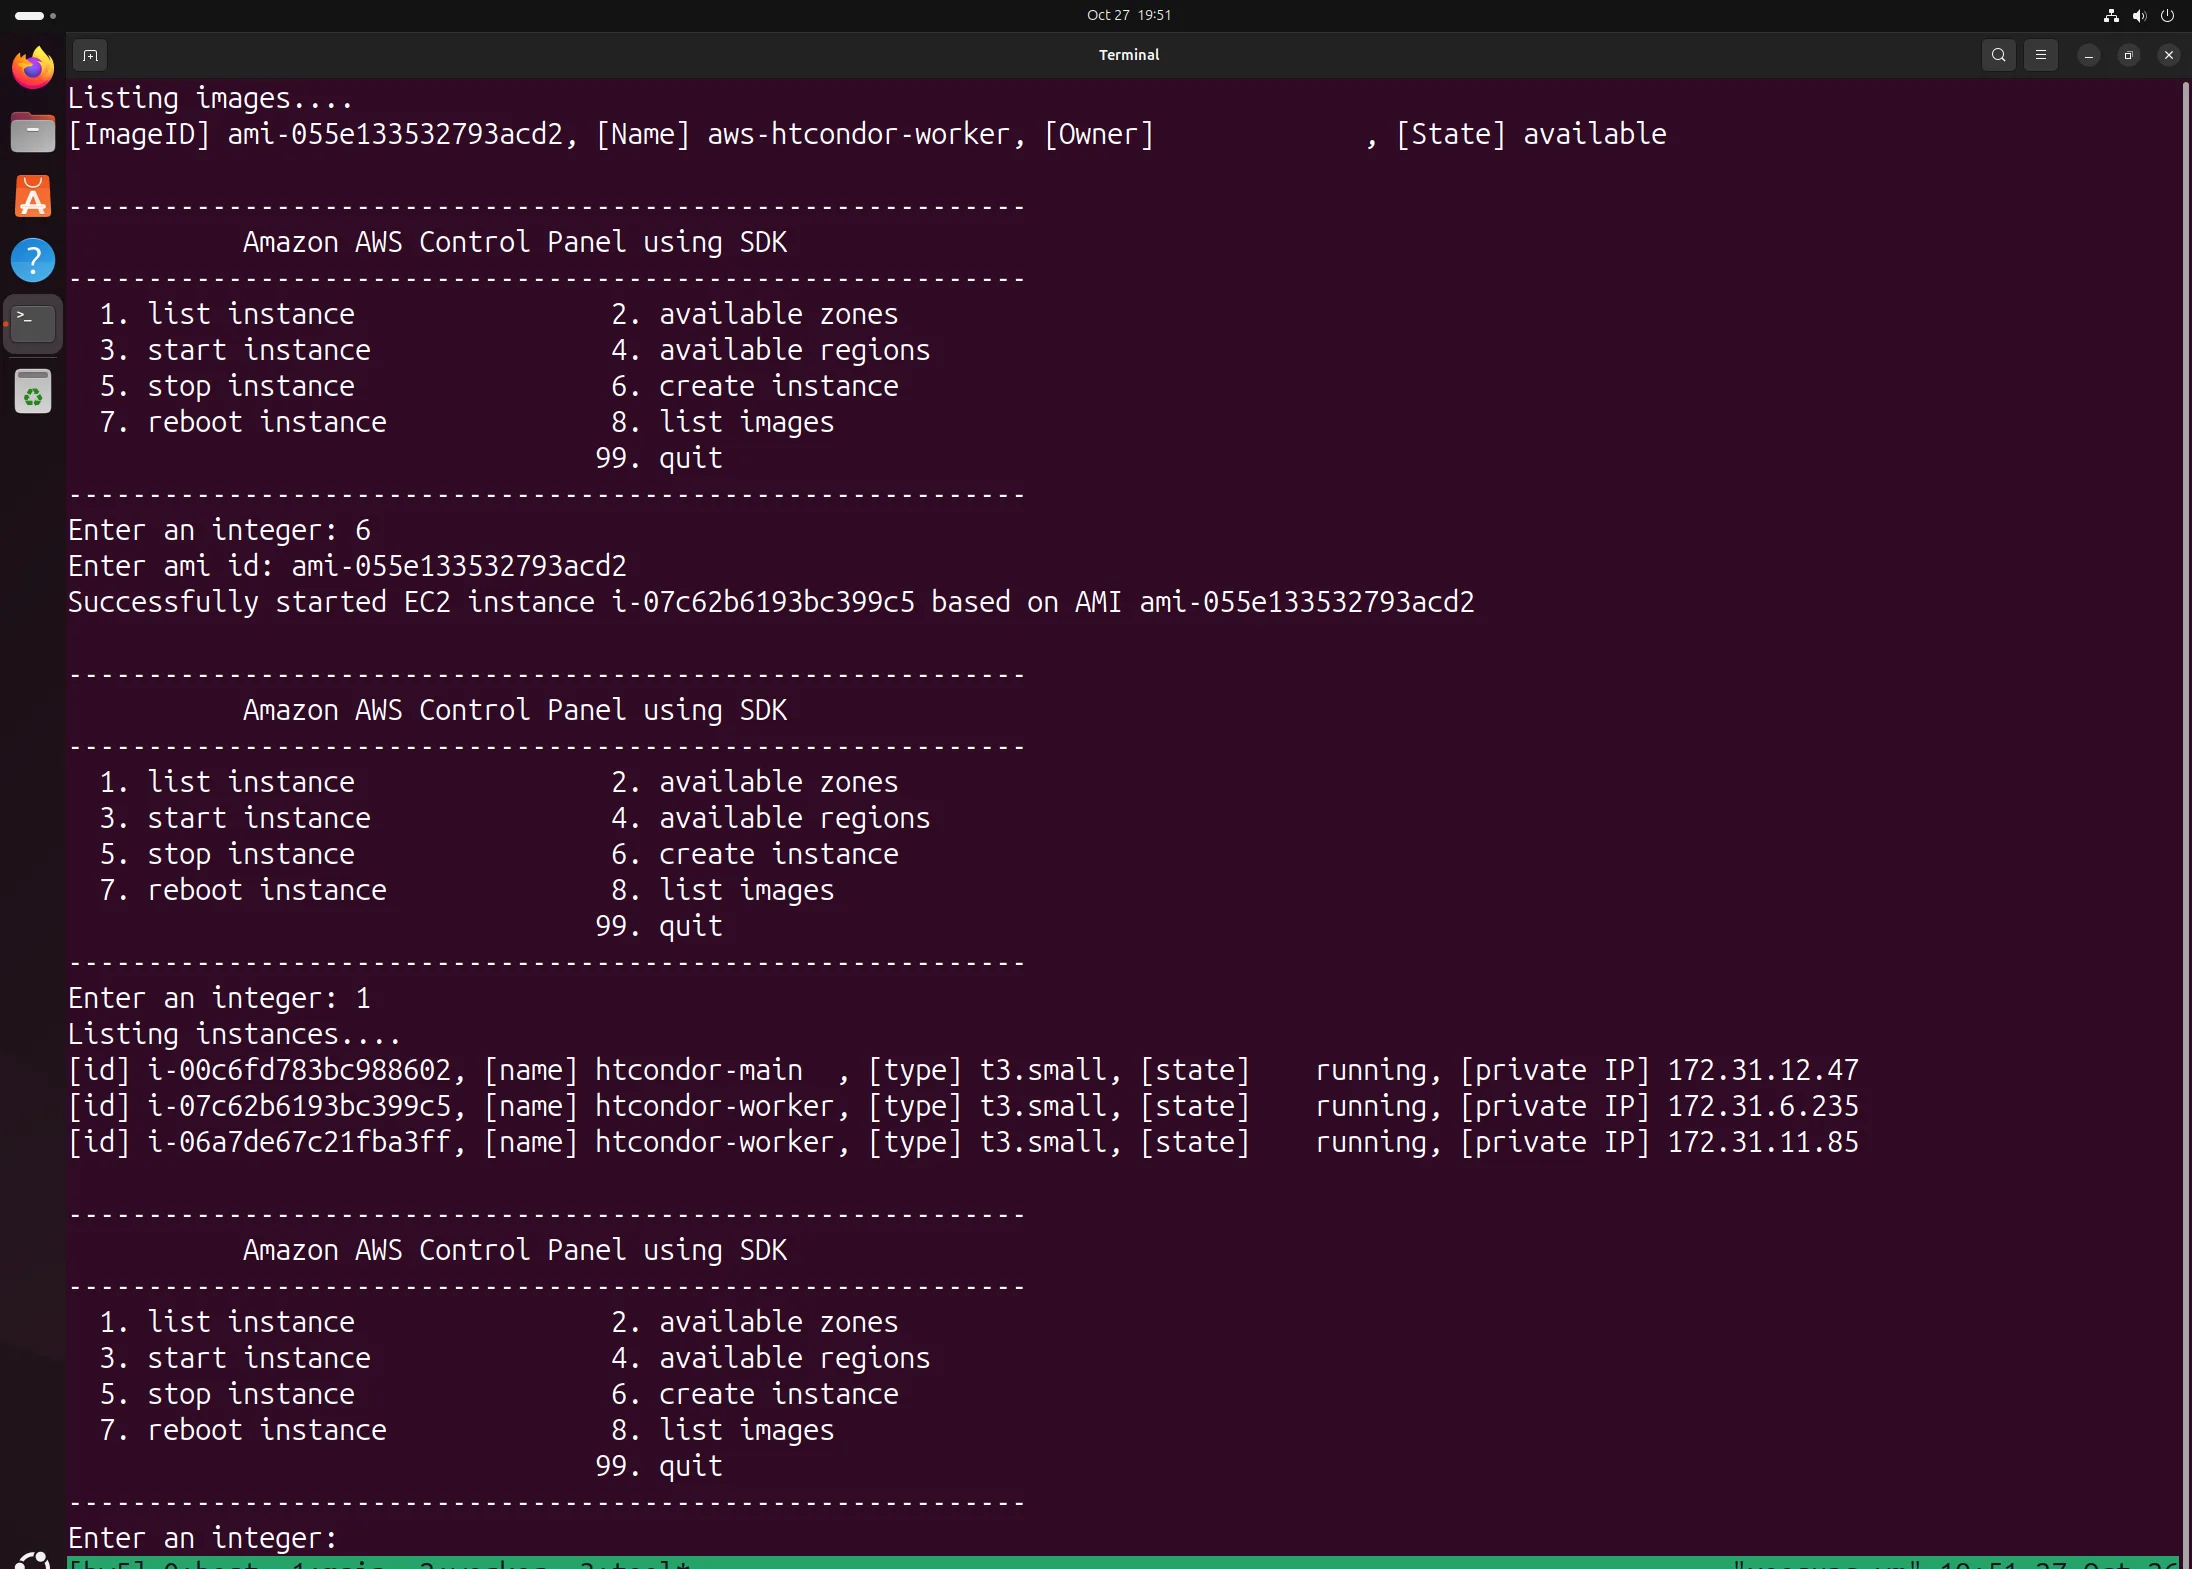
8 list images → 6 create instance (AMI ami-055e133532793acd2) → 3 instances in the list (account ID hidden)
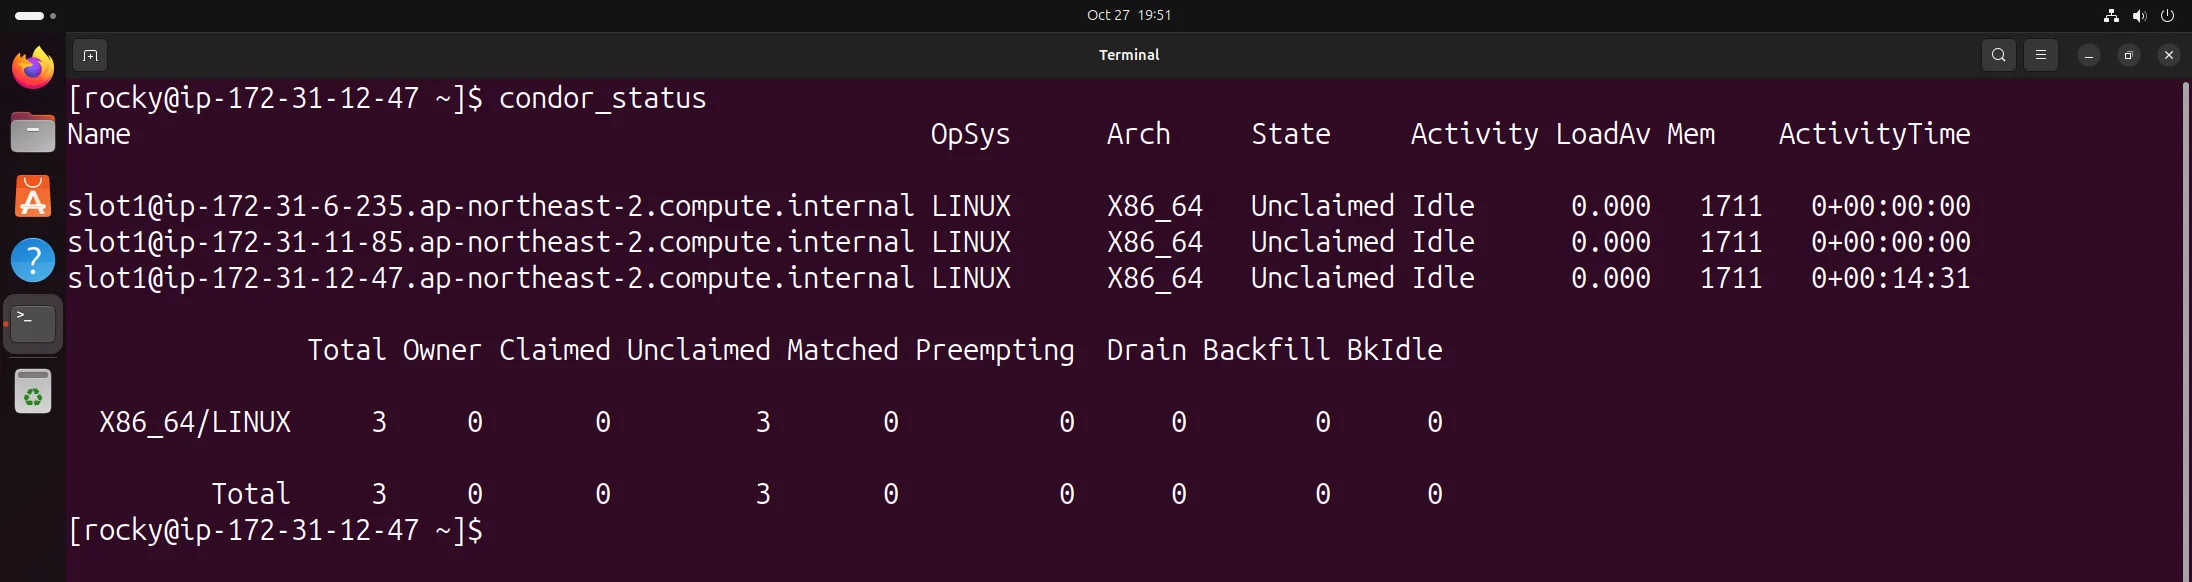
condor_status after creating the new instance — 3 nodes (172.31.6.235 added)
Scaling back down
As on slides 53–58, I stopped the instance I had just created and then the first worker, and saw the pool shrink to 2 and then 1 node.
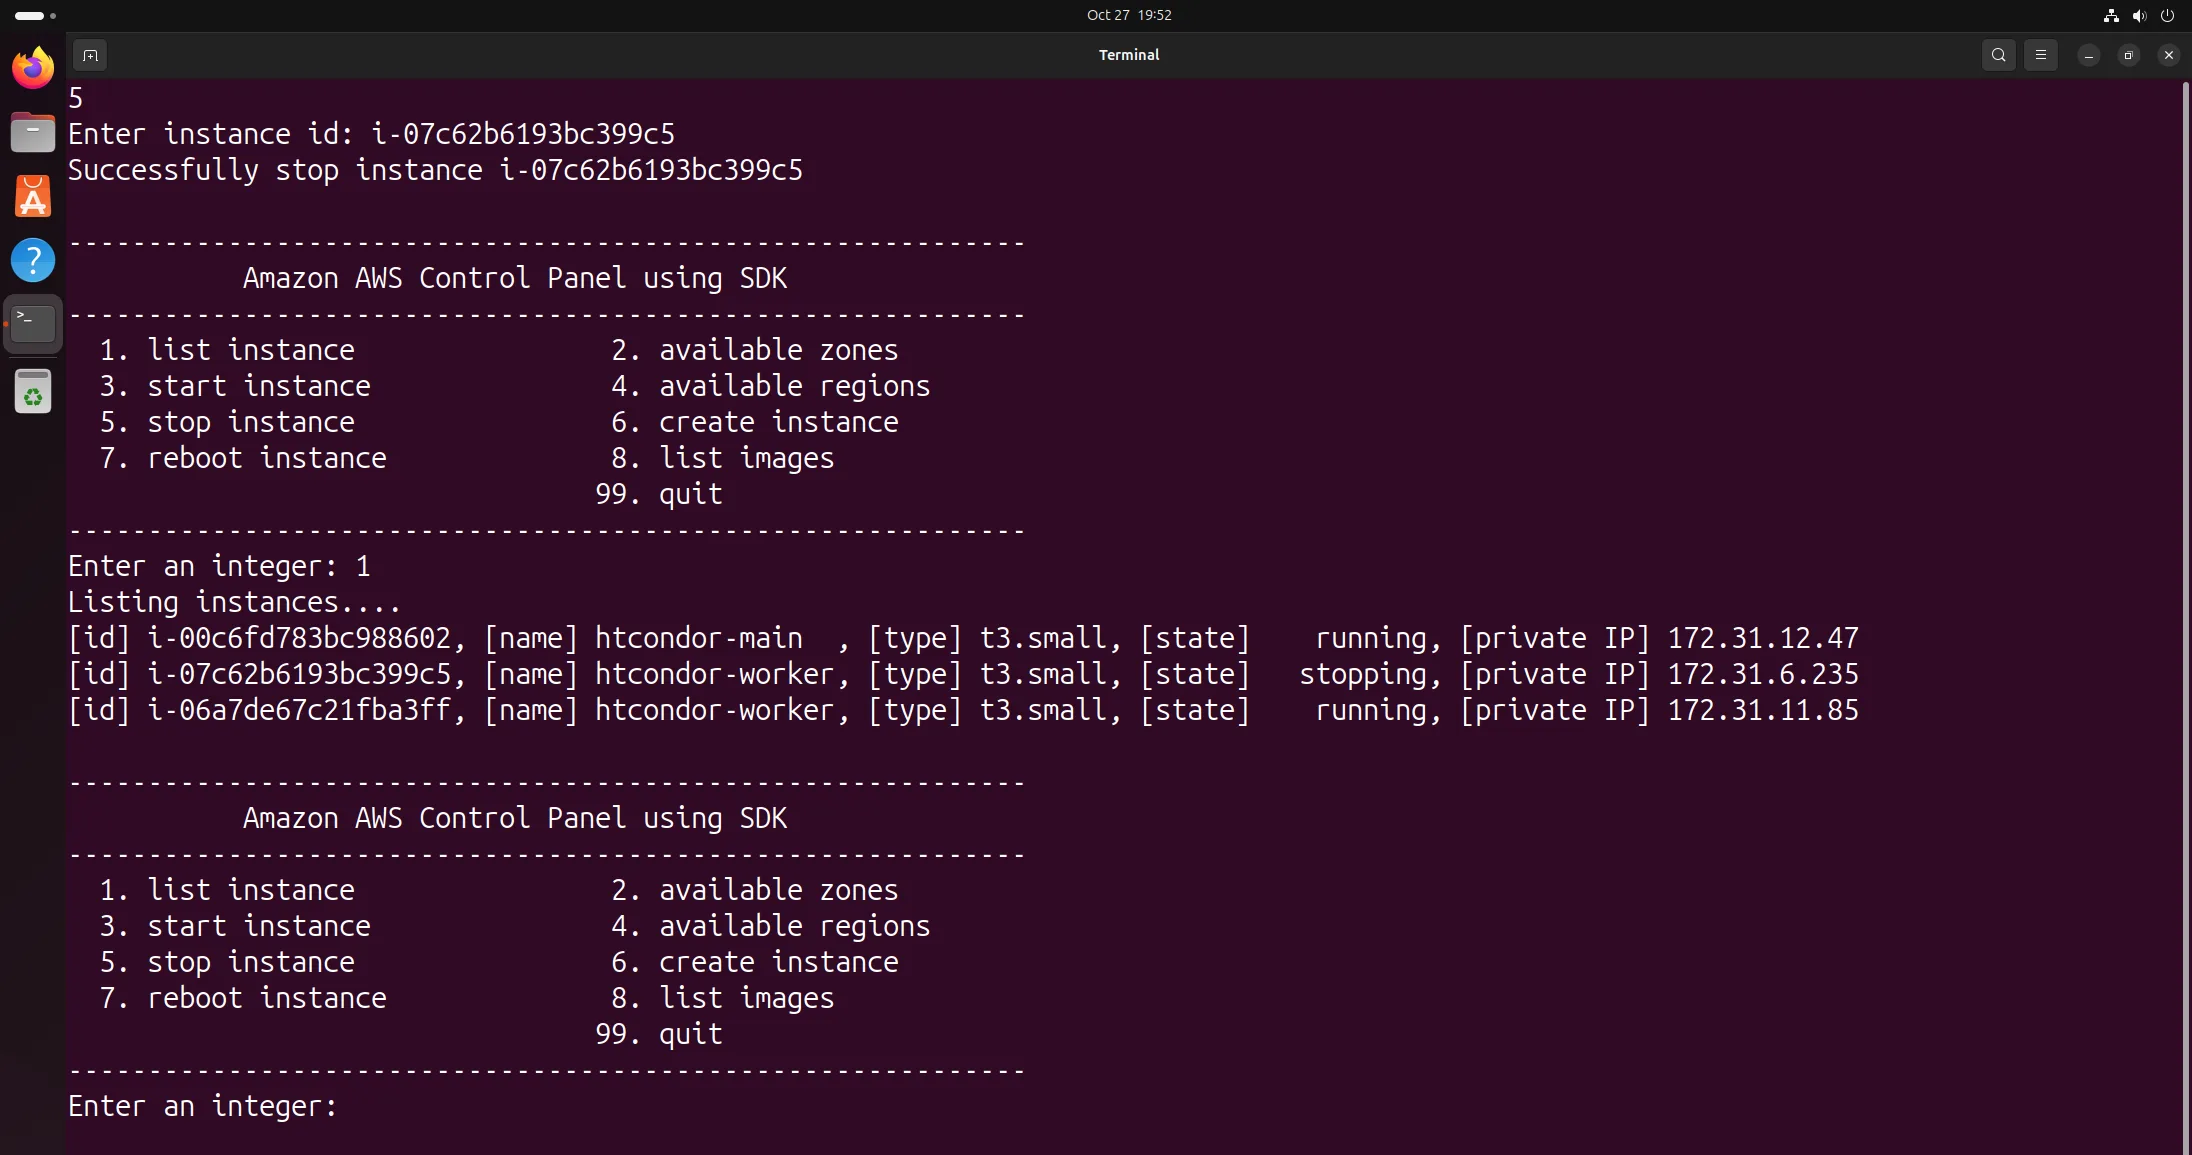
Stopping the new instance → stopping
condor_status — 2 nodes
Stopping the first worker → stopping (the new instance is stopped)
condor_status — main only
reboot
Rebooting main dropped the SSH session to main with closed by remote host, as on slides 59–61. After reconnecting, uptime is 1 minute, and since condor is enabled, condor_status works again right away.
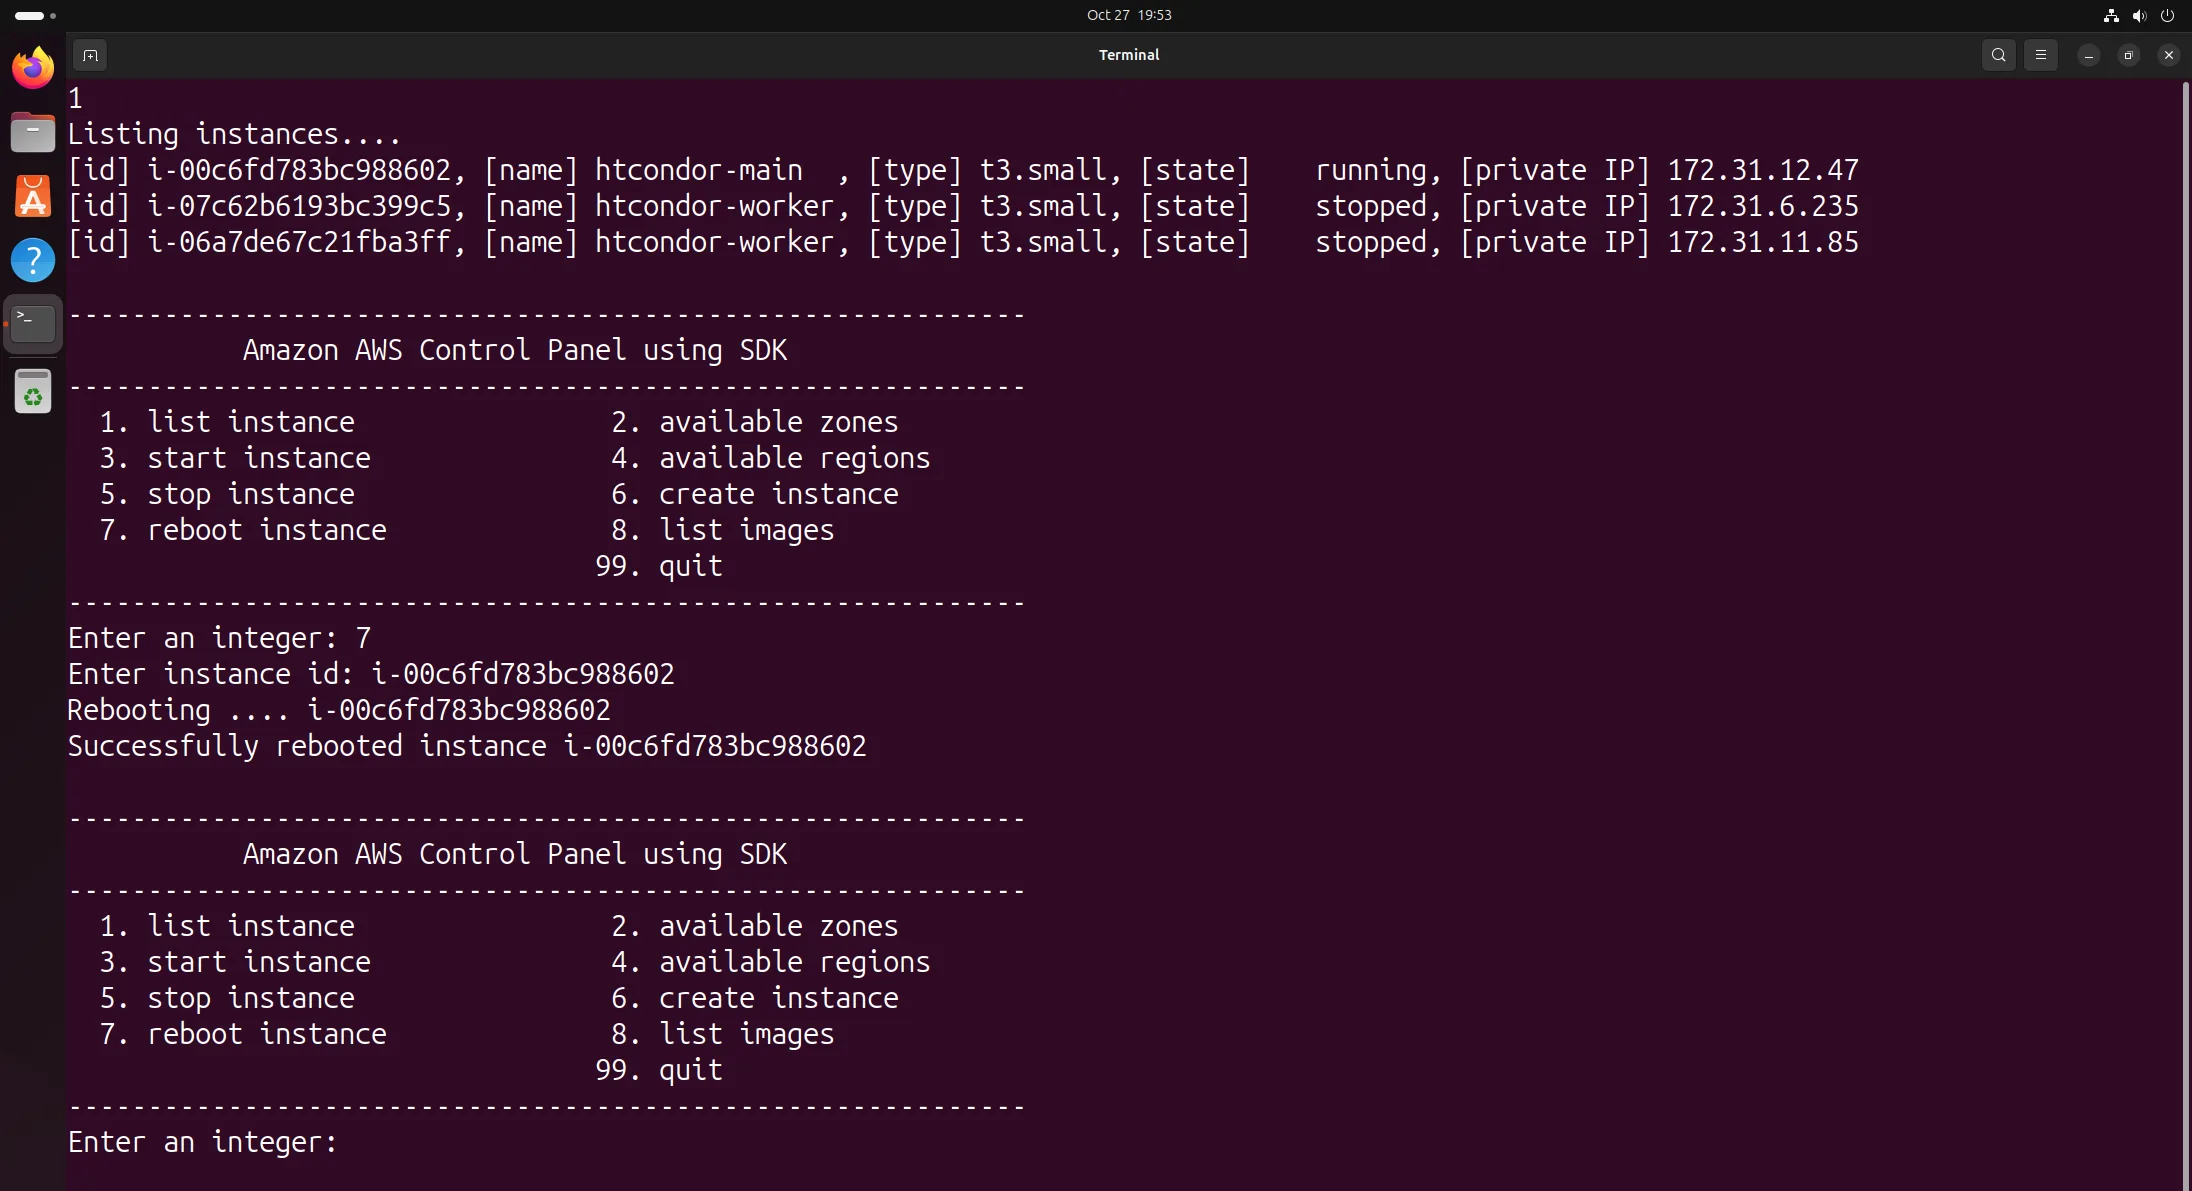
Rebooting main with 7 reboot instance
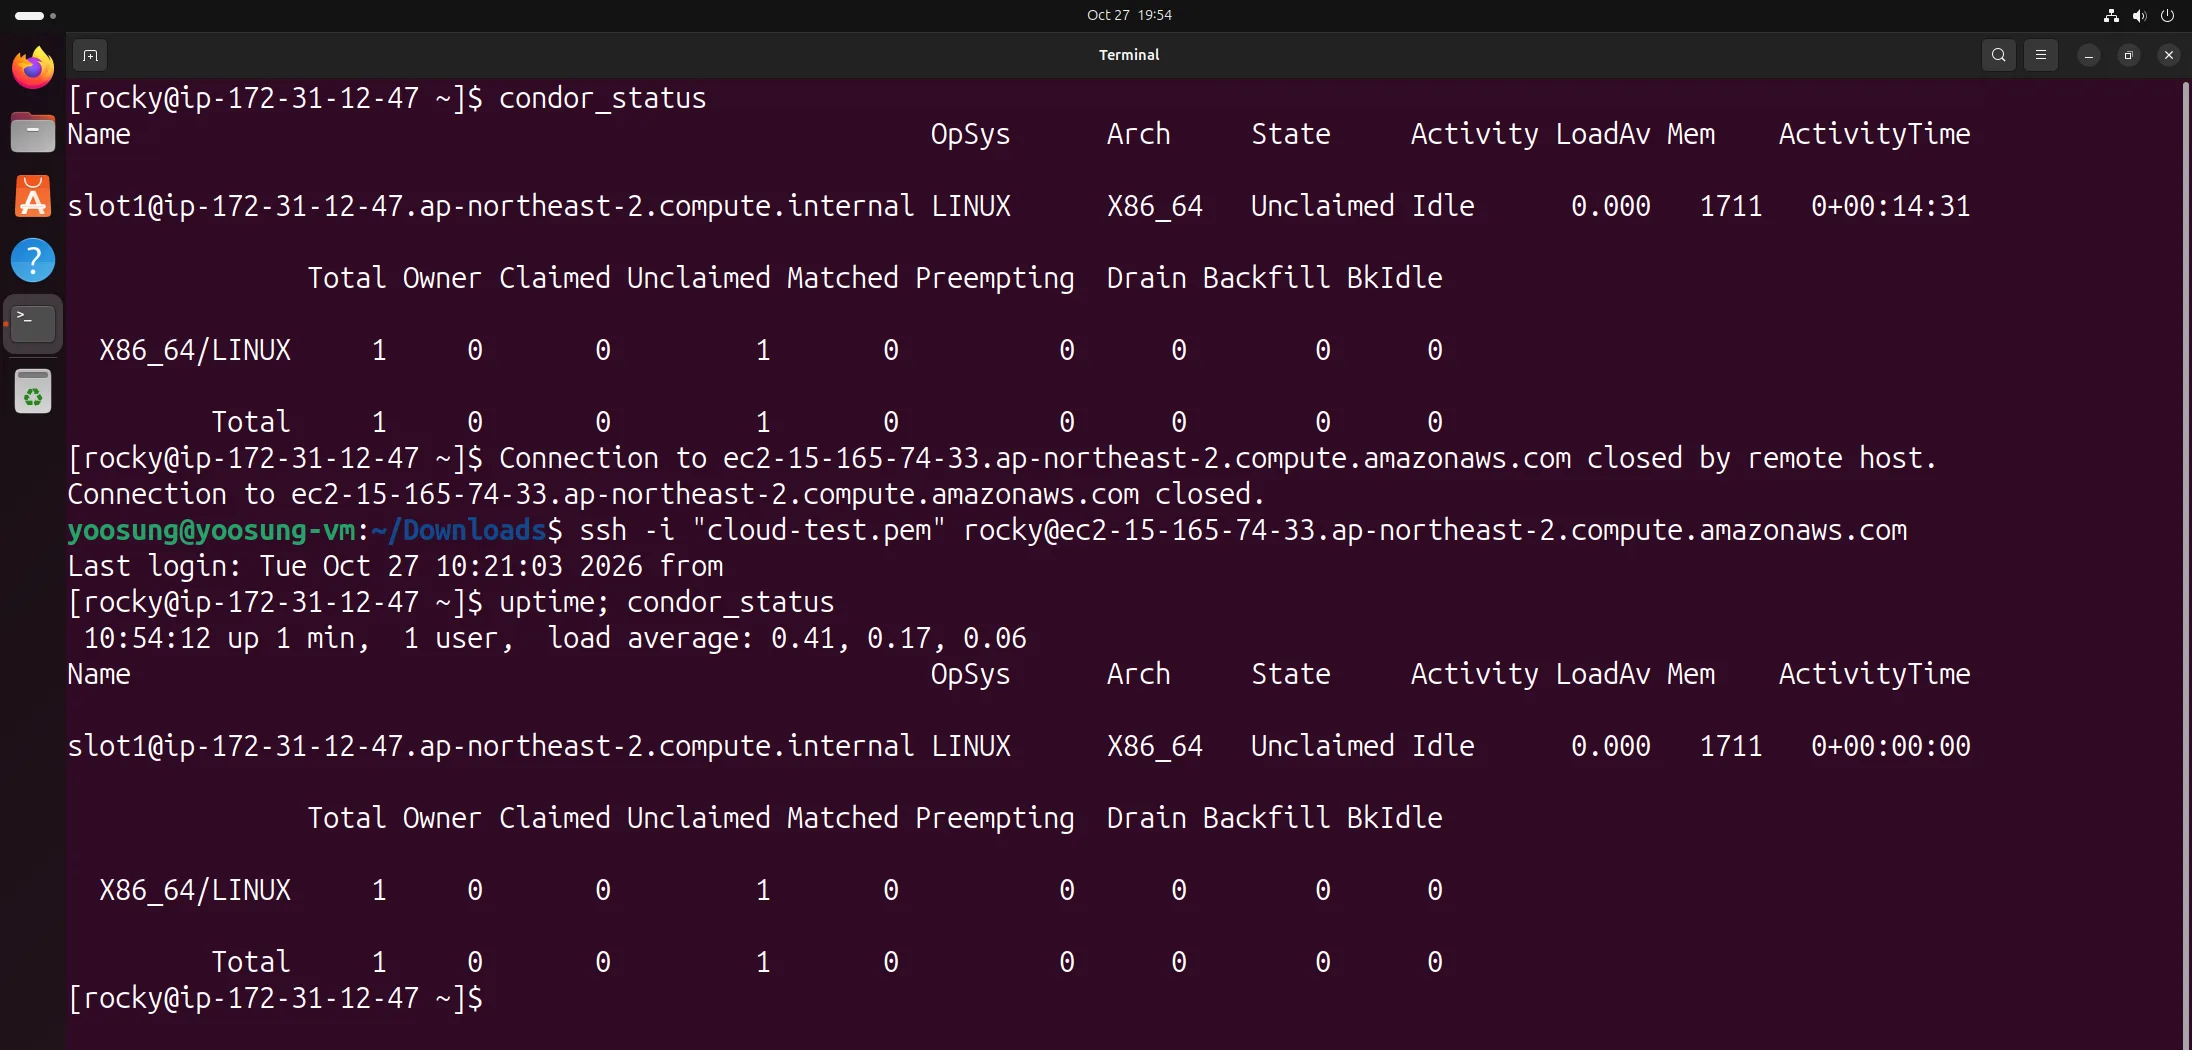
SSH dropped → reconnected, uptime 1 minute, condor_status normal
5. Problems during the lab
Problem 1. Worker missing even after matching the pool password
Symptom: Both nodes had the same POOL md5, but condor_status on main only showed main. The worker's /var/log/condor/StartLog had attempt to connect to <172.31.12.47:9618> failed: Connection refused and TCP connection to collector ... failed.
Cause: I restarted the worker (with the POOL file installed) before main, so when the worker first tried to register, main's collector was in the middle of restarting and refused the connection. startd sends again at its periodic update (every 5 minutes by default), so waiting would have worked, but until then it's not in the pool.
Fix: Restarting main and then the worker once more gave 2 nodes right away. Following the order on slide 34 (main → worker) avoids this.
Problem 2. AWS requests suddenly failing authentication
Symptom: Partway through the lab, aws commands on the Ubuntu host failed with AuthFailure, SignatureDoesNotMatch: Signature expired: 20261027T111114Z is now earlier than 20261027T114023Z.
Cause: The Ubuntu VM's clock was 44 minutes behind. It looks like the VM clock stopped while the Mac was asleep. AWS rejects a request as a possible replay attack if the request time in the signature differs from server time by more than 15 minutes.
Fix: Re-syncing NTP with sudo systemctl restart systemd-timesyncd fixed the clock, and authentication worked right away.
Typos and traps in the slides
| Slide | What | Result |
|---|---|---|
| Ch9 66 | In -o "awscliv2.zip“ the closing quote is a curly quote (U+201C) | Pasting it leaves the shell string unclosed. Type plain quotes |
| Ch9 74 | After apt install openjdk-8-jdk, java -version shows 25.0.3 | 8 was installed but the default JDK stayed 25. To use it, pick it with update-alternatives |
| Ch9 16 | The prompt after dnf install -y condor is ip-172-31-20-99 | main is ip-172-31-17-242. A screen from another instance got mixed in |
| Ch9 26 | Worker prompt [rocky@172-31-19-71 ~], output shows Rocky Linux 9 - BaseOS | ip- missing, and a Rocky 10 image printing the Rocky 9 repository |
6. Exercises
Ch8-9. The Various AMIs AWS Offers
Research the various AMIs offered by Amazon AWS and describe their characteristics.
An AMI (Amazon Machine Image) is the template used to launch an instance. It consists of a snapshot of the root volume (the OS and installed software), launch permissions (who can use the AMI) and the block device mapping for volumes attached to the instance. Every instance launched from the same AMI starts in the same state, which is why in this lab I could save the worker with HTCondor installed as an AMI and launch an identical worker with menu 6 (create instance). AMIs fall into four groups depending on who made them and where they're published.
| Type | What / examples | Characteristics |
|---|---|---|
| Quick Start AMI (provided by AWS) | Amazon Linux 2023, Ubuntu, Red Hat Enterprise Linux, SUSE, Debian, Windows Server, macOS and so on. The first tab of the console's launch screen | Verified by AWS or the OS vendor, with security-patched versions published regularly. Amazon Linux comes with the AWS CLI and SSM agent preinstalled at no extra cost. For commercial OSes like Windows and RHEL, the license fee is included in the hourly price |
| AWS Marketplace AMI | AMIs sold by software companies with their product (firewall, DB, security solution and so on) installed and configured on an OS. Rocky Linux and CIS hardened images are here too | Requires a subscription (accepting terms) before use, and paid products add a software fee to the instance price. The product is ready to use with no installation or setup |
| Community AMI (public AMI) | AMIs anyone has published publicly. The Rocky-10-EC2-Base-10.2-20260525.0.x86_64 (ami-0e86f920feb0e6b17) used in this lab was published by the official Rocky account (792107900819) | Usable right away by specifying the ID, with no subscription. But since anyone can publish one, you must check that the owner account is the official publisher (AMIs with malware planted in them can be mixed in) |
| My AMI (self-made) | AMIs made from my own running or stopped instances. aws-htcondor-worker (ami-055e133532793acd2) in this lab | Private by default, and can be shared with specific accounts or made public. It clones a fully configured state, so it's used to scale out identical nodes quickly (auto scaling, or create instance here). The EBS snapshot the AMI references keeps costing storage, so deregister it and delete the snapshot when done |
There are also AMIs prepared for specific purposes: the Deep Learning AMI with deep learning frameworks and GPU drivers, ECS/EKS optimized AMIs with Docker and agents for container services, and Bottlerocket, a minimal OS just for running containers.
When choosing an AMI, check these attributes as well.
- Architecture: x86_64 (Intel, AMD) or arm64 (AWS Graviton). It has to match the instance type. This time I picked the x86_64 Rocky AMI to use t3.small (unrelated to the Ubuntu host being aarch64).
- Root device type: EBS-backed AMIs can be stopped and started and keep their disk contents. Instance store-backed ones can't be stopped and lose their data on termination. Almost all are EBS-backed now.
- Virtualization type and boot mode: Current-generation instances only support HVM, and the boot mode (Legacy BIOS or UEFI) has to be one the instance type supports.
- Region: AMIs exist per region with different IDs. Even for the same Rocky 10.2 you need the Seoul region's ID, and to use it in another region you have to copy the AMI (copy-image).
Ch8-13. AWS Instance Types and Their Characteristics
What instance types does AWS offer (e.g. t3.nano), and what are their characteristics?
An instance type is the combination of vCPU count, memory, storage and network performance assigned to an instance. The name follows the format family + generation + (extra attributes) . size. For example, t3.nano is the nano size of the 3rd generation of the T family (burstable general purpose), and c7gn.xlarge is the xlarge size of the 7th generation of the C family (compute optimized) with g (Graviton processor) and n (enhanced networking). A higher number means a newer generation with better performance for the same price.
| Category | Main families | Characteristics and uses |
|---|---|---|
| General purpose | T, M, Mac | Balanced CPU and memory (about 4 GiB per vCPU). M for general work like web servers and small to mid-size DBs. T is the burstable type that normally runs below a baseline and briefly boosts CPU when needed; the cheapest. Mac is a dedicated host for running macOS |
| Compute optimized | C | Less memory per vCPU (about 2 GiB). For work that uses a lot of CPU for a long time, like batch processing, scientific computing, video encoding and game servers. Good for HTCondor execute nodes |
| Memory optimized | R, X, z, u- (High Memory) | More memory per vCPU (R about 8 GiB, X about 16 GiB or more). In-memory DBs (Redis, SAP HANA), large-scale analytics. z has a high clock frequency |
| Accelerated computing | P, G, Inf, Trn, F | GPUs (P: ML training and HPC, G: graphics and inference), AWS's own chips (Inferentia: inference, Trainium: training), FPGAs (F). The most expensive |
| Storage optimized | I, D, H | Local NVMe SSDs or HDDs attached directly to the instance, so disk I/O is very fast. NoSQL DBs, data warehouses, distributed file systems |
| HPC optimized | Hpc | For high performance computing. Low-latency networking between nodes (EFA) suits large-scale parallel computation |
The extra attributes in the middle of the name are: g AWS Graviton (Arm) processor, a AMD processor, i Intel processor, d includes local NVMe storage, n enhanced network bandwidth, e extra memory or storage, flex a cheaper flexible variant. Sizes grow in the order nano < micro < small < medium < large < xlarge < 2xlarge …, and each step up roughly doubles the resources and price. metal is bare metal, using the whole physical server without virtualization.
The T3 family from the question, by size:
| Type | vCPU | Memory | Baseline per vCPU |
|---|---|---|---|
| t3.nano | 2 | 0.5 GiB | 5% |
| t3.micro | 2 | 1 GiB | 10% |
| t3.small | 2 | 2 GiB | 20% |
| t3.medium | 2 | 4 GiB | 20% |
| t3.large | 2 | 8 GiB | 30% |
| t3.xlarge / t3.2xlarge | 4 / 8 | 16 / 32 GiB | 40% |
The T family earns CPU credits while it uses less than its baseline, and spends them to go up to 100% when it briefly needs a lot of CPU. T3 defaults to Unlimited mode, so performance holds even when credits run out, but usage above the baseline is billed extra. That makes it cheap and fine for development and test servers that are usually idle, but for computation that keeps the CPU at 100%, the C or M family is more economical. In this lab, 1 GiB was tight for running several HTCondor daemons, so I used t3.small (2 vCPU, 2 GiB), and condor_status showed 1711 MB of slot memory (what's left after the OS and kernel take their share).
Ch9-3. Running condor_status Directly from the Tool
Modify the program tool so that it can run the condor_status command directly.
In the lab, after start, stop or create in the tool, I switched to the SSH window on the main instance and typed condor_status separately to see whether the pool had changed. To do this inside the tool, I added the menu 9. condor status (aws_control.py).
condor_status has to run on the main node where the Collector runs. The Ubuntu host running the tool has no HTCondor, and the security group only opens port 9618 inside the VPC (172.31.0.0/16), so the Collector can't be queried directly from outside either. So the tool connects to main over SSH, runs the command and prints the result.
- Look up the address: Use the EC2 API
describe_instancesto find the instance whose Name tag is htcondor-main and whose state is running. main's public DNS name changes on every stop and start, so it's looked up each time instead of hard-coded. - Run remotely: Run
ssh -i cloud-test.pem rocky@<public DNS> condor_statusagainst that address (Pythonsubprocess). So it doesn't hang when the address changes, unknown host keys are accepted automatically (StrictHostKeyChecking=accept-new), with a 10-second connect limit and a 60-second overall limit. - Print the result: Show stdout as is, and print SSH's error message on failure. If main is off, print
htcondor-main is not running..
MAIN_NAME = os.environ.get("AWS_MAIN_NAME", "htcondor-main")
KEY_FILE = os.path.expanduser(os.environ.get("AWS_KEY_FILE", "~/Downloads/cloud-test.pem"))
SSH_USER = os.environ.get("AWS_SSH_USER", "rocky")

def condor_status():
    # The public DNS name changes on every stop/start, so look it up each time.
    res = ec2.describe_instances(Filters=[
        {"Name": "tag:Name", "Values": [MAIN_NAME]},
        {"Name": "instance-state-name", "Values": ["running"]},
    ])
    insts = [i for r in res["Reservations"] for i in r["Instances"]]
    if not insts:
        print(f"{MAIN_NAME} is not running.")
        return
    host = insts[0].get("PublicDnsName") or insts[0].get("PublicIpAddress")
    print(f"Running condor_status on {MAIN_NAME} ({insts[0]['InstanceId']}) ....")
    try:
        r = subprocess.run(
            ["ssh", "-i", KEY_FILE,
             "-o", "StrictHostKeyChecking=accept-new",
             "-o", "ConnectTimeout=10",
             f"{SSH_USER}@{host}", "condor_status"],
            capture_output=True, text=True, timeout=60,
        )
    except subprocess.TimeoutExpired:
        print("Error: condor_status timed out")
        return
    print(r.stdout, end="")
    if r.returncode != 0:
        print(f"Error: {r.stderr.strip()}")

ACTIONS = {
    ...
    8: (list_images, None),
    9: (condor_status, None),   # added
}
I also added the 9. condor status line to the menu. Now instance operations and pool changes can be checked in a row on one screen, like "5 stop instance → 9 condor status → 3 start instance → 9 condor status". The key file location, SSH user and main name can be changed with environment variables (AWS_KEY_FILE, AWS_SSH_USER, AWS_MAIN_NAME), so it works as is for other accounts or clusters.
Another option is sending the command without SSH through AWS Systems Manager Run Command (ssm.send_command). There's no key file to carry around and port 22 can be closed, but each instance needs the SSM agent and an IAM role attached separately (this Rocky AMI has no agent), and the result has to be fetched in a second call, so for this environment, which already runs on SSH, the SSH approach is simpler.
Ch9-12. Korean Cloud Providers with VM APIs
Research Korean cloud service providers that offer APIs for controlling virtual machines and summarize them.
Major Korean cloud providers, like AWS, let you create, start and stop virtual machines through APIs, CLIs and SDKs besides the console. Authentication and API design differ by provider, but they roughly split into signing each request with an access key like AWS (Naver Cloud) and getting a token first and putting it in the request header like OpenStack (NHN Cloud, Kakao Cloud).
| Provider | VM API | Authentication and characteristics |
|---|---|---|
| Naver Cloud Platform (NCP) | Server API (REST). For VPC, createServerInstances, startServerInstances, stopServerInstances, rebootServerInstances, getServerInstanceList and so on under /vserver/v2/. Provides a CLI, SDKs for Java, Python and others, and a Terraform provider | Requests are signed with HmacSHA256 using the Access Key and Secret Key issued in the console, put in the x-ncp-apigw-signature-v2 header and sent along with timestamp and access key headers. Rejected if more than 5 minutes off from server time (similar to AWS's signing). The API naming maps almost one-to-one to the boto3 functions in this lab |
| NHN Cloud | OpenStack based. The Compute (Instance) API is compatible with OpenStack Nova, with a different endpoint per region (Pangyo kr1, Pyeongchon kr2 and so on) | Set an API password separate from the account password, send the tenant ID, user and API password to the Identity API (POST /v2.0/tokens) to get a token, then call with the X-Auth-Token header. Being OpenStack compatible, OpenStack CLI, SDK and Terraform tooling work as is |
| Kakao Cloud | OpenStack-based Virtual Machine service. Provides a REST API, CLI and Terraform | Issue a per-project access key from the console profile (permissions set by IAM role; the secret key can only be viewed at creation). Get a token from https://iam.kakaocloud.com/identity/v3/auth/tokens and use the value of the X-Subject-Token response header; it expires after 12 hours |
| KT Cloud | Open API to create, start, stop and delete servers (e.g. deployVirtualMachine). Python SDK examples provided | Requests are signed with an API key and secret key. A CloudStack-style design where creating a server specifies a template ID (OS), service offering ID (spec) and zone |
In short, Korean providers also offer VM create, start, stop, reboot and list through APIs, so the same menu can be built by swapping only the boto3 calls in this assignment's dynamic resource management tool for each provider's API. In particular, NHN Cloud and Kakao Cloud follow the standard OpenStack API, so one OpenStack SDK can handle both, and Naver Cloud uses key signing similar to AWS, which makes the AWS tool's structure easy to port. For the public sector, Naver Cloud, NHN Cloud and KT Cloud all run separate public regions (CSAP certified) with the same kind of API.