
- Published on
HW4. Automating an HTCondor Cluster with Vagrant and Ansible
- Authors

- Name
- seren-wib
Contents
- 0. Lab Environment
- Automation Flow
- SSH Access Layout
- 1. Creating 3 VMs with Vagrant
- Deleting the Old VMs
- Installing Vagrant
- The Slide Way: HashiCorp apt Repository
- Problem 1. No arm64 Vagrant in the Repository
- Installing from RubyGems
- libvirt Provider Plugin
- vagrant init
- Problem 2. Storage Pool Conflict
- Adding the Rocky Linux 10 Box
- Problem 3. Box Download 404
- Adding pci=nomsi to the Box Image
- Writing the Vagrantfile
- vagrant up
- Problem 4. All Three VMs Drop to the dracut Emergency Shell
- Checking the Nodes
- The vagrant Account's Keys and ssh-config
- 2. Configuring HTCondor with Ansible
- Installing Ansible and the Inventory
- Checking Host Connectivity
- Writing the Playbook
- Running the Playbook
- Problem 5. The Playbook Succeeded but condor_status Is Empty
- Final Result
- Copy-Paste Traps in the Slides
- 3. Exercises
- Ch7-3. Other Automation Tools for the Data Center
- Ch7-8. Idempotence in Ansible and Why It Matters
In HW3 I built the HTCondor cluster by hand, step by step. This time I automated that process following textbook Chapter 7. I deleted all three VMs from Chapter 4, created three new VMs with the same names and IPs using Vagrant, and then installed and configured HTCondor with a single Ansible playbook. The later part collects my answers to the Chapter 7 exercises.
0. Lab Environment
Same environment as HW2 and HW3. An Apple M3 Mac can't run x86 VirtualBox VMs, so I run Ubuntu in UTM and use KVM/libvirt inside it as the hypervisor. Vagrant and Ansible run on this Ubuntu host.
macOS (Apple M3)
└─ UTM (Apple Virtualization, nested virtualization)
   └─ Ubuntu 24.04 ARM64  (host yoosung-vm, the course's "Ubuntu host") ← runs Vagrant and Ansible
      └─ KVM + libvirt   (replaces VirtualBox, vagrant-libvirt plugin)
         ├─ main   Rocky Linux 10.2 aarch64  192.168.56.101  main.cloud.org   (central manager + submit)
         ├─ work1  Rocky Linux 10.2 aarch64  192.168.56.102  work1.cloud.org  (execute)
         └─ work2  Rocky Linux 10.2 aarch64  192.168.56.103  work2.cloud.org  (execute)
| Textbook (slides) | This environment |
|---|---|
| Ubuntu host x86_64, account cloudman@abelia | Ubuntu 24.04.5 aarch64, account yoosung@yoosung-vm |
| Vagrant provider VirtualBox | libvirt (KVM), vagrant-libvirt 0.12.2 plugin |
| Vagrant install: HashiCorp apt repository | No arm64 Linux package in the repository, so installed the vagrant 2.4.9 gem from RubyGems (same version as the slides) |
| Box bento/rockylinux-10 | Official Rocky rockylinux/10 libvirt arm64 box (10.2-20260525.0) |
| Guest NICs eth0 (NAT), eth1 (host-only), cluster interface enp0s8 | enp3s0 (management network 192.168.121.0/24 NAT), enp4s0 (cluster network 192.168.56.0/24) → NETWORK_INTERFACE = enp4s0 |
| SSH: forwarded ports 2222–2224 on 127.0.0.1 | Direct connection to port 22 on the management IP (192.168.121.x). No port forwarding needed |
| HTCondor version not specified | condor-25.14.1-1.el10.aarch64 (25.0 repository) |
Automation Flow
The work I did by hand in Chapter 5 is split between two tools. Vagrant creates the three VMs from one Vagrantfile (provisioning) and sets up hostnames, IPs and SSH keys. Ansible installs HTCondor on those three VMs and deploys the per-role configuration files from one playbook (htcondor.yaml). Both handle the VMs over SSH from the Ubuntu host.
| Step | Tool | Input files | Result |
|---|---|---|---|
| 1. VM provisioning | Vagrant + vagrant-libvirt | ~/vrepo/Vagrantfile | main, work1, work2 created, hostnames, 192.168.56.101–103, per-node SSH keys |
| 2. VM configuration | Ansible | /etc/ansible/hosts, ~/Ansible/htcondor.yaml | SELinux, firewall, hosts, packages, HTCondor config, service restart |
SSH Access Layout
The assignment requires every step to be done by connecting to the VMs over SSH, so I wrote down the access paths. There are three layers.
- Mac → Ubuntu host: SSH key login, same as HW3.
- Ubuntu host → VMs: I used
vagrant ssh <node>. It runs ssh with the per-node private key thatvagrant upcreated and the management IP;vagrant ssh-config(shown later) prints that configuration. The[vagrant@main ~]$prompt in the screenshots is this connection. - Ansible: Ansible also works over SSH. It connects to each node with
ansible_user=vagrantandansible_ssh_private_key_filefrom the inventory and runs modules there.
Apart from one look through virsh console while diagnosing problem 4, I didn't use the VM consoles.
1. Creating 3 VMs with Vagrant
Deleting the Old VMs
I deleted main, work1 and work2, which I had made with virt-clone in Chapter 4, including their disks and NVRAM. The three domains are full clones (no backing chain), so removing their disks with --remove-all-storage doesn't affect the original. I kept rocky-base, the clone source, since it isn't one of the three Chapter 4 VMs.
virsh -c qemu:///system list --all
virsh -c qemu:///system undefine main  --nvram --remove-all-storage
virsh -c qemu:///system undefine work1 --nvram --remove-all-storage
virsh -c qemu:///system undefine work2 --nvram --remove-all-storage
virsh -c qemu:///system list --all
virsh -c qemu:///system vol-list images
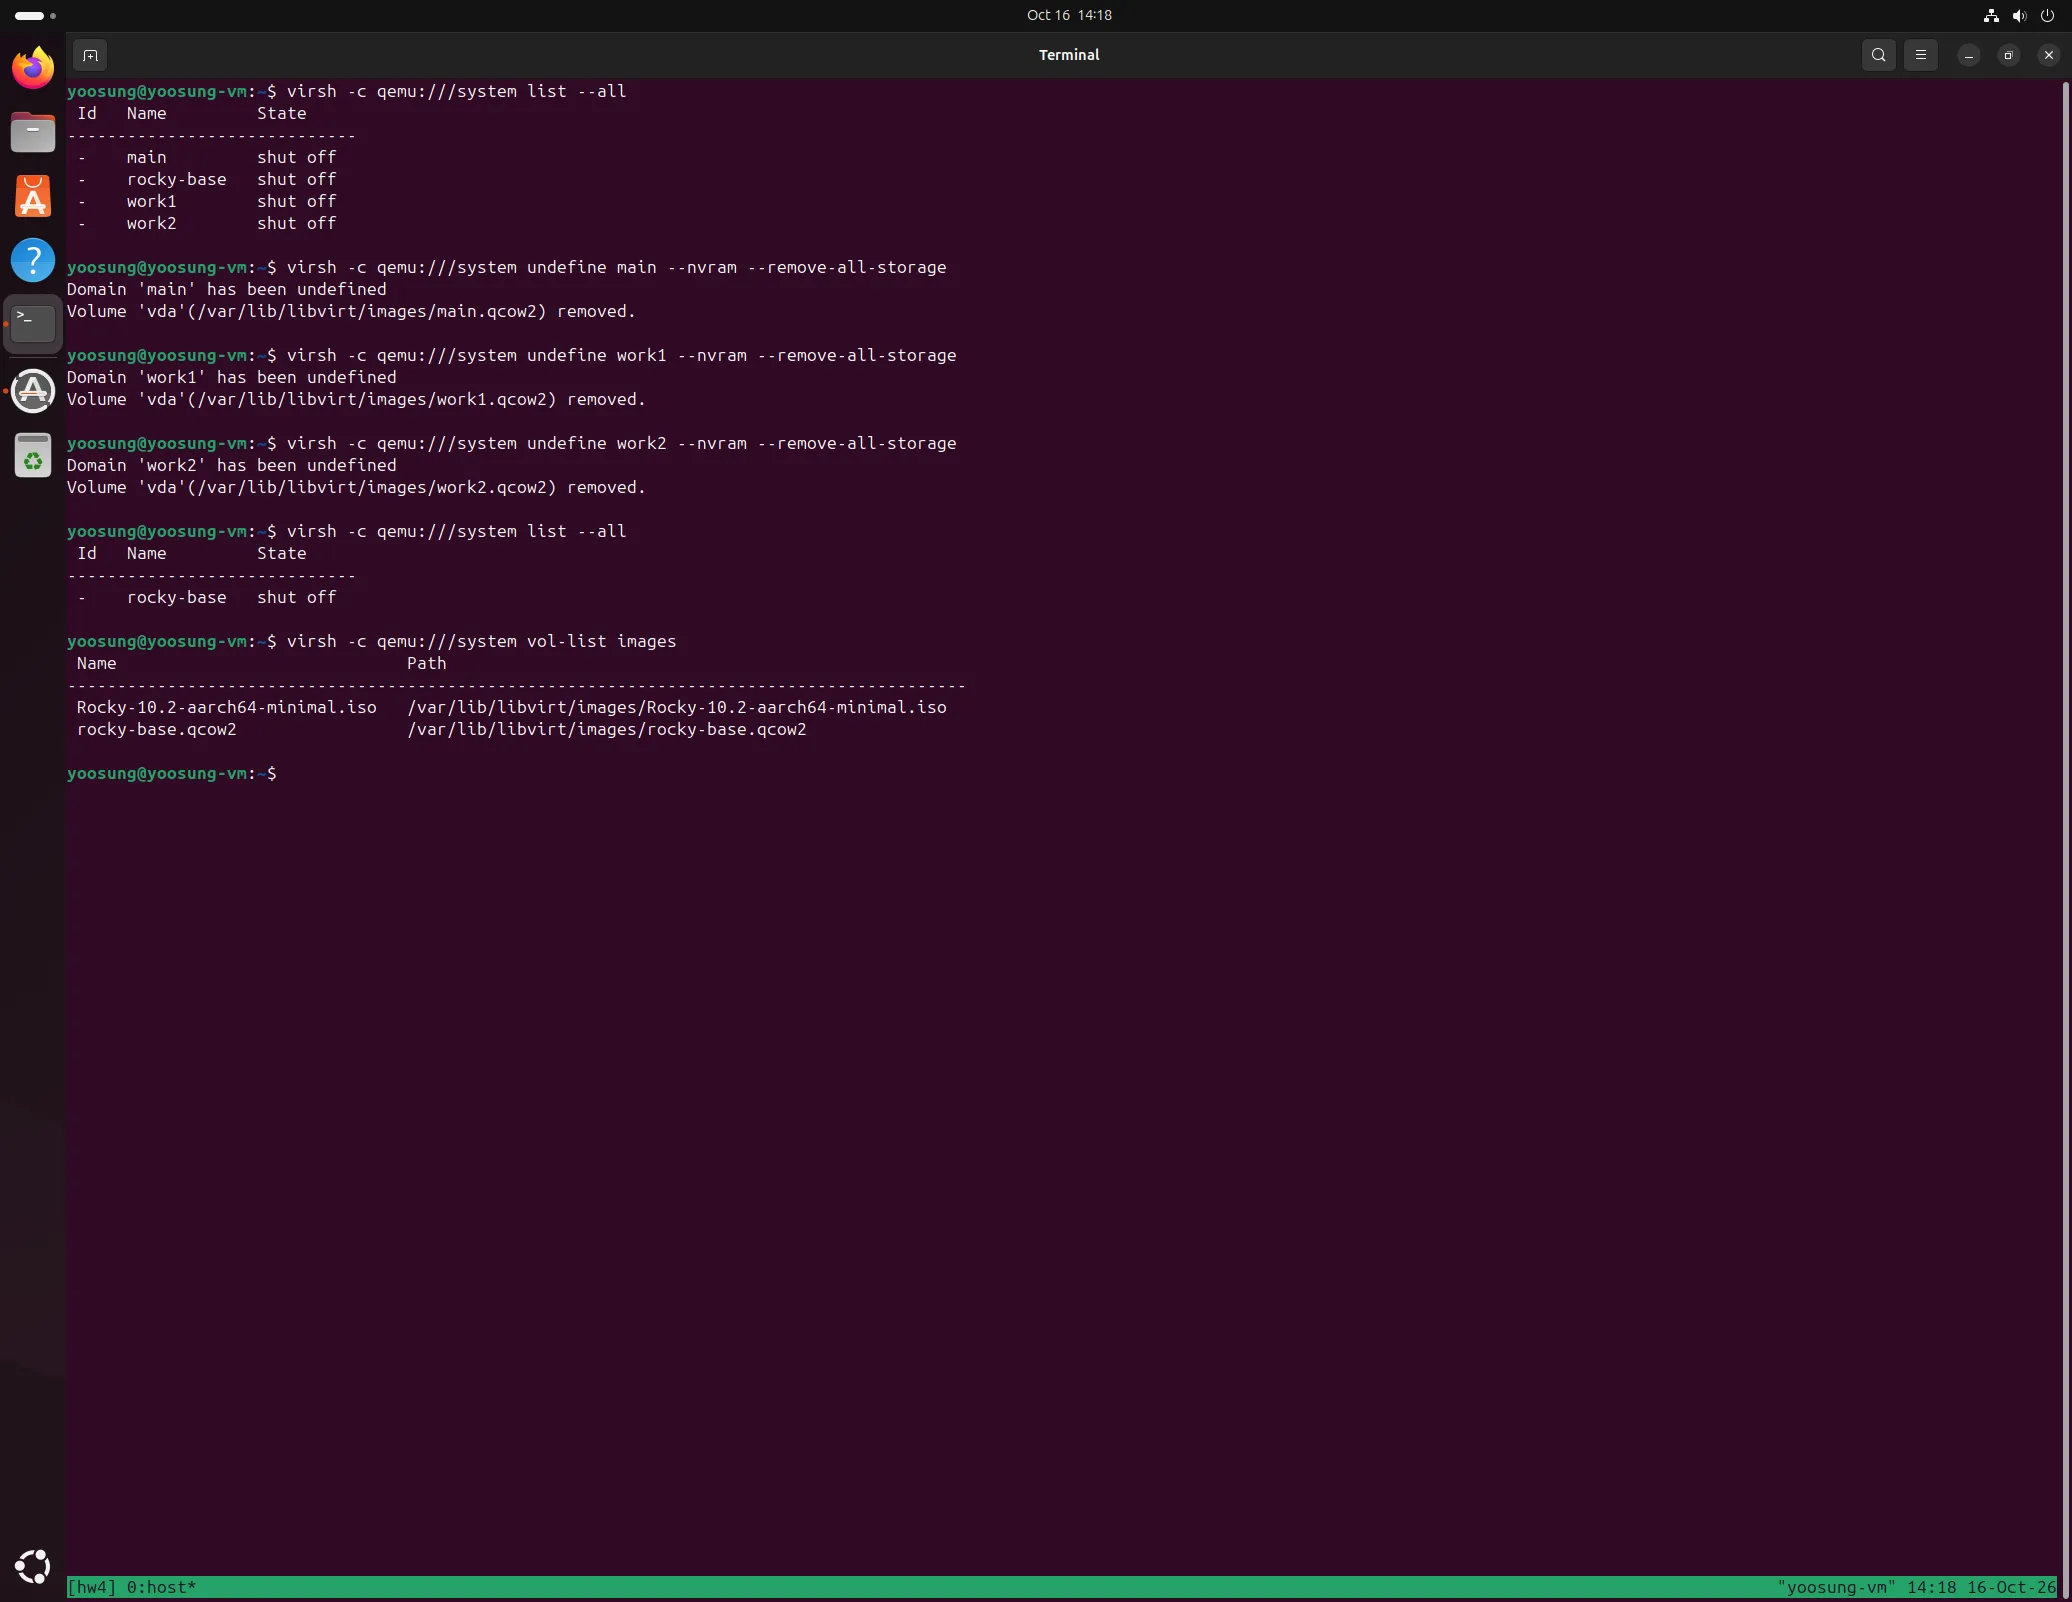
main, work1, work2 removed with domain, disk and NVRAM; only rocky-base left
Installing Vagrant
The Slide Way: HashiCorp apt Repository
First I registered the GPG key and repository as on slide 13. The –o on the slide is an EN DASH (U+2013), not a hyphen, so pasting it as-is makes gpg treat –o as a file name and fail. I typed -o by hand.
wget -O- https://apt.releases.hashicorp.com/gpg | sudo gpg --dearmor -o /usr/share/keyrings/hashicorp-archive-keyring.gpg
echo "deb [arch=amd64 signed-by=/usr/share/keyrings/hashicorp-archive-keyring.gpg] https://apt.releases.hashicorp.com noble main" | sudo tee /etc/apt/sources.list.d/hashicorp.list
sudo apt update
sudo apt install vagrant
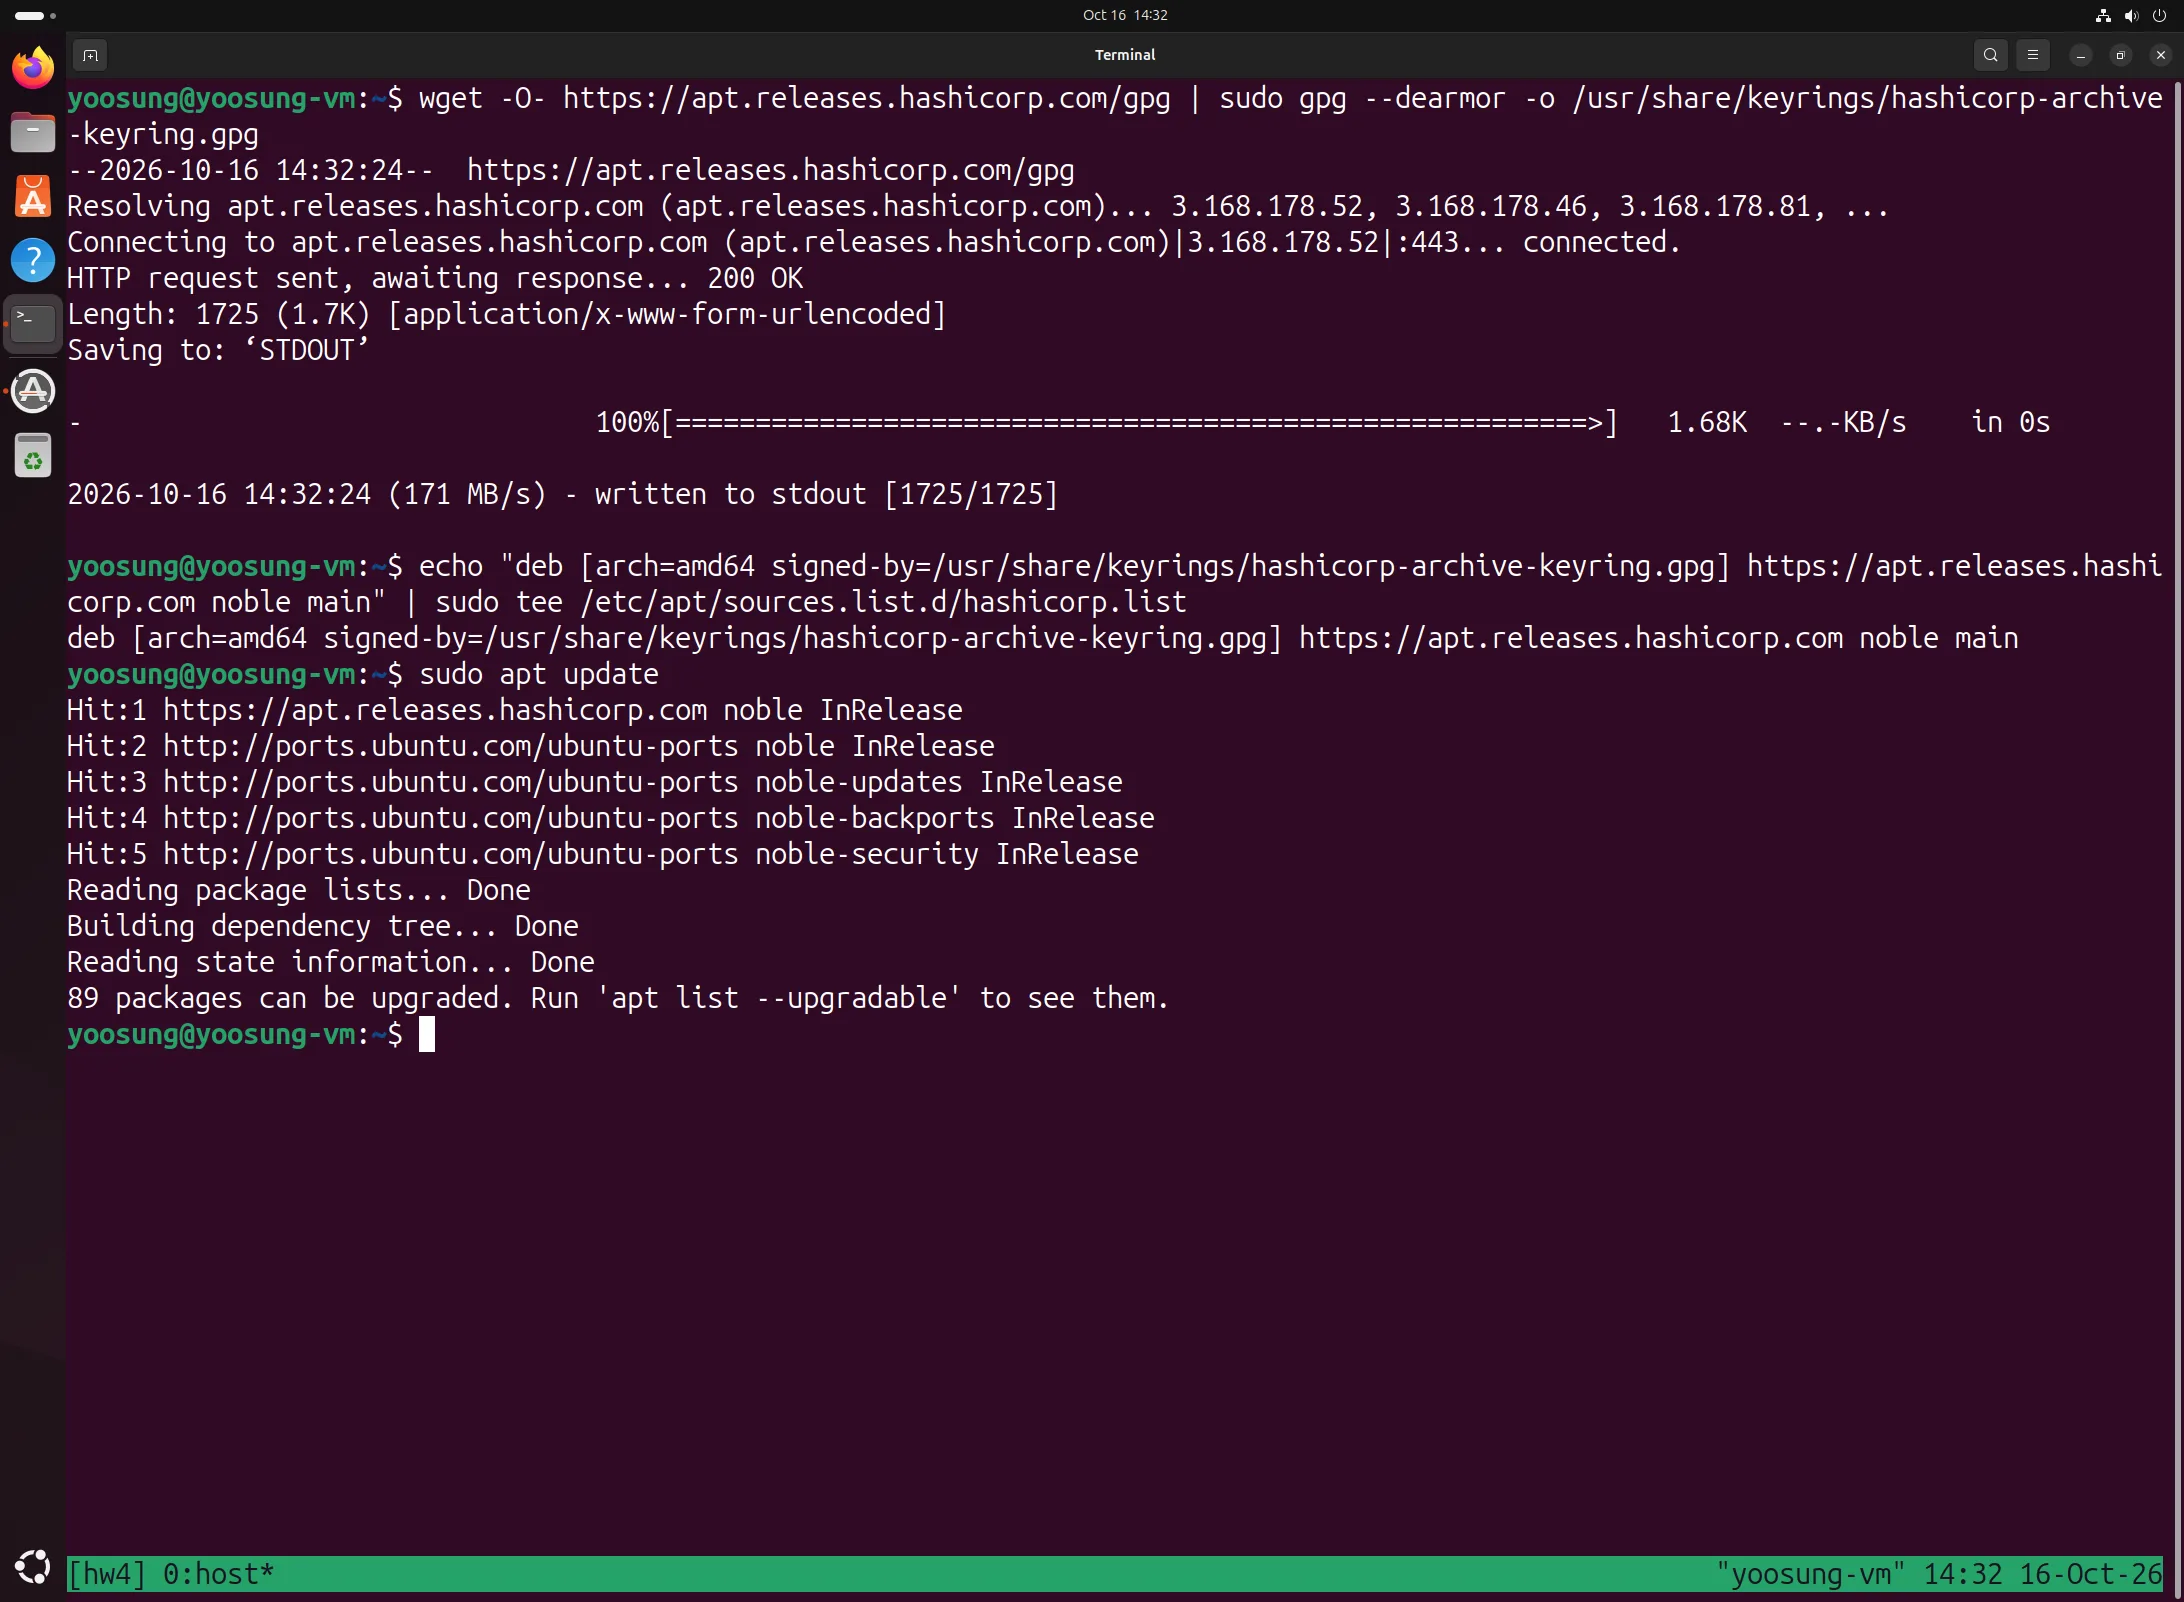
Registering the HashiCorp repository and apt update
Problem 1. No arm64 Vagrant in the Repository
apt install vagrant tried to fetch vagrant:amd64 and failed with package architecture (amd64) does not match system (arm64).
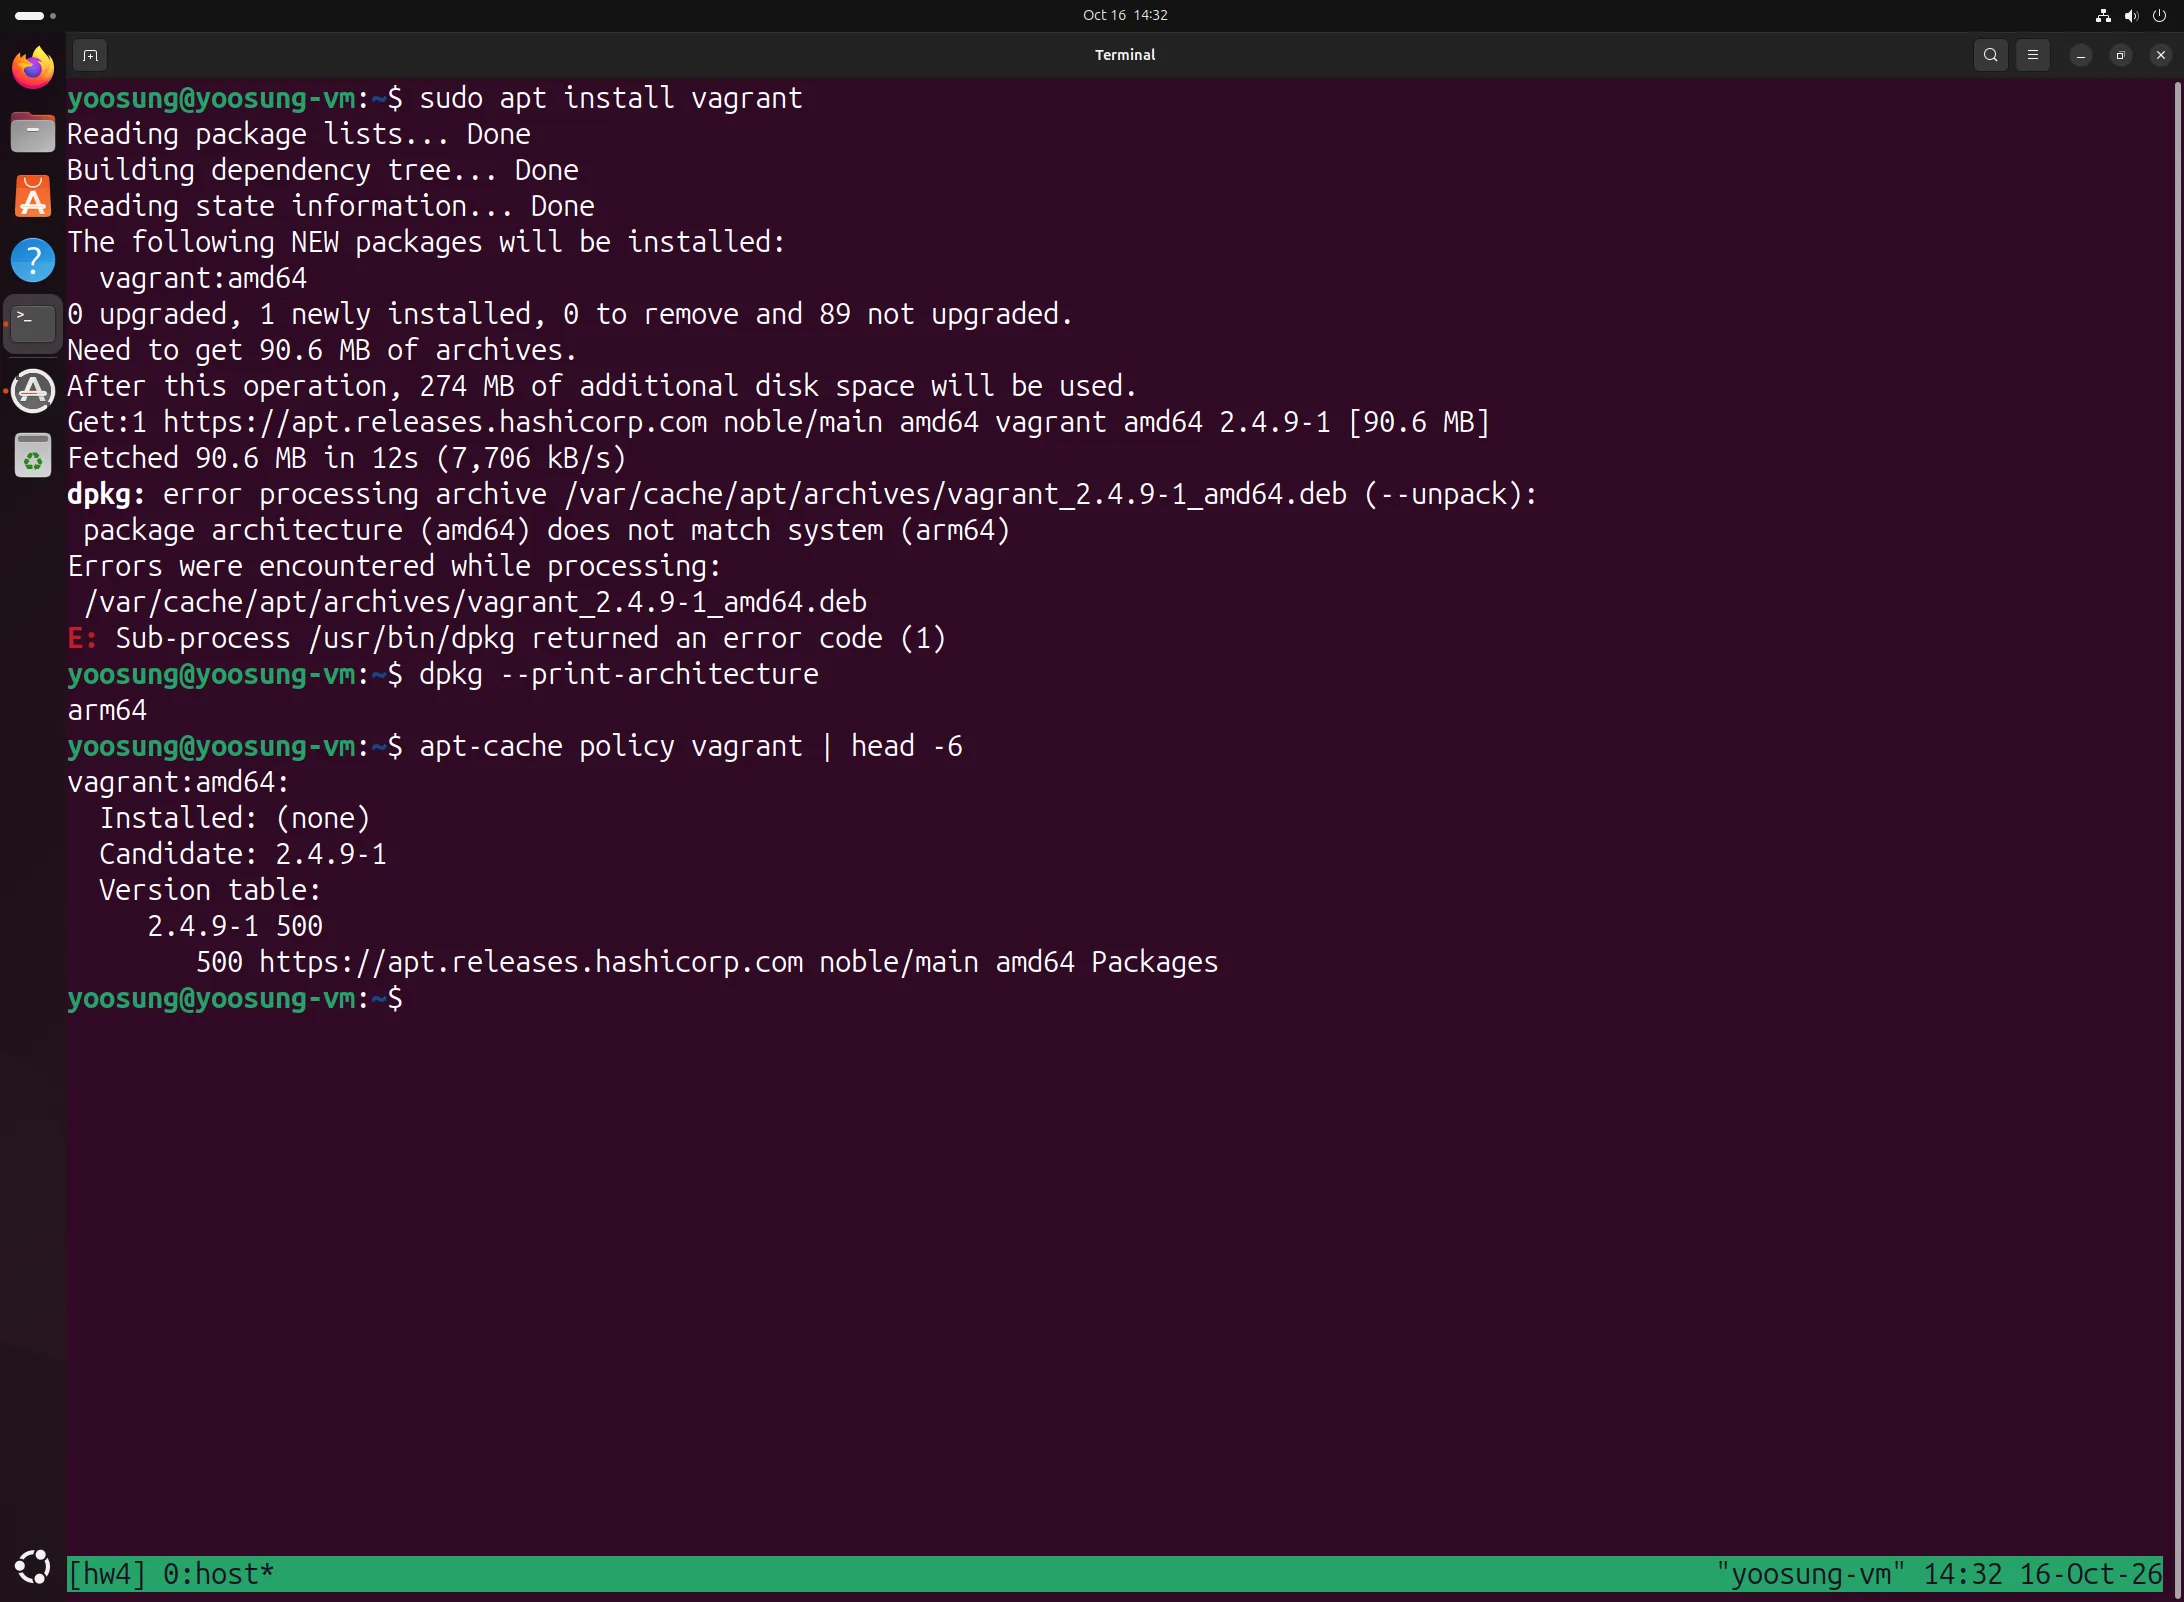
apt only offers the amd64 package, so the install fails on an arm64 system
Looking into it, the repository's package index only has vagrant for amd64 and i686, and releases.hashicorp.com only has a linux_amd64 zip. Ubuntu's own archive last shipped vagrant in 23.10 (mantic); 24.04 (noble) doesn't have it at all. HashiCorp does, however, publish the same version on RubyGems. That works because Vagrant is written in Ruby.
Installing from RubyGems
I installed Ruby and build tools, then installed vagrant as a gem. libarchive-tools provides bsdtar, which vagrant uses to unpack boxes, and libvirt-dev is needed to compile the plugin in the next step. Since this isn't an official install path, it warns "outside of the official installers", but it works fine. The installed version is 2.4.9, same as the slides.
sudo rm /etc/apt/sources.list.d/hashicorp.list && sudo apt clean
sudo apt install -y ruby-full ruby-dev build-essential libarchive-dev libarchive-tools zlib1g-dev libssl-dev pkg-config libvirt-dev
ruby --version; gem --version; bsdtar --version
sudo gem install vagrant --no-document
vagrant --version
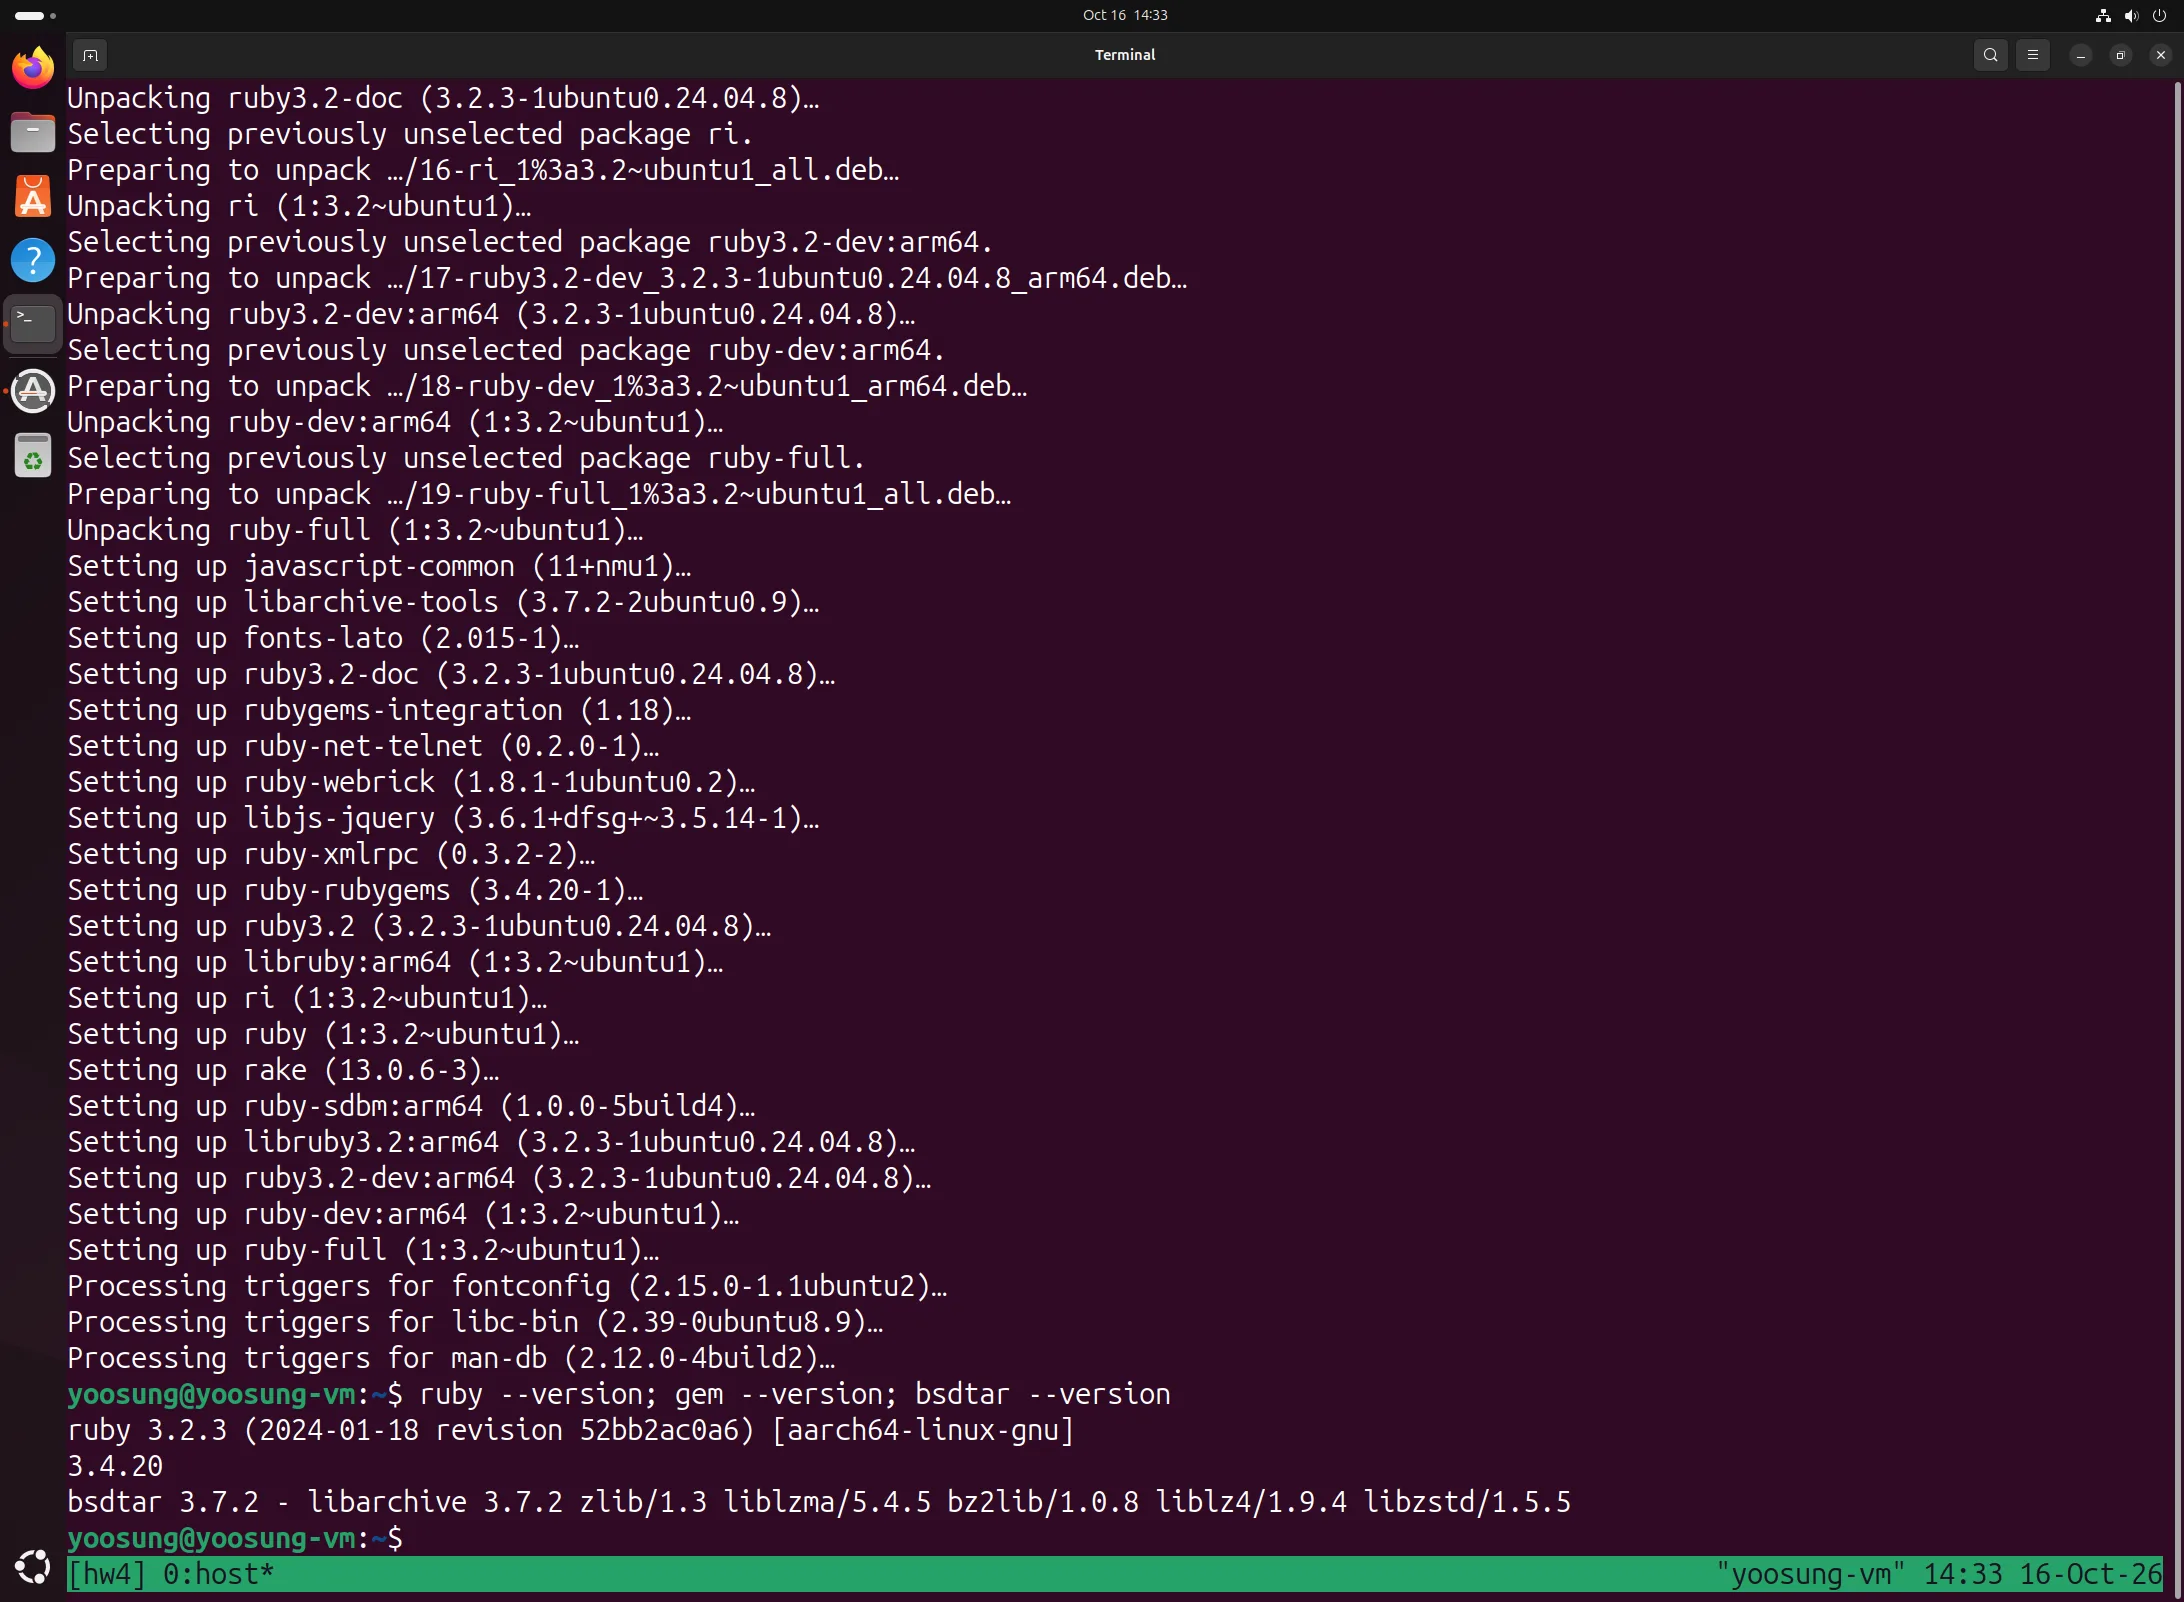
Ruby 3.2.3, RubyGems 3.4.20, bsdtar installed
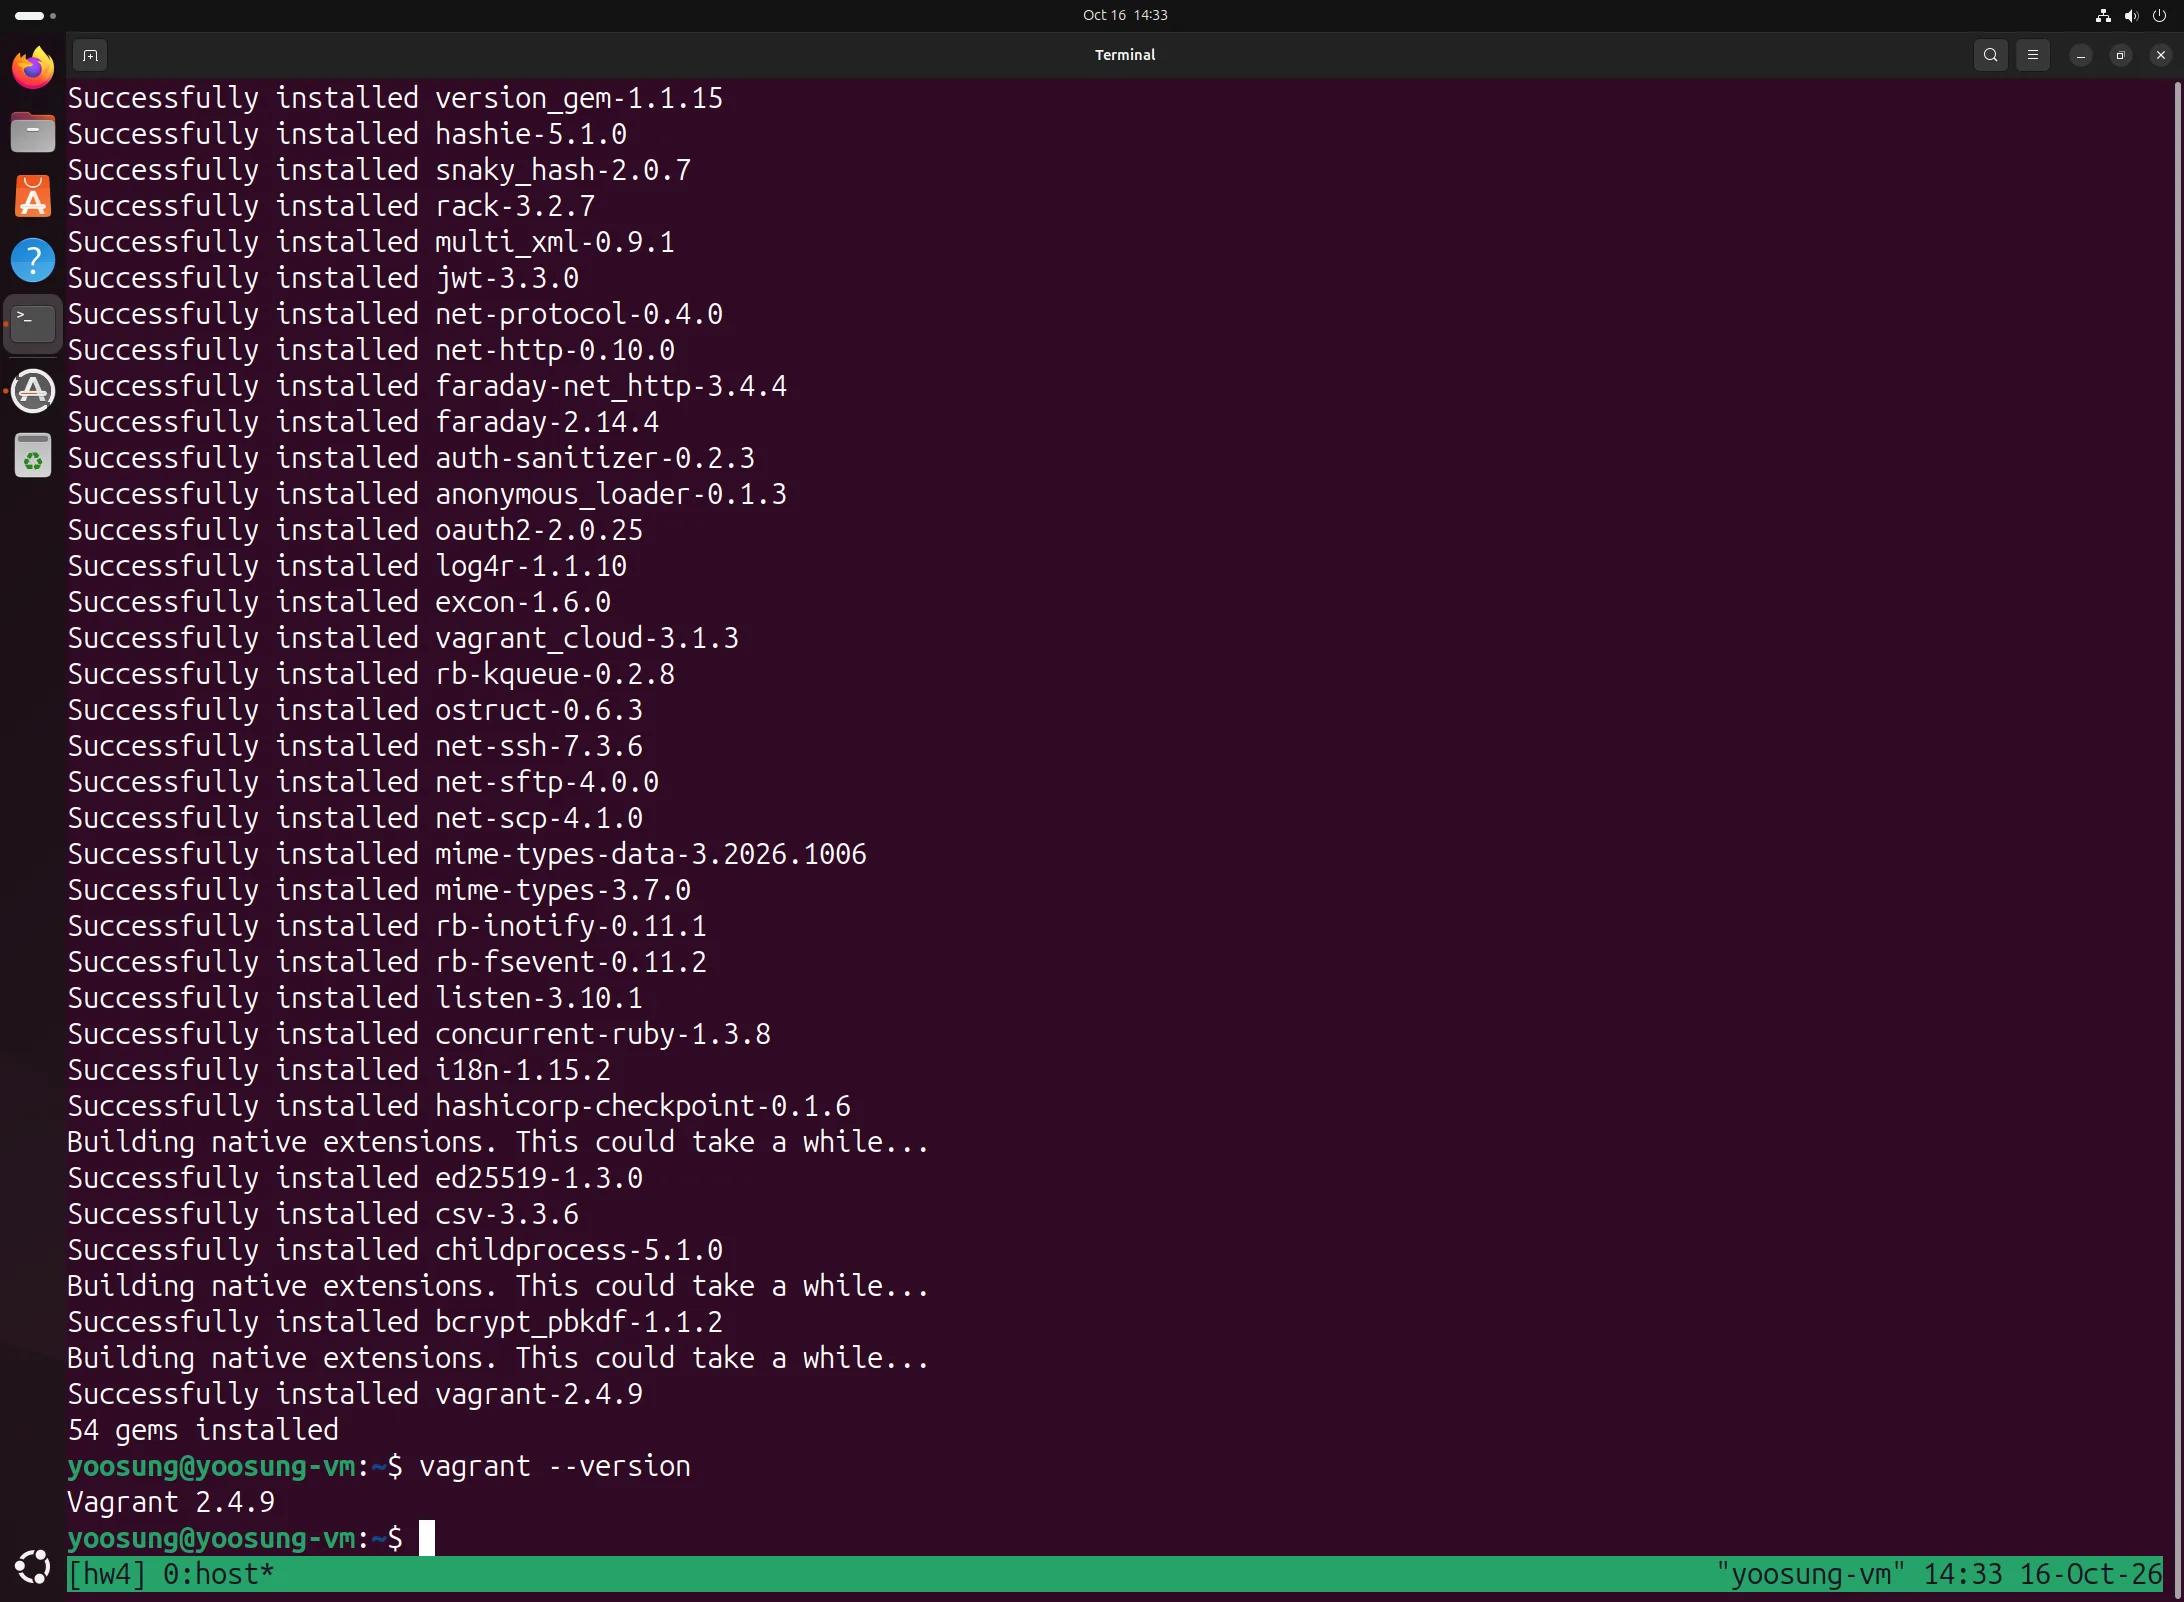
gem install vagrant: 54 gems installed, Vagrant 2.4.9
libvirt Provider Plugin
There's no VirtualBox here, so I installed the vagrant-libvirt plugin to make Vagrant create VMs with KVM/libvirt. In terms of slide 12's "tools Vagrant supports", this means picking libvirt as the provider.
vagrant plugin install vagrant-libvirt
vagrant plugin list
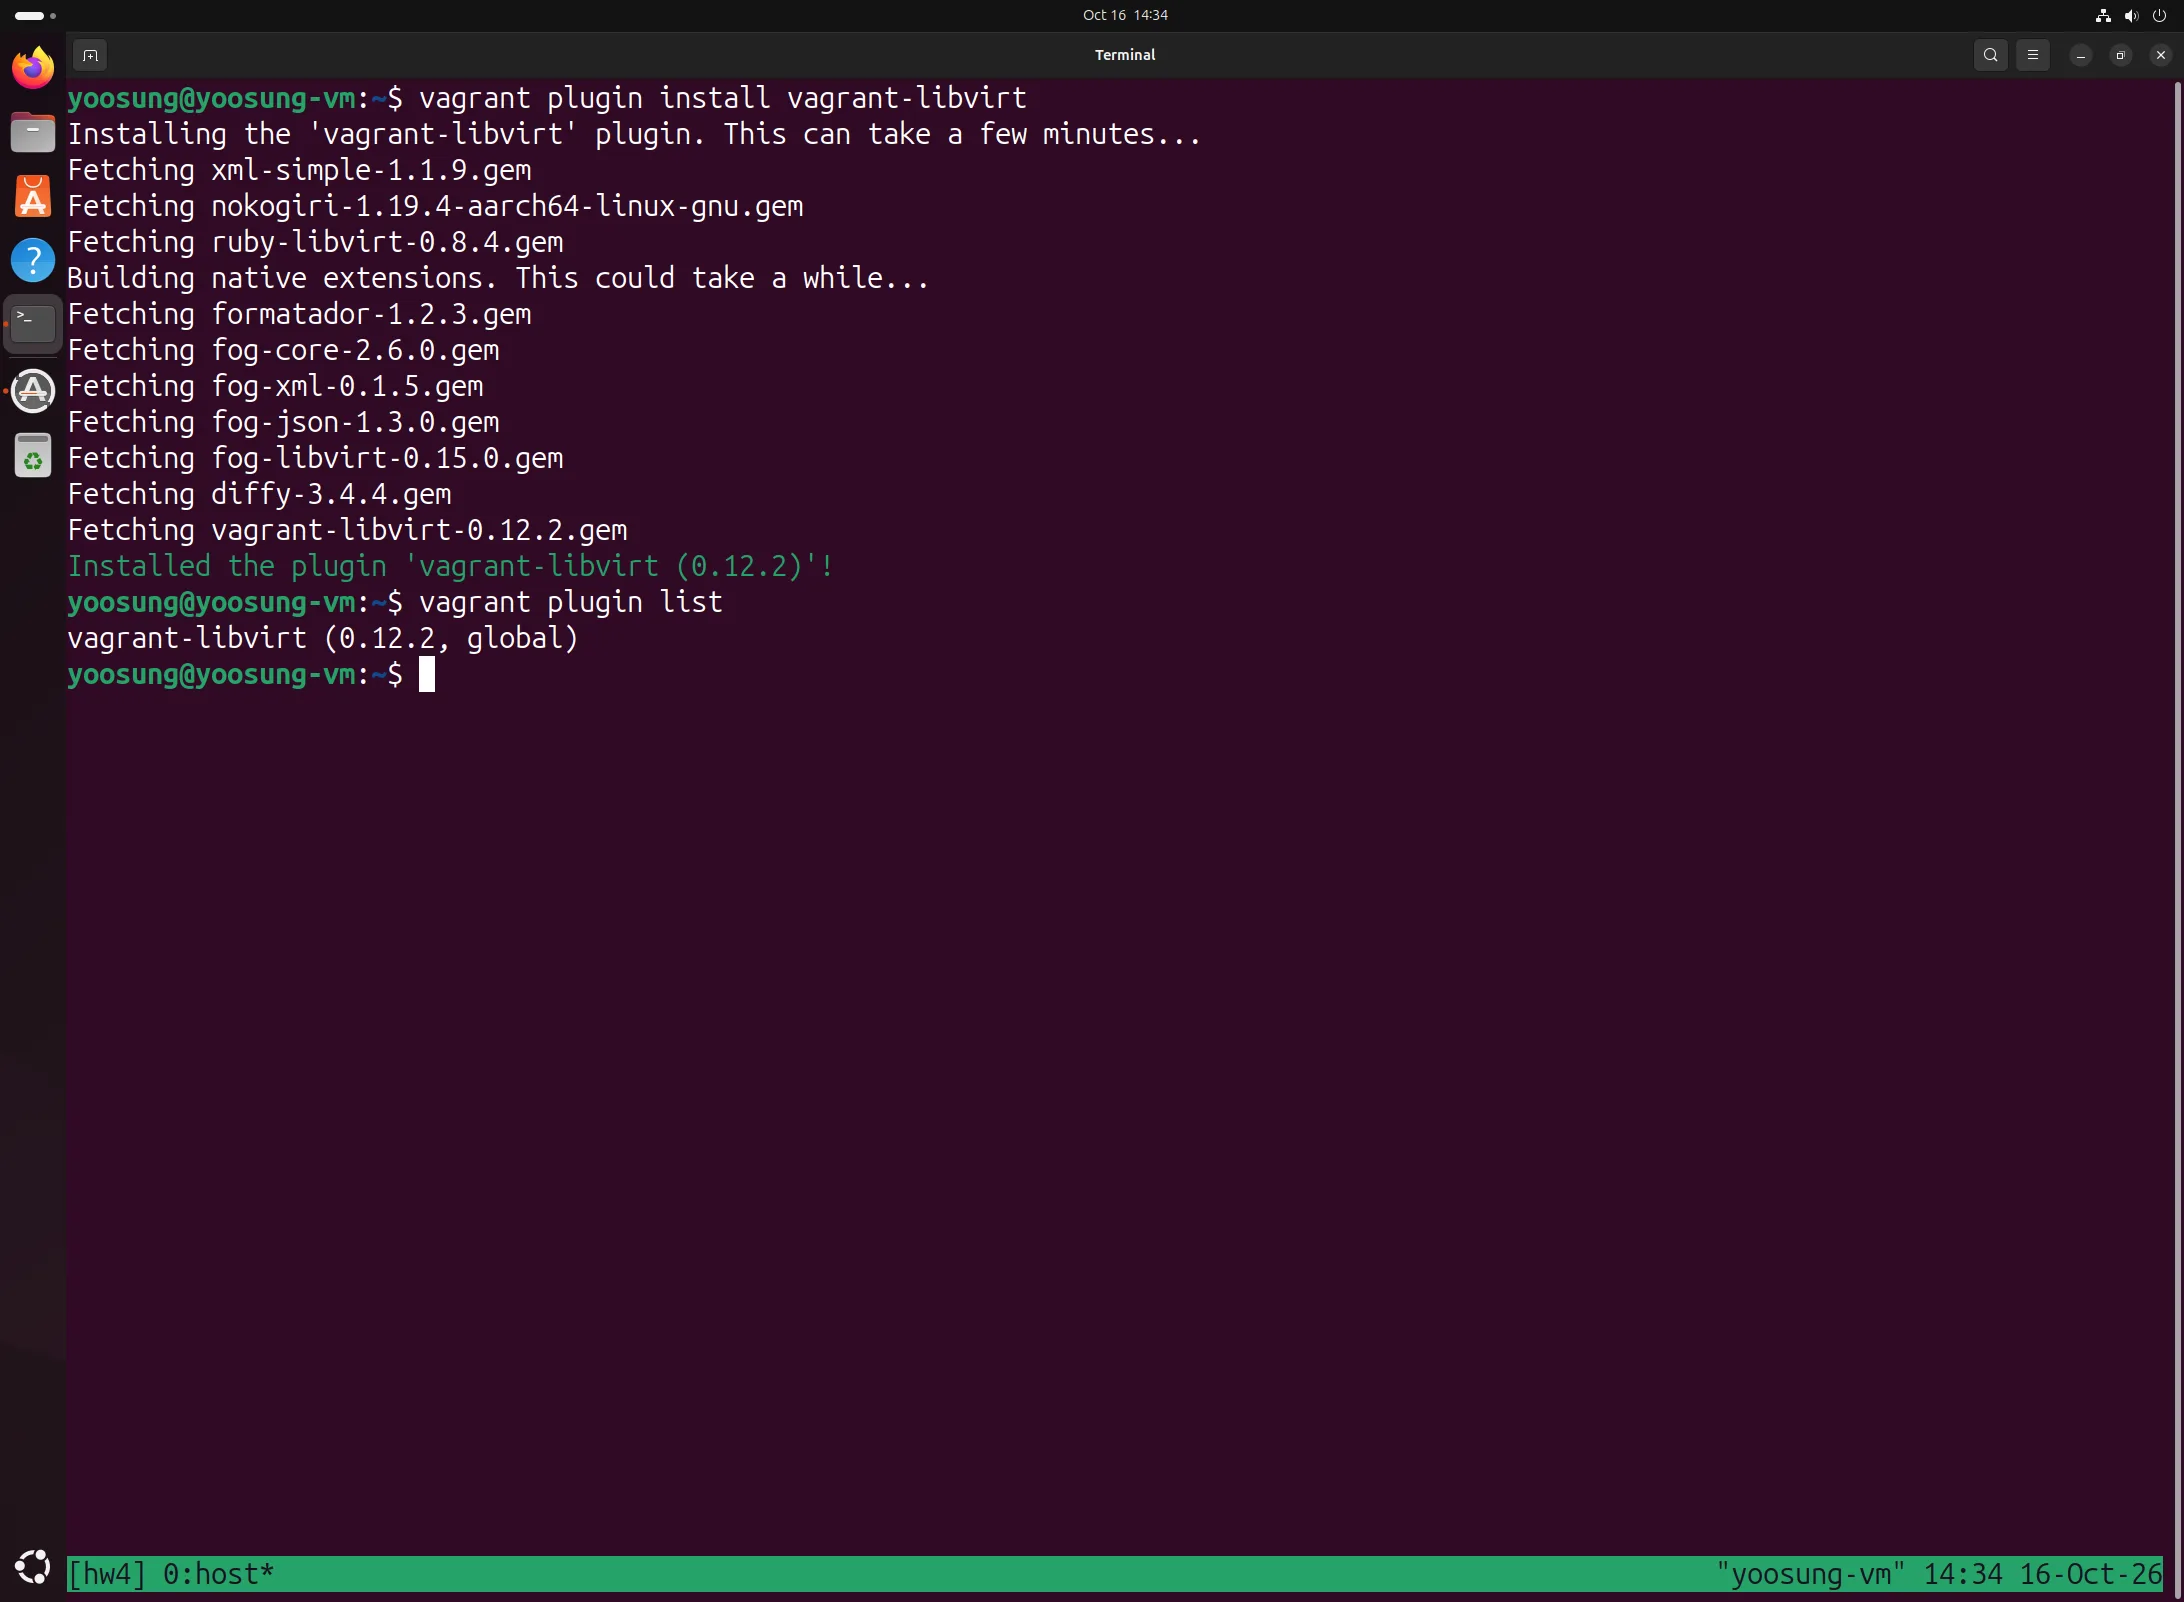
vagrant-libvirt 0.12.2 plugin installed
vagrant init
Without comments, the default Vagrantfile from vagrant init is just one line: config.vm.box = "base".
mkdir vrepo && cd vrepo && vagrant init
ls
grep -v "^ *#" Vagrantfile | grep -v "^ *$"
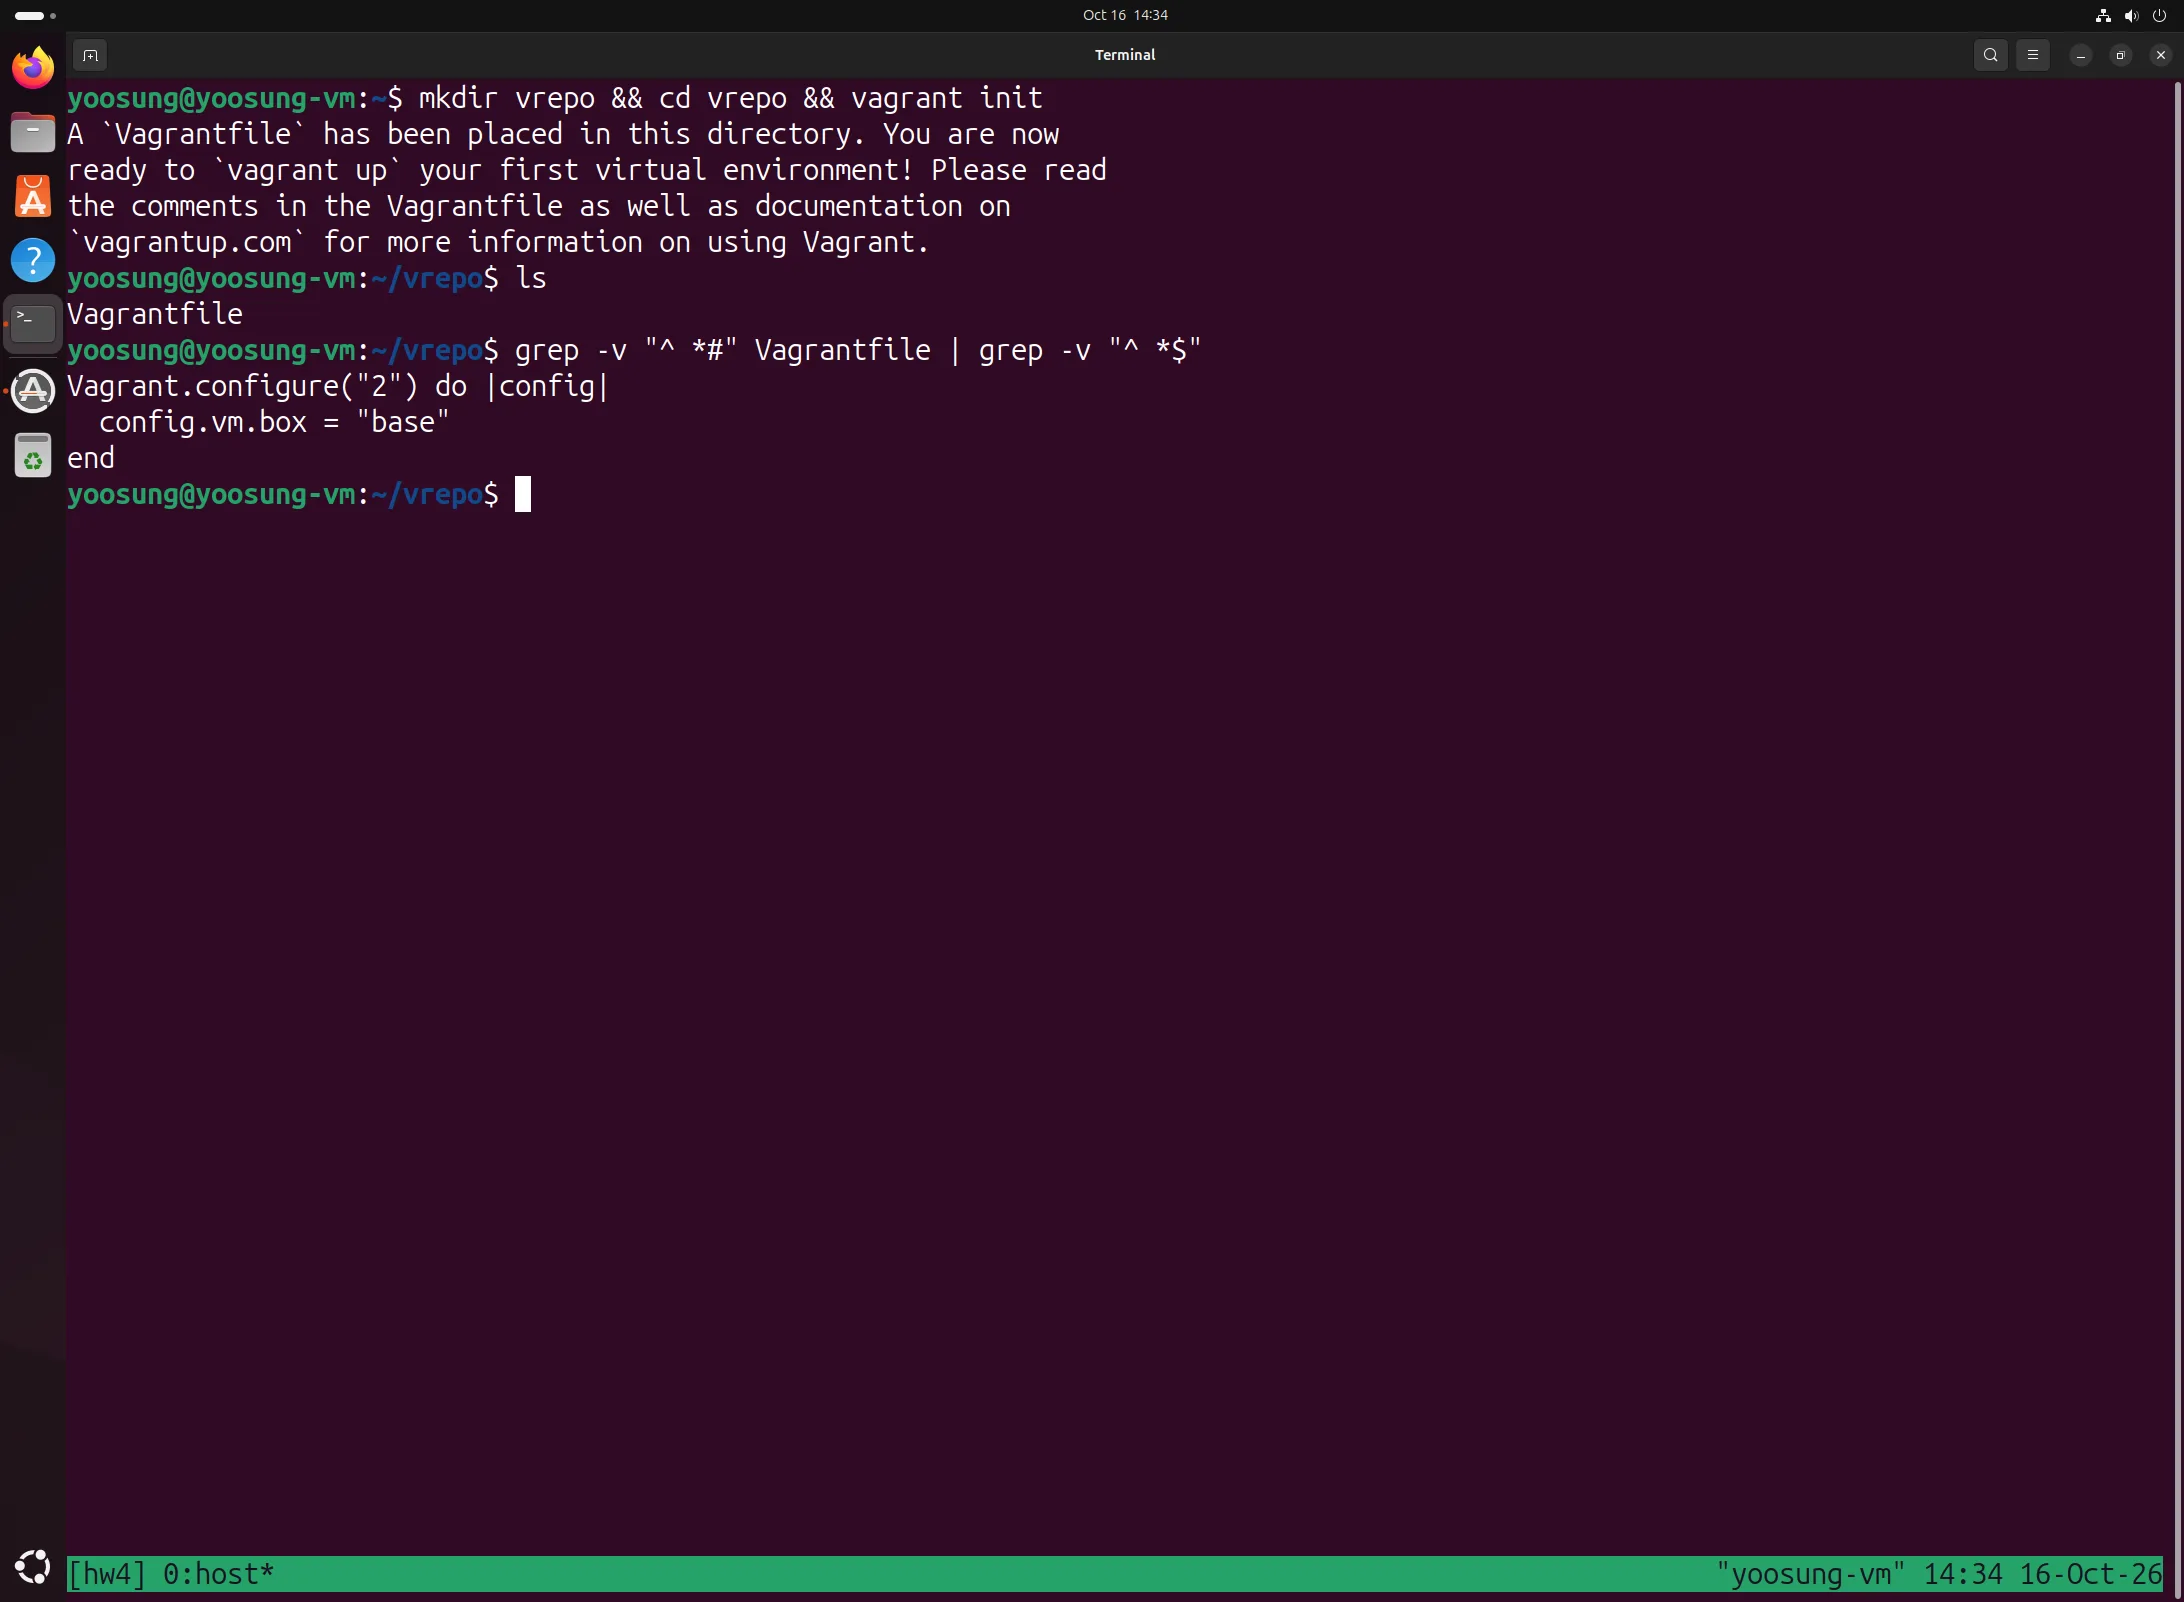
vagrant init and the default Vagrantfile
Problem 2. Storage Pool Conflict
When I ran vagrant up with the default Vagrantfile as on slide 16, libvirt threw an error even before looking for the base box.
Call to virStoragePoolDefineXML failed: ... Storage source conflict with pool: 'images'
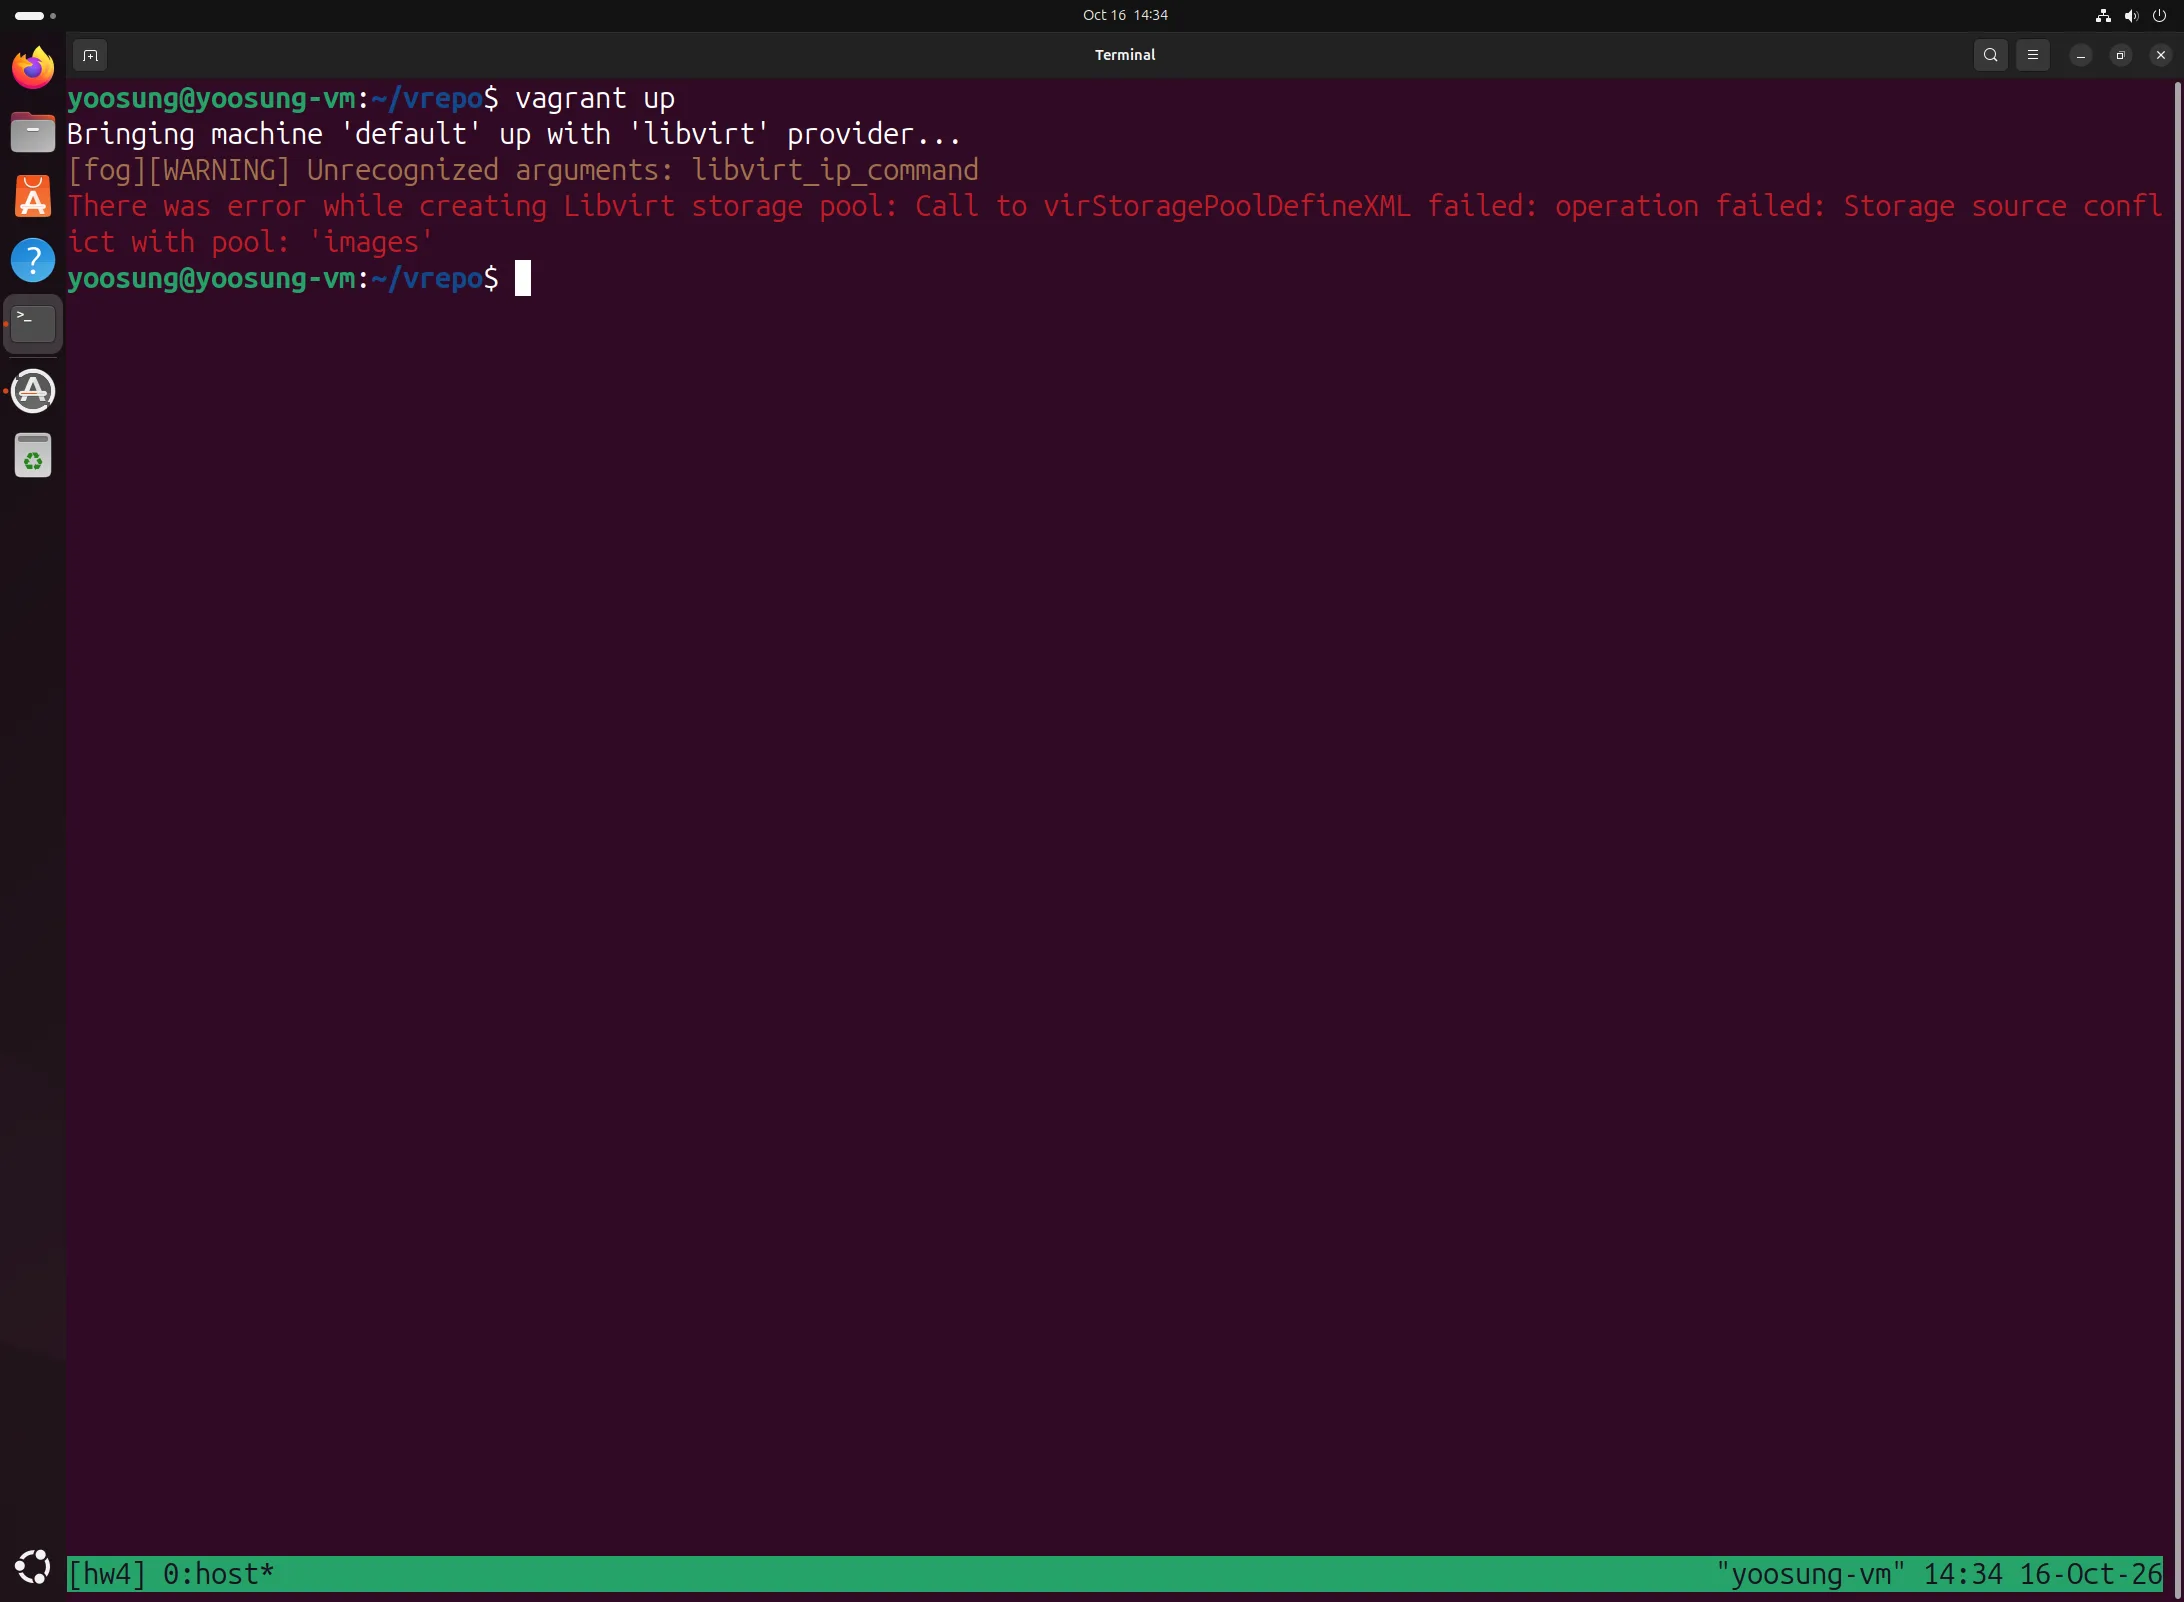
up with the default Vagrantfile: Storage source conflict with pool: 'images'
The plugin tries to define a new pool named default at /var/lib/libvirt/images, but in HW2 I had already created a pool named images at the same path, so libvirt refused. I set storage_pool_name = "images" in the libvirt provider block of the Vagrantfile so it uses the existing pool.
Adding the Rocky Linux 10 Box
Problem 3. Box Download 404
The slide's bento/rockylinux-10 only comes for parallels, utm, virtualbox and vmware, with no libvirt version, so I chose the official Rocky rockylinux/10 box. But vagrant box add failed with a 404.
vagrant box add rockylinux/10 --provider libvirt # → 404
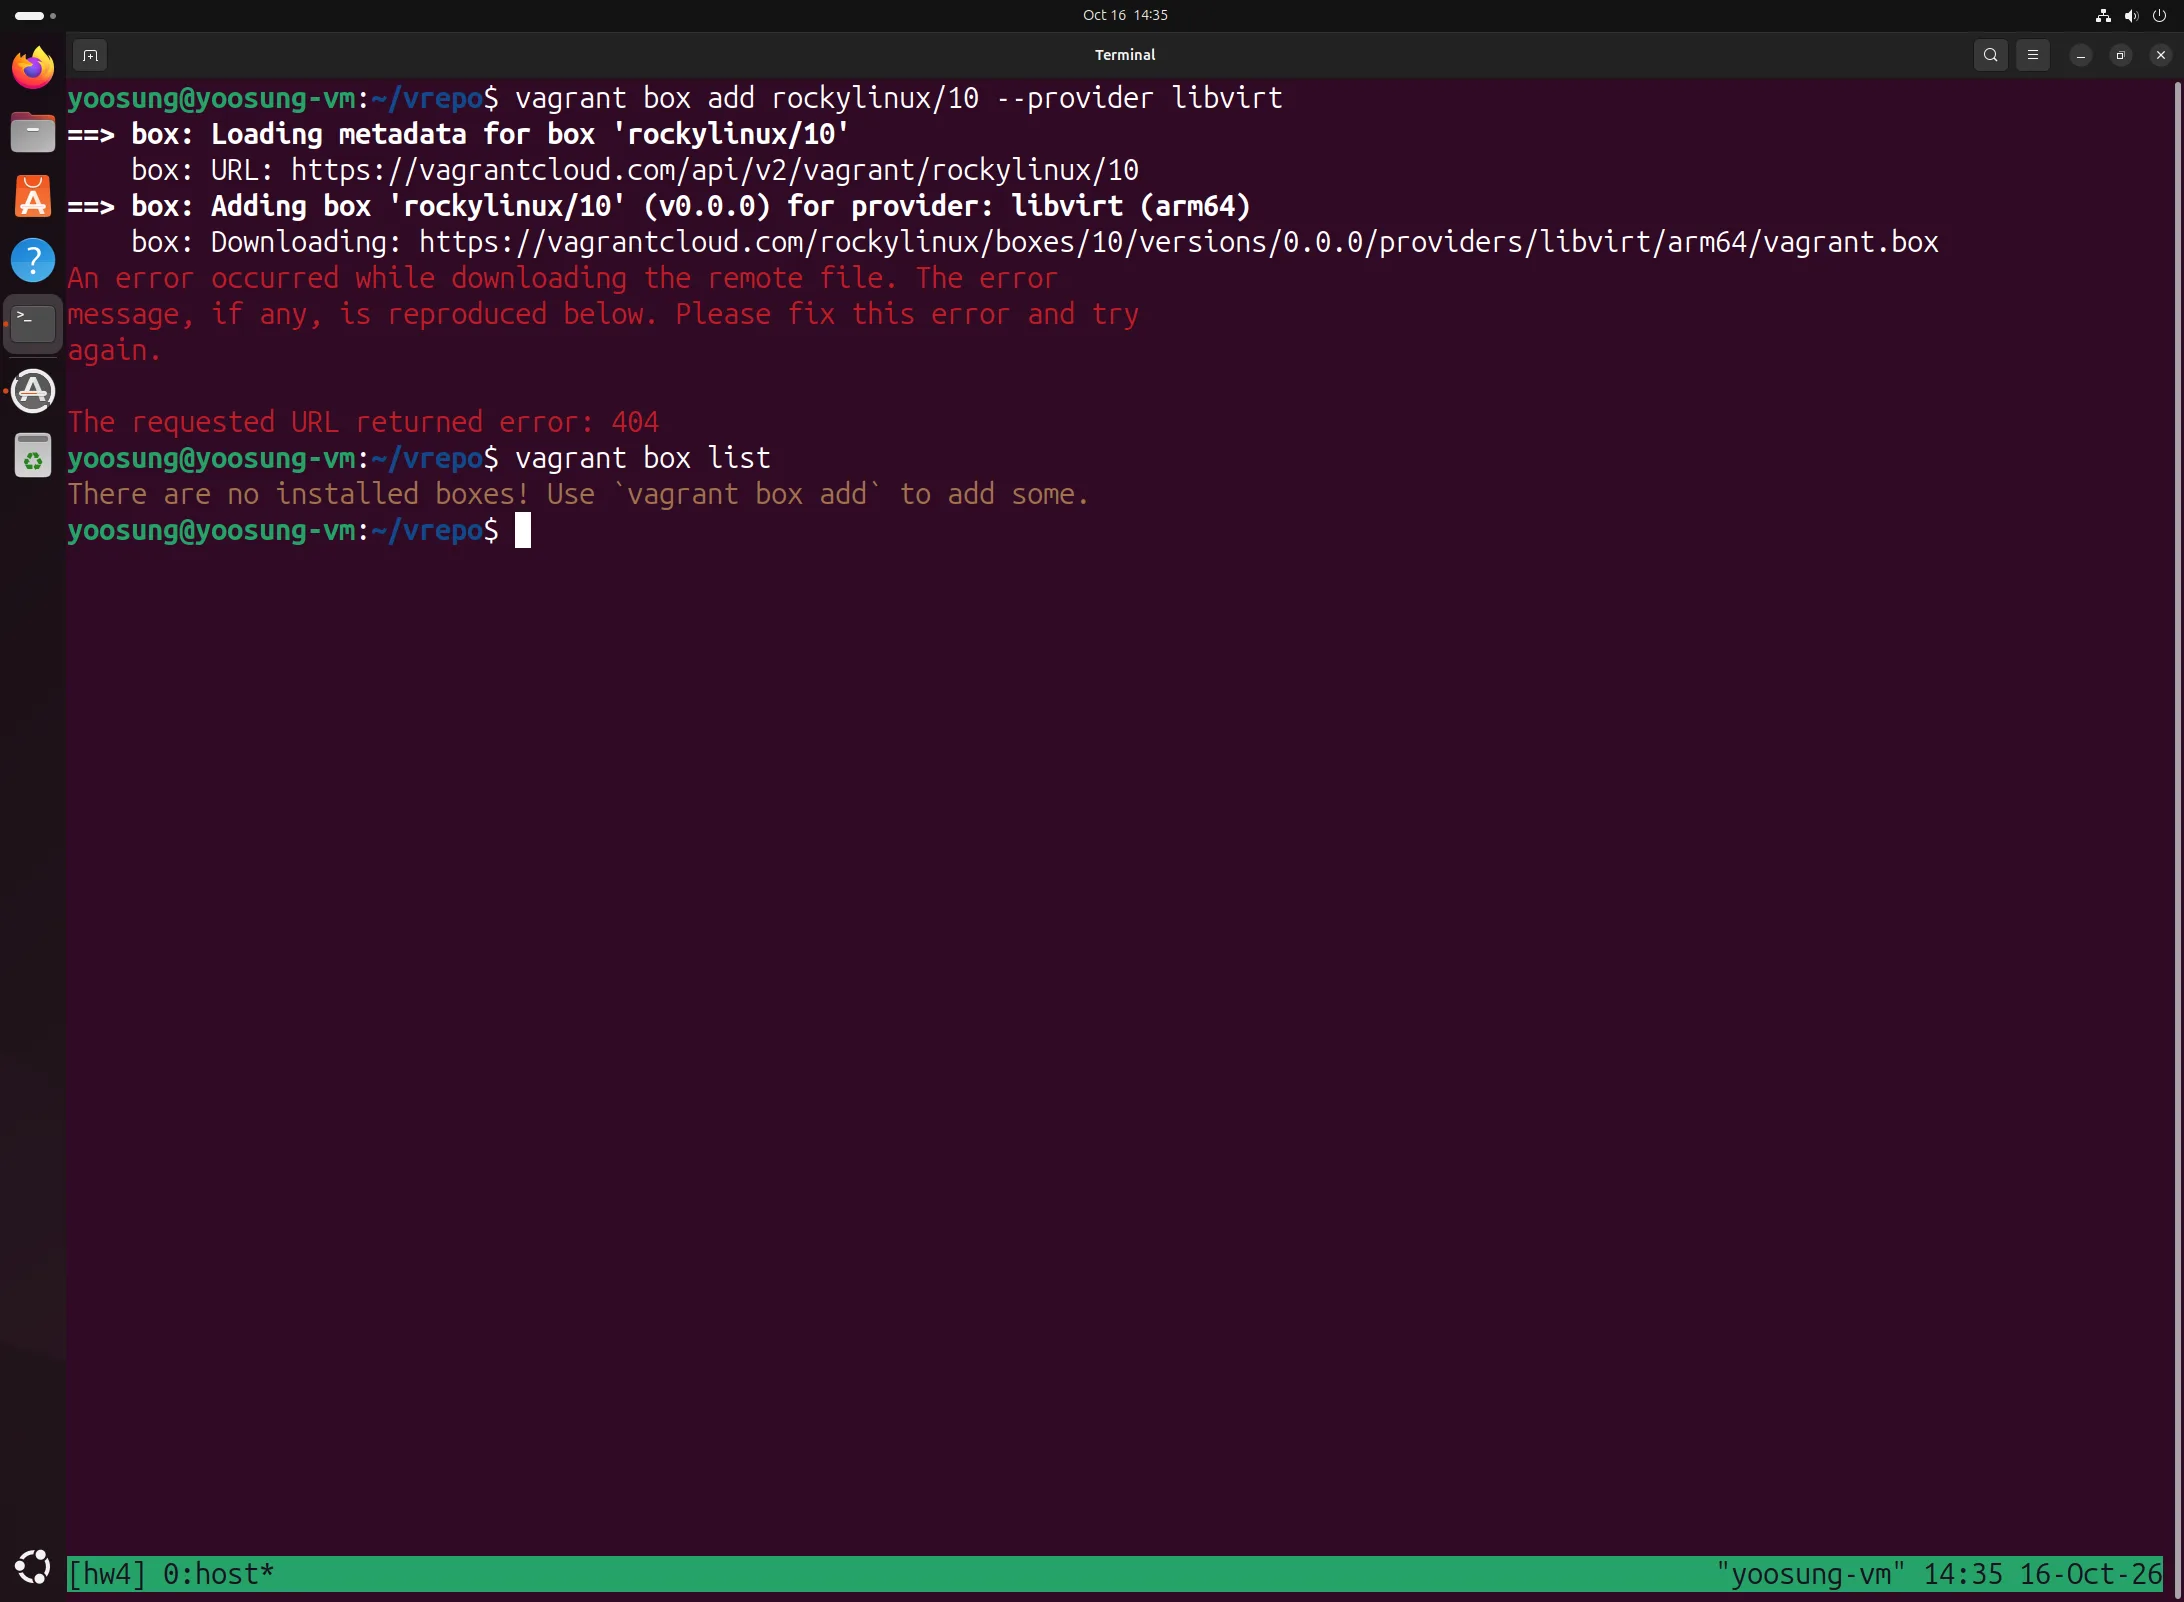
Download via Vagrant Cloud returns 404
The Vagrant Cloud box metadata redirects to dl.rockylinux.org/.../Rocky-10-Vagrant-Libvirt-10.0-20250609.1.aarch64.box, but the Rocky mirror only has the 10.2 (20260525.0) files now; the 10.0 file has been removed. I found the latest file URL in the mirror directory and added it directly with a name.
vagrant box add --name rockylinux/10 https://dl.rockylinux.org/pub/rocky/10/images/aarch64/Rocky-10-Vagrant-Libvirt.latest.aarch64.vagrant.libvirt.box
vagrant box list
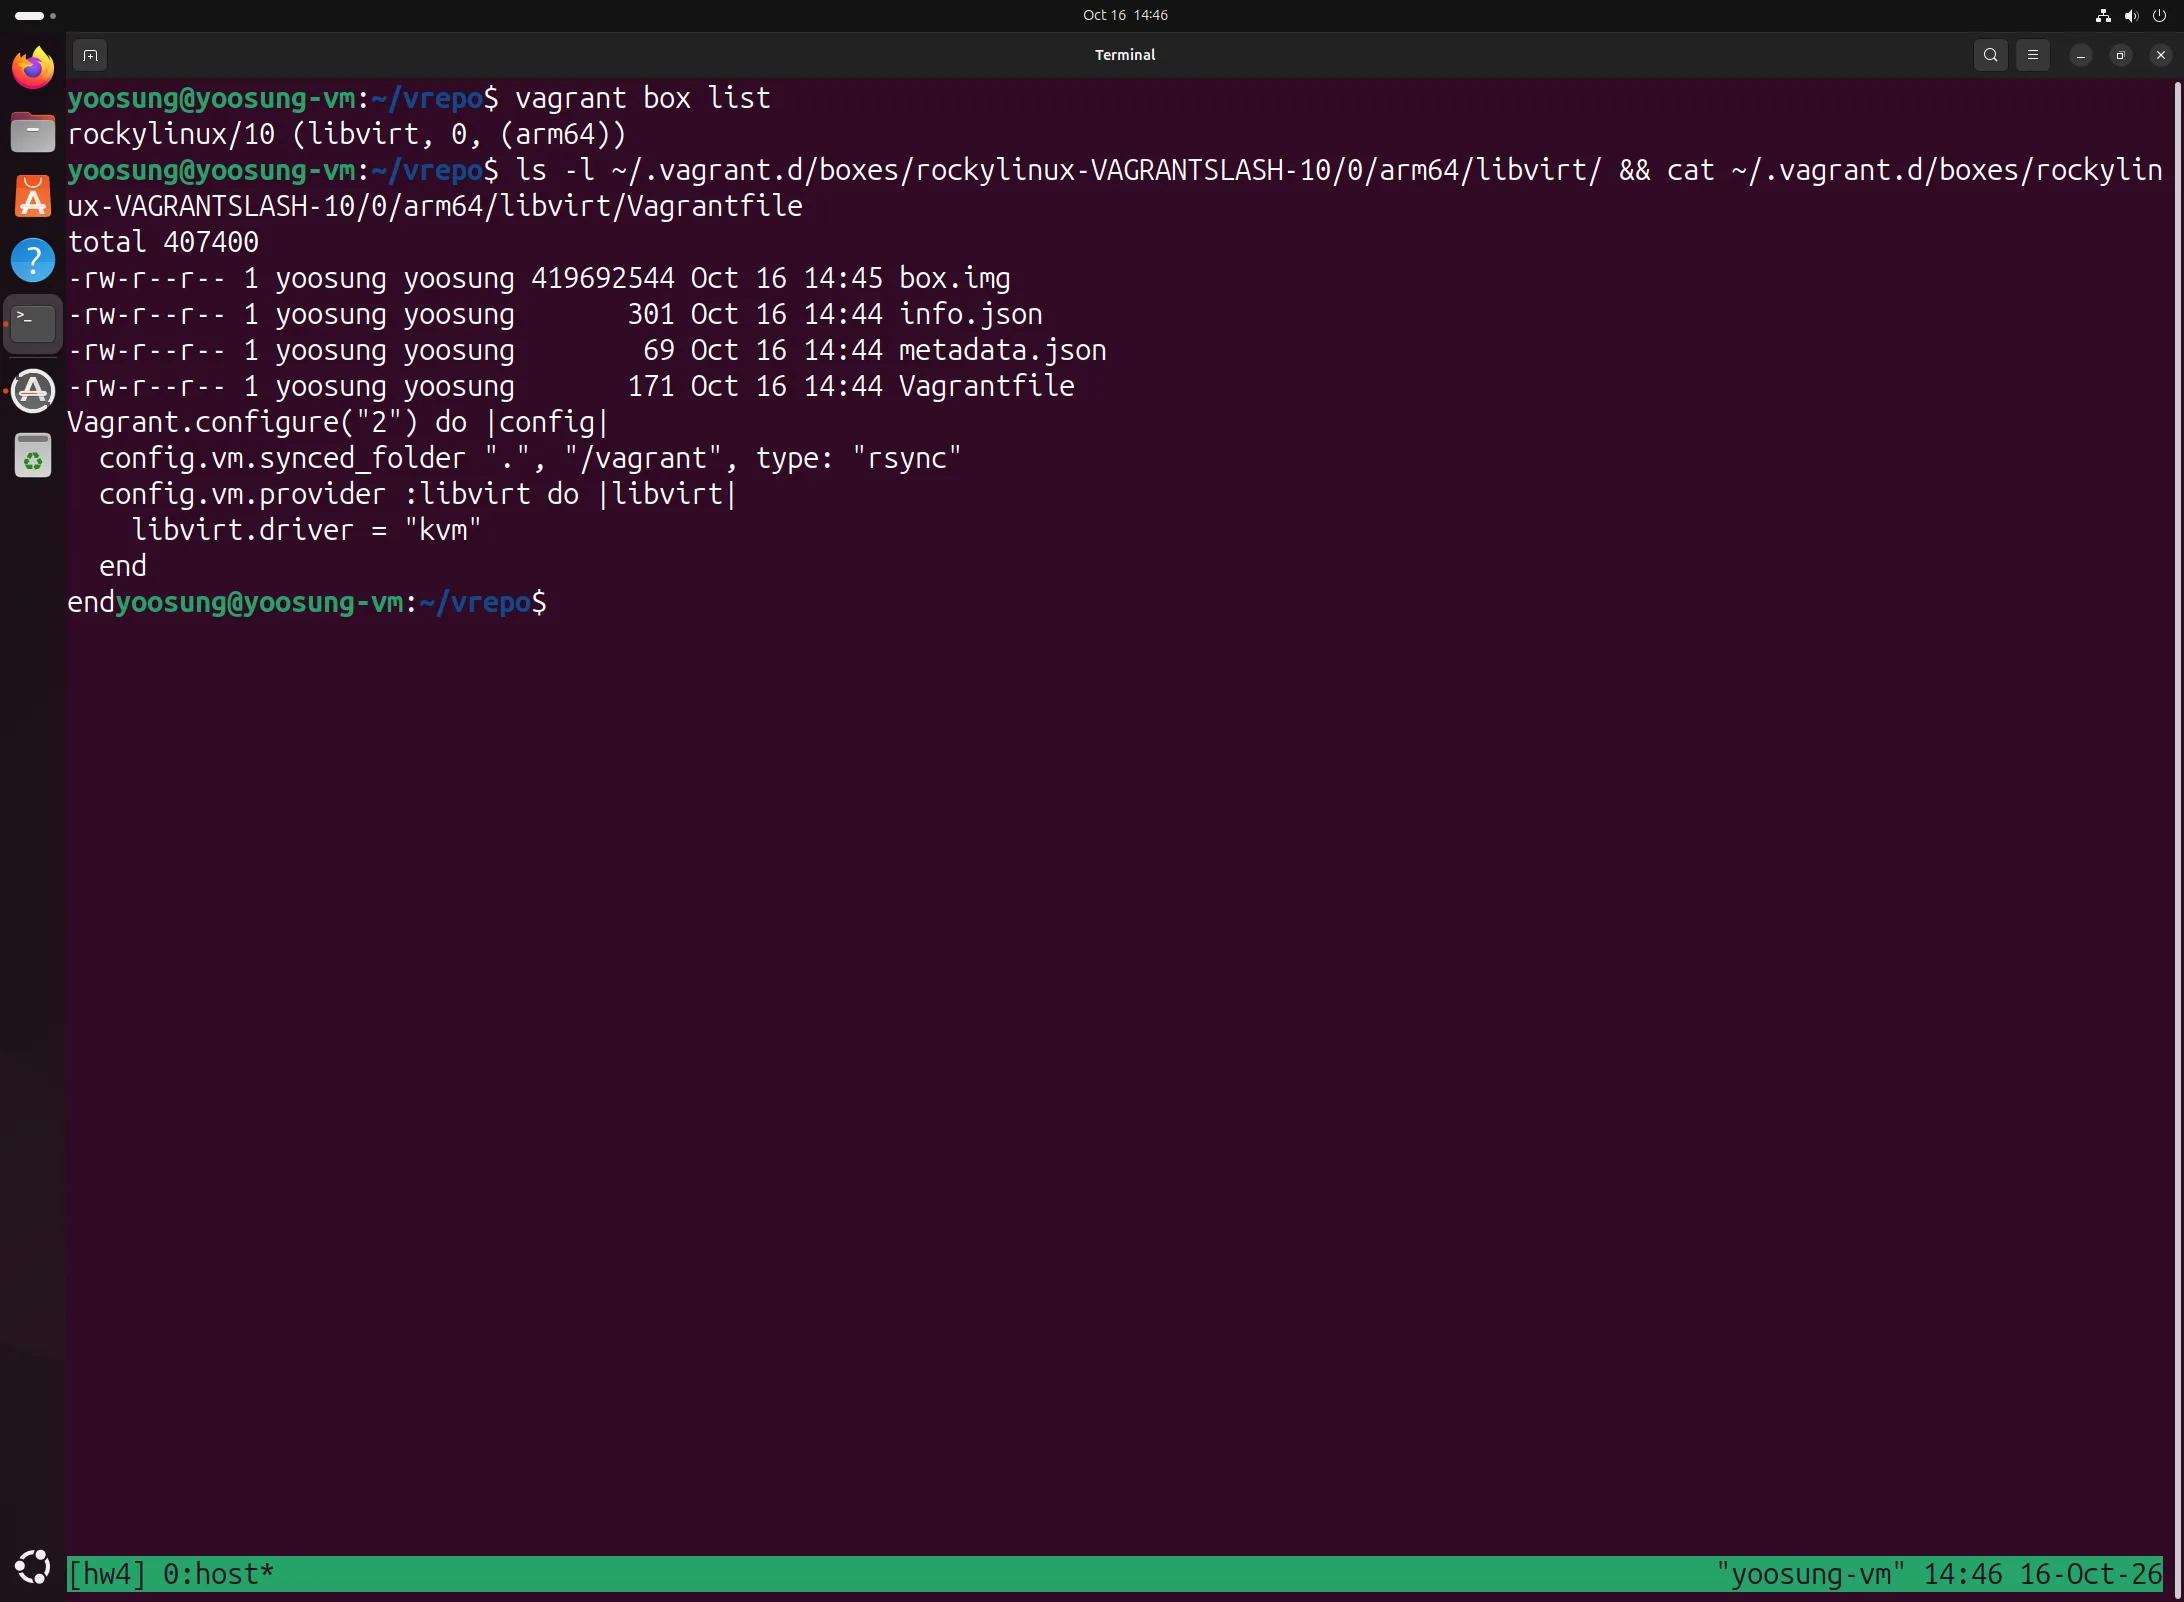
Box list after adding from the mirror URL, box files (box.img, metadata.json, Vagrantfile) and the box's built-in Vagrantfile
Adding pci=nomsi to the Box Image
As I found in HW2, in this nested virtualization setup the Rocky guest kernel hangs during boot without pci=nomsi, because it can't receive virtio interrupts. So I wrote a script that attaches the box image with qemu-nbd and appends the argument to the options line of the boot entries (/boot/loader/entries/*.conf). It only needs to run once before the first vagrant up; every VM disk created afterwards uses this image as its backing file.
#!/bin/bash
# box-nomsi.sh <box.img>
# Add "pci=nomsi" to the kernel command line inside a qcow2 box image (offline, via qemu-nbd).
set -e
IMG="$1"; [ -f "$IMG" ] || { echo "usage: $0 <box.img>"; exit 1; }
sudo modprobe nbd max_part=16
sudo qemu-nbd --disconnect /dev/nbd0 >/dev/null 2>&1 || true
sudo qemu-nbd --connect=/dev/nbd0 "$IMG"
sleep 2; sudo partprobe /dev/nbd0 2>/dev/null || true; sleep 1
lsblk -o NAME,SIZE,FSTYPE,LABEL /dev/nbd0
M=$(mktemp -d)
cleanup() { sudo umount "$M/boot" 2>/dev/null; sudo umount "$M" 2>/dev/null; rmdir "$M" 2>/dev/null; sudo qemu-nbd --disconnect /dev/nbd0 >/dev/null 2>&1; }
trap cleanup EXIT
ROOT=""; BOOT=""
for p in /dev/nbd0p*; do
  fs=$(lsblk -no FSTYPE "$p"); [ -z "$fs" ] && continue
  [ "$fs" = vfat ] && continue
  sudo mount -o ro "$p" "$M"
  if [ -d "$M/etc" ] && [ -d "$M/boot" ]; then ROOT="$p"; fi
  if [ -d "$M/loader/entries" ]; then BOOT="$p"; fi
  sudo umount "$M"
done
echo "root=$ROOT boot=$BOOT"
sudo mount "$ROOT" "$M"
[ -n "$BOOT" ] && sudo mount "$BOOT" "$M/boot"
# /boot/loader/entries is root-only (0700): expand the glob inside sudo
show() { sudo bash -c "grep -h '^options' '$M'/boot/loader/entries/*.conf; cat '$M/etc/kernel/cmdline' 2>/dev/null; grep '^GRUB_CMDLINE_LINUX=' '$M/etc/default/grub'; true"; }
echo "--- before"; show
sudo bash -c "sed -i '/^options/{/pci=nomsi/!s/\$/ pci=nomsi/}' '$M'/boot/loader/entries/*.conf"
sudo bash -c "[ -f '$M/etc/kernel/cmdline' ] && sed -i '/pci=nomsi/!s/\$/ pci=nomsi/' '$M/etc/kernel/cmdline' || true"
sudo sed -i '/^GRUB_CMDLINE_LINUX=/{/pci=nomsi/!s/"$/ pci=nomsi"/}' "$M/etc/default/grub" 2>/dev/null || true
echo "--- after"; show
sync; cleanup; trap - EXIT
echo "done: pci=nomsi added to $IMG"
~/bin/box-nomsi.sh ~/.vagrant.d/boxes/rockylinux-VAGRANTSLASH-10/0/arm64/libvirt/box.img
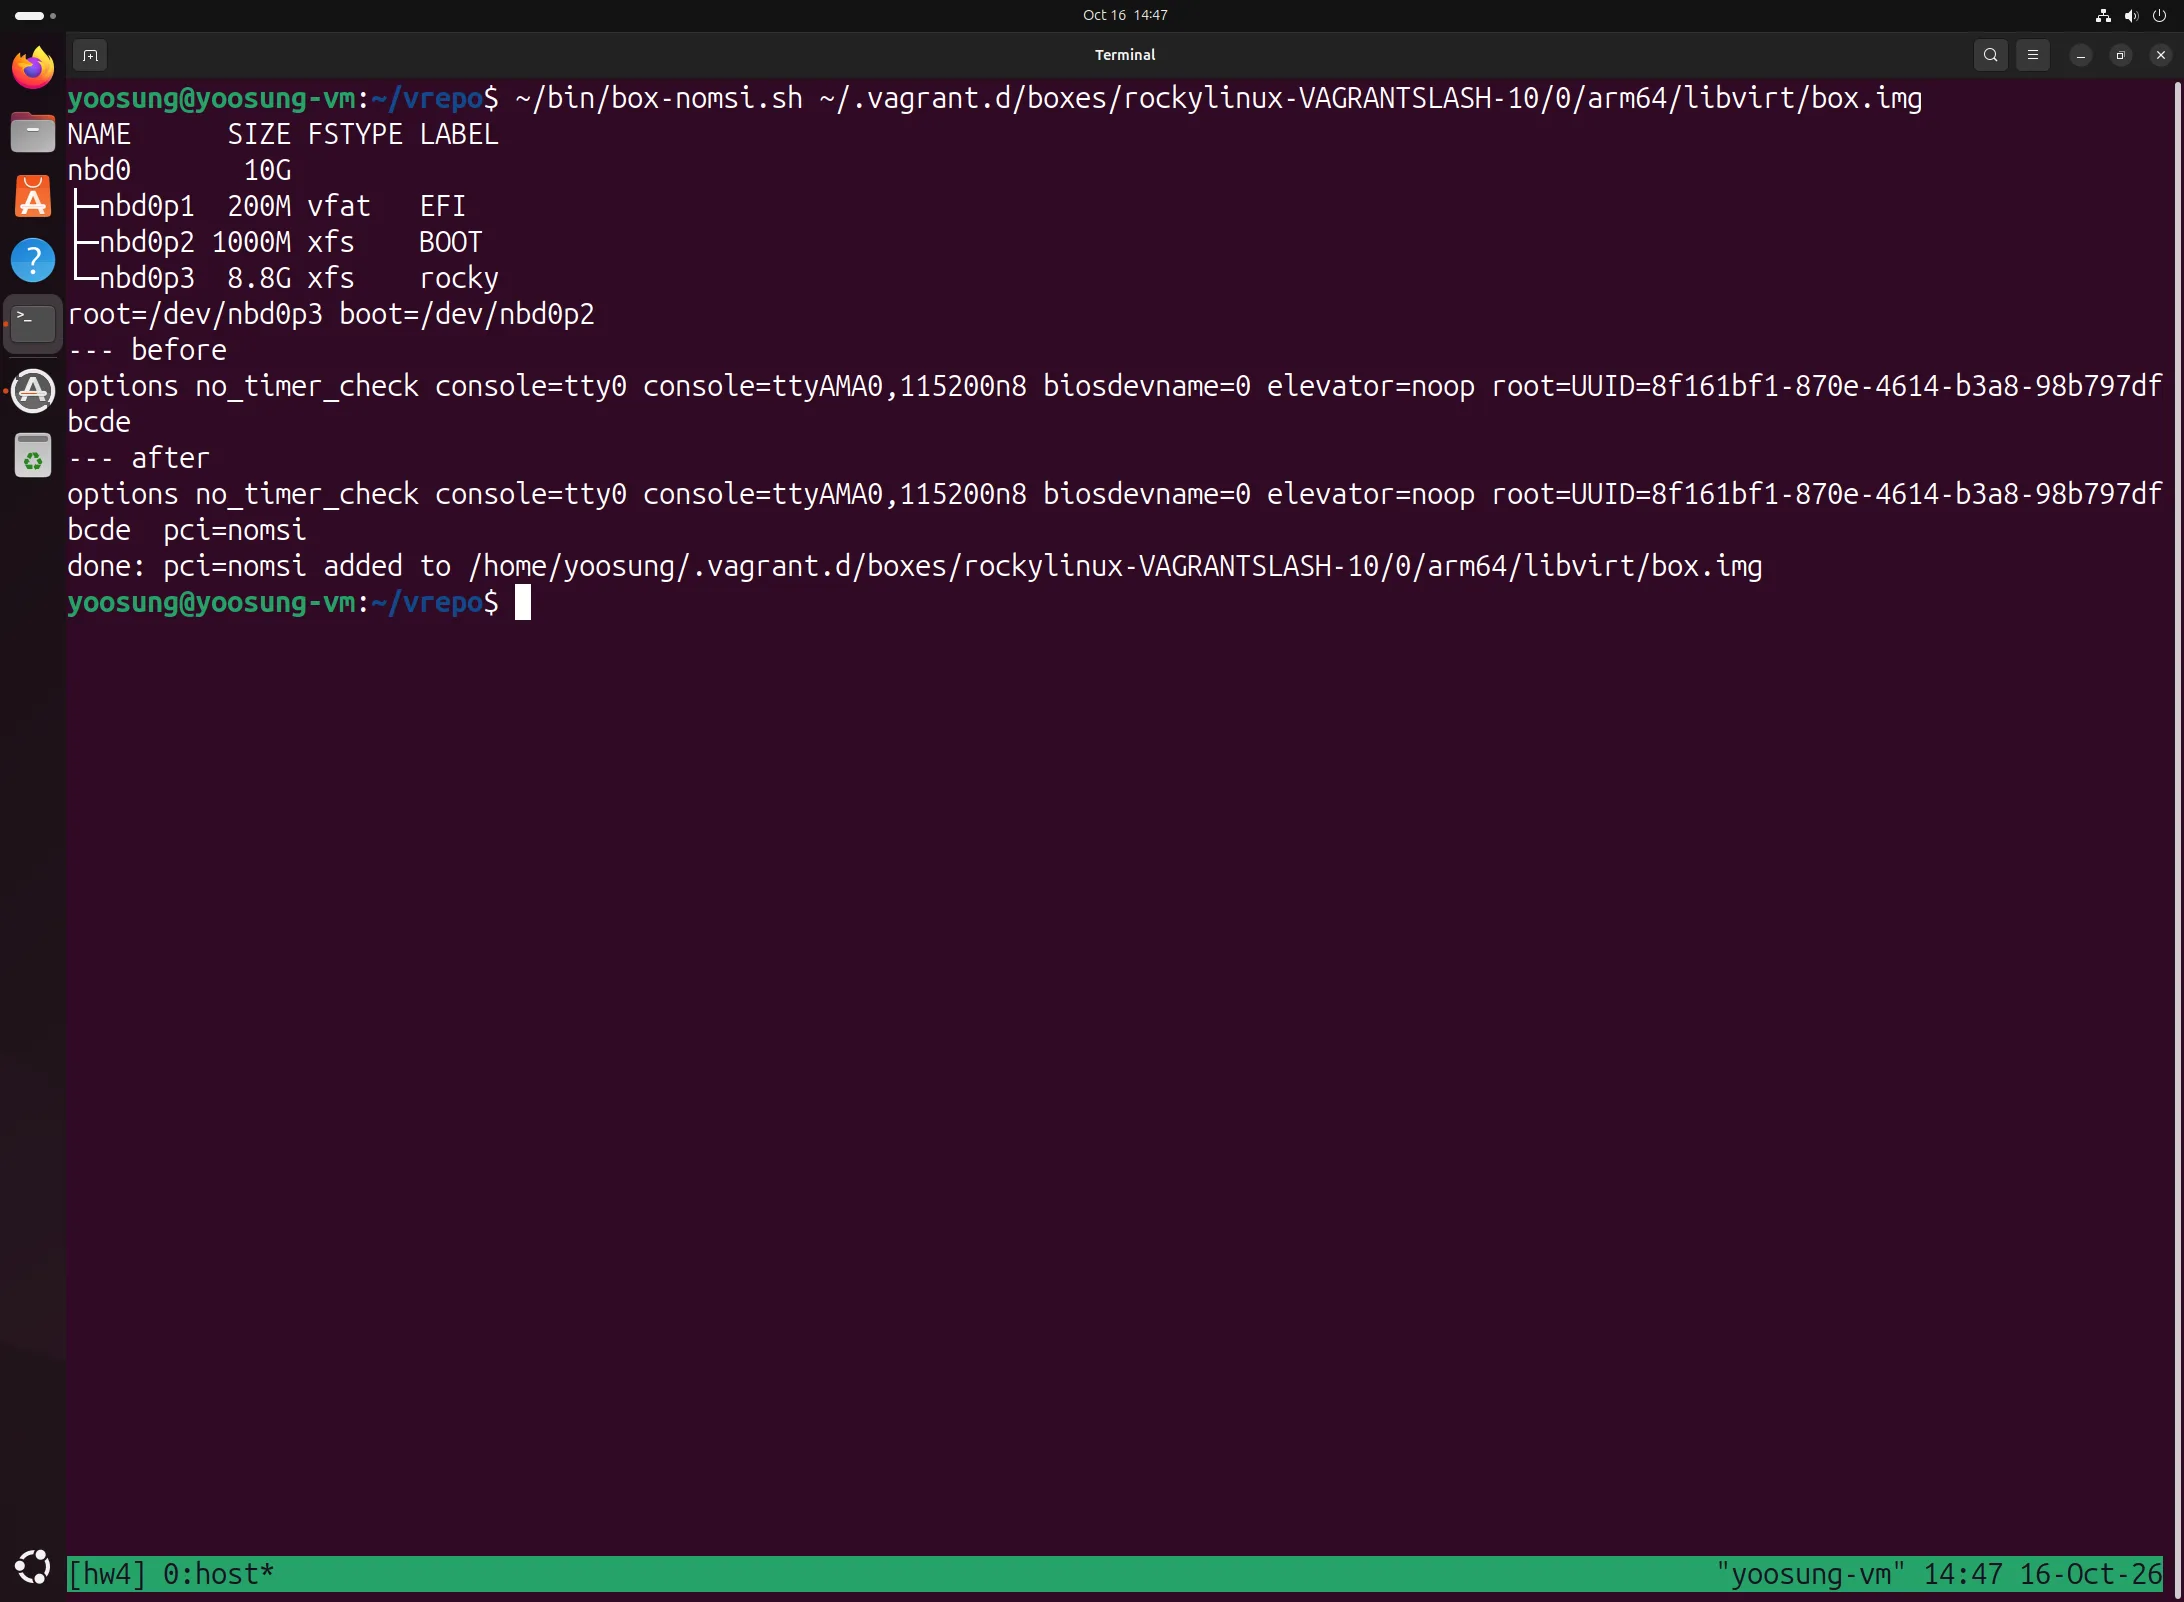
Box image partitions (EFI, BOOT, rocky) and the kernel options line before/after
Writing the Vagrantfile
I kept the structure from slide 18 (NODE_COUNT, the main definition, a times loop defining work1 and work2) and only replaced the VirtualBox-specific parts with libvirt ones.
- Box and provider:
config.vm.box = "rockylinux/10", provider"libvirt".cpusandmemoryinstead ofmodifyvm, andtitlefor the VM name. - Options that fix problems:
storage_pool_name = "images"fixes the conflict with the existing pool (problem 2), andmachine_virtual_size = 10corrects the box metadata error (problem 4). - aarch64 UEFI boot:
machine_type/machine_arch, the AAVMFloaderwithout secure boot, and per-nodenvram. The VirtualBox defaults, cirrus video and a PS/2 mouse, don't work on aarch64, sographics_type = "none"plus a virtio keyboard. - Network:
private_networkreuses the 192.168.56.0/24 network from Chapter 4 vialibvirt__network_name: "cloud56". I SSH directly to the management IP, so I removedforwarded_port, and I disabled the rsync shared folder built into the box since I don't use it. - Typo: the slide's last line
Endis a Ruby syntax error, so I wroteend.
NODE_COUNT=2

Vagrant.configure("2") do |config|
  config.vm.box = "rockylinux/10"
  config.vm.synced_folder ".", "/vagrant", disabled: true

  config.vm.provider "libvirt" do |v|
    v.storage_pool_name = "images"
    v.machine_virtual_size = 10
    v.machine_type = "virt"
    v.machine_arch = "aarch64"
    v.cpu_mode = "host-passthrough"
    v.loader = "/usr/share/AAVMF/AAVMF_CODE.no-secboot.fd"
    v.graphics_type = "none"
    v.input type: "keyboard", bus: "virtio"
    v.cpus = 1
    v.memory = 1024
  end

  config.vm.define "main" do |main|
    main.vm.hostname = "main.cloud.org"
    main.vm.network "private_network", ip: "192.168.56.101", libvirt__network_name: "cloud56"
    main.vm.provider "libvirt" do |v|
      v.title = "Main(vagrant)"
      v.nvram = "/var/lib/libvirt/qemu/nvram/vrepo_main_VARS.fd"
    end
  end

  NODE_COUNT.times do |i|
    node_id = "work#{i+1}"
    ip_address = "192.168.56.10#{i+2}"
    config.vm.define node_id do |node|
      node.vm.hostname = "#{node_id}.cloud.org"
      node.vm.network "private_network", ip: ip_address, libvirt__network_name: "cloud56"
      node.vm.provider "libvirt" do |v|
        v.title = "Work#{i+1}(vagrant)"
        v.nvram = "/var/lib/libvirt/qemu/nvram/vrepo_#{node_id}_VARS.fd"
      end
    end
  end
end
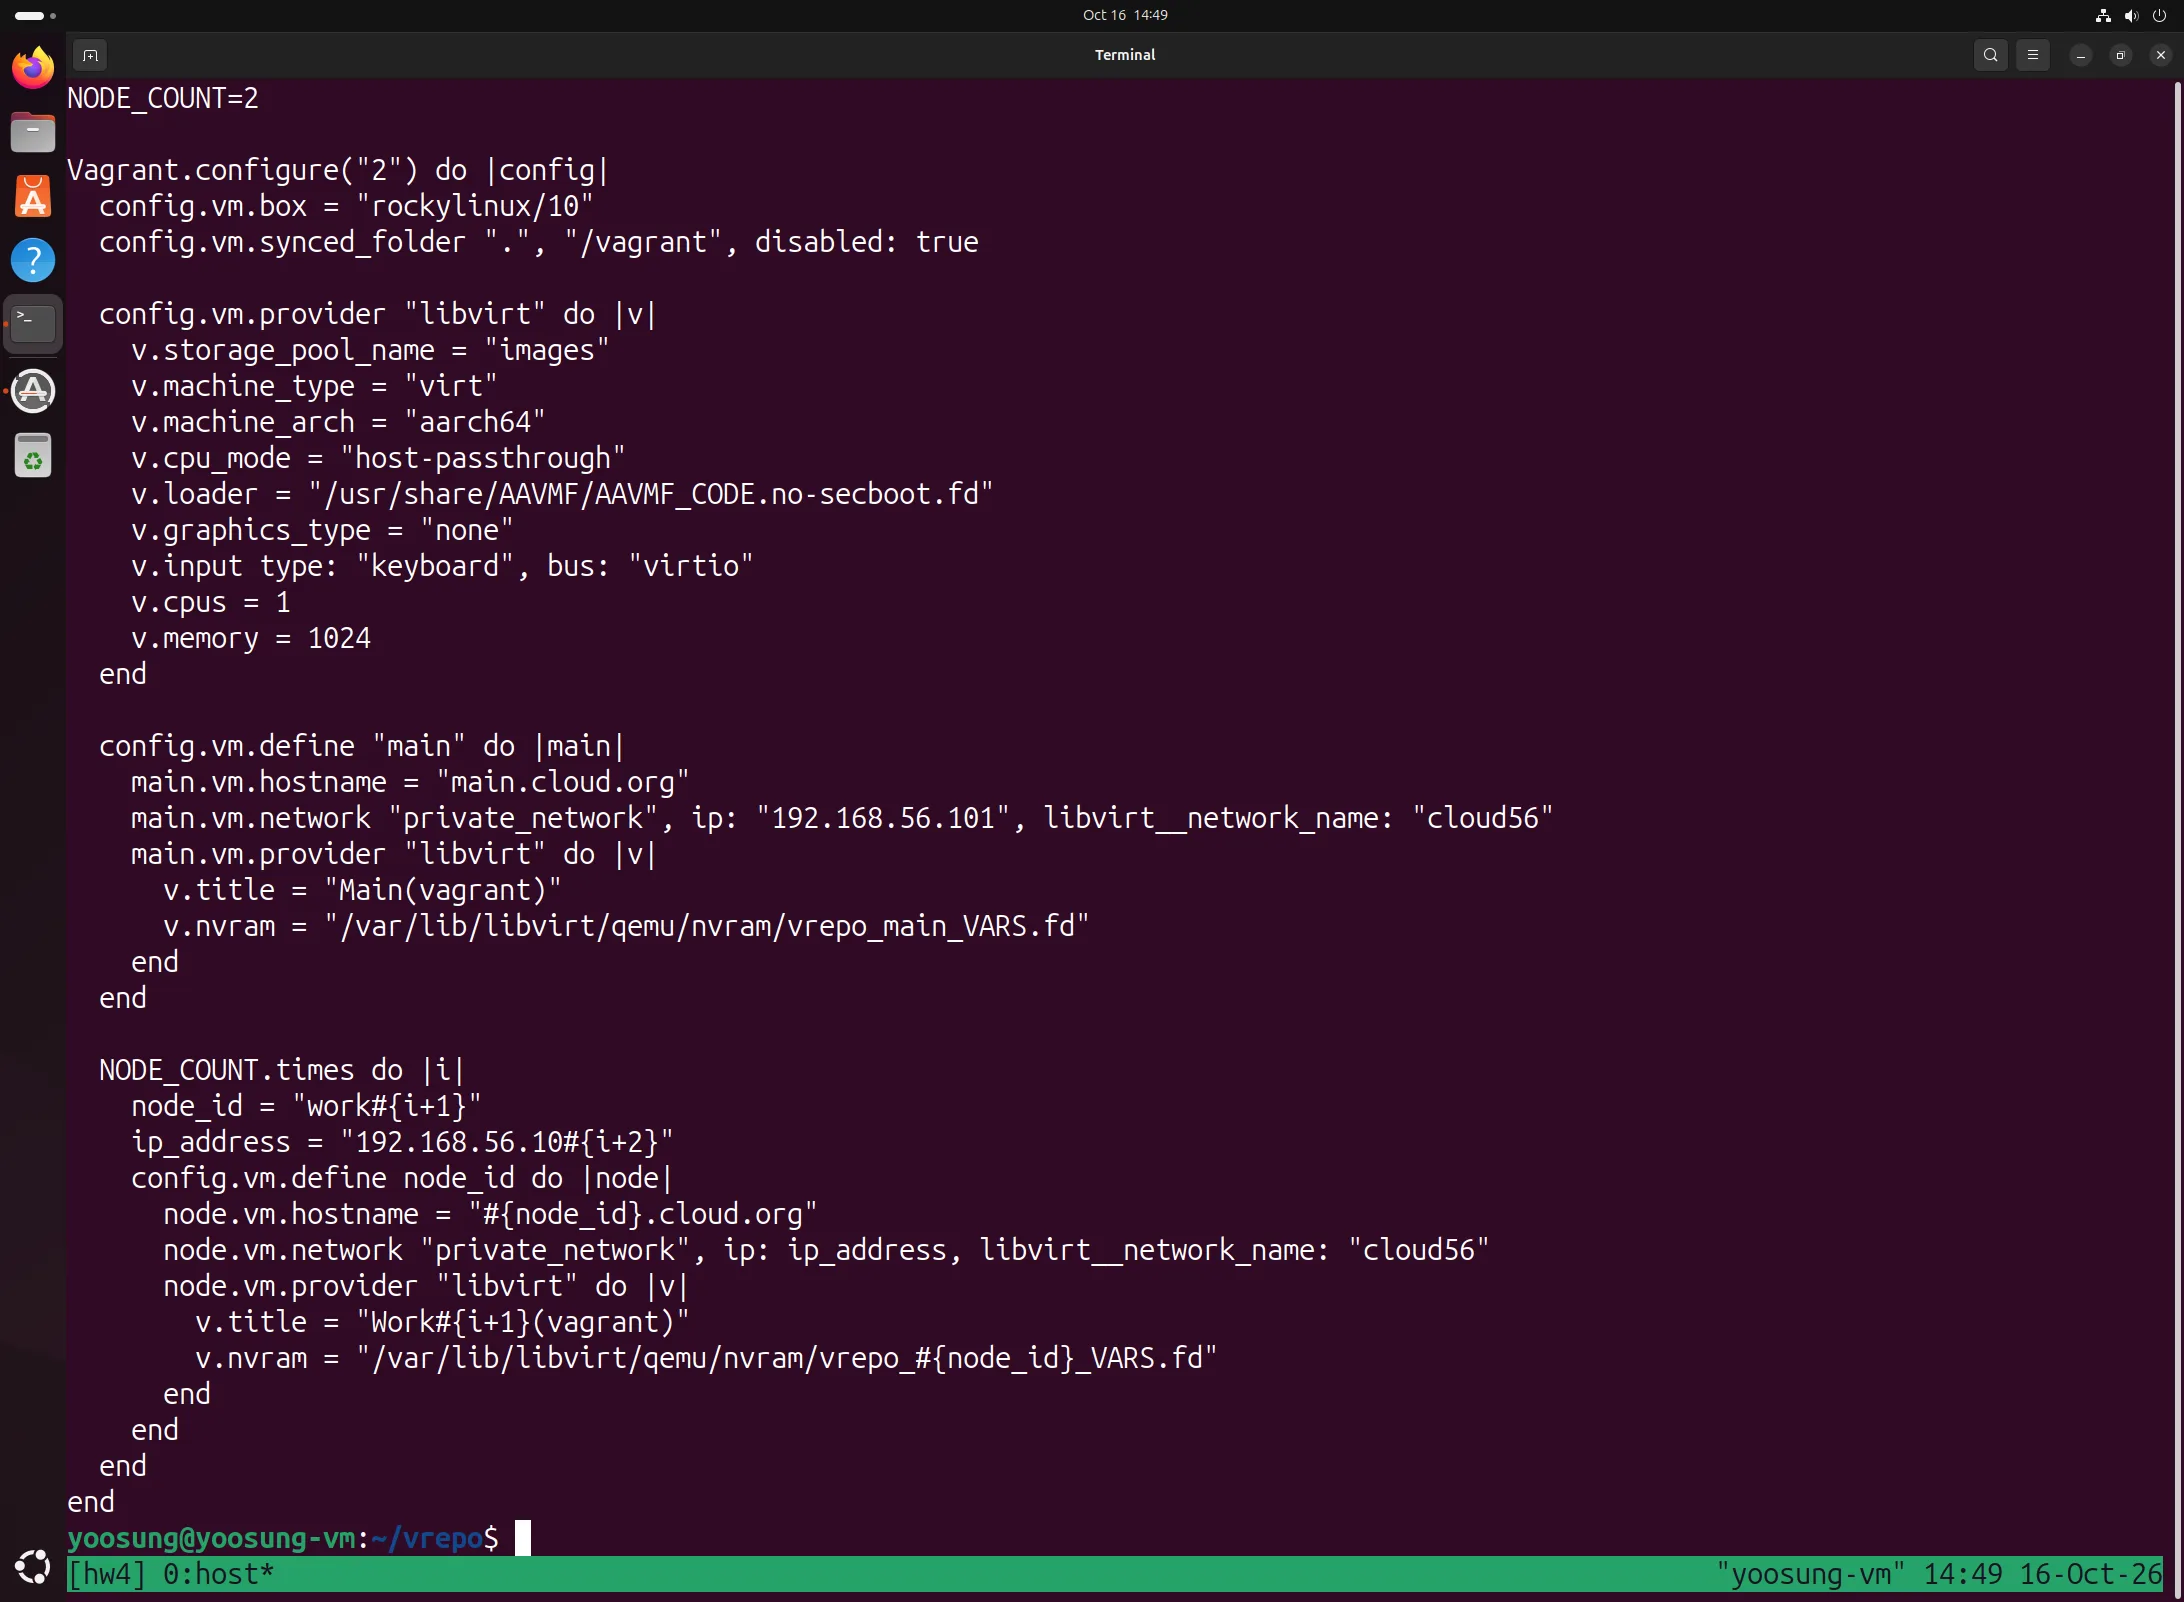
First version of the Vagrantfile (machine_virtual_size was added while fixing problem 4)
vagrant up
Problem 4. All Three VMs Drop to the dracut Emergency Shell
On the first vagrant up, all three VMs got stuck at Waiting for domain to get an IP address.... The kernel was running (CPU idle) but there were no DHCP requests, so I went in with virsh console and found an sh-5.2# emergency shell. /run/initramfs/rdsosreport.txt showed a timeout waiting for the root UUID device and Could not boot., and blkid showed only /dev/vda: PTTYPE="PMBR", with no partitions at all.
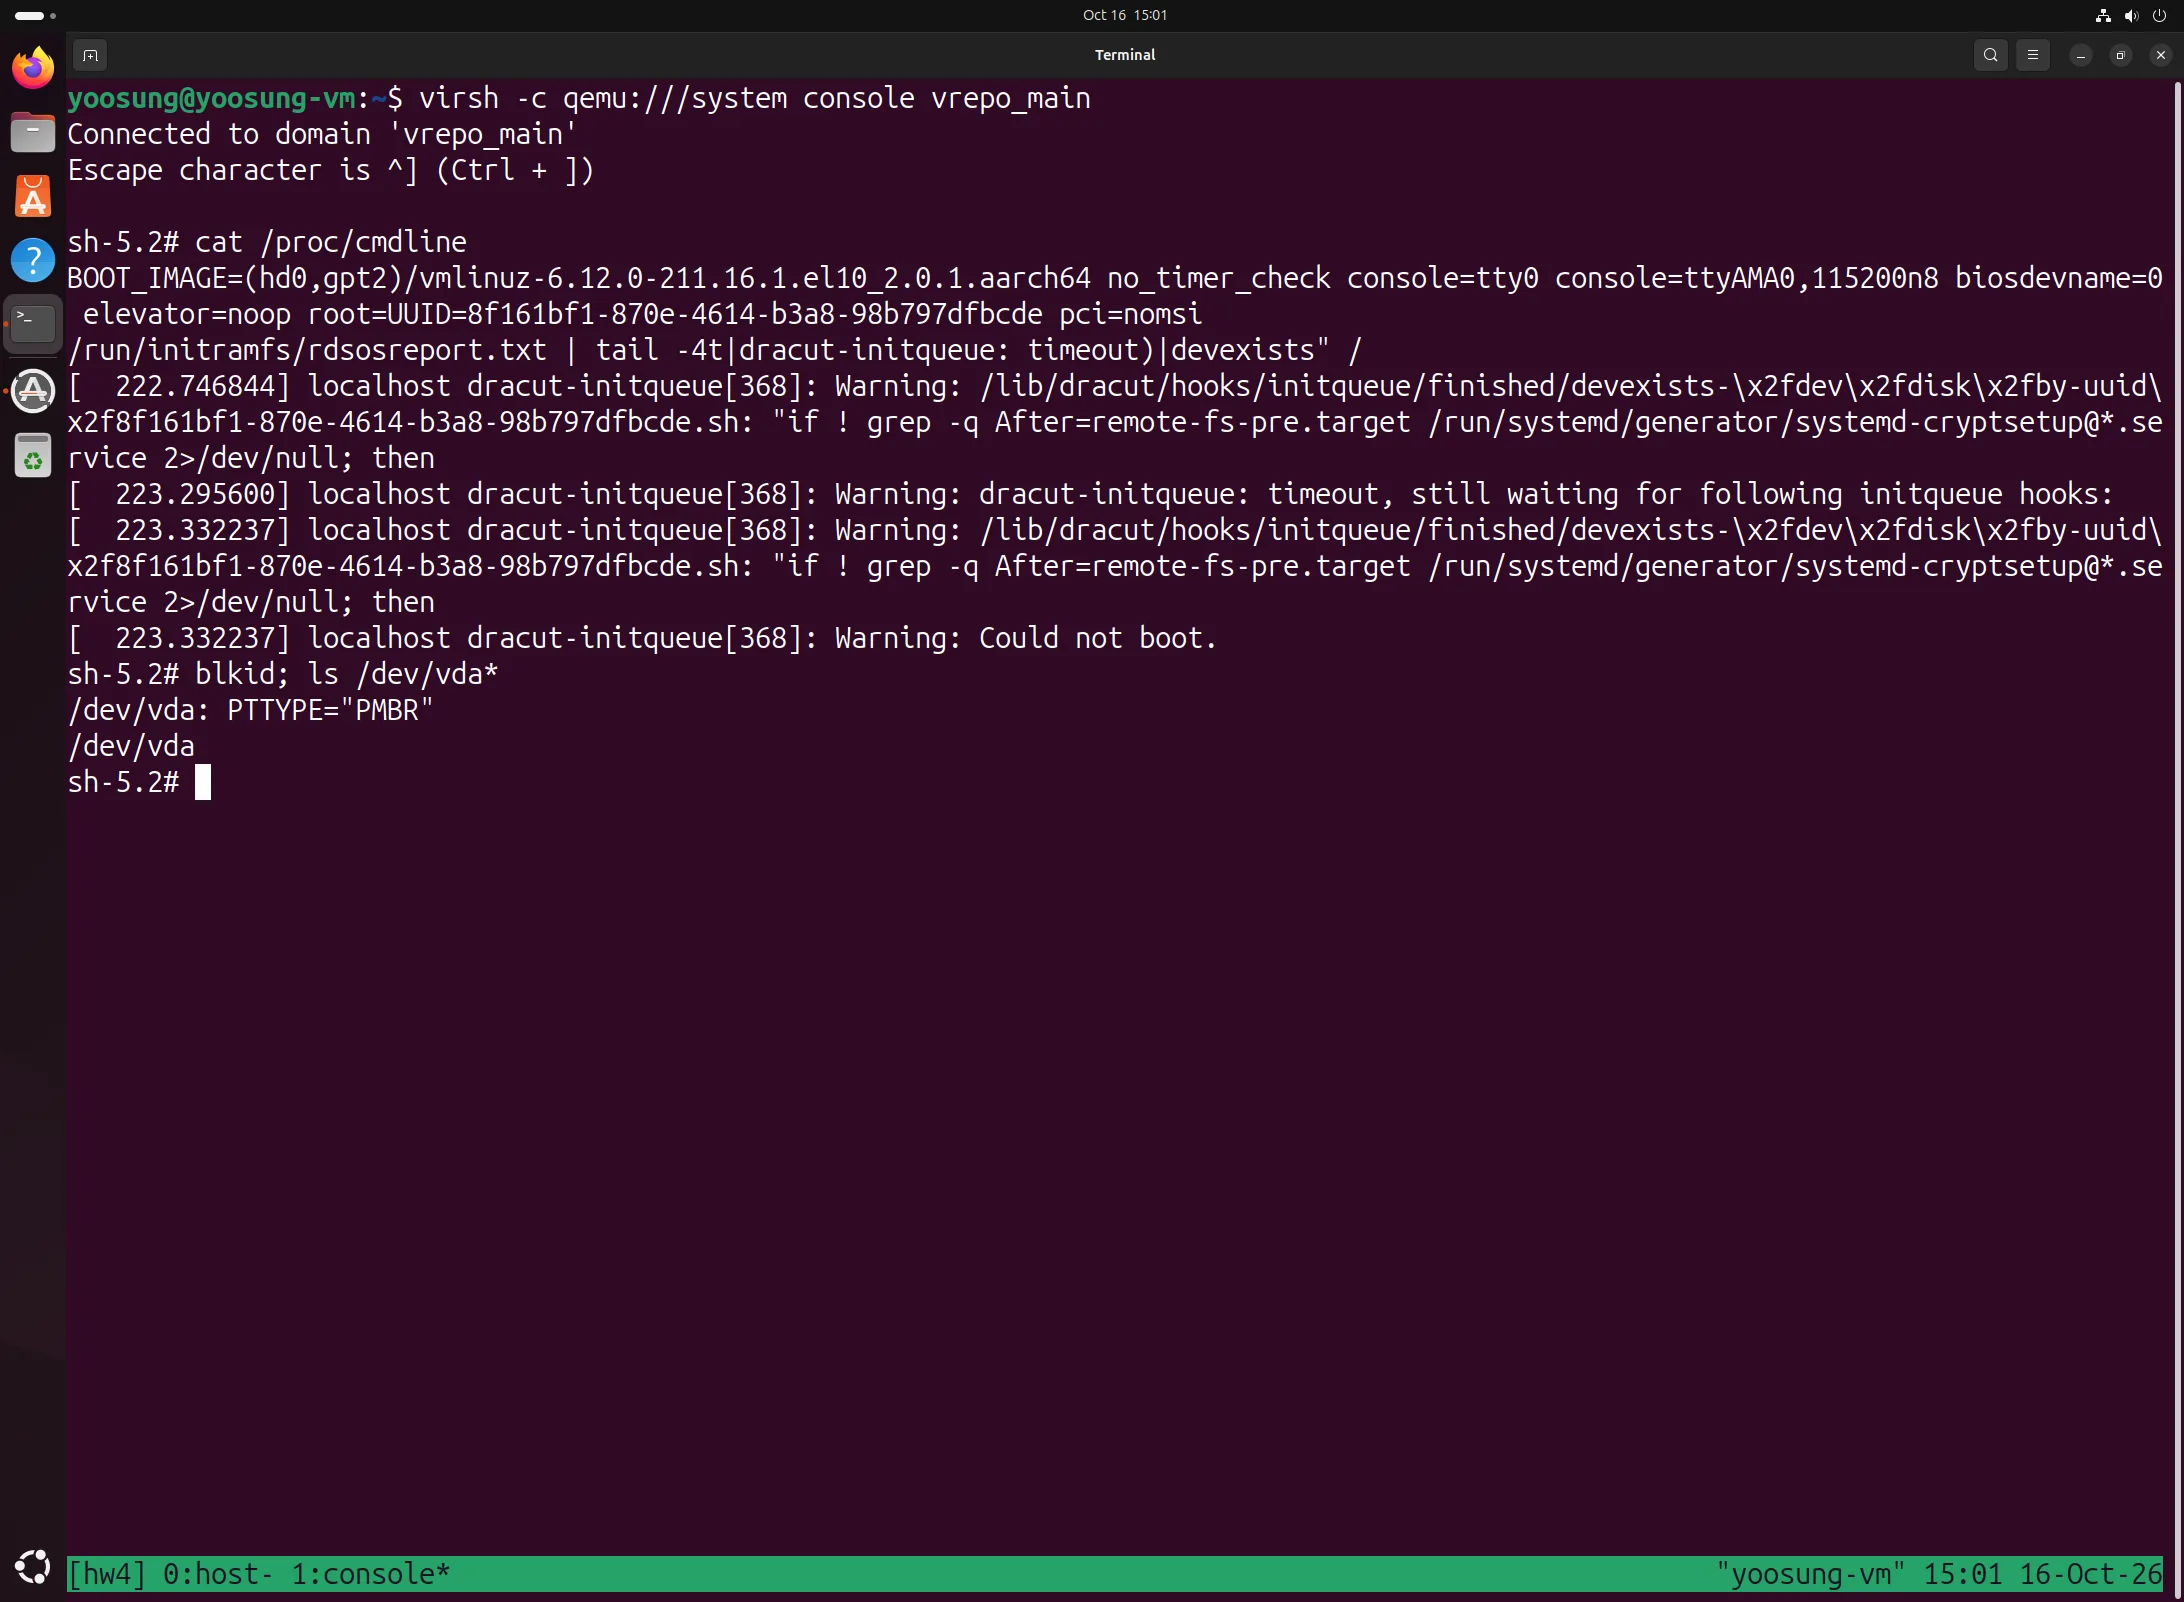
Console of the 1st up: dracut timeout, no partitions in blkid
The cause was the box metadata. The box's metadata.json says virtual_size: 5 (GB), but the actual box.img is 10 GiB. vagrant-libvirt created a 5 GiB VM disk from the metadata value, and the kernel dropped the GPT partitions that ran past the end of the disk, so it couldn't find the root filesystem. It's a bug on the Rocky box side, so I added machine_virtual_size = 10 to the Vagrantfile and brought the VMs up again.
vagrant up                      # 1st: emergency shell
virsh -c qemu:///system console vrepo_main
vagrant destroy -f
grep -n machine_virtual_size Vagrantfile
vagrant up                      # 2nd: success
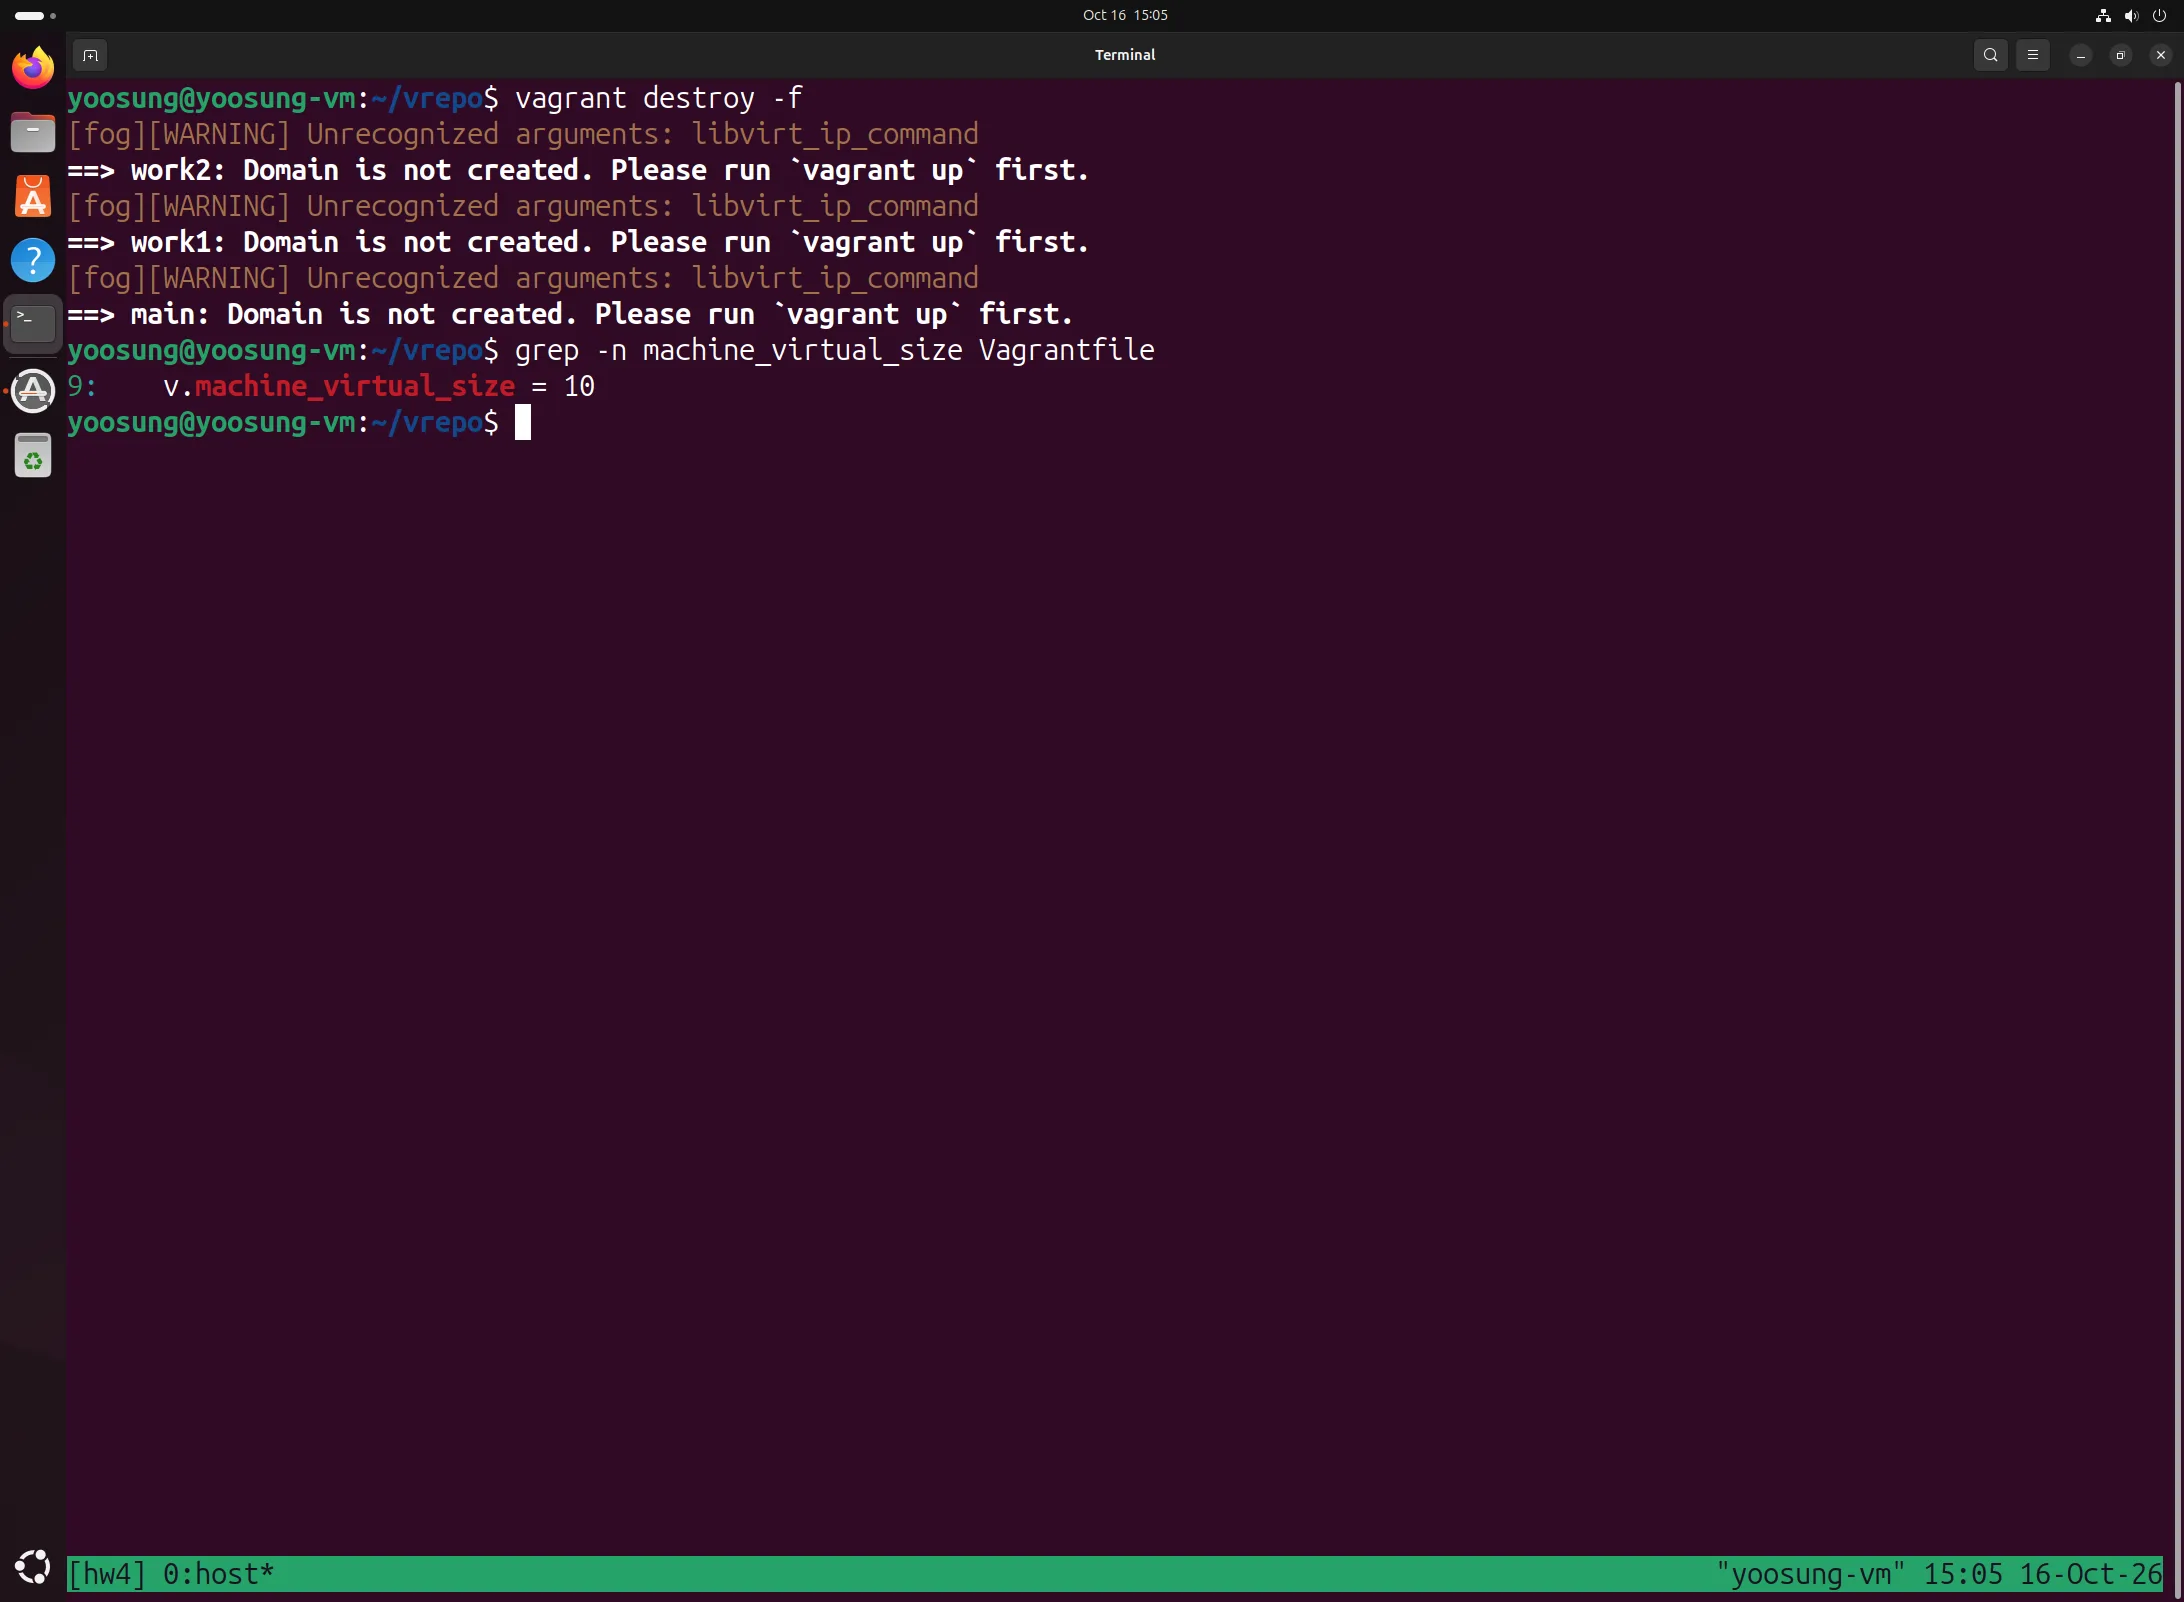
vagrant destroy -f and adding the disk size option
With 10 GiB disks, all three VMs booted in about 40 seconds. You can see it replacing the per-node SSH keys and setting up hostnames and networking, as on slide 19.
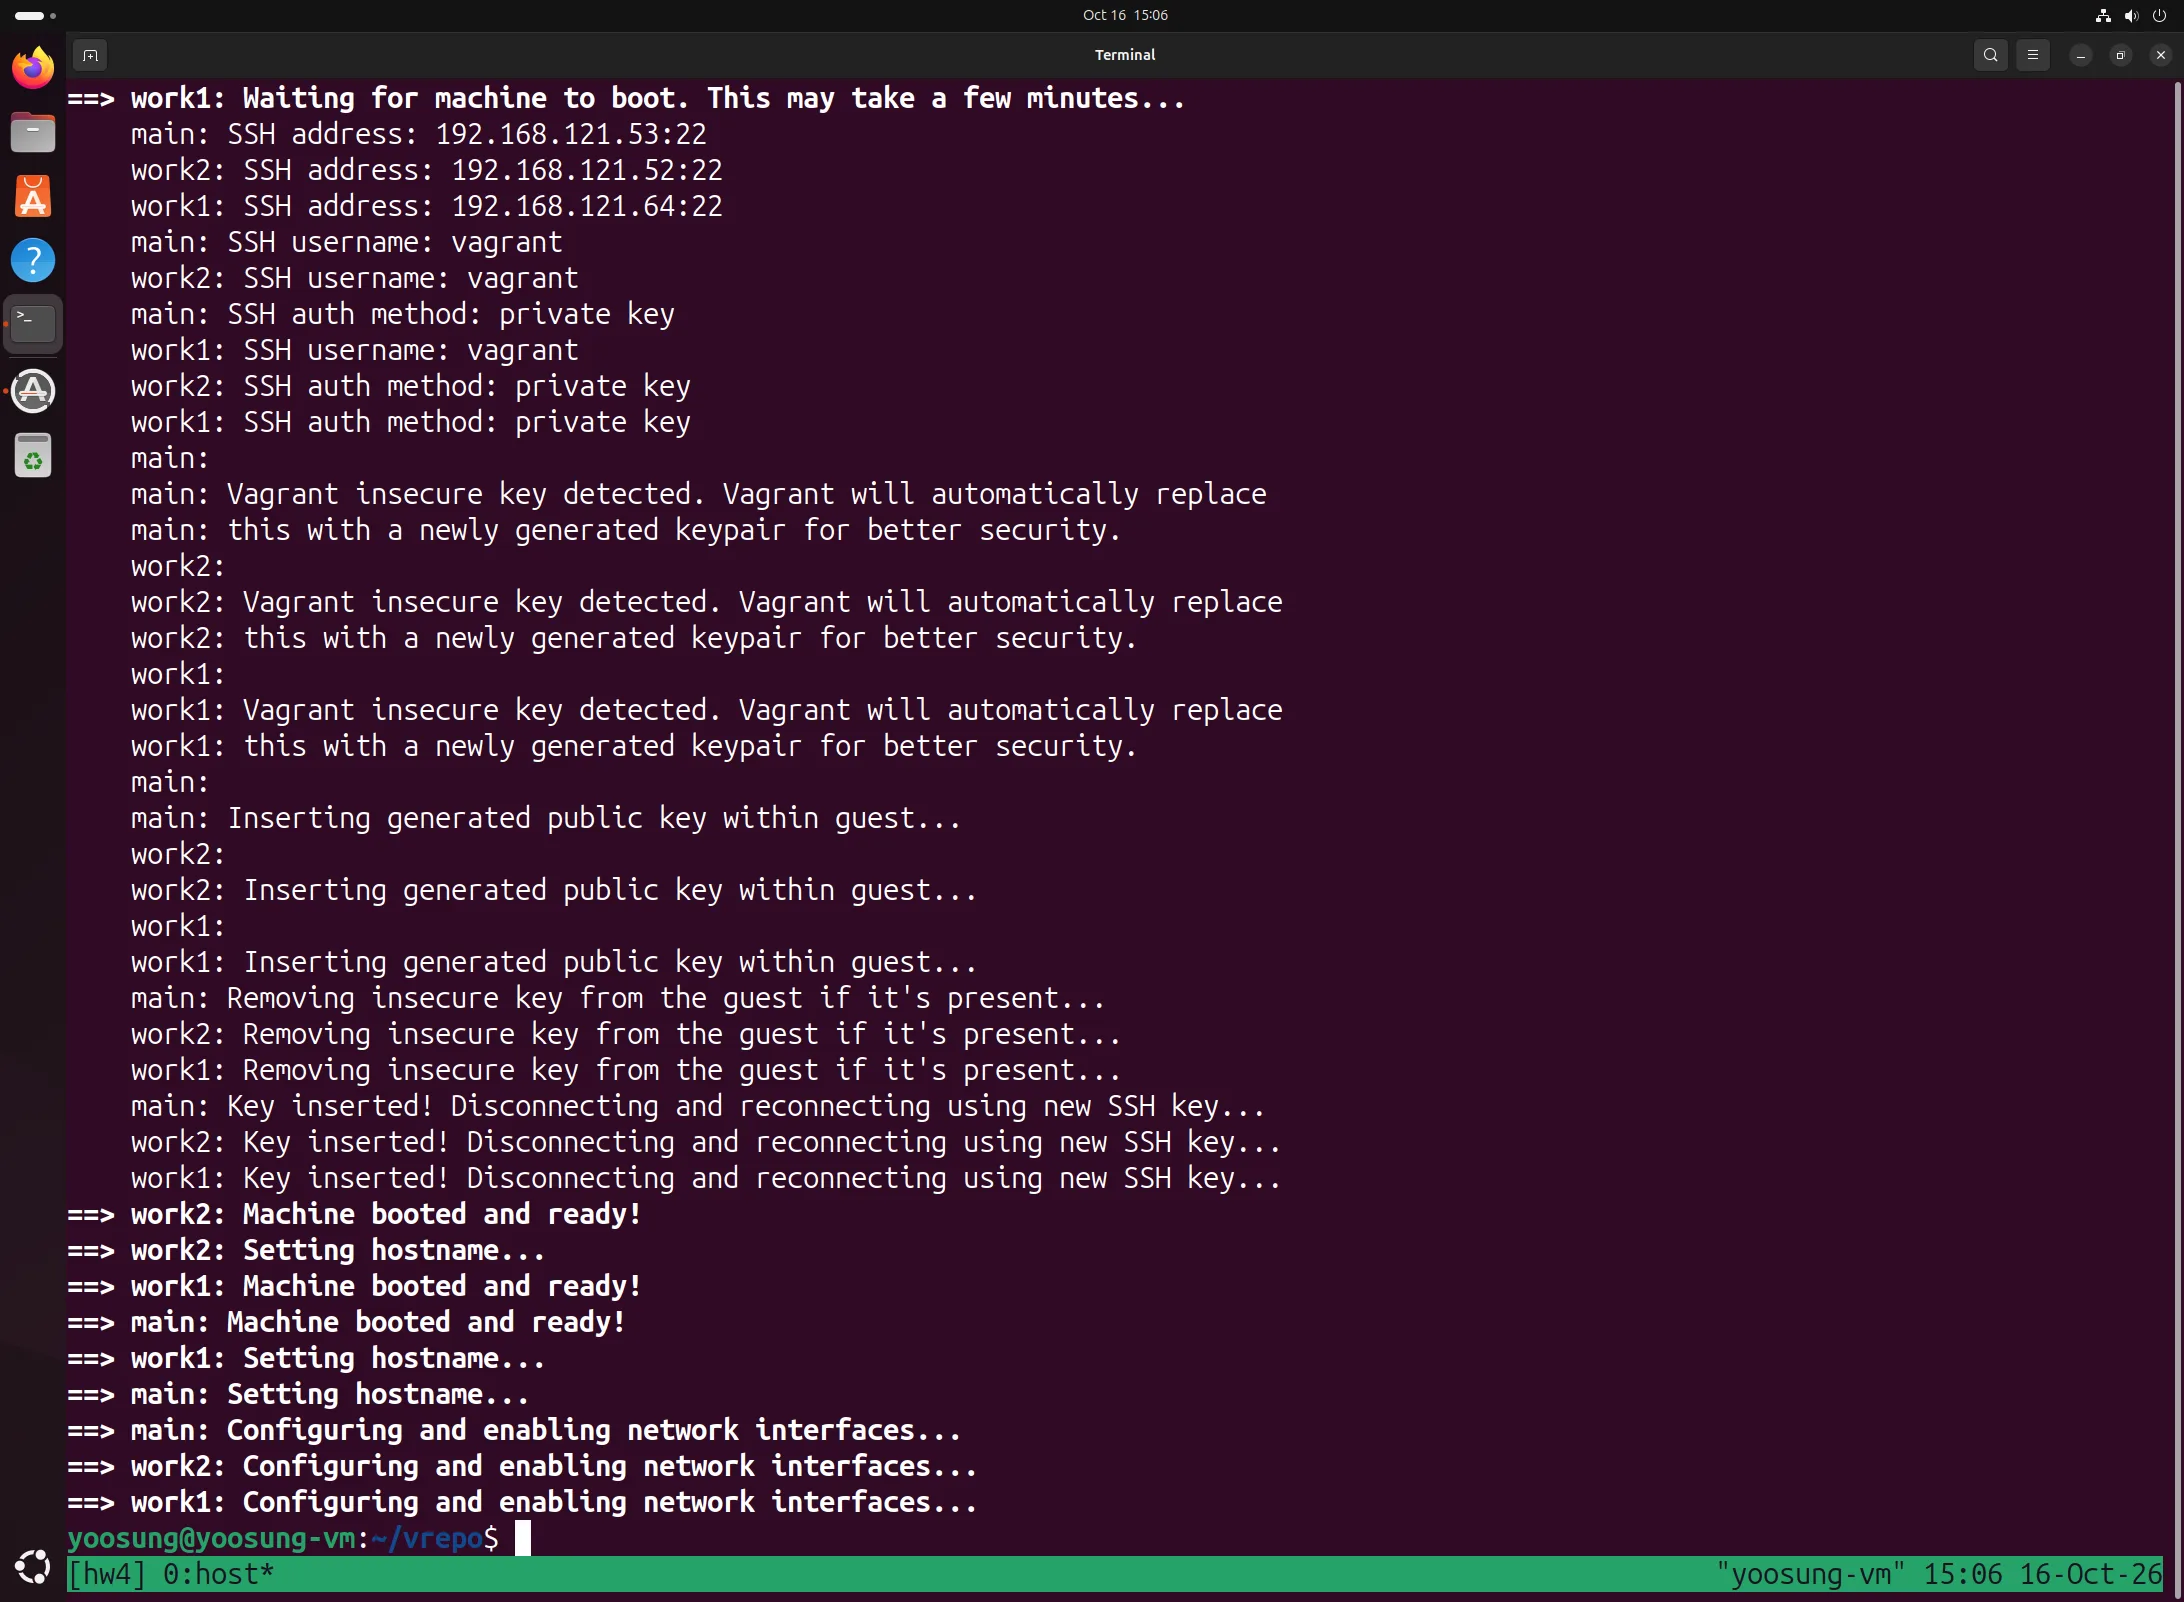
2nd vagrant up: per-node SSH key replacement, "Machine booted and ready!", hostname and network setup
Checking the Nodes
vagrant status showed all three running, then I went into each node with vagrant ssh to check the hostname and addresses. enp3s0 (192.168.121.x) is the NAT management network vagrant-libvirt created for SSH, and enp4s0 got 192.168.56.101–103, same as the slides.
vagrant status
vagrant ssh main      # hostname; ip -br addr; exit   (same for work1, work2)
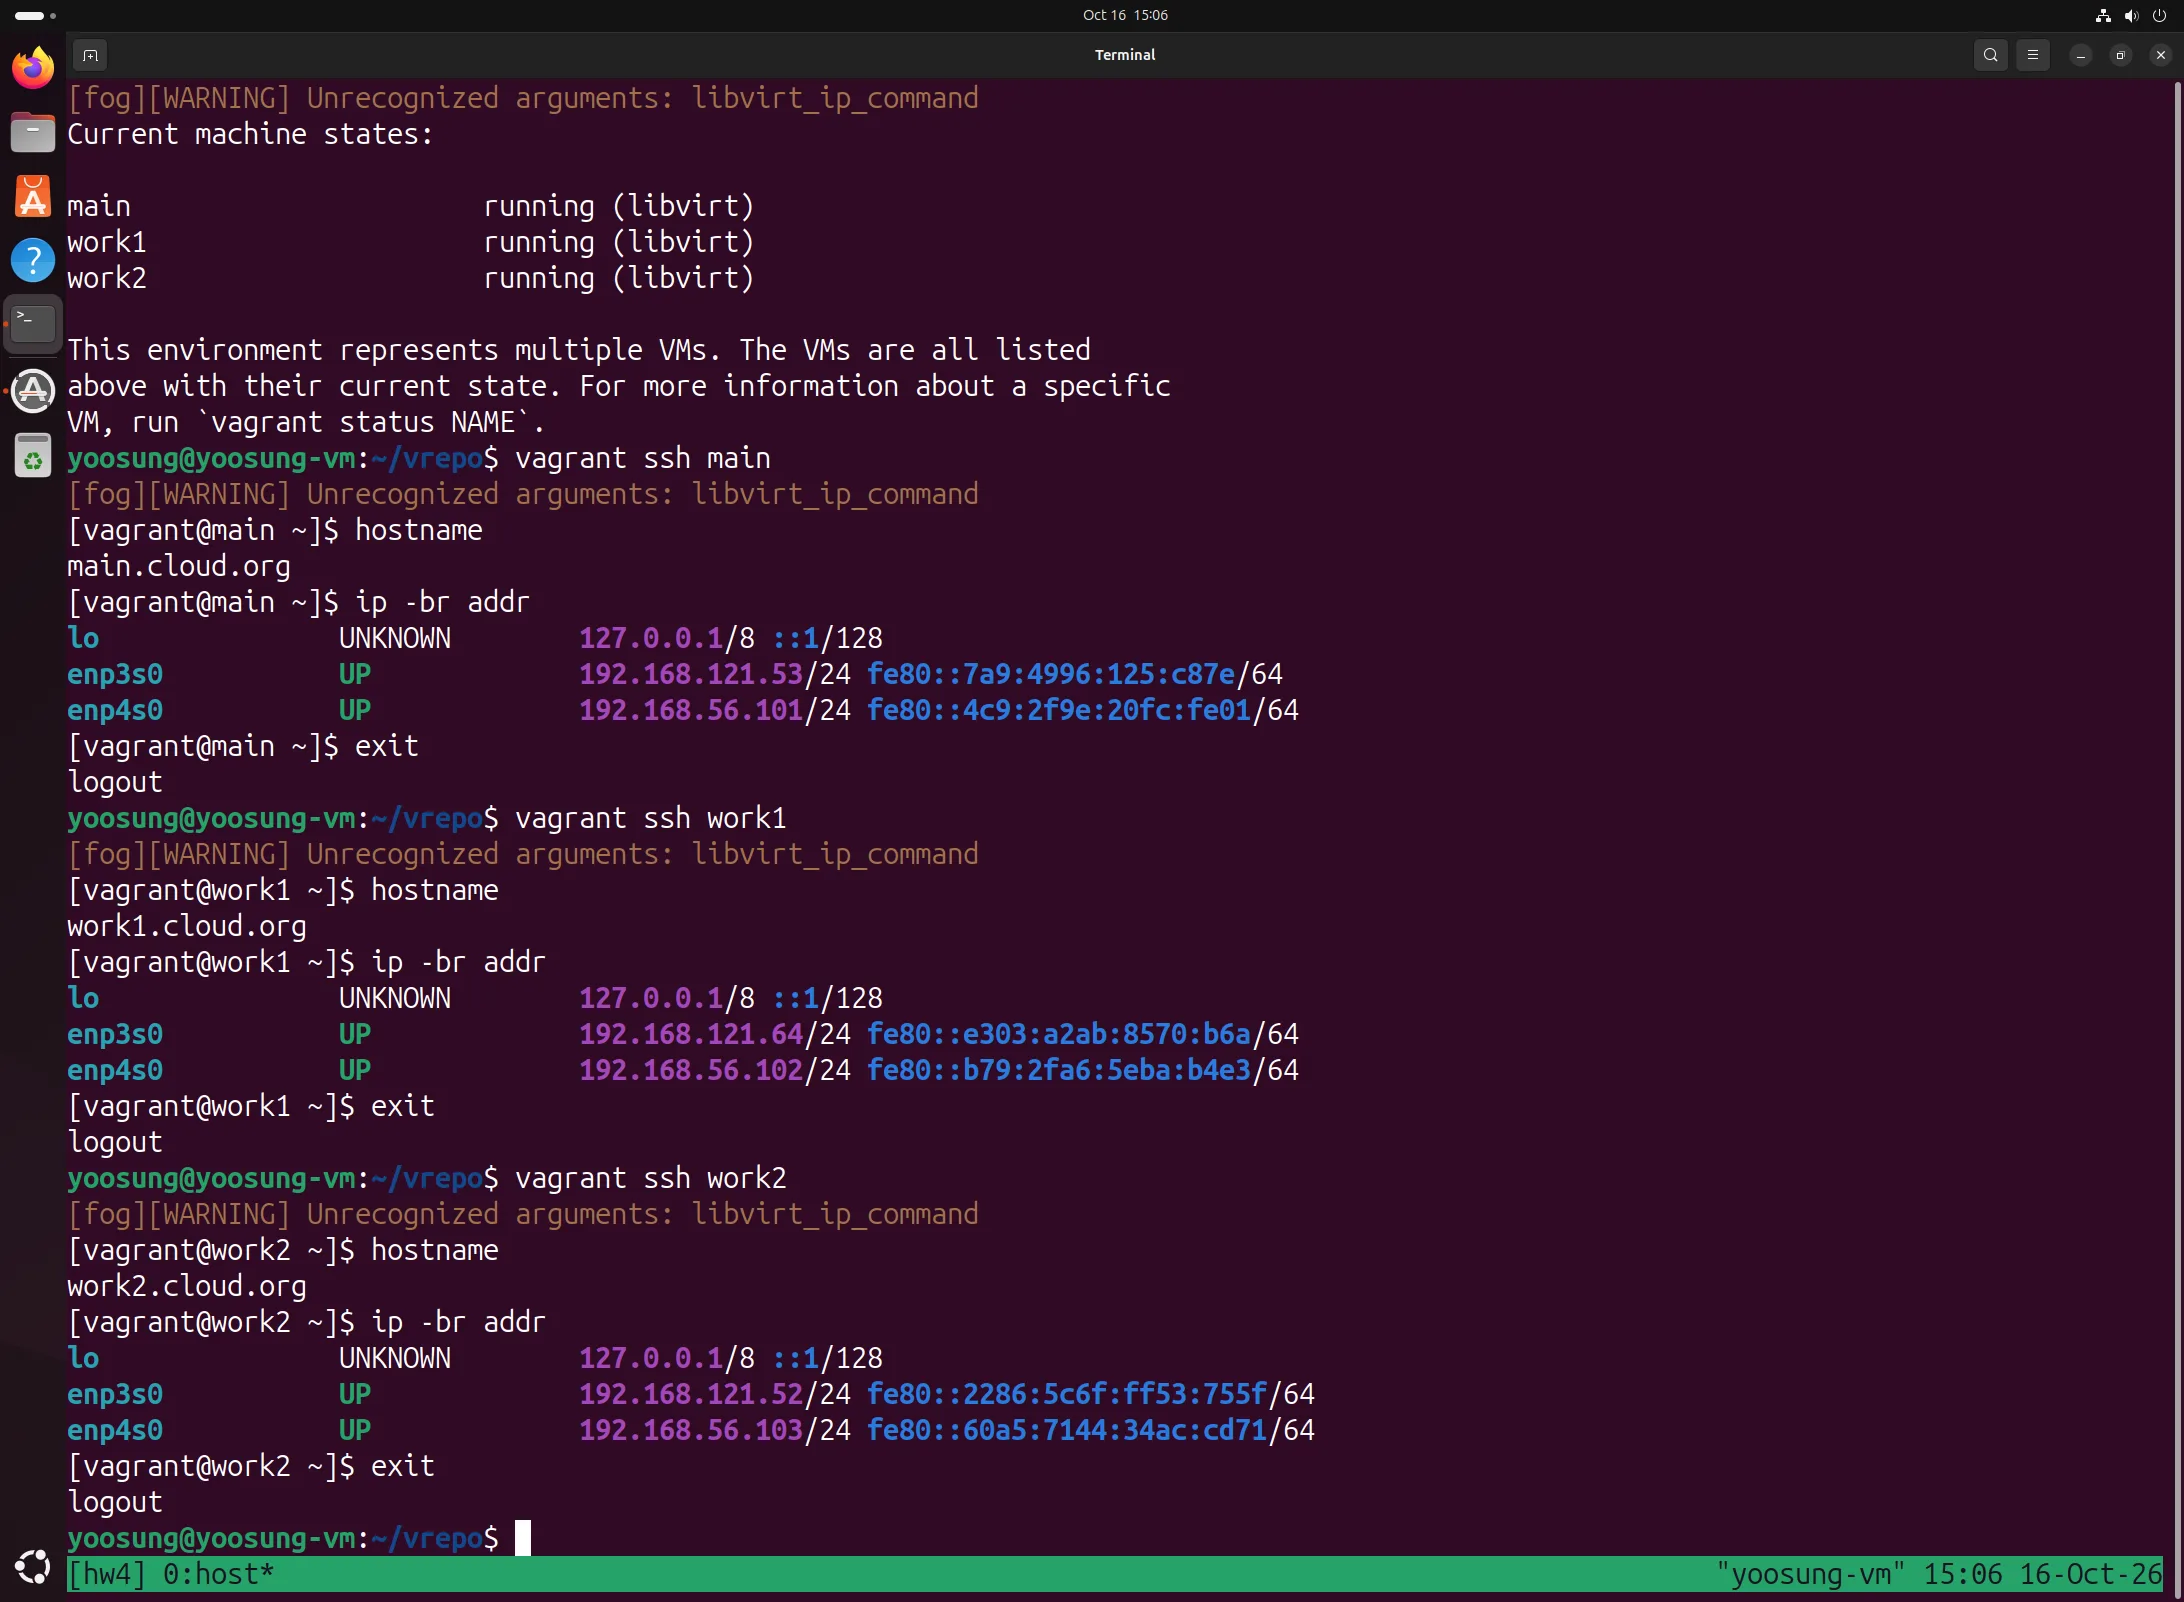
hostname and ip -br addr on the three nodes
The vagrant Account's Keys and ssh-config
vagrant up created a new key pair for each node and put it in .vagrant/machines/<node>/libvirt/private_key (where the slides have a virtualbox directory). vagrant ssh-config shows these keys and the management IPs, and I use them as-is in the Ansible inventory.
tree .vagrant/ -L 4 -a
vagrant ssh-config
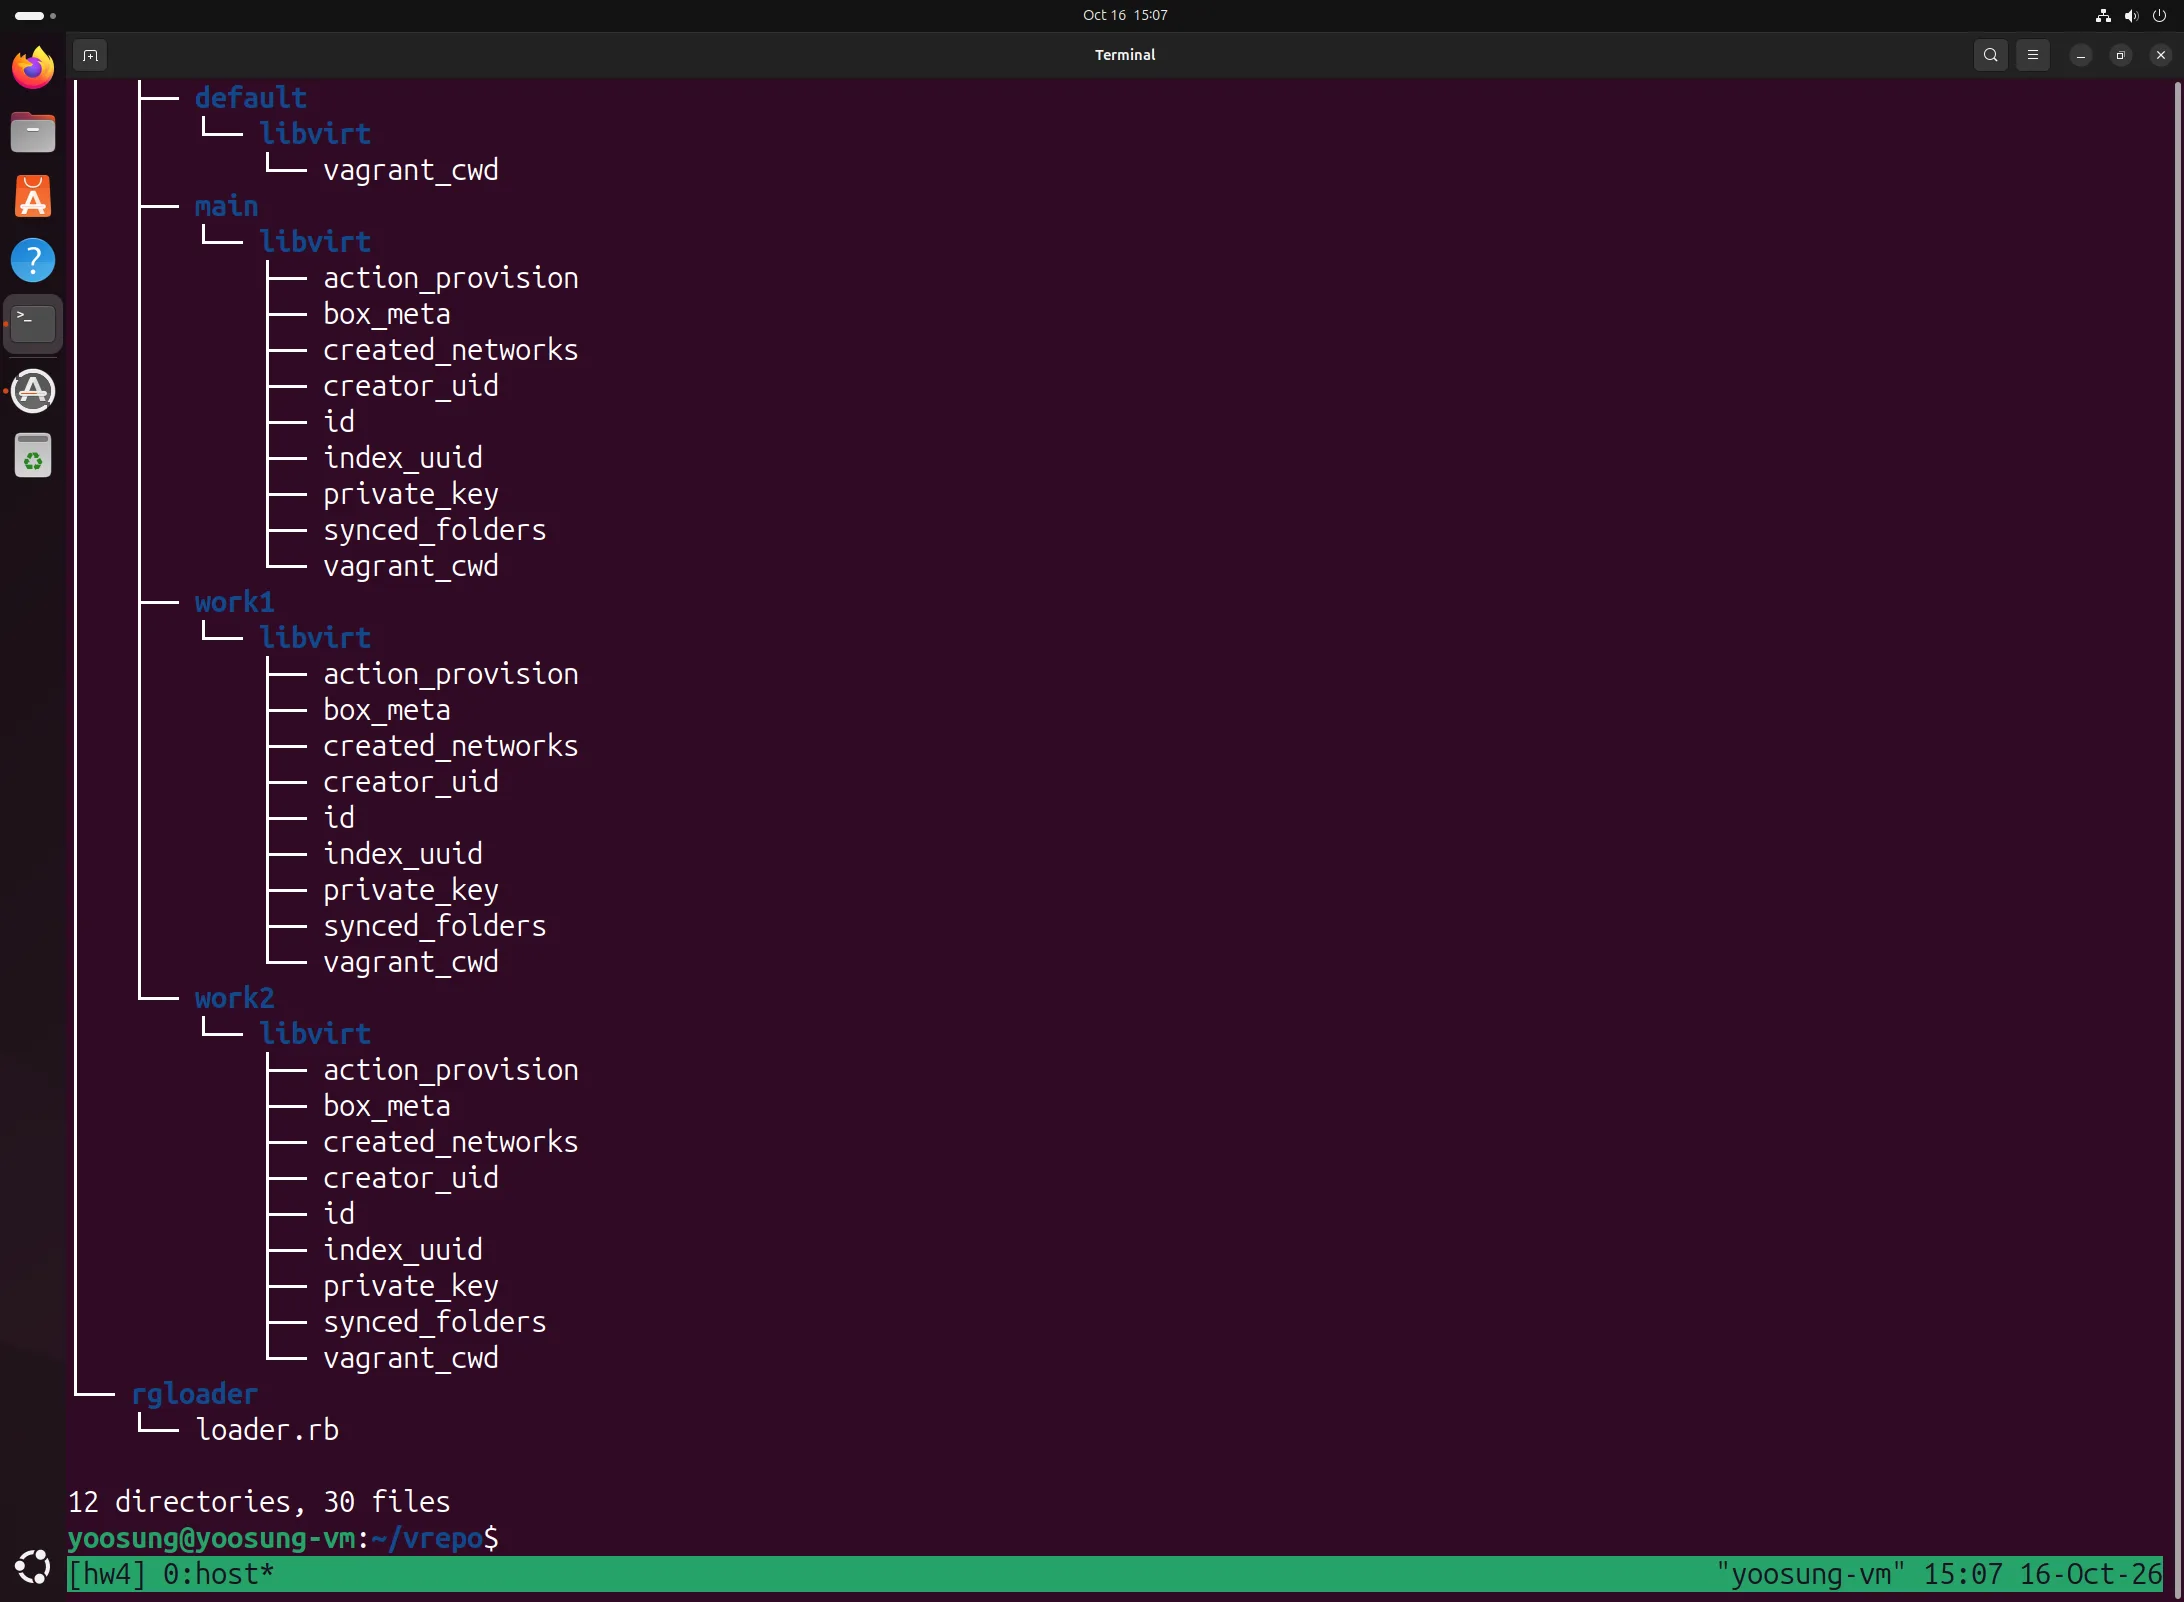
.vagrant/ tree: per-node private_key
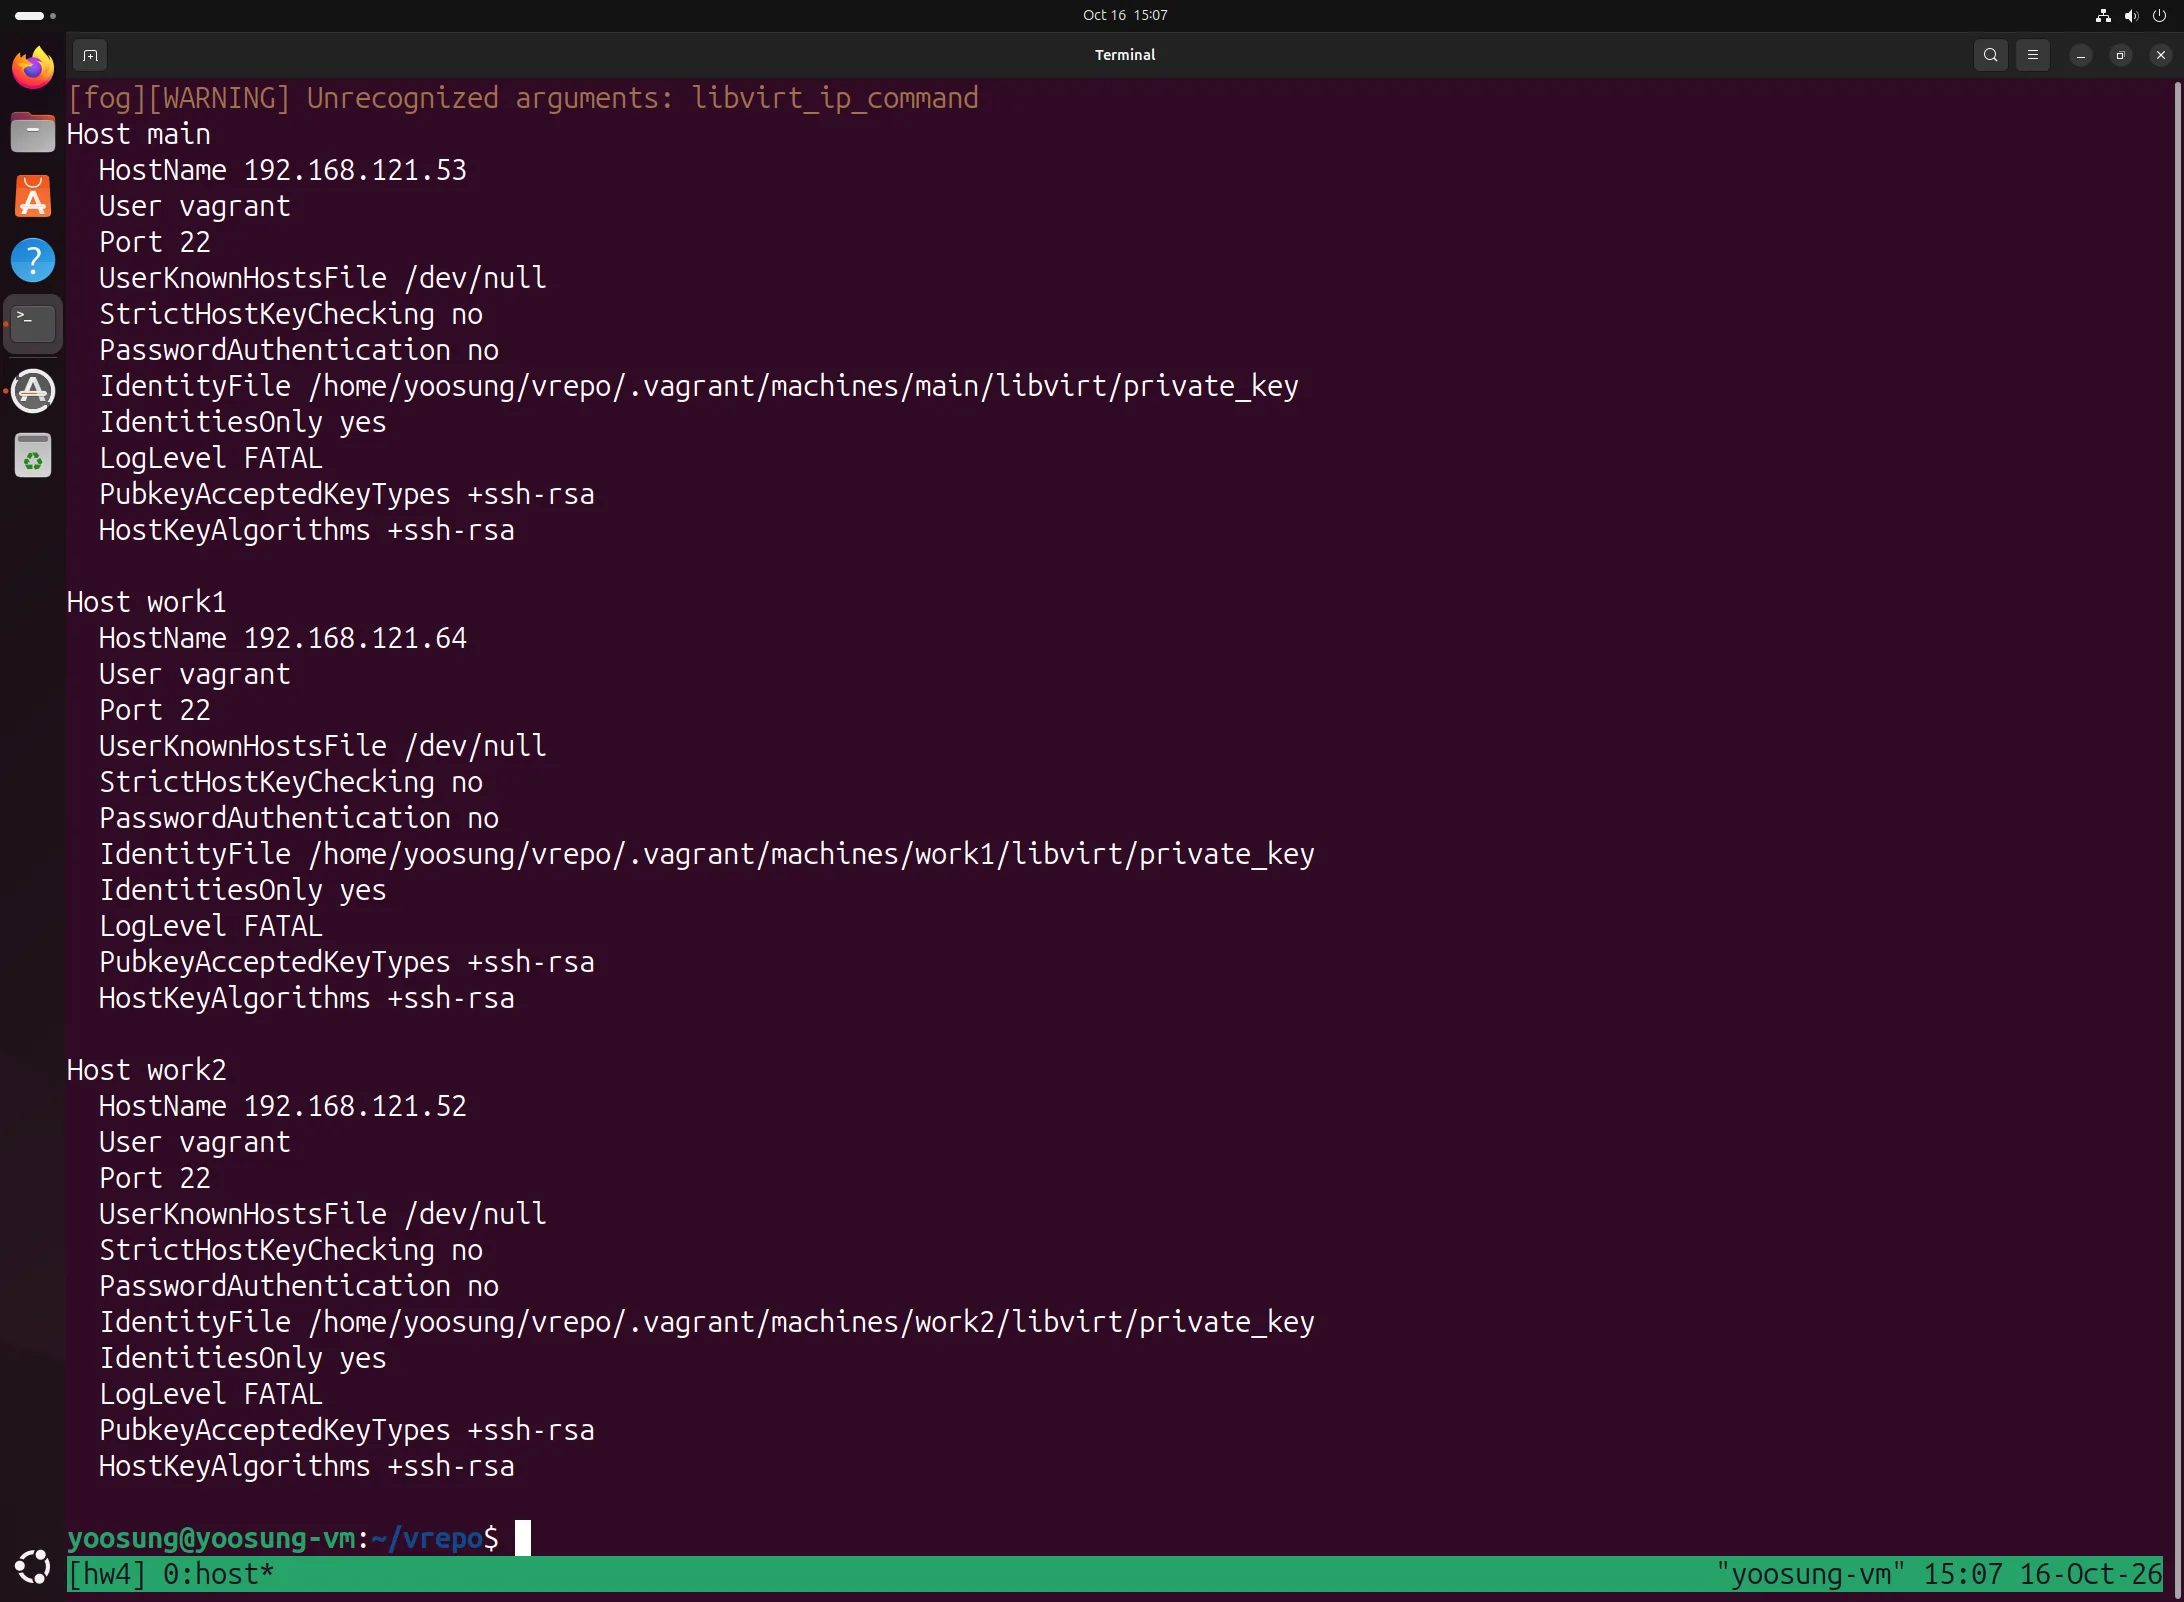
vagrant ssh-config: HostName is the management IP, Port 22, IdentityFile
2. Configuring HTCondor with Ansible
Installing Ansible and the Inventory
The Ubuntu ansible package (core 2.16.3) includes the ansible.posix collection the playbook uses.
sudo apt install -y ansible
ansible --version
sudo mkdir -p /etc/ansible
sudo cp /mnt/share/VM/share/ansible-hosts /etc/ansible/hosts   # file prepared in the shared folder
cat /etc/ansible/hosts
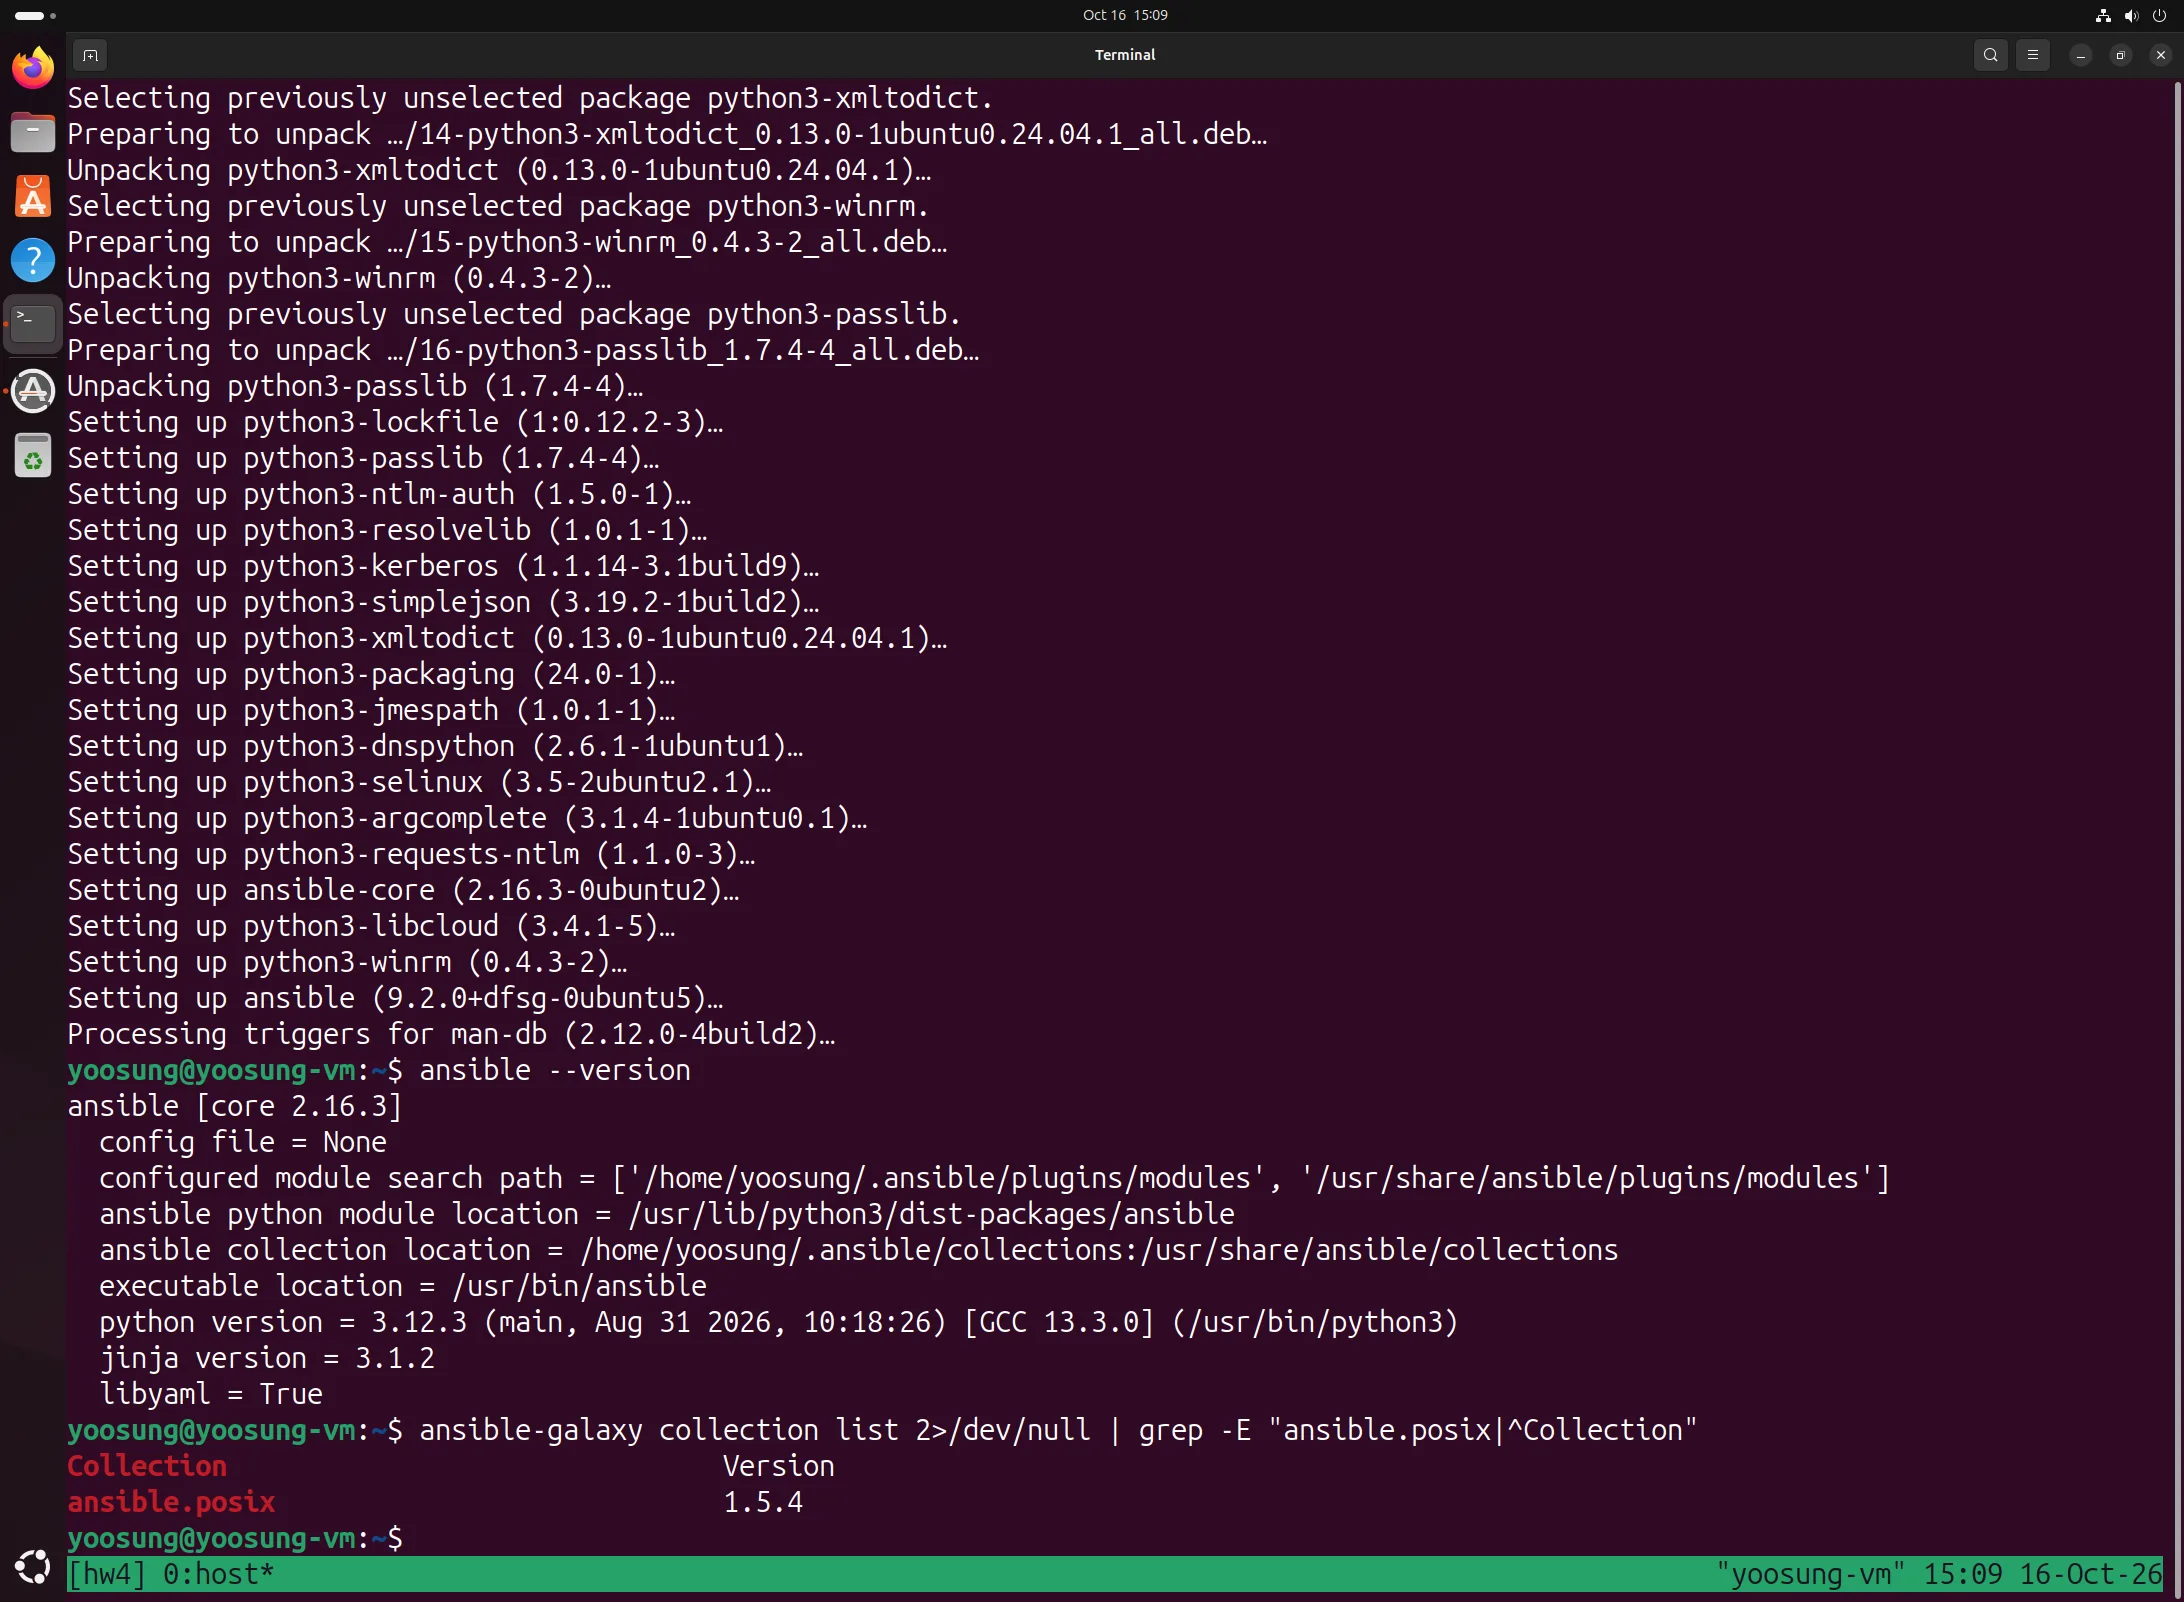
ansible installed, version, ansible.posix 1.5.4
The inventory has three groups, [cluster], [main] and [worker], like the slides, with one host per line. Only the key paths are changed for this environment.
[cluster]
main.cloud.org ansible_user=vagrant ansible_ssh_private_key_file=/home/yoosung/vrepo/.vagrant/machines/main/libvirt/private_key
work1.cloud.org ansible_user=vagrant ansible_ssh_private_key_file=/home/yoosung/vrepo/.vagrant/machines/work1/libvirt/private_key
work2.cloud.org ansible_user=vagrant ansible_ssh_private_key_file=/home/yoosung/vrepo/.vagrant/machines/work2/libvirt/private_key

[main]
main.cloud.org ansible_user=vagrant ansible_ssh_private_key_file=/home/yoosung/vrepo/.vagrant/machines/main/libvirt/private_key

[worker]
work1.cloud.org ansible_user=vagrant ansible_ssh_private_key_file=/home/yoosung/vrepo/.vagrant/machines/work1/libvirt/private_key
work2.cloud.org ansible_user=vagrant ansible_ssh_private_key_file=/home/yoosung/vrepo/.vagrant/machines/work2/libvirt/private_key
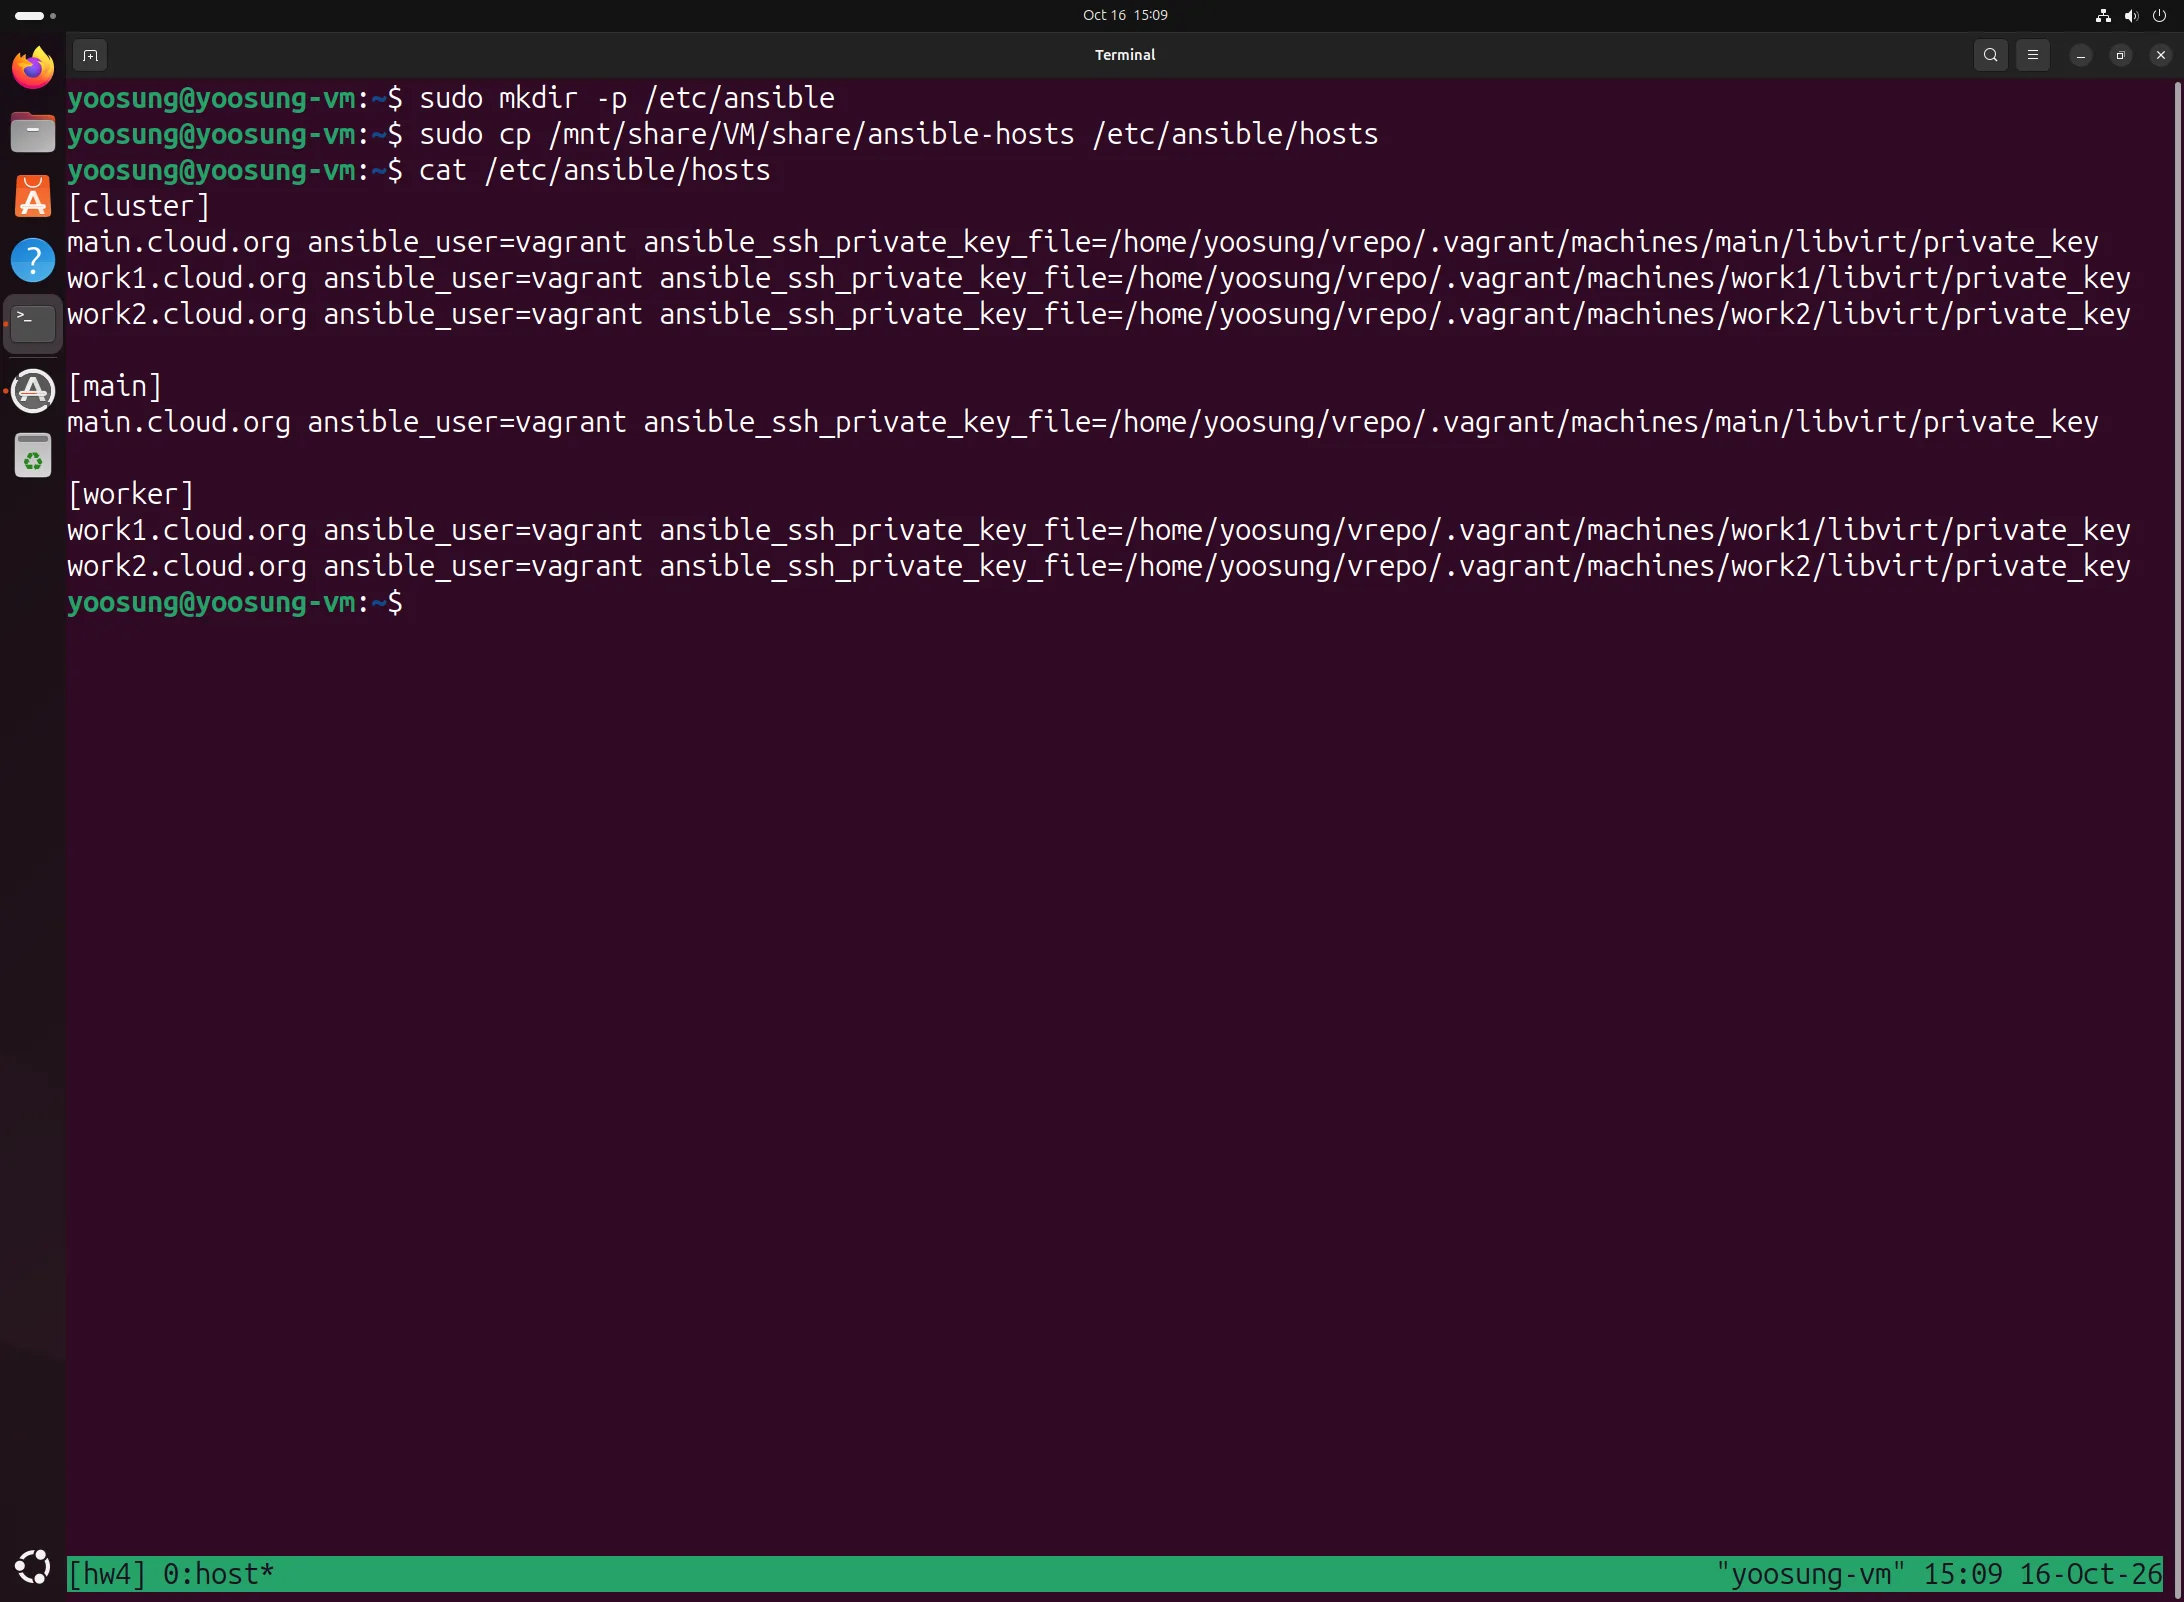
/etc/ansible/hosts
Checking Host Connectivity
I added the three nodes to /etc/hosts on the Ubuntu host and checked name resolution and 192.168.56.0/24 connectivity with ping.
printf "%s\n" "192.168.56.101 main.cloud.org main" "192.168.56.102 work1.cloud.org work1" "192.168.56.103 work2.cloud.org work2" | sudo tee -a /etc/hosts
ping -c 2 main.cloud.org; ping -c 2 work1.cloud.org; ping -c 2 work2.cloud.org
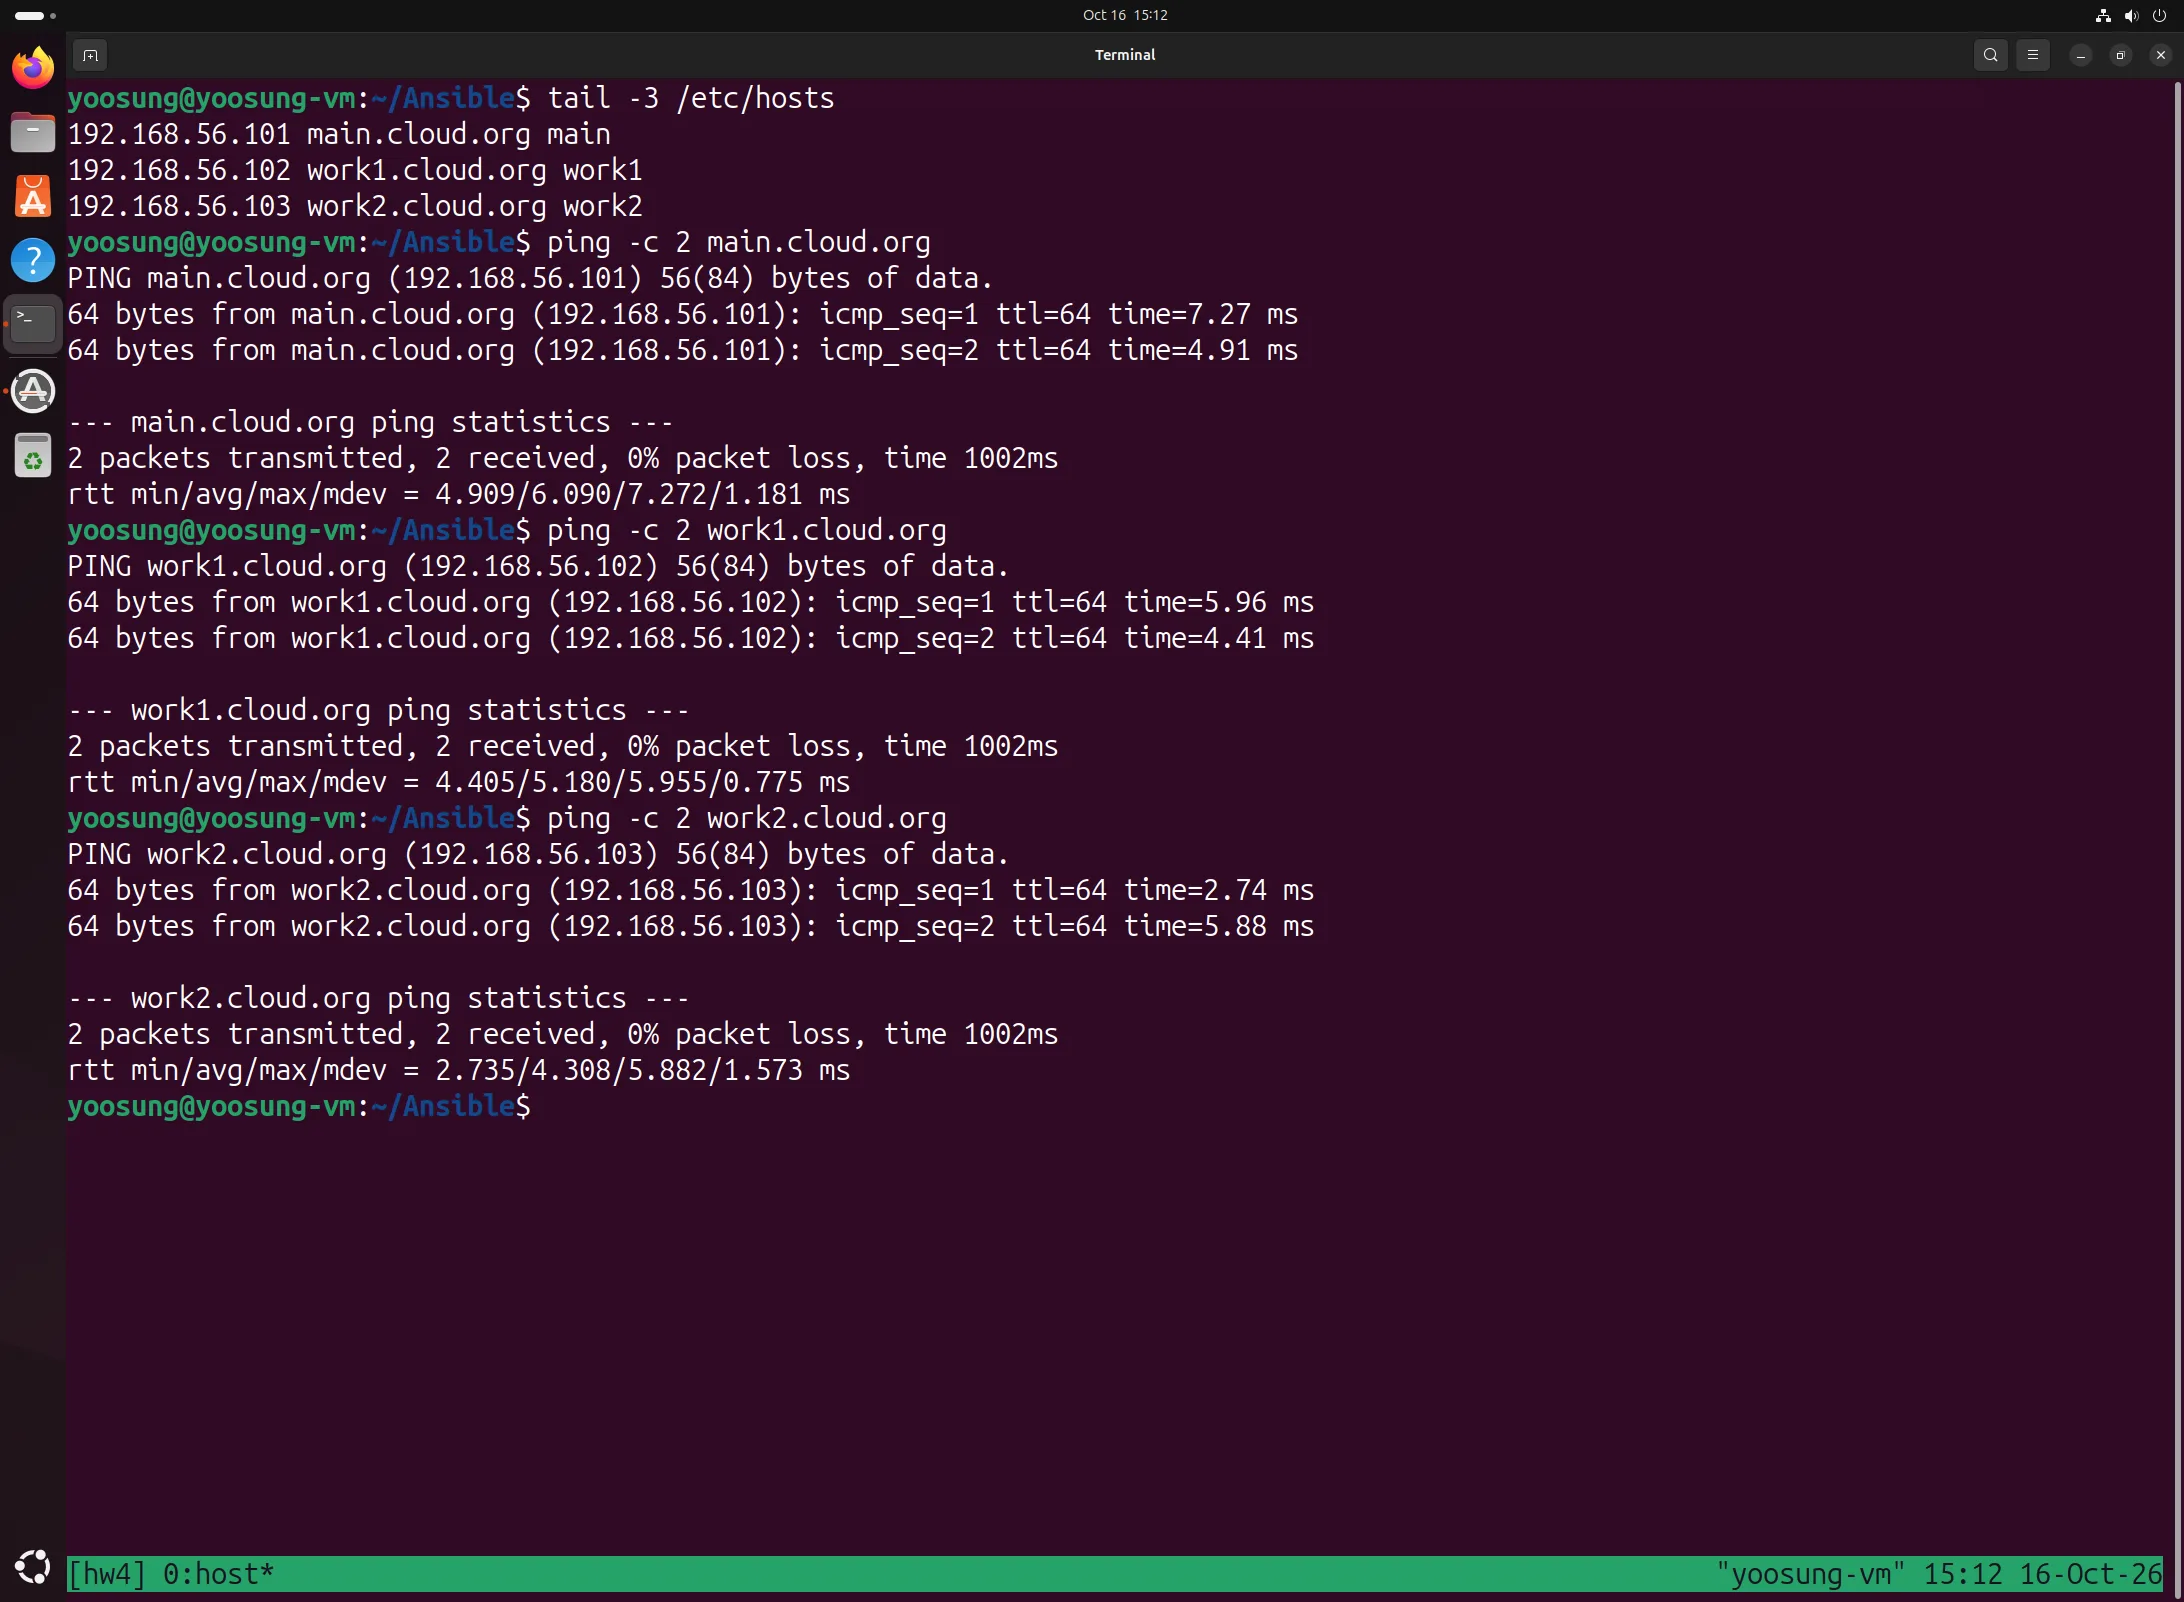
Adding /etc/hosts entries and pinging the three nodes
The first time I ran ansible cluster -m ping, the SSH host key prompts for all three nodes appeared at once and it got stuck. After putting the host keys into known_hosts with ssh-keyscan and running it again, all three nodes answered pong.
ssh-keyscan main.cloud.org work1.cloud.org work2.cloud.org >> ~/.ssh/known_hosts
ansible cluster -m ping
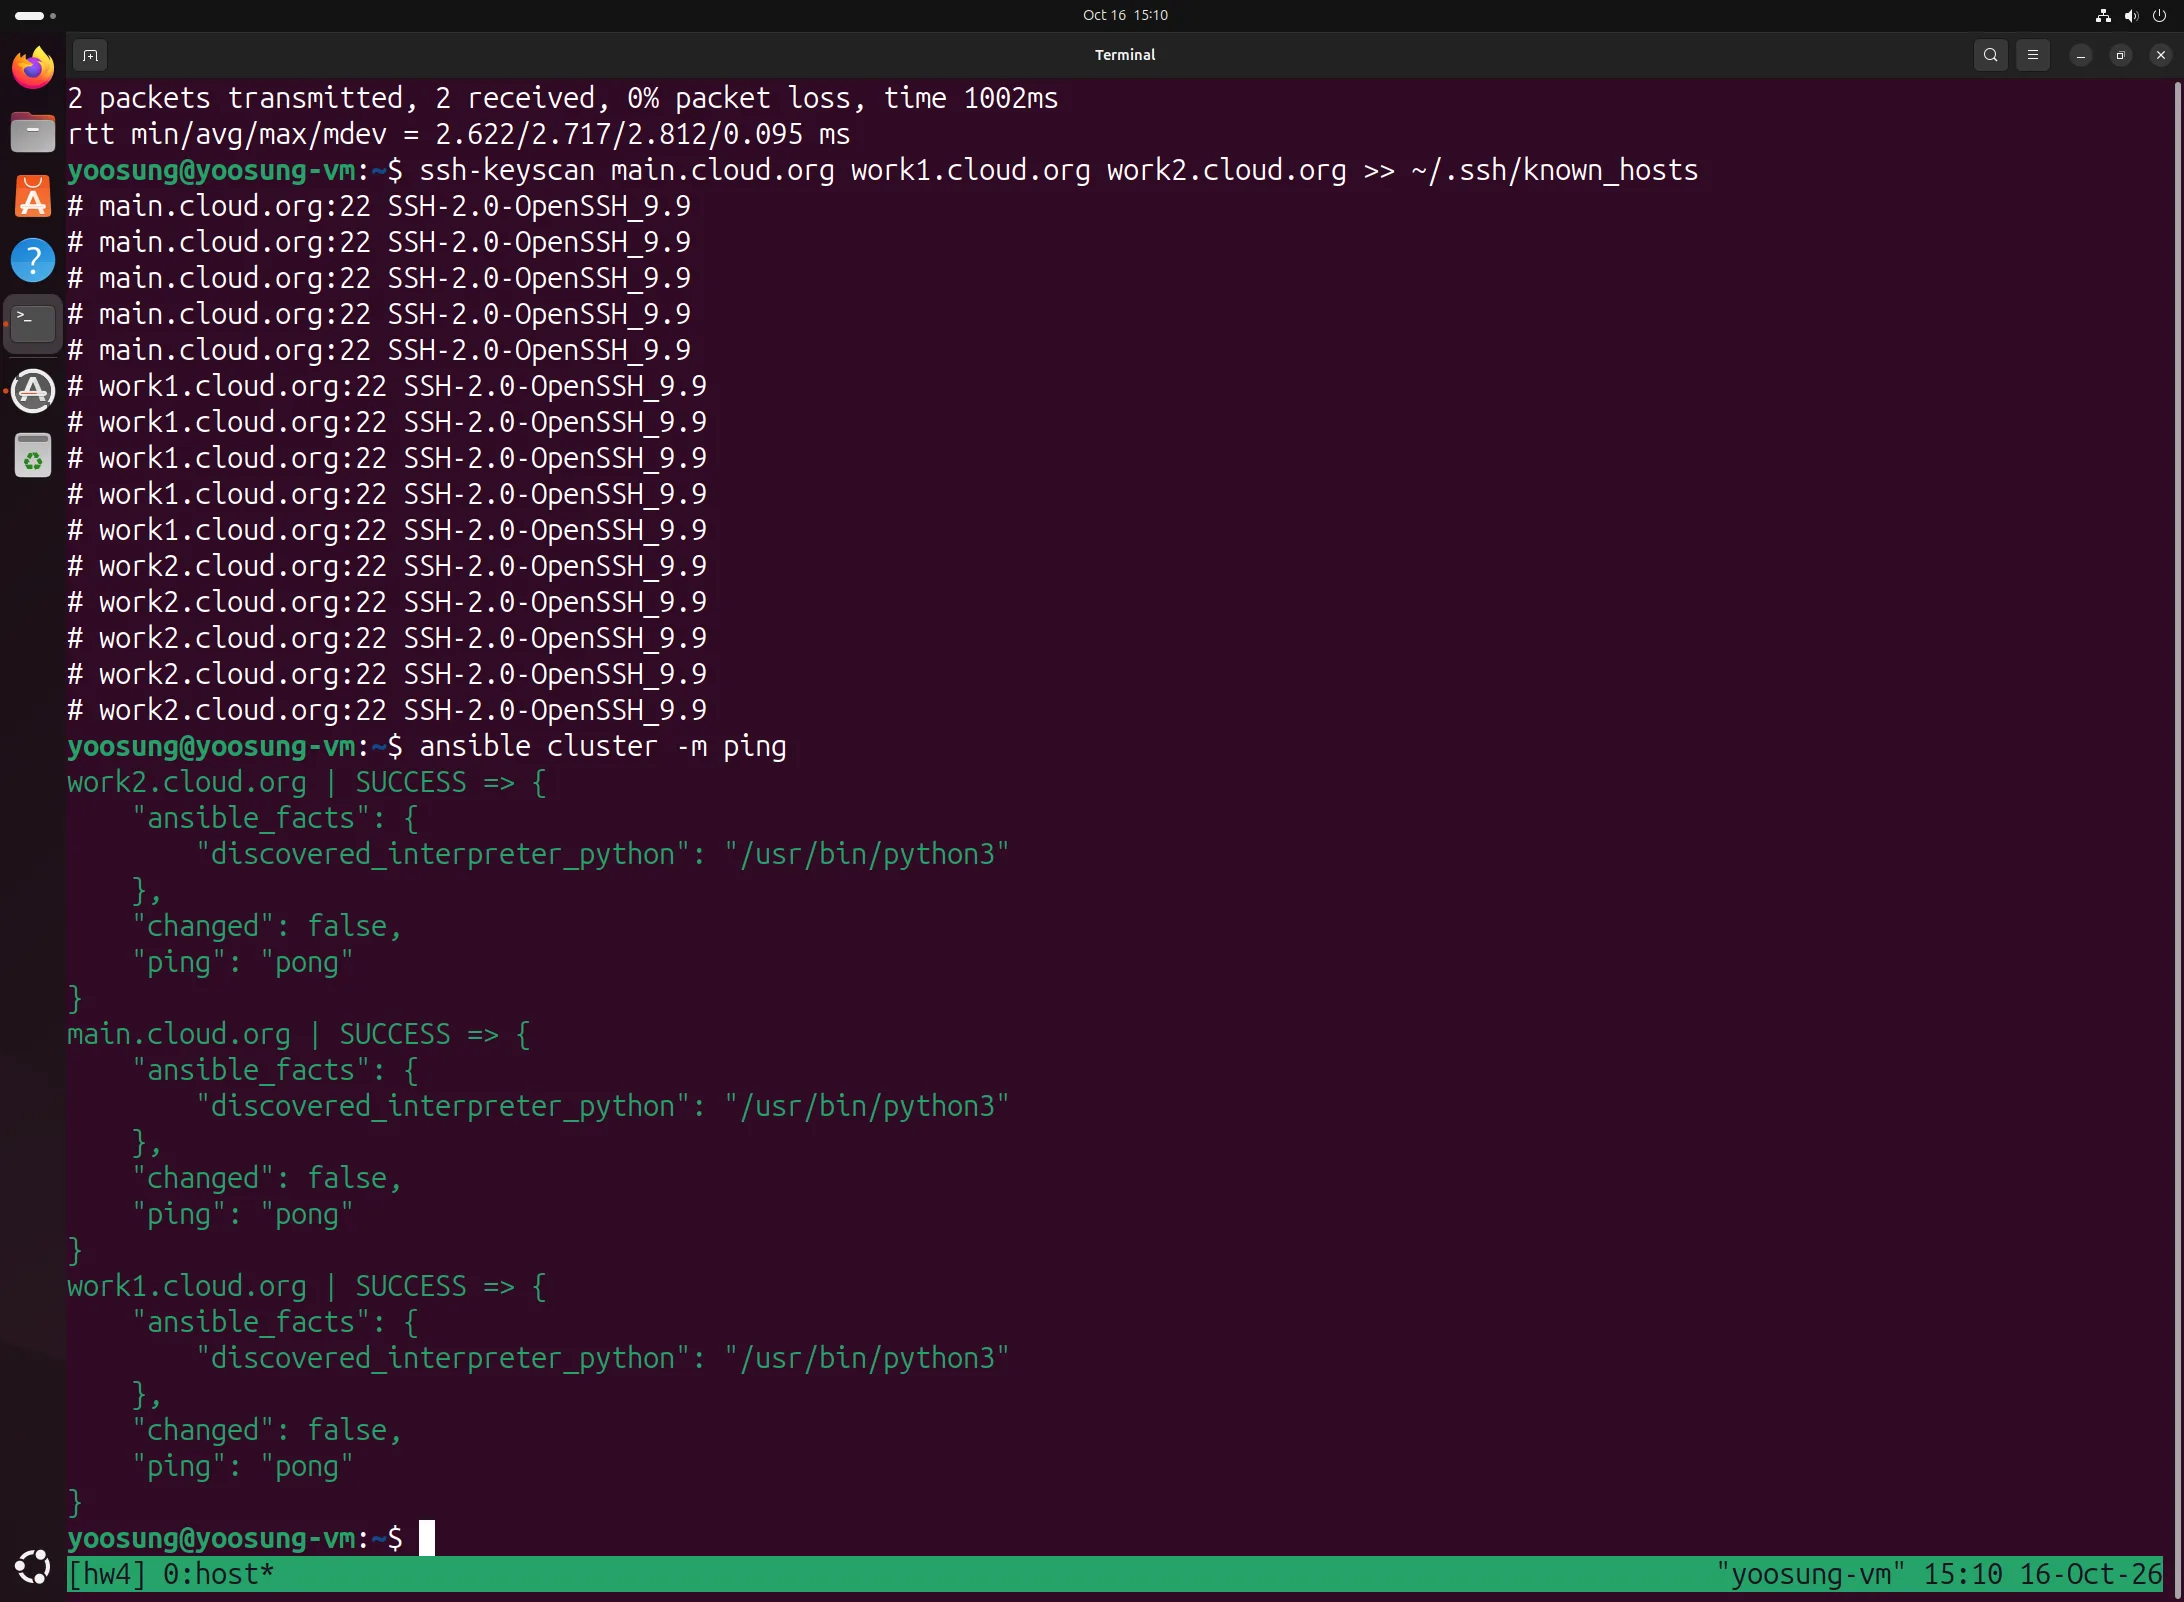
ssh-keyscan and ansible cluster -m ping: SUCCESS/pong from all three nodes
Writing the Playbook
I copied the three plays from slides 34–38 (common install on cluster, main setup, worker setup) and changed only two things. NETWORK_INTERFACE is now enp4s0, this environment's cluster interface, and I added a task that turns off firewalld to the cluster play (it's the fix for problem 5, so it wasn't there on the first run). Indentation is two spaces, no tabs.
---
- name: HTCondor Installation
  hosts: cluster
  become: yes
  become_user: root

  tasks:
    - name: Disable SELinux
      ansible.posix.selinux:
        state: permissive
        policy: targeted

    - name: Stop and disable firewalld
      ansible.builtin.service:
        name: firewalld
        state: stopped
        enabled: no

    - name: Modify /etc/hosts file
      ansible.builtin.blockinfile:
        path: /etc/hosts
        block: |
          192.168.56.101 main.cloud.org     main
          192.168.56.102 work1.cloud.org    work1
          192.168.56.103 work2.cloud.org    work2

    - name: Ensure OpenSSH fully update
      ansible.builtin.dnf:
        name:
          - openssh-server
          - openssh-clients
          - openssl
          - openssl-libs
        state: latest

    - name: Install wget package
      ansible.builtin.dnf:
        name: wget
        state: present

    - name: Install EPEL
      ansible.builtin.dnf:
        name: epel-release
        state: present

    - name: Install HTCondor Repository for EL10
      ansible.builtin.dnf:
        name: https://research.cs.wisc.edu/htcondor/repo/25.0/htcondor-release-current.el10.noarch.rpm
        state: present
        disable_gpg_check: yes

    - name: Install condor
      ansible.builtin.dnf:
        name: condor
        state: present

- name: HTCondor Main Node Setup
  hosts: main
  become: yes
  become_user: root

  tasks:
    - name: Remove old configuration file
      ansible.builtin.file:
        path: /etc/condor/config.d/condor_config.local
        state: absent

    - name: Creating a configuration file
      ansible.builtin.copy:
        dest: /etc/condor/config.d/condor_config.local
        content: |
          UID_DOMAIN = cloud.org
          ALLOW_READ = *
          ALLOW_WRITE = 192.168.56.*
          CONDOR_ADMIN = root@$(FULL_HOSTNAME)
          CONDOR_HOST = main.cloud.org
          IN_HIGHPORT = 9999
          IN_LOWPORT = 9000
          REQUIRE_LOCAL_CONFIG_FILE = False
          NETWORK_INTERFACE = enp4s0
          DAEMON_LIST = MASTER, SCHEDD, COLLECTOR, NEGOTIATOR
          SEC_DEFAULT_AUTHENTICATION_METHODS = CLAIMTOBE
          SEC_CLIENT_AUTHENTICATION_METHODS = CLAIMTOBE
        mode: '0644'

    - name: Restart HTCondor
      ansible.builtin.service:
        name: condor
        state: restarted
        enabled: yes

- name: HTCondor Worker Node Setup
  hosts: worker
  become: yes
  become_user: root

  tasks:
    - name: Remove old configuration file
      ansible.builtin.file:
        path: /etc/condor/config.d/condor_config.local
        state: absent

    - name: Creating a configuration file
      ansible.builtin.copy:
        dest: /etc/condor/config.d/condor_config.local
        content: |
          UID_DOMAIN = cloud.org
          ALLOW_READ = *
          ALLOW_WRITE = 192.168.56.*
          CONDOR_ADMIN = root@$(FULL_HOSTNAME)
          CONDOR_HOST = main.cloud.org
          IN_HIGHPORT = 9999
          IN_LOWPORT = 9000
          REQUIRE_LOCAL_CONFIG_FILE = False
          NETWORK_INTERFACE = enp4s0
          DAEMON_LIST = MASTER, STARTD
          SEC_DEFAULT_AUTHENTICATION_METHODS = CLAIMTOBE
          SEC_CLIENT_AUTHENTICATION_METHODS = CLAIMTOBE
        mode: '0644'

    - name: Restart HTCondor
      ansible.builtin.service:
        name: condor
        state: restarted
        enabled: yes
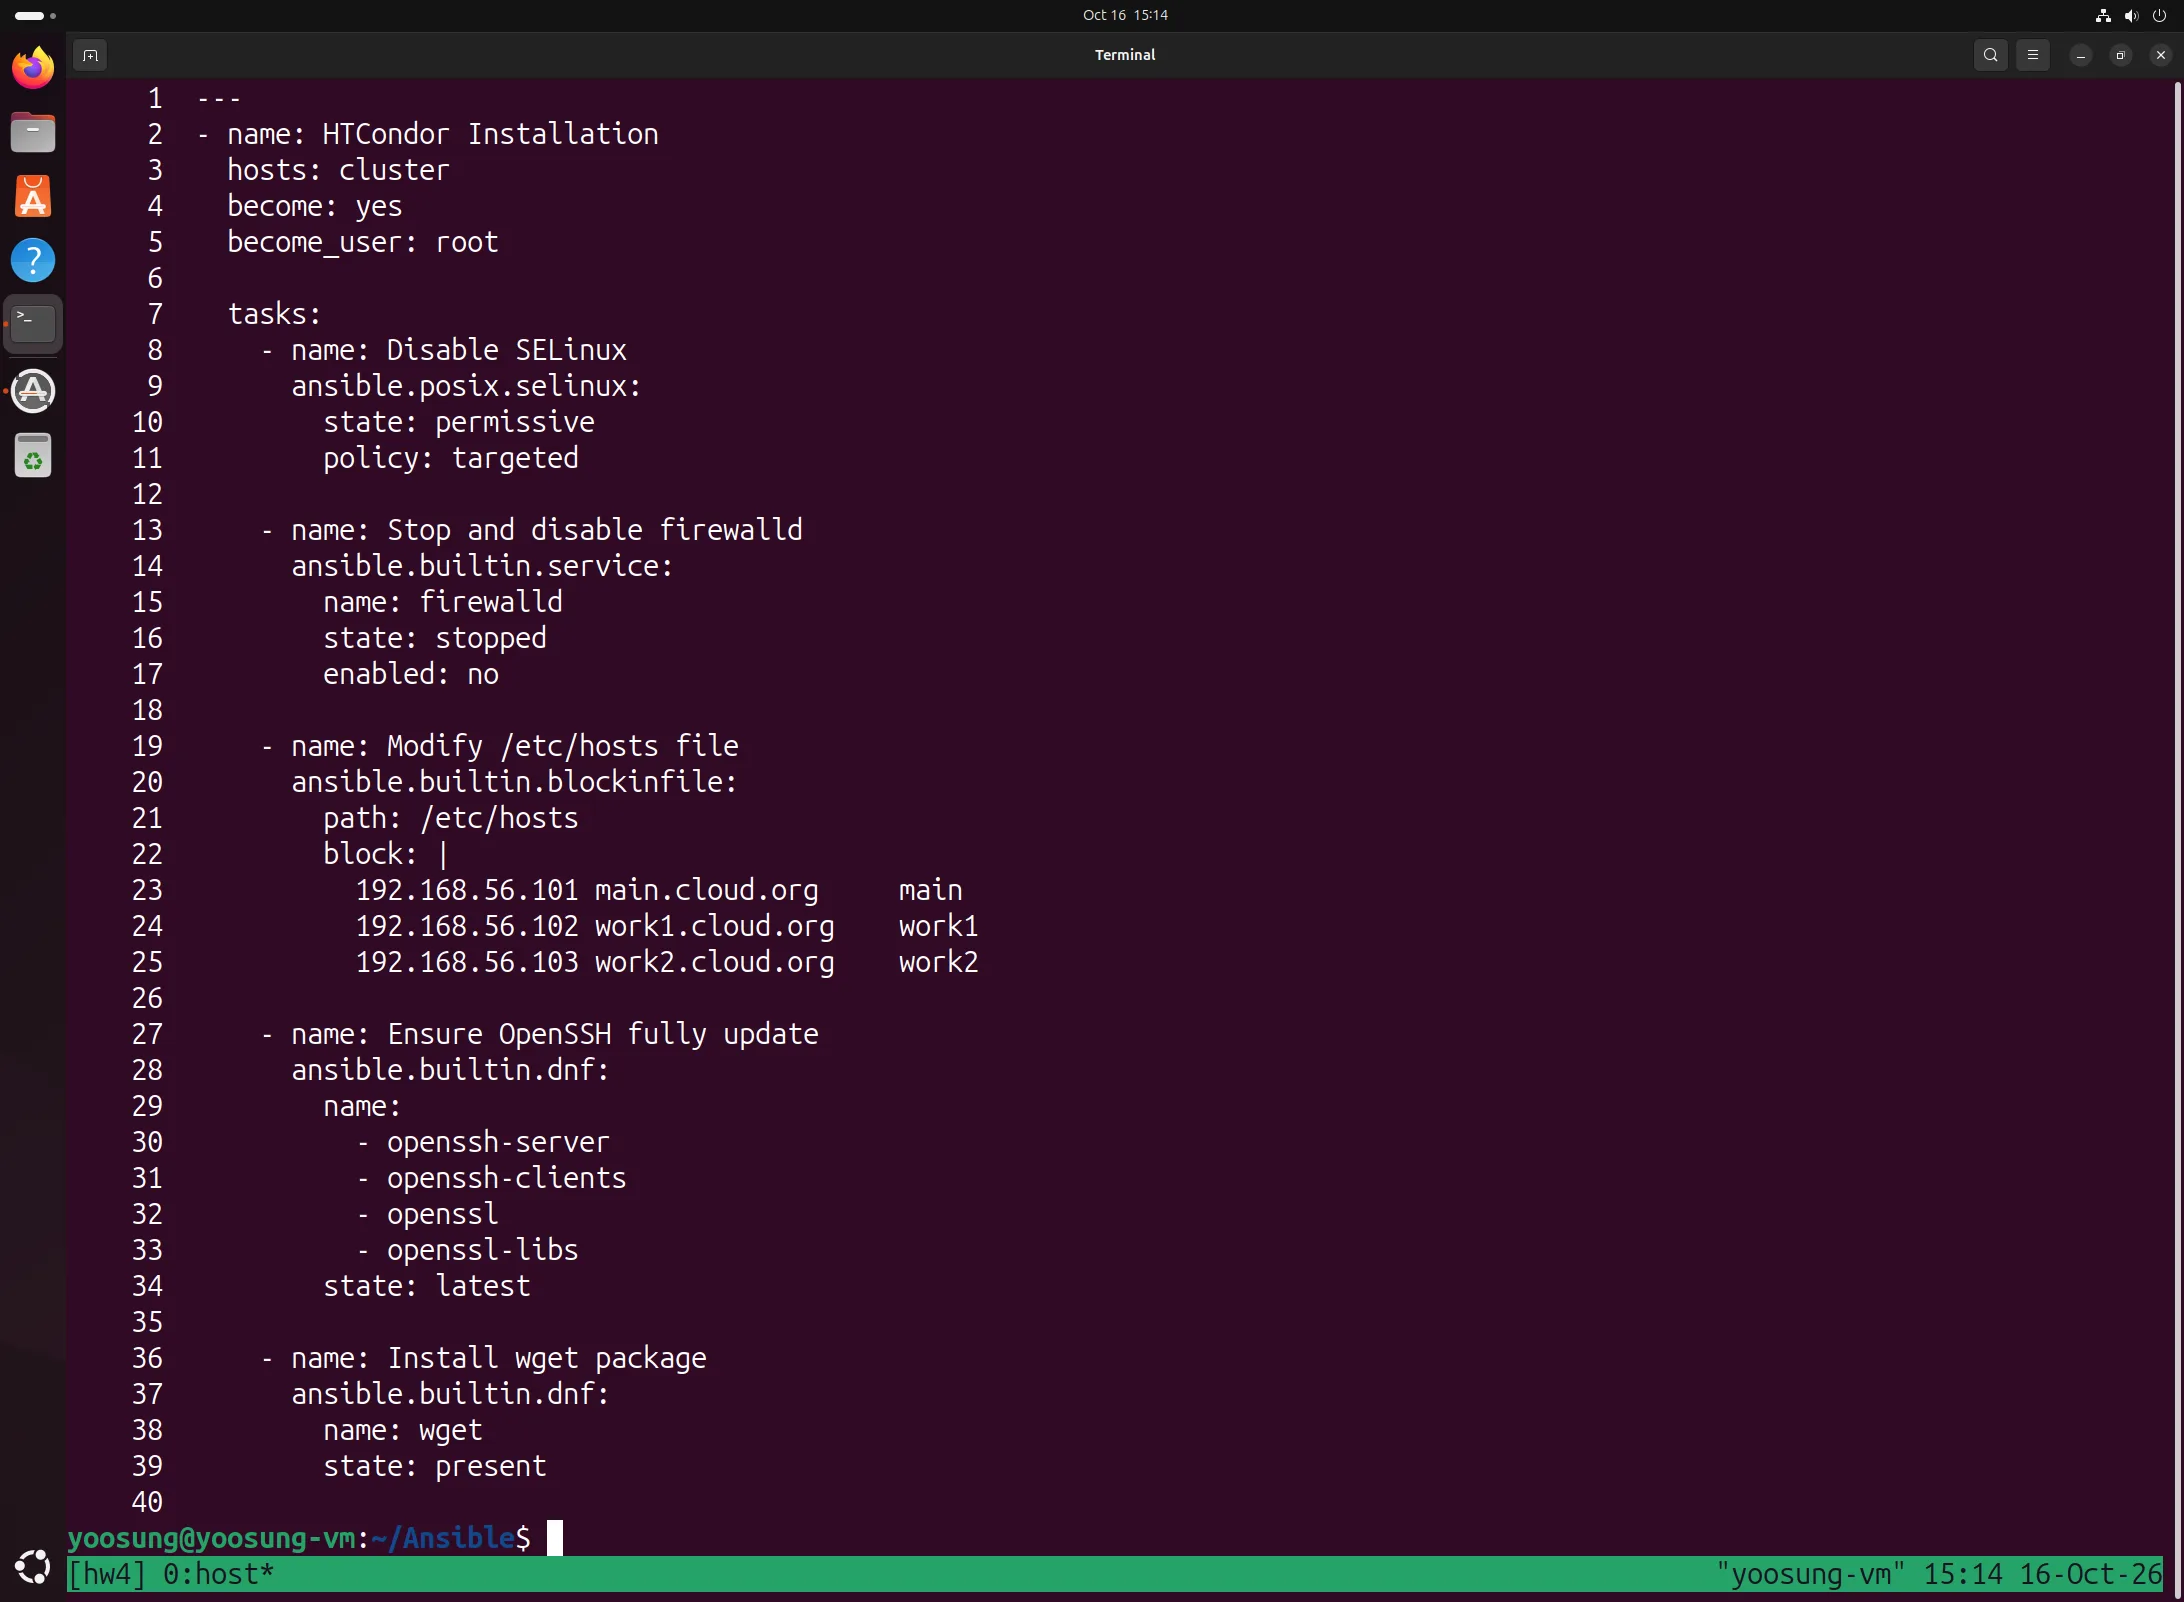
htcondor.yaml lines 1–40: HTCondor Installation play (SELinux, firewalld (added), /etc/hosts, OpenSSH, wget)
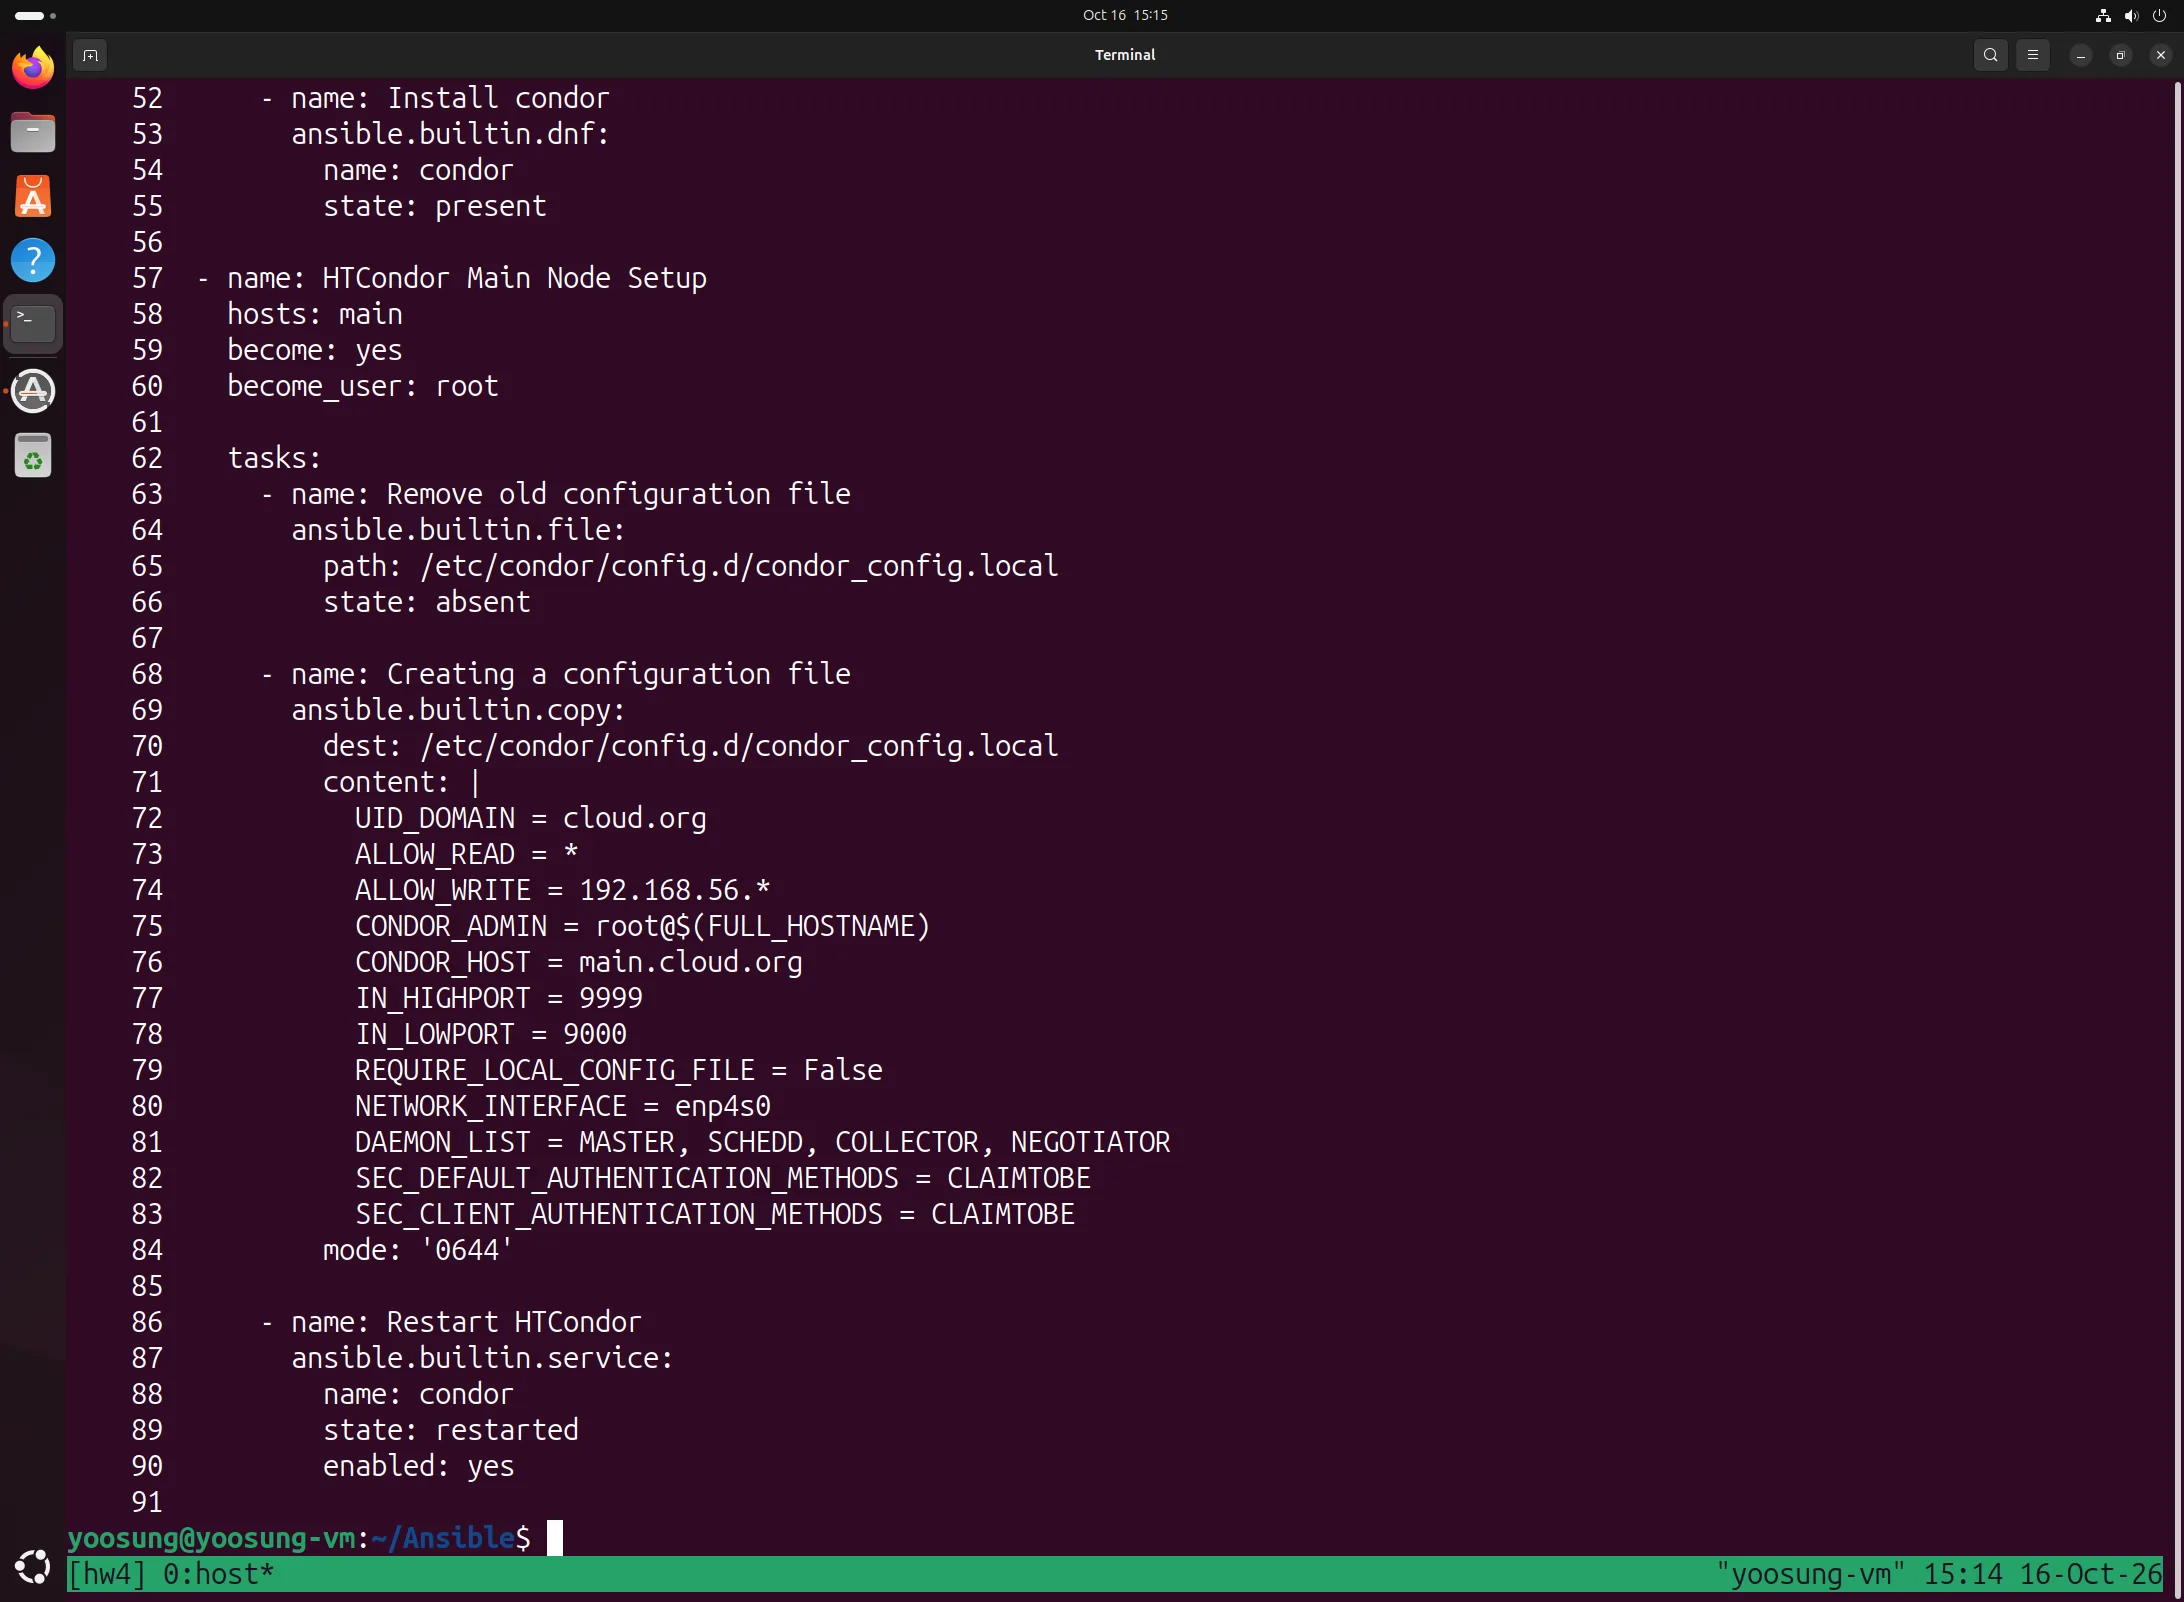
htcondor.yaml lines 41–91: EPEL, HTCondor repository, condor install, Main Node Setup play
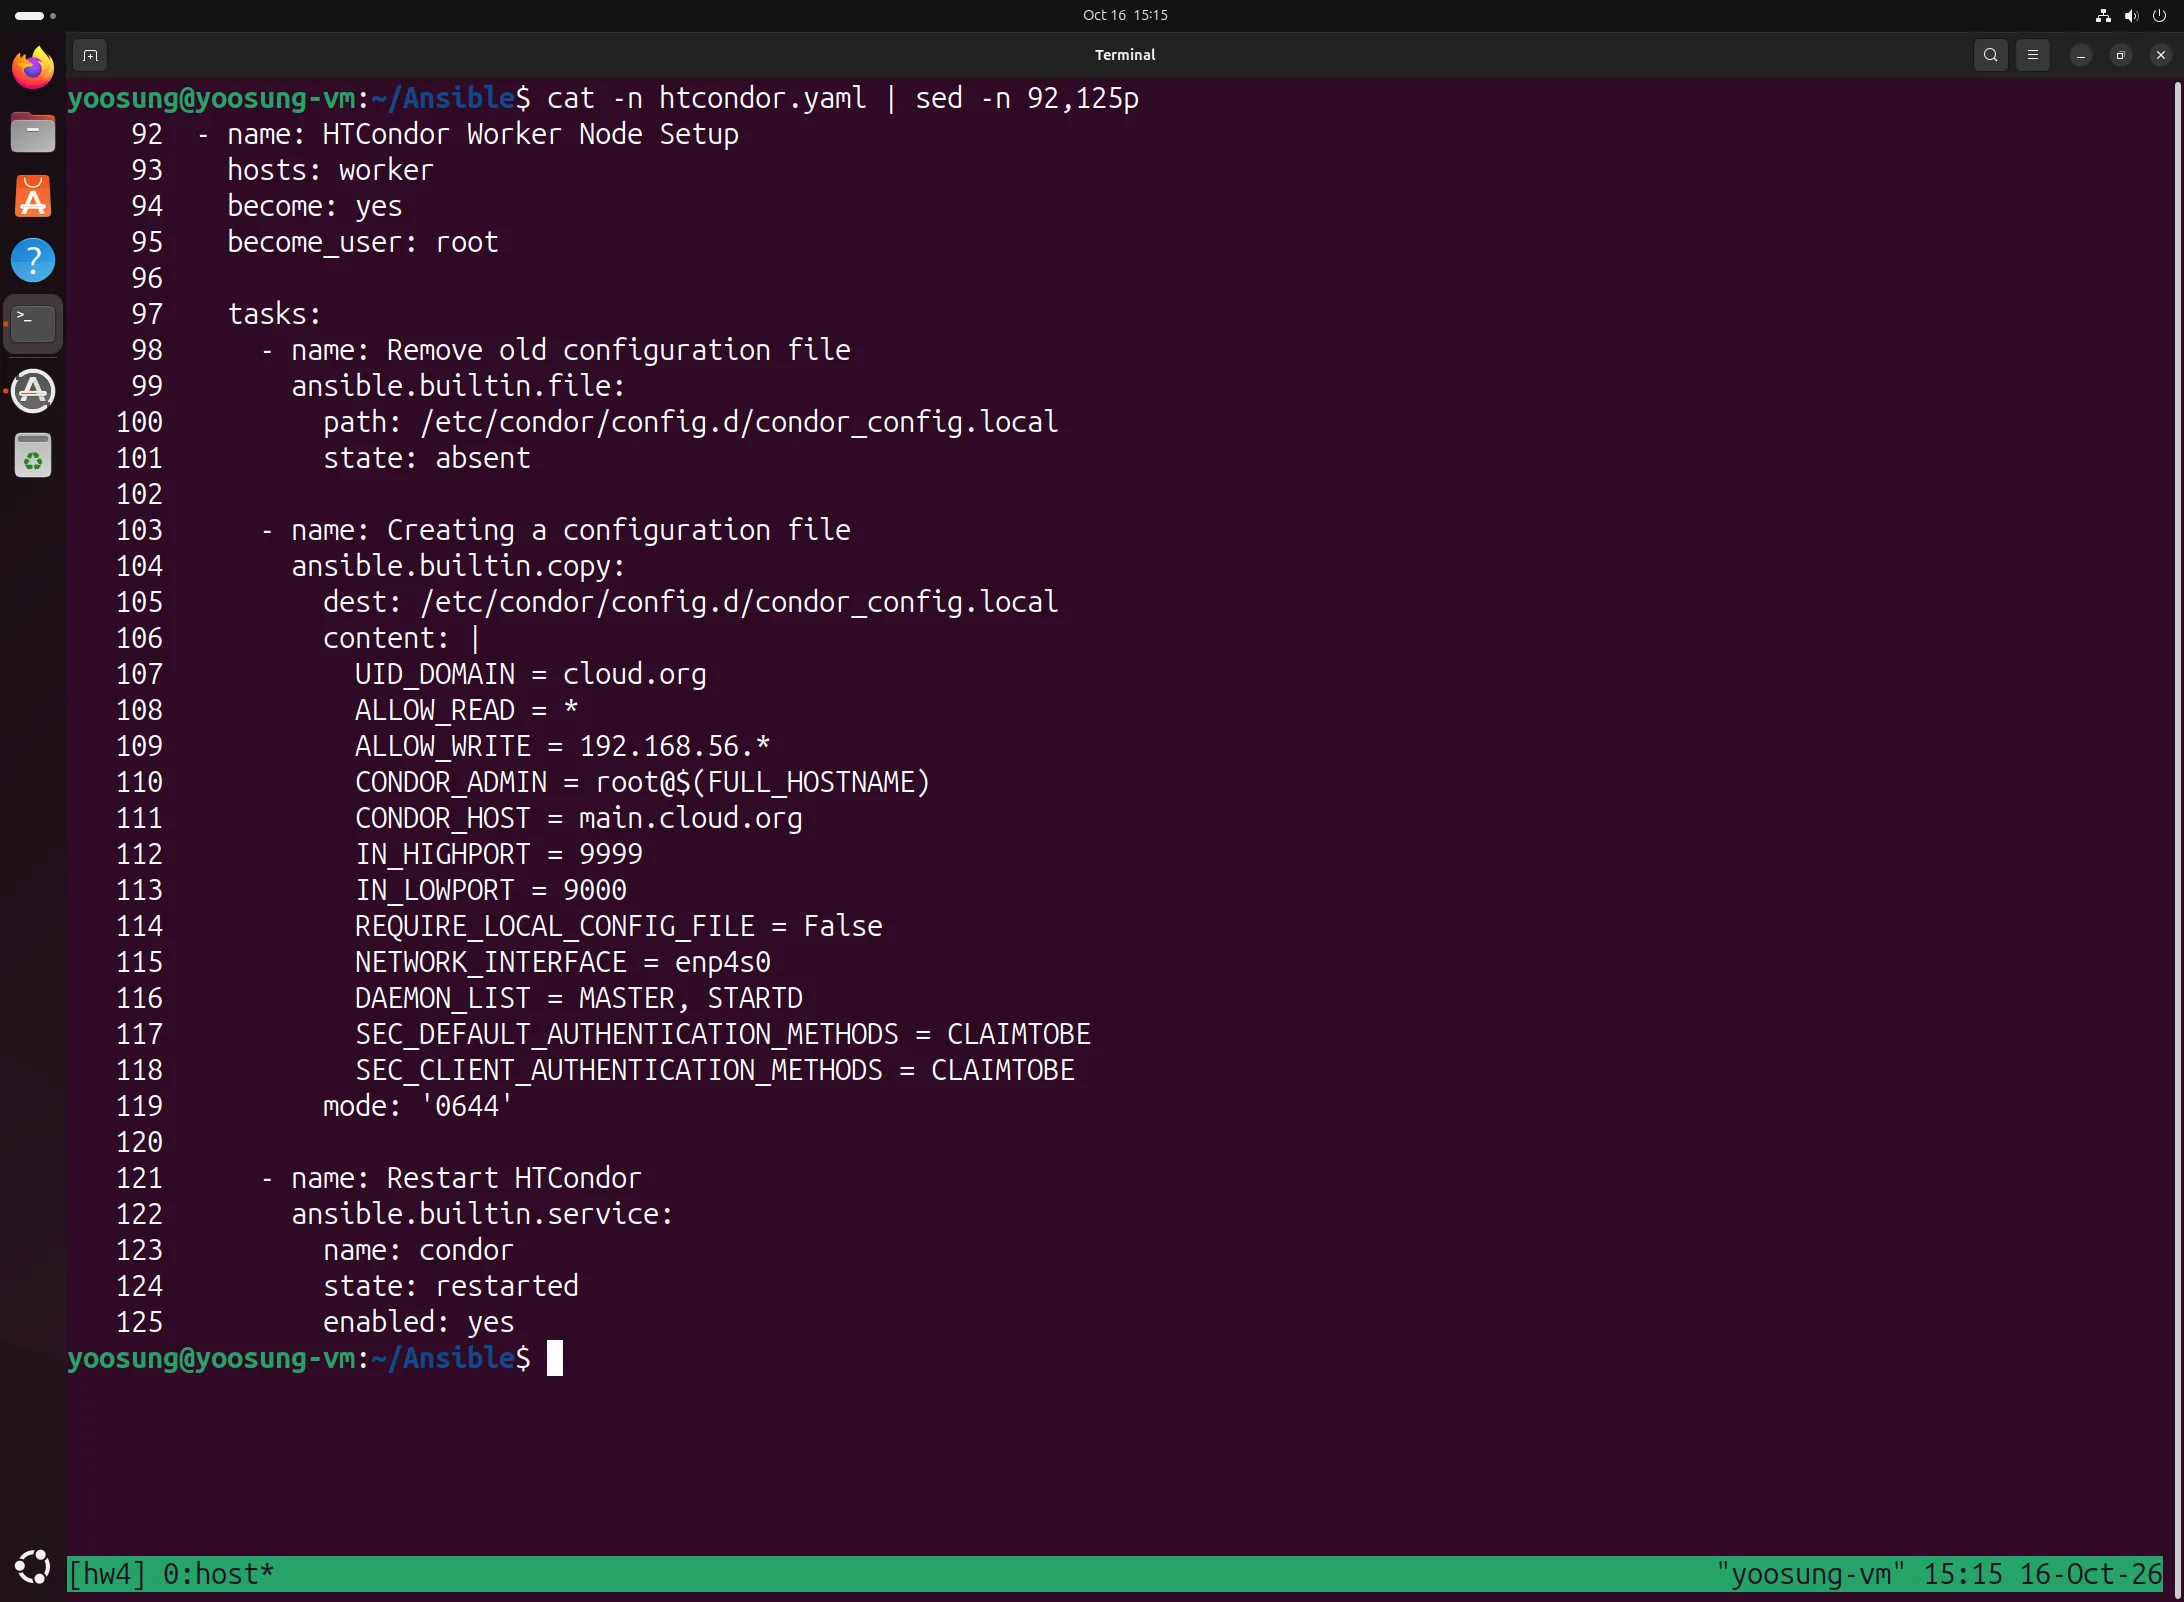
htcondor.yaml lines 92–125: Worker Node Setup play
Running the Playbook
The first run, before adding the firewalld task, finished with ok=12 changed=9 failed=0 on all three nodes.
ansible-playbook --syntax-check htcondor.yaml
ansible-playbook htcondor.yaml
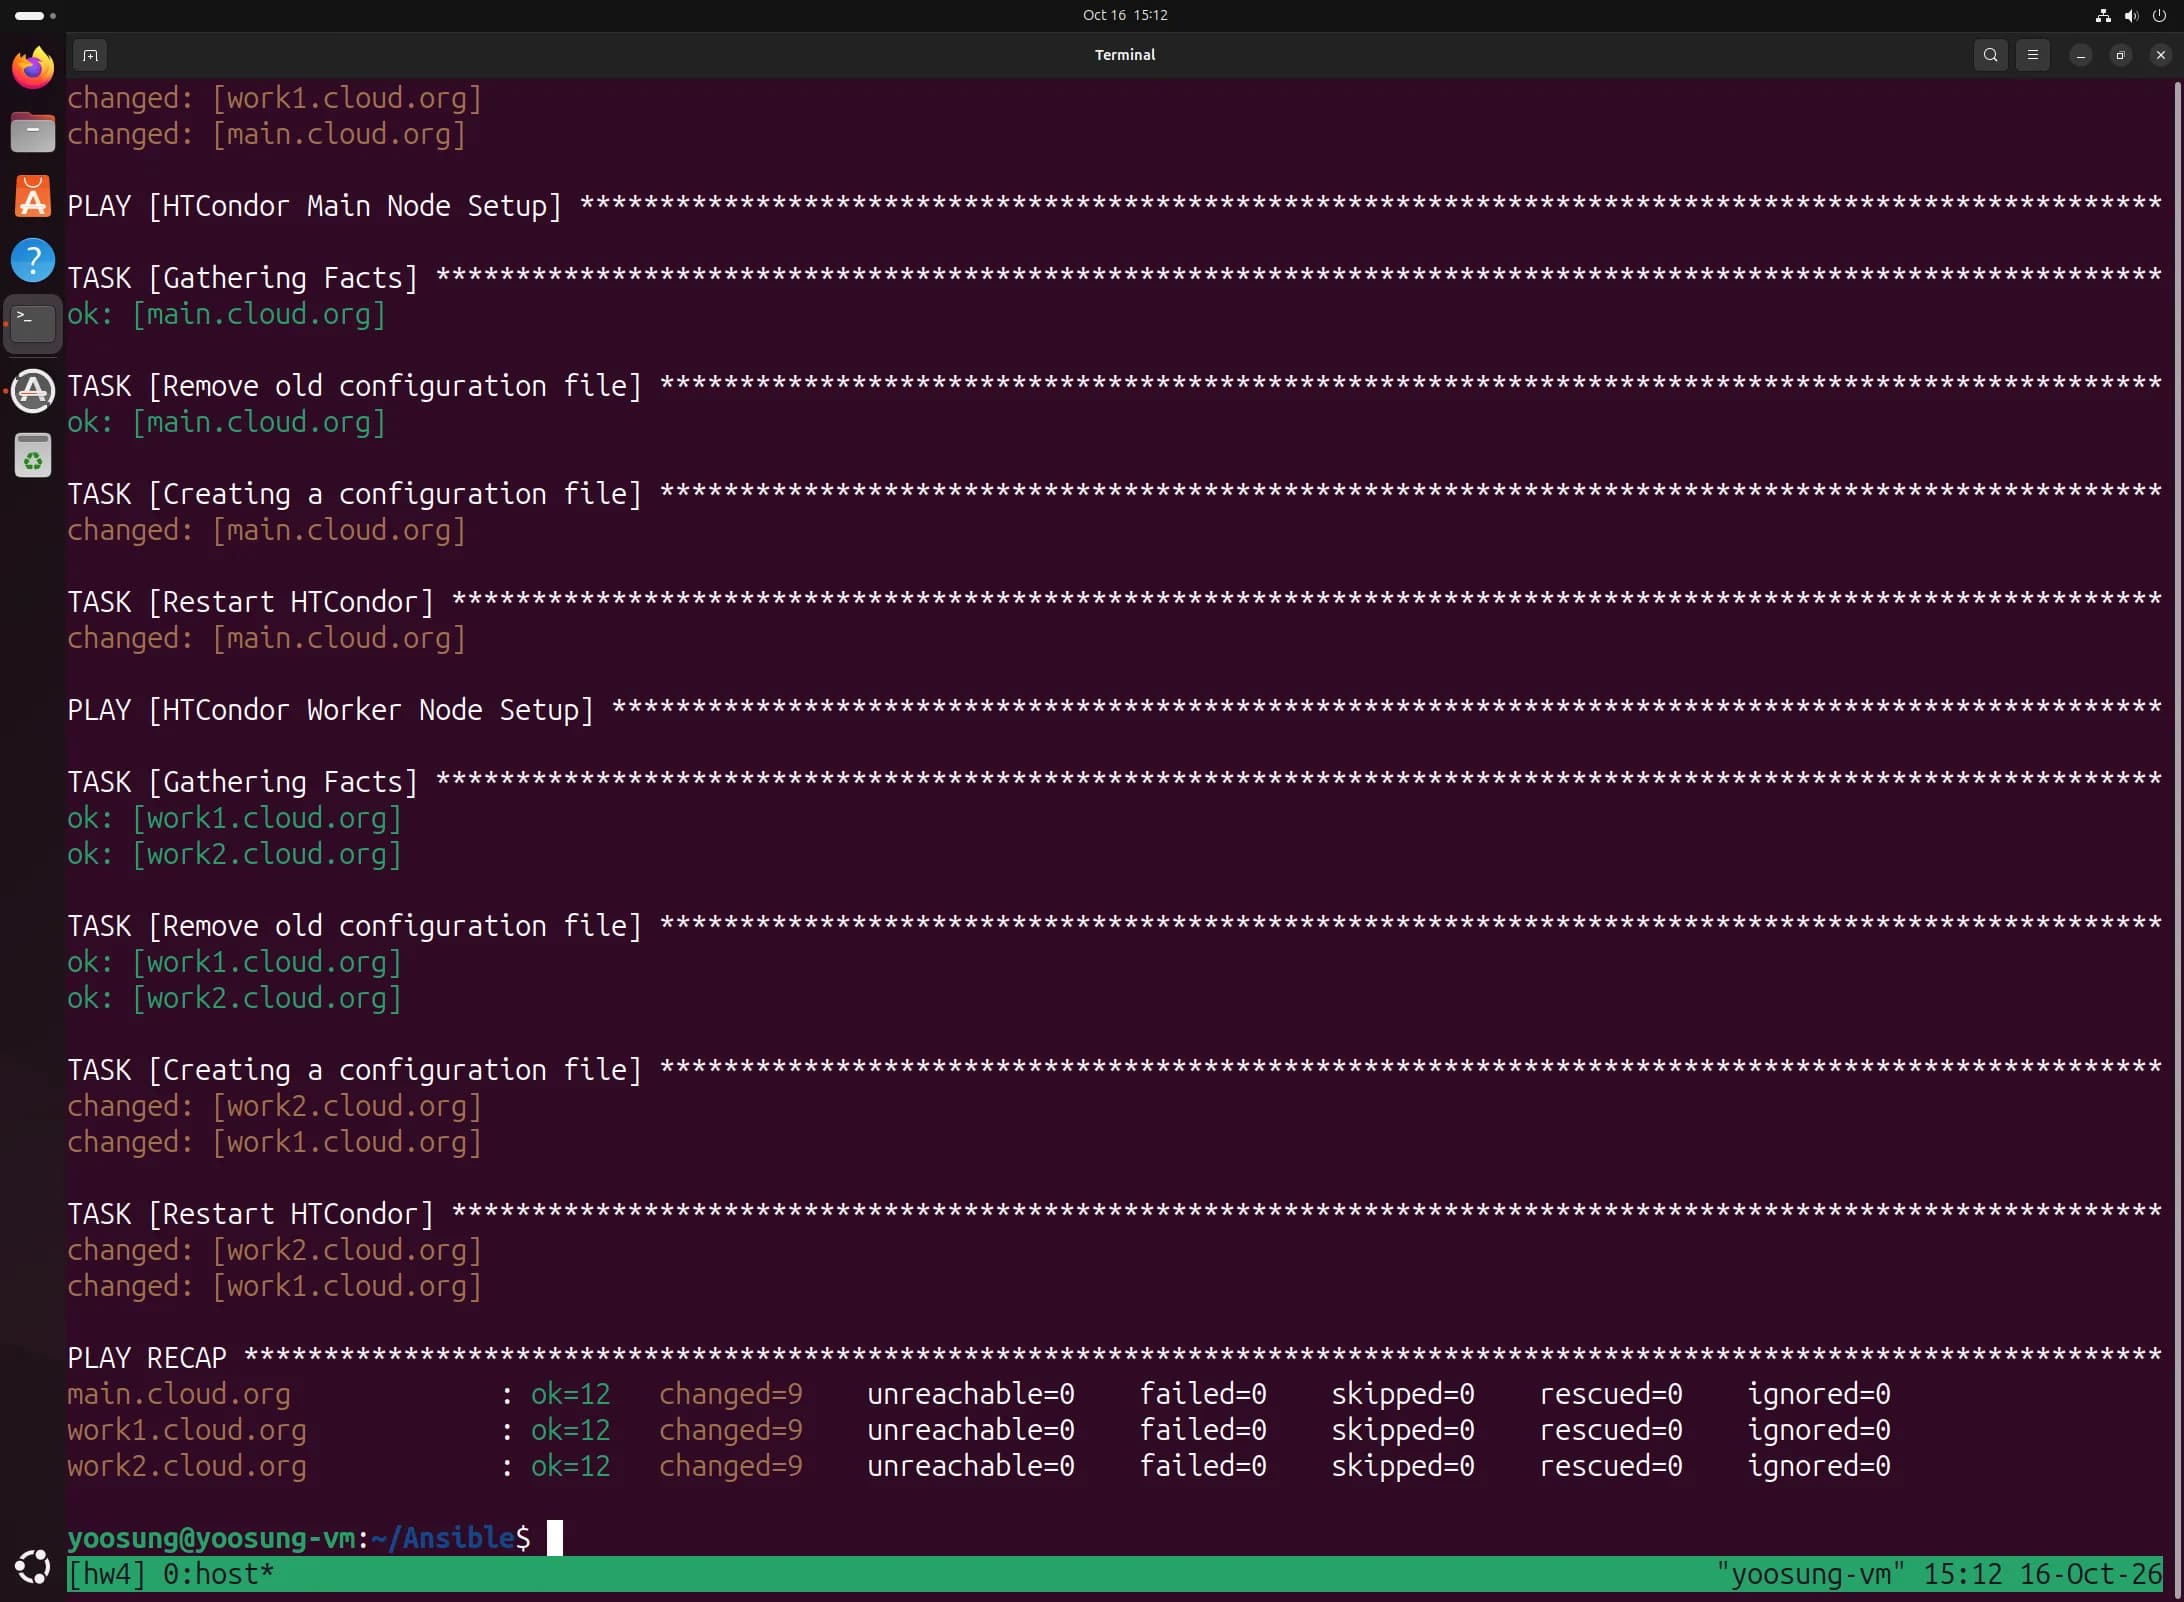
1st ansible-playbook: PLAY RECAP ok=12 changed=9 failed=0
Problem 5. The Playbook Succeeded but condor_status Is Empty
But condor_status on main showed nothing.
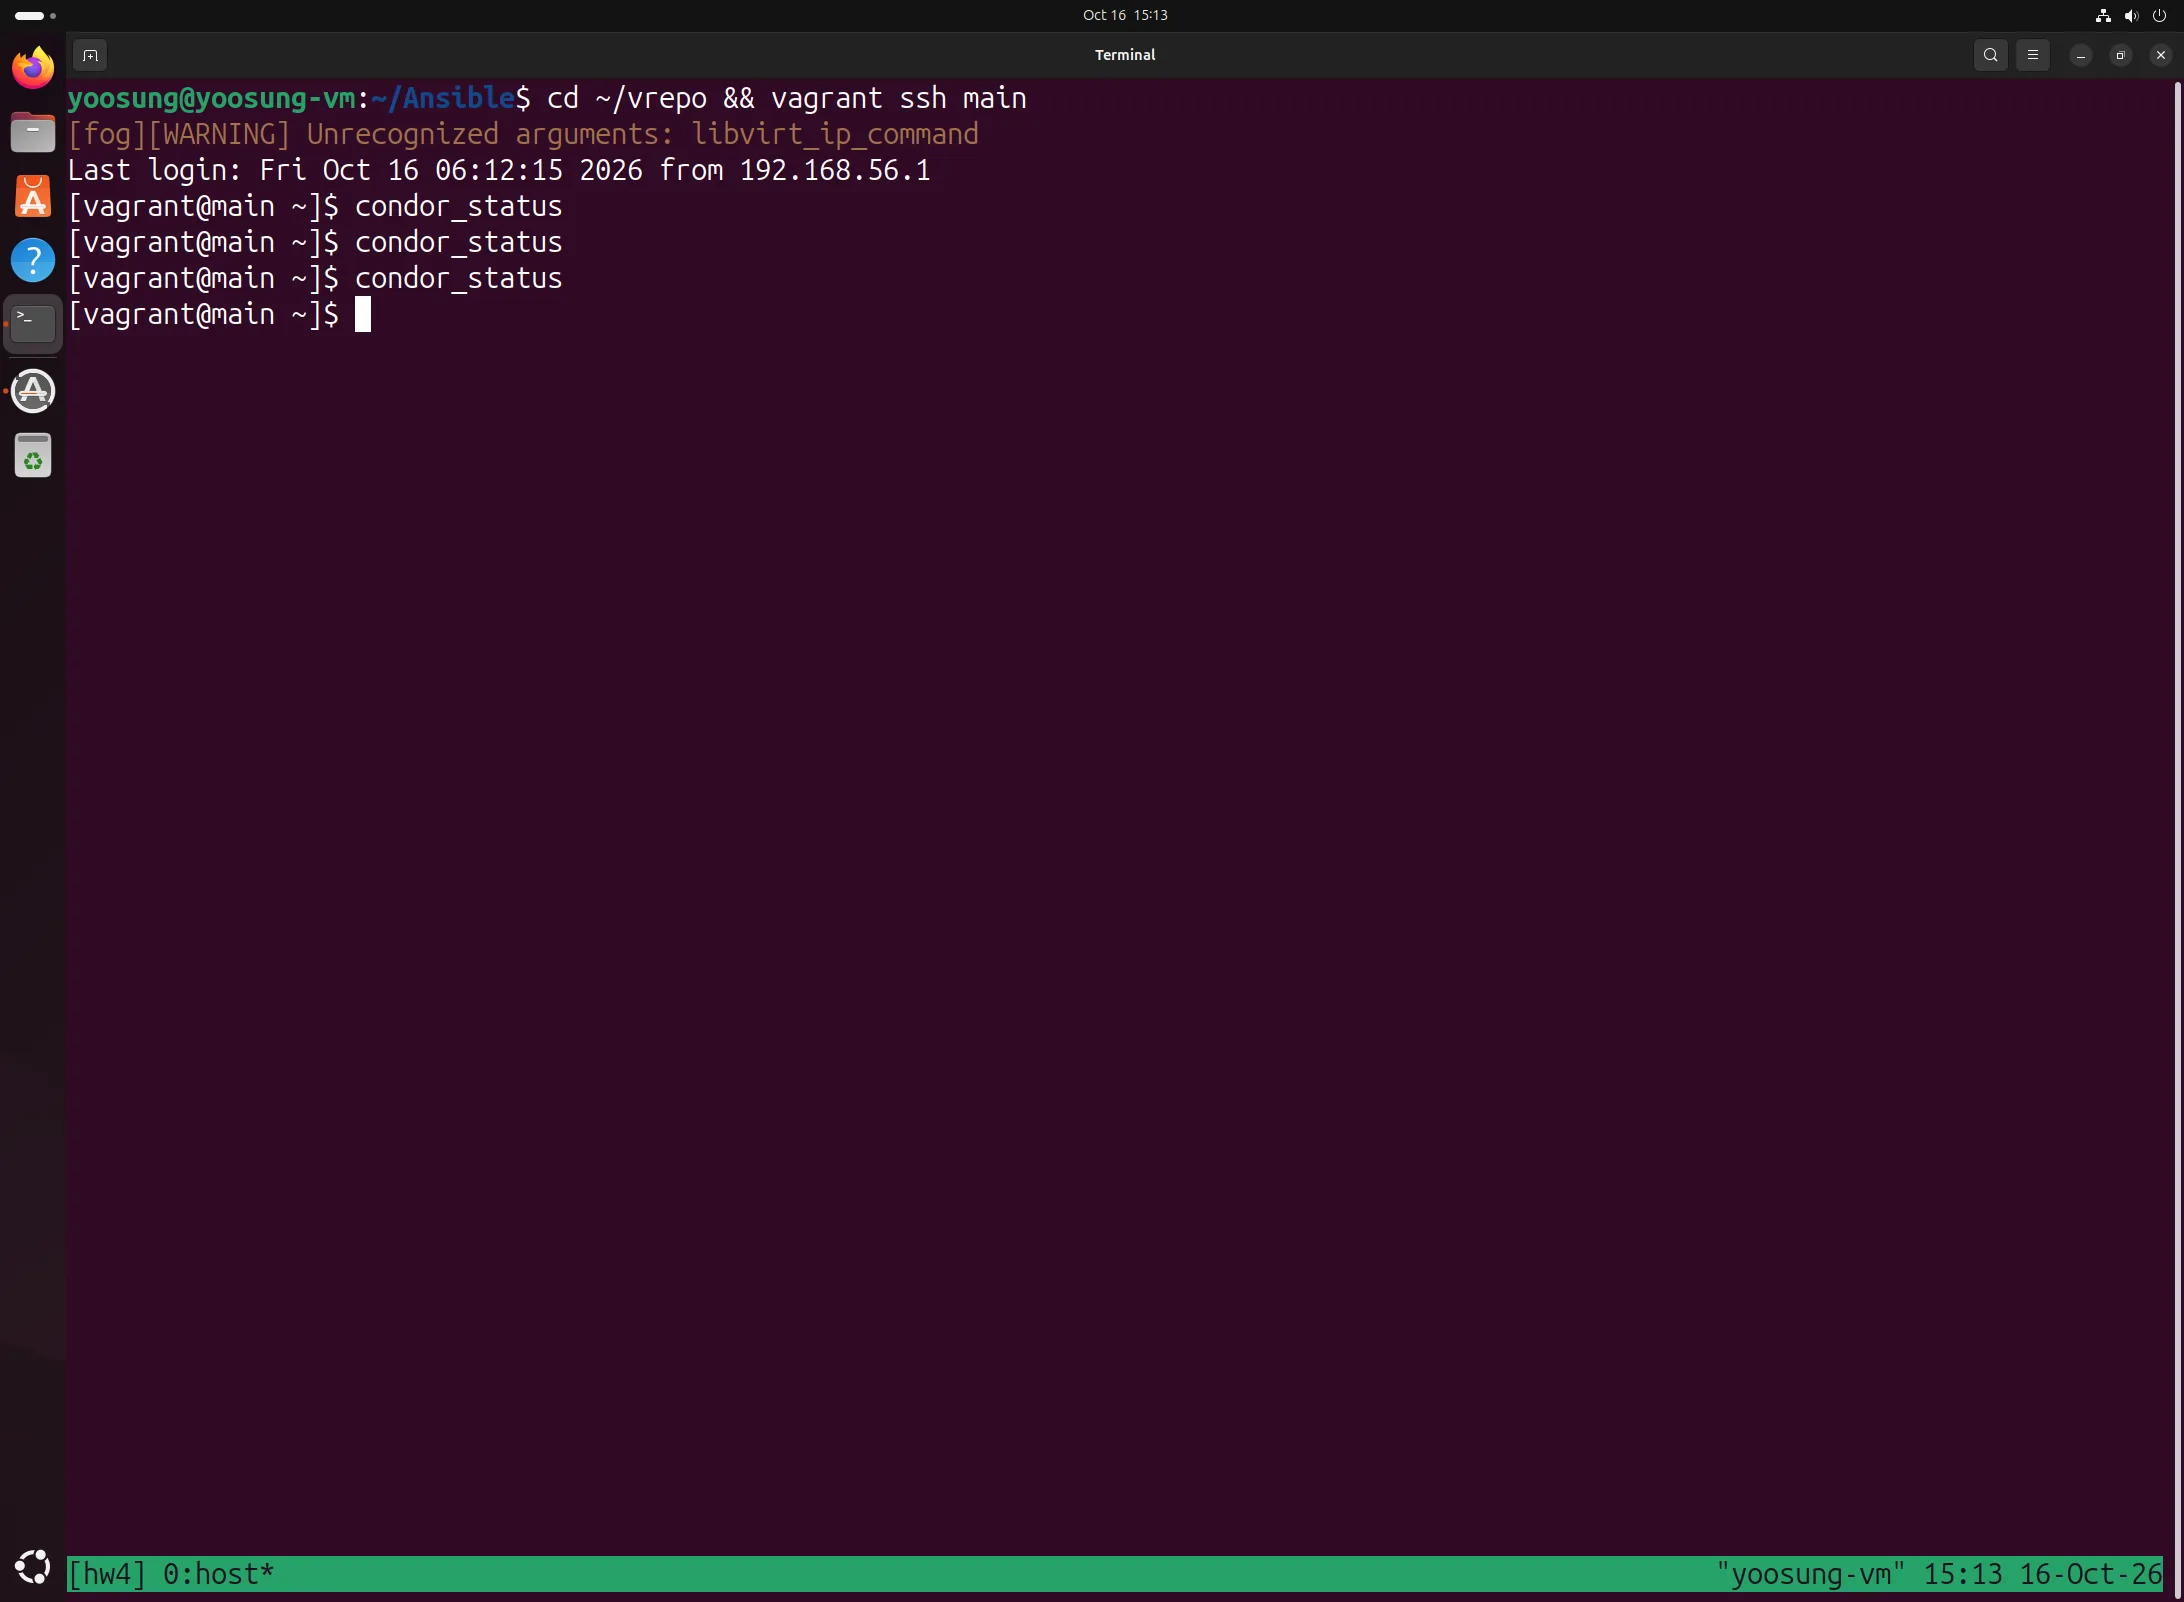
condor_status on main is empty after the 1st run
The workers' /var/log/condor/StartLog showed they couldn't connect to port 9618 on main.
attempt to connect to <192.168.56.101:9618> failed: No route to host
TCP connection to collector main.cloud.org failed
The Rocky box comes with firewalld enabled, and the default zone only allows ssh, cockpit and dhcpv6-client, so the HTCondor port (9618) was blocked. The slide playbook has no firewall step. In the Chapter 5 lab, the install script opened 9618 and I later turned off firewalld by hand, so it never came up.
vagrant ssh main
condor_status                                                   # empty output
ansible worker  -b -m shell -a "tail -3 /var/log/condor/StartLog"
ansible cluster -b -m shell -a "firewall-cmd --state; firewall-cmd --list-services"
ansible-playbook htcondor.yaml                                  # after adding the firewalld task
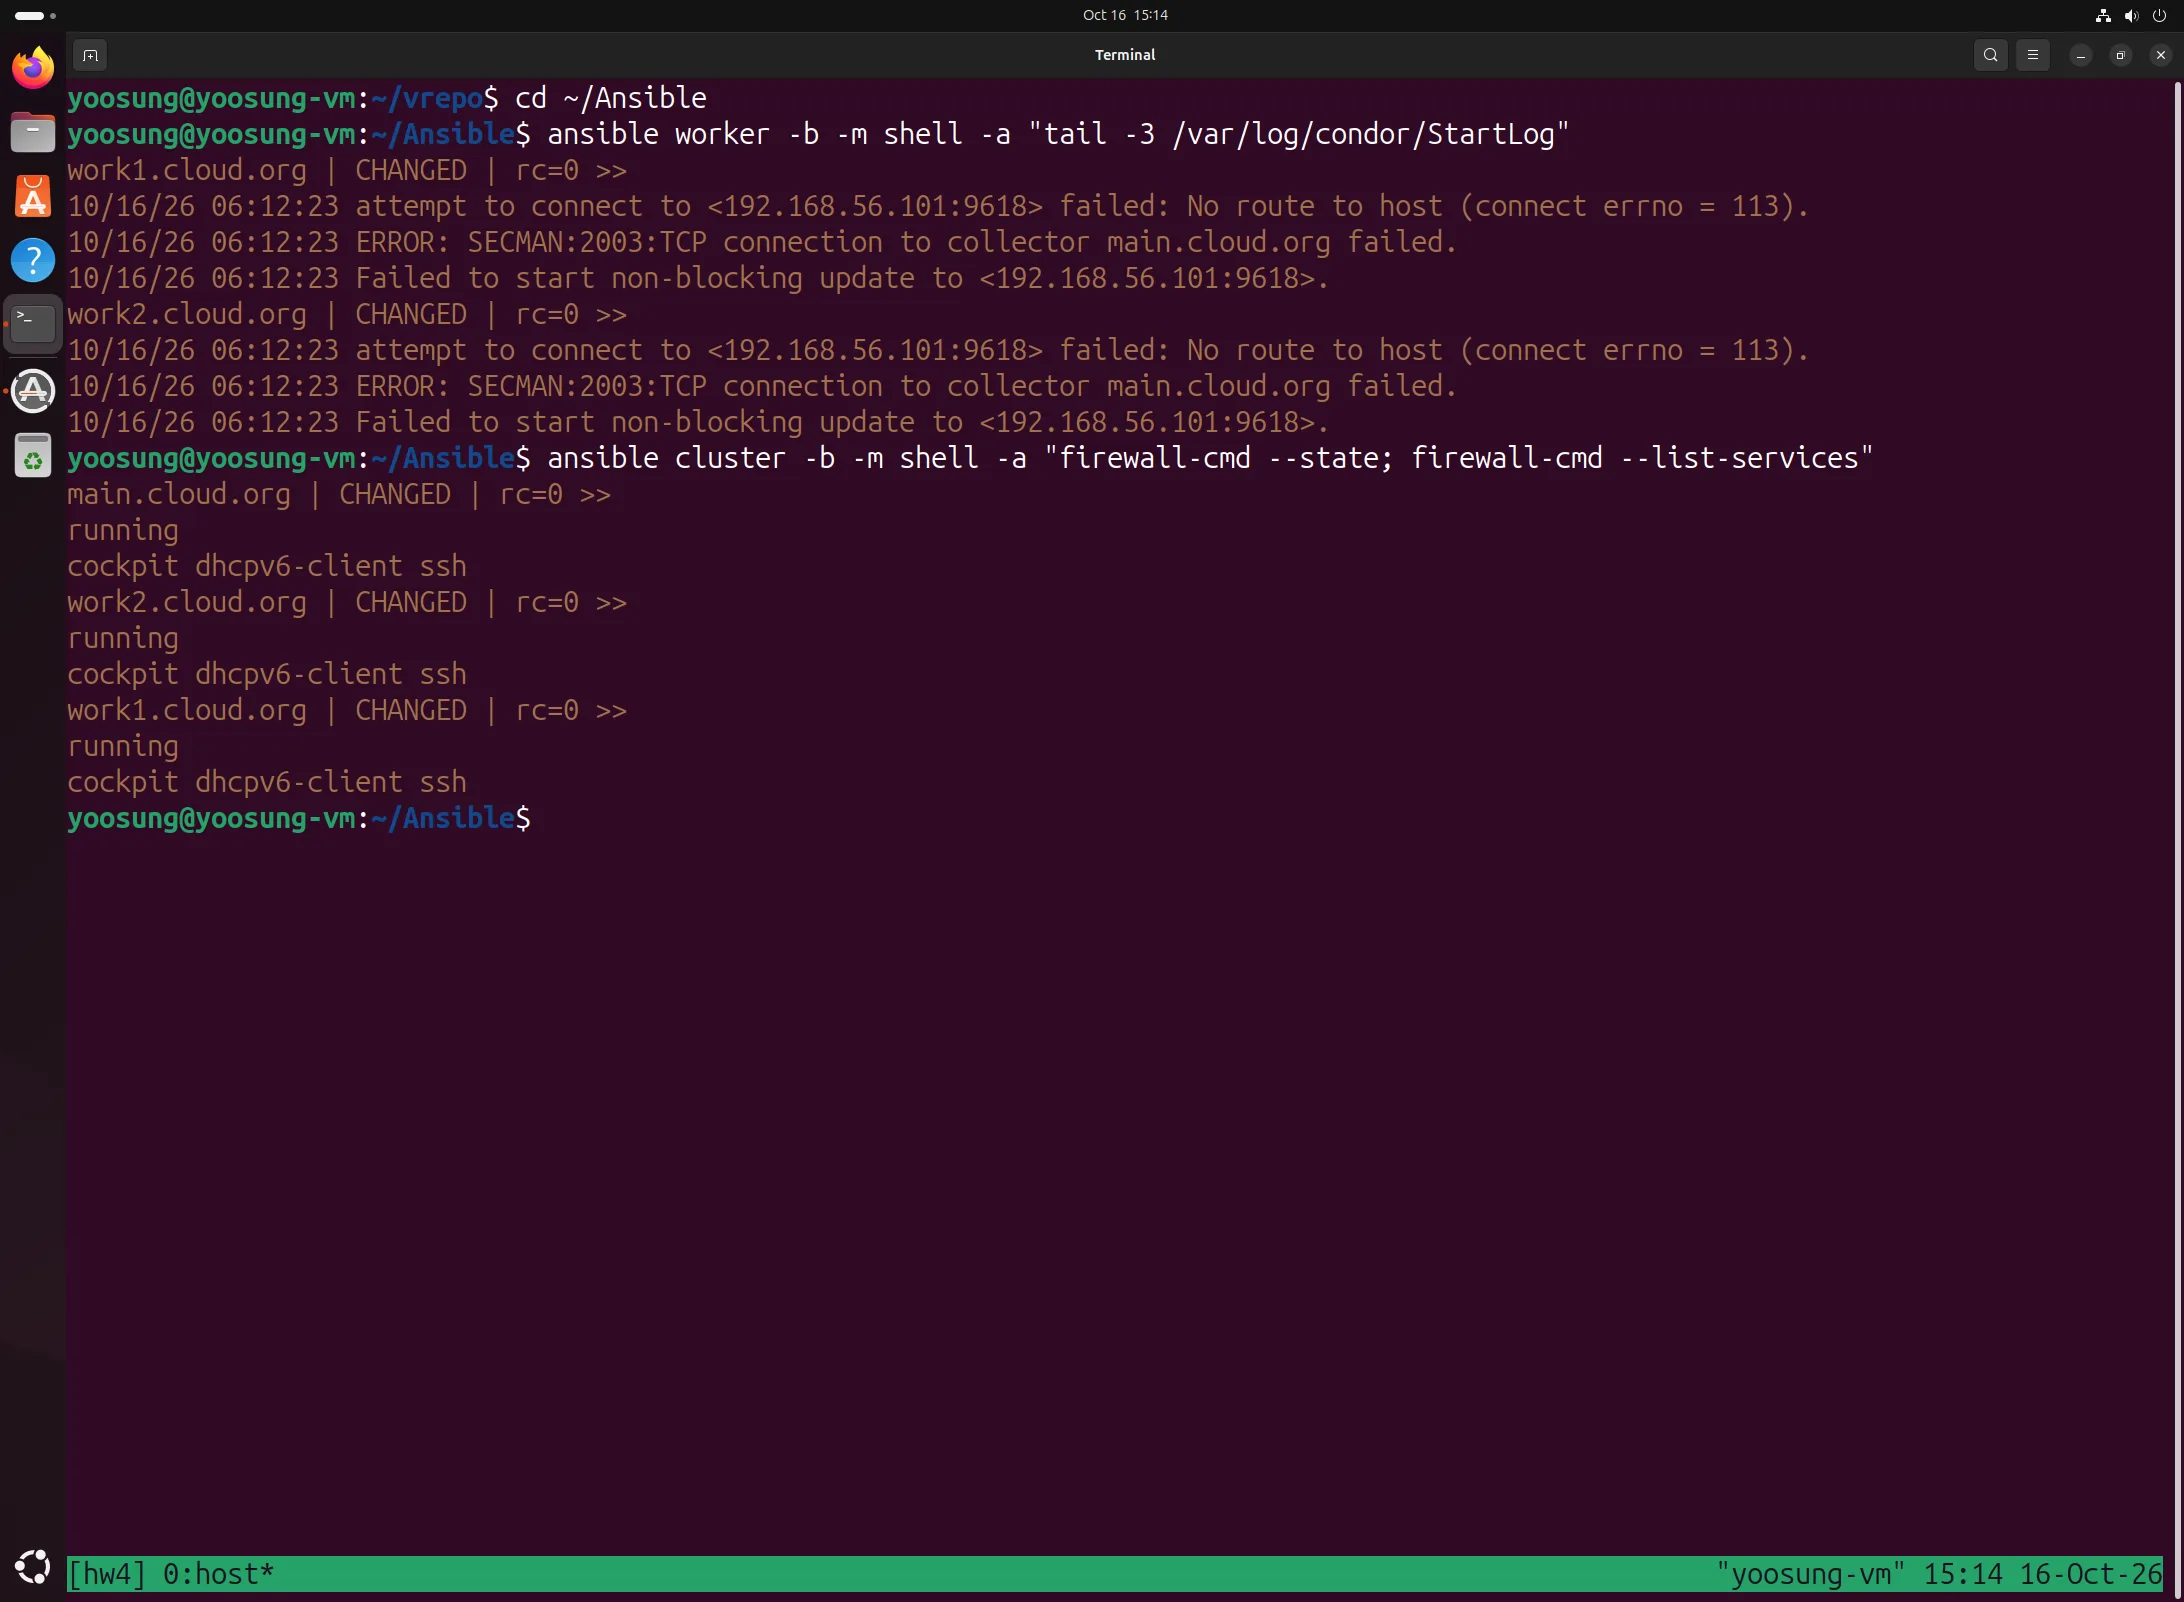
"No route to host" in the worker StartLog and firewalld state on the three nodes
I added a task to the cluster play that sets firewalld to stopped and enabled: no with ansible.builtin.service and ran it again. Only stopping firewalld and the condor config and restart were changed; everything else passed as ok (ok=13 changed=4). This shows idempotence in action, so I used it in the answer to exercise 8 too.
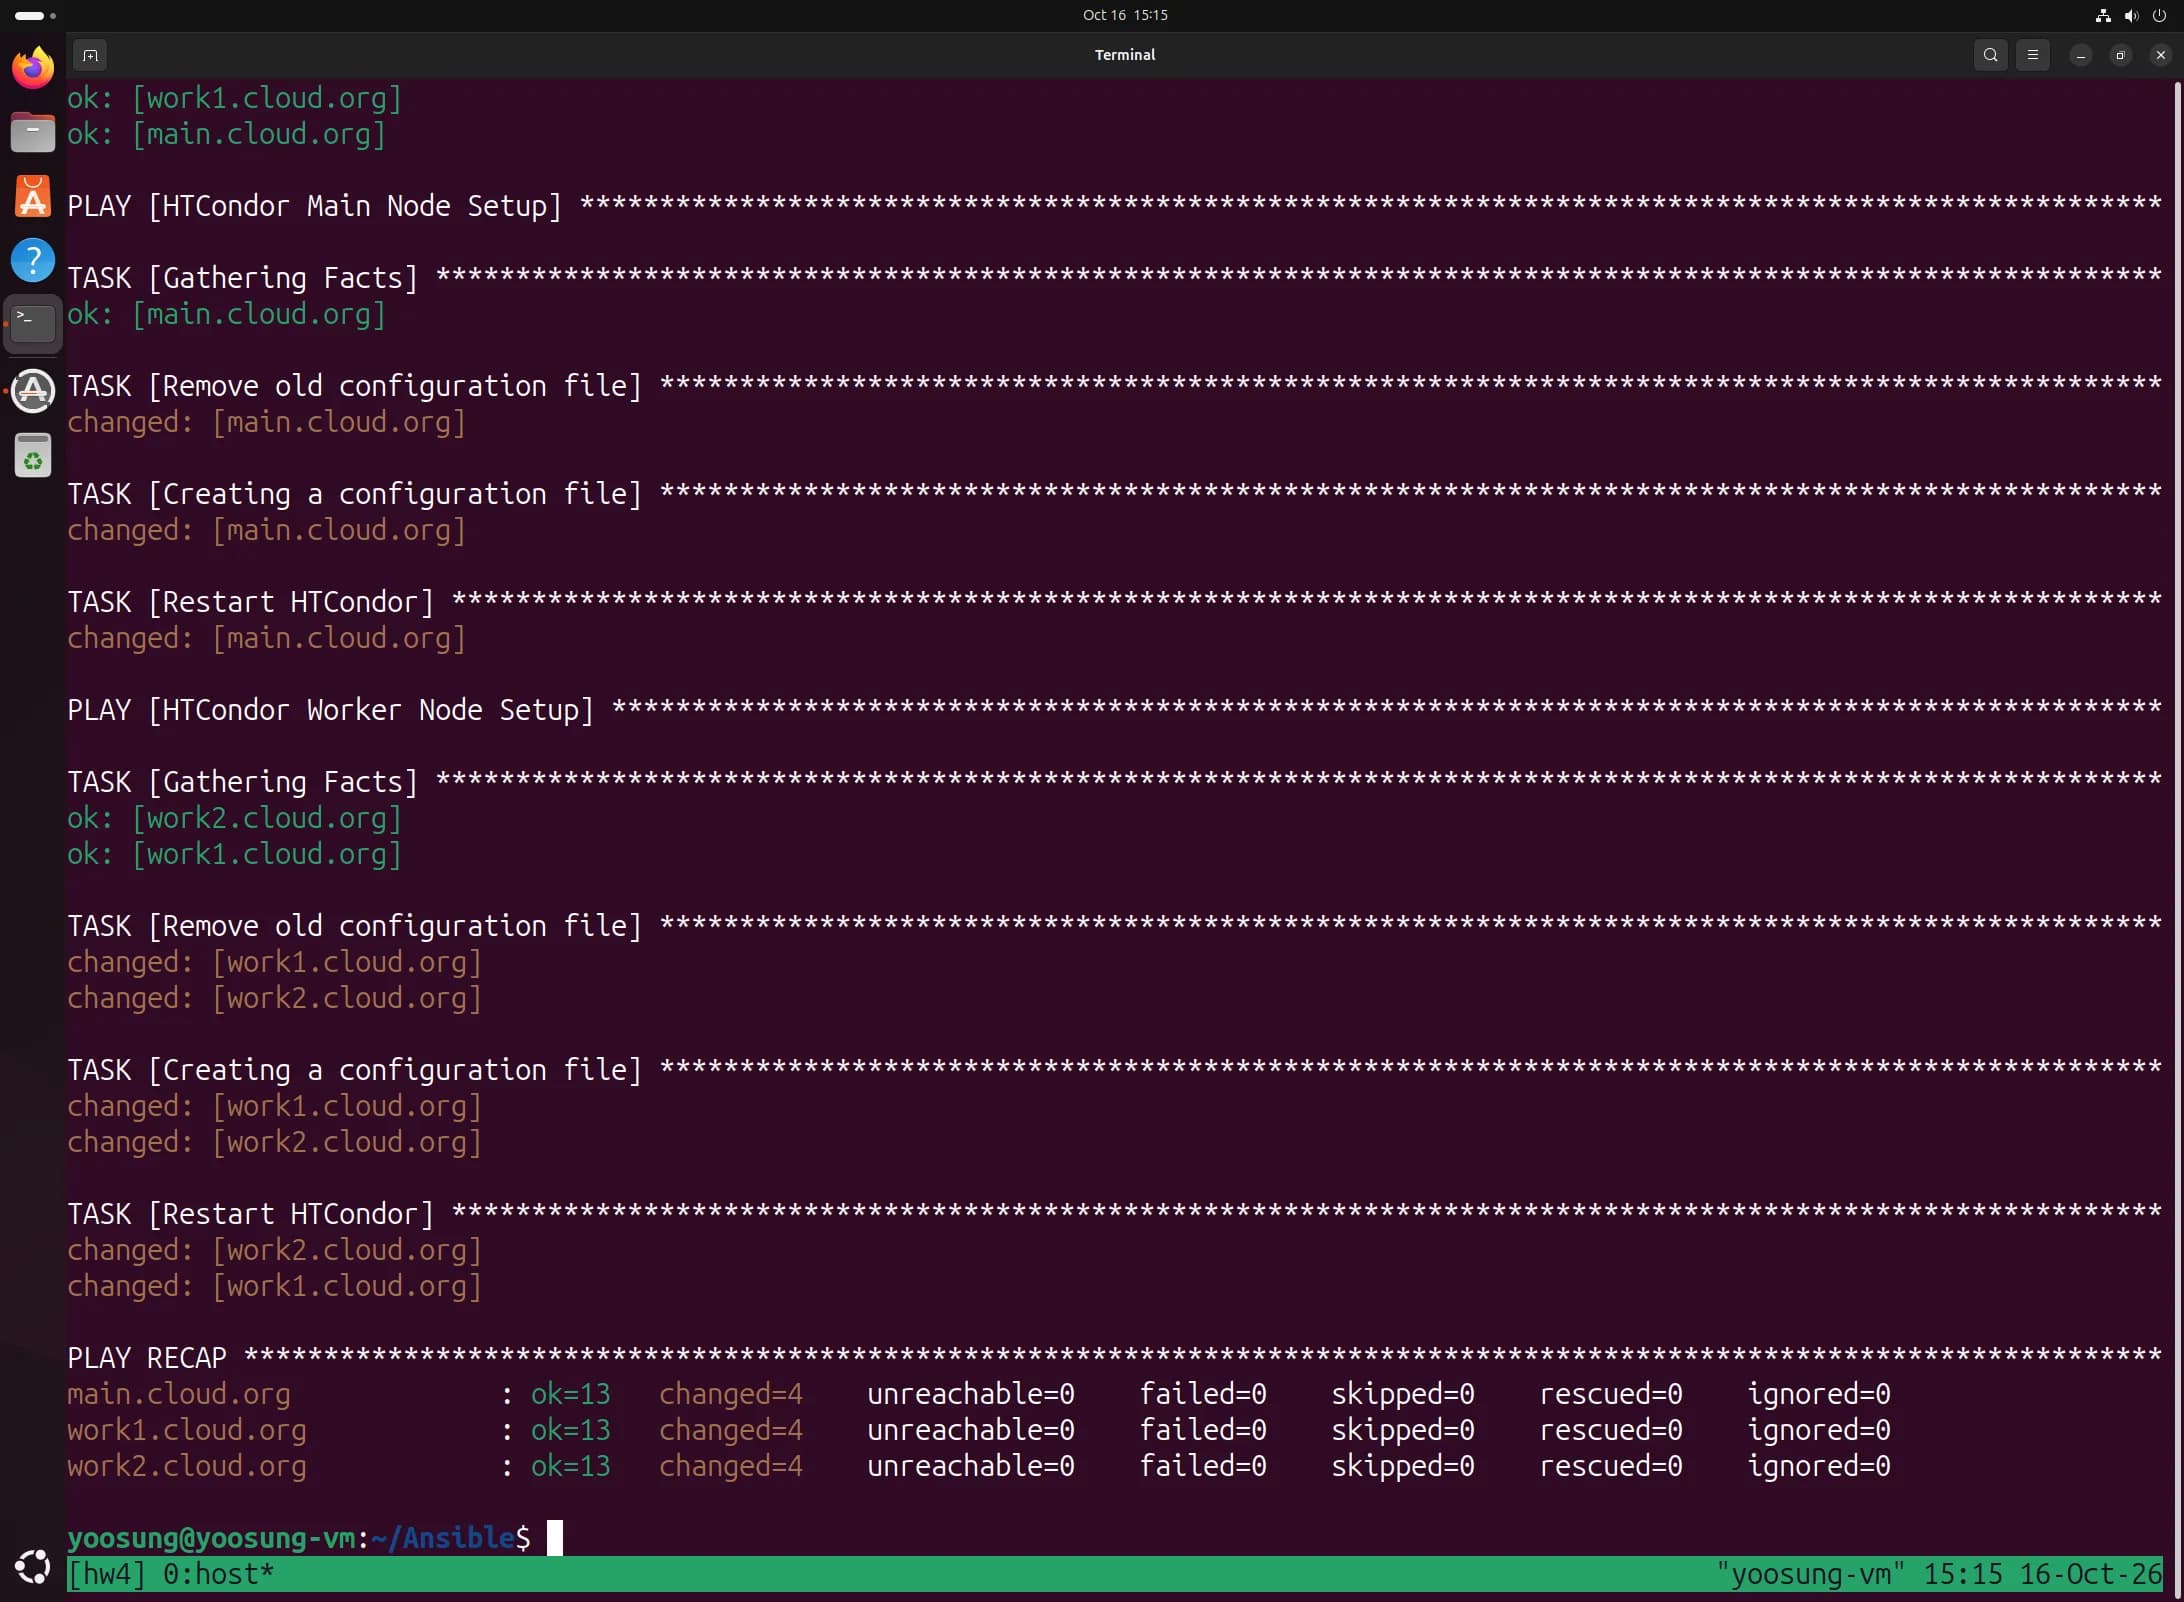
2nd ansible-playbook: PLAY RECAP ok=13 changed=4 failed=0
Final Result
condor_status on main lists slot1@work1.cloud.org and slot1@work2.cloud.org as Unclaimed/Idle, Total 2. The same cluster as on slide 40 was built automatically. Arch is aarch64 because of this environment.
vagrant ssh main
condor_status
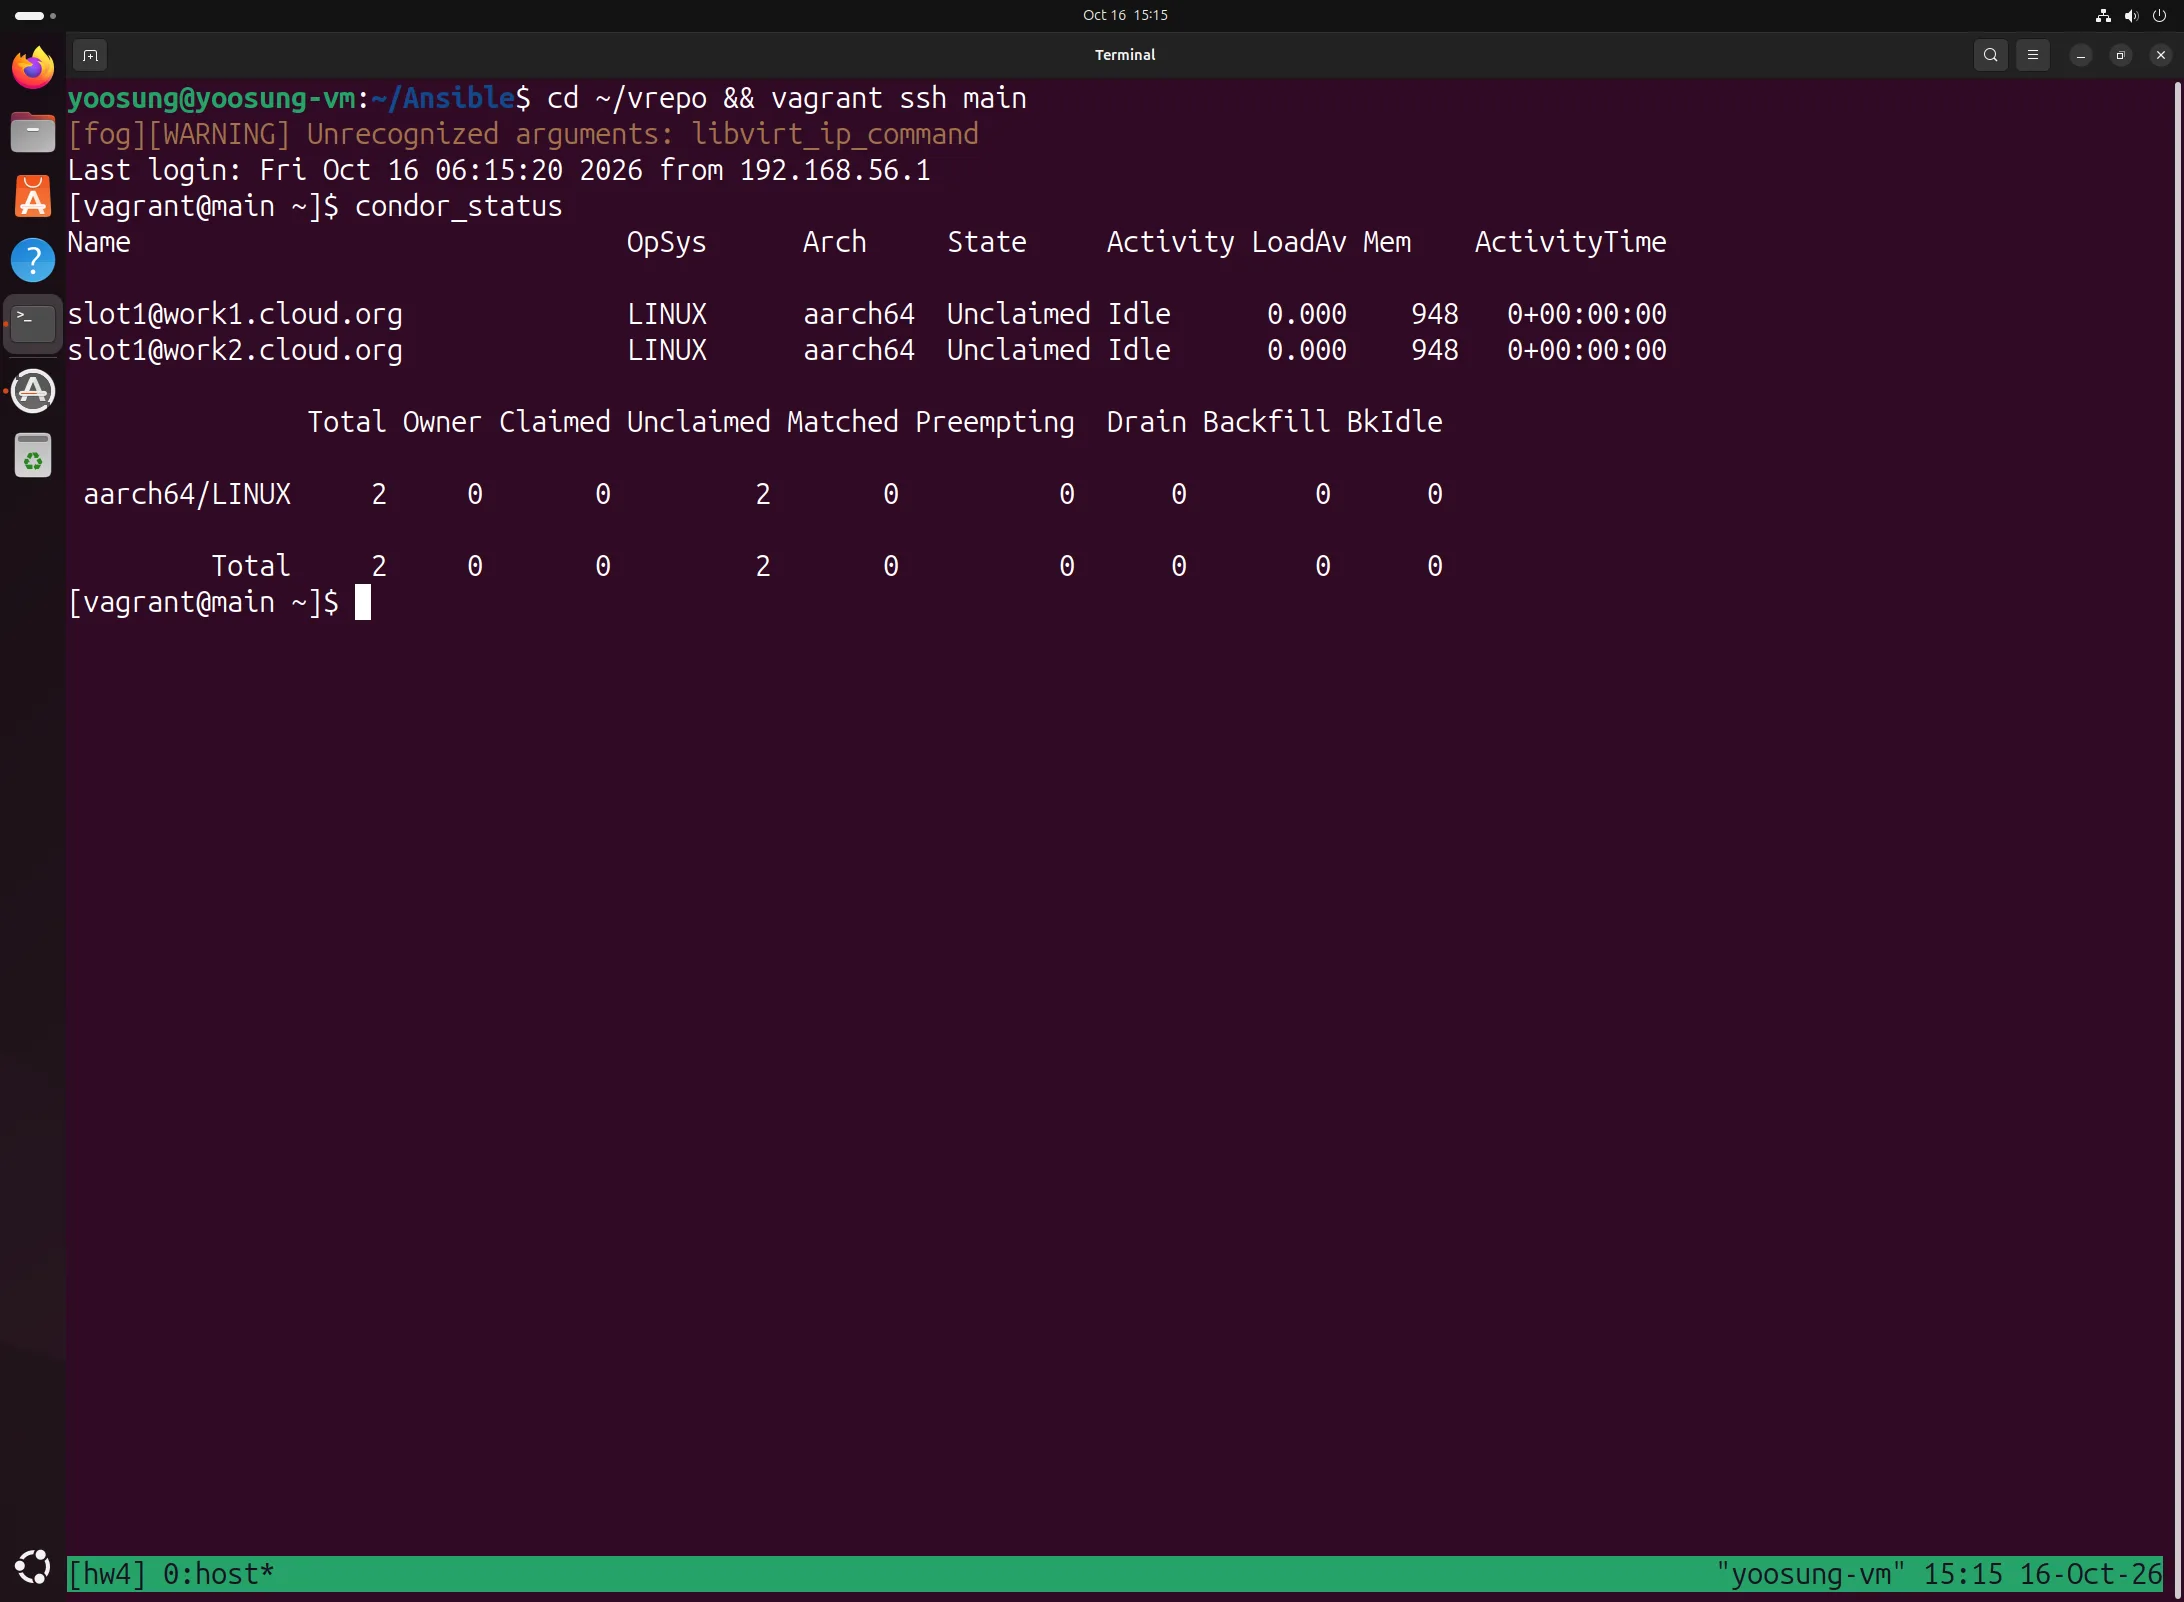
Final condor_status: 2 workers Unclaimed Idle, Total 2
Copy-Paste Traps in the Slides
I was told the slides contain special characters that make copy-pasted commands fail, so I checked the PDF text. These items break commands, so type them by hand.
| Page | Content | Result |
|---|---|---|
| 13 | –o in sudo gpg --dearmor –o ... is an EN DASH (U+2013) | gpg reads –o as an input file name and fails. Type -o |
| 18 | The Vagrantfile's last line is End, not end | Ruby is case-sensitive, so the block never closes: syntax error. Type end |
| 30 | sudo vi /etc/host | /etc/hosts |
3. Exercises
Ch7-3. Other Automation Tools for the Data Center
Automation tools fall into two groups by what they do. Provisioning tools create resources like servers, networks and storage (Vagrant in this lab), and configuration management tools bring the packages, settings and services inside existing servers to a desired state (Ansible). I researched them based on the IaC tool list on slides 8–9.
| Tool | Type / approach | Pros | Cons |
|---|---|---|---|
| Terraform (HashiCorp) | Provisioning, declarative, immutable infrastructure. HCL language. Agentless | Many providers (AWS, Azure, GCP, OpenStack, vSphere…) so multiple clouds in one codebase. Preview changes with plan, then apply. State file matches real resources to code. Largest community | Can't configure inside servers, so it needs a configuration management tool. Losing the state file or concurrent use causes accidents. License changed to BSL in 2023, which led to the OpenTofu fork |
| AWS CloudFormation | Provisioning, declarative, immutable. JSON/YAML templates. AWS only (Closed) | Fastest and deepest support for AWS services, no extra cost. Create, change and delete by stack, automatic rollback on failure. IAM integration | Unusable outside AWS. Templates are long and verbose. Slow deploys, unfriendly error messages. Small community |
| OpenStack Heat | Provisioning, declarative, immutable. HOT (YAML) templates. OpenStack only | Built into private clouds (OpenStack), no extra install. Accepts CloudFormation-compatible templates | Unusable outside OpenStack. Few users and resources (Small community), less mature |
| Pulumi | Provisioning, declarative model written in general languages (Python, TypeScript, Go…) | No separate DSL to learn; loops, functions and tests from the language. Reuses Terraform providers | State storage defaults to the paid Pulumi Cloud service (Must-have). Small community, and the free-form code makes styles drift between teams |
| Chef | Configuration management, procedural, mutable infrastructure. Ruby DSL. Server–agent | Old and stable with plenty of resources (Large community). Plain Ruby makes complex logic easy to express | Hard to learn: need Ruby and the Chef server. Every node needs an agent (chef-client) plus a central server. Procedural, so you spell out every "how" |
| Puppet | Configuration management, declarative, mutable. Own DSL. Master–agent | You only write "what state it should be in". Good node state reporting and auditing, strong for compliance. Large community | Need to learn its own DSL and master server. Agents pull periodically, so weak at ad-hoc runs. Heavy for small environments |
| SaltStack (Salt) | Configuration management + remote execution, declarative (YAML). Master–minion (ZeroMQ), agentless with salt-ssh | Message bus sends commands to thousands of machines quickly and simultaneously. State application and remote execution in one tool. Event-driven automatic responses (reactor) | Many unique concepts (grains, pillar, state) raise the entry barrier. Requires master and minion installs. Smaller community than Ansible |
In short, for creating resources, Terraform is more general than CloudFormation or Heat, which are tied to a specific cloud, since it handles many environments in one codebase; Pulumi is the alternative if you want a familiar programming language. For configuring the inside of servers, Chef, Puppet and Salt all use agents and a central server, which makes them strong for large, long-running operations but costly to adopt. Ansible works over plain SSH without agents, which suits quickly configuring a small cluster like this lab.
Real data centers usually don't do everything with one tool; they pair a provisioning tool with a configuration management tool, as in "create with Terraform (or Vagrant), configure with Ansible (or Puppet)". The Vagrant + Ansible combination in this assignment is a miniature of that.
Ch7-8. Idempotence in Ansible and Why It Matters
Idempotence is the property that applying the same operation once or many times gives the same result (slide 27). In Ansible it means the system stays in the same state no matter how many times you run the playbook.
This works because Ansible modules don't "run commands"; they take a "desired state", check the current state first, and change things only when they differ. For example, dnf: name: condor, state: present installs condor if it's missing and does nothing if it's already there. blockinfile finds the block it inserted by its marker comments and never adds it twice. That's why results are split into changed (I changed it) and ok (already in that state, left alone).
This lab is a direct example. The first run installed and configured everything with ok=12 changed=9 on all three nodes, and after adding one firewalld task the second run gave ok=13 changed=4. The four changes were only the new firewalld stop, the config file removal and creation, and the condor restart; the rest, like SELinux, hosts and package installs, were already in the desired state and passed through. Without idempotence, the second run would have appended the same three lines to /etc/hosts again and re-downloaded packages, messing up the state.
Why idempotence matters:
- Safe re-runs: if a run fails midway, say from a dropped network, you just run it again from the start. Nobody has to work out how far it got, which cuts the human errors of manual work (like the KT outage case on slides 3 and 5, where a single command was missed).
- Many machines in the same state: running the same playbook on 100 machines puts them all in the same state regardless of when they were set up or what state they were in. Configuration drift, where servers' settings diverge over time, can be reversed by running it regularly.
- Infrastructure as code: the playbook becomes a record of "what state the system should be in" rather than a procedure, so it can be version-controlled, reviewed and reused in other environments (the IaC features on slide 7).
- Change tracking: looking at changed alone tells you what a run actually changed, so any change on a server that shouldn't change shows up immediately.
--checkmode lets you check without applying.
Not every task is idempotent on its own, though. The shell and command modules run every time, and this playbook's service: state: restarted restarts on every run, so it's deliberately not idempotent. Such tasks need a creates: condition, or a handler (notify) that restarts only when the config file changed, for the whole playbook to be idempotent.